

Most dimension guides for booth seating were written for restaurant operators. The numbers work for a commercial diner, not for a home kitchen where the ceiling is 8 feet, and the room is 10 feet across.
The core dimensions are not complicated. The sequencing is. Seat height locks in table height. Bench depth locks in the total room footprint. Back height locks in how the space reads from across the room.
What Booth Seating Dimensions Mean for a Home Kitchen
Home booth dimensions and restaurant booth dimensions serve different purposes.
In a restaurant, every spec optimizes for turnover. The seat depth is just enough for a 45-minute meal. The back height provides privacy without slowing service.
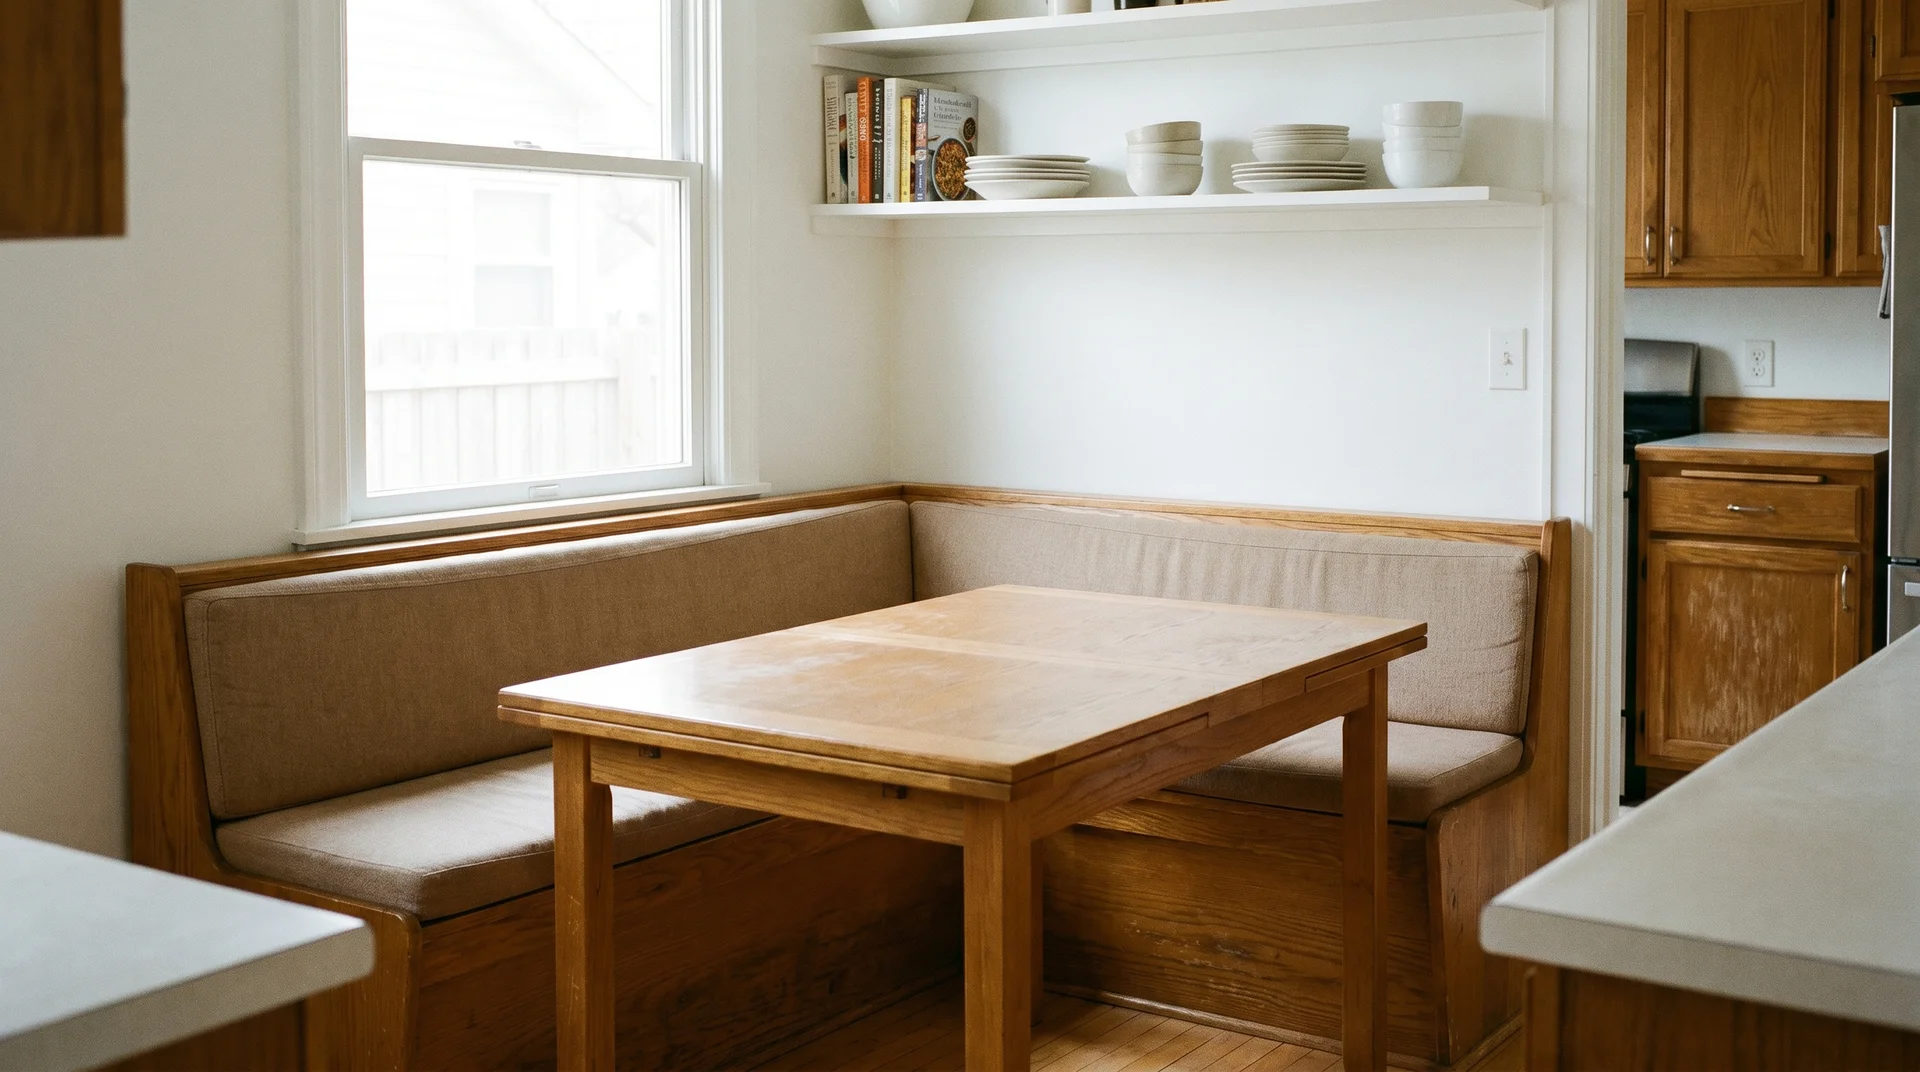
At home, the priorities shift. A kitchen booth gets used for breakfasts, for children doing homework, and for extended meals where nobody is in a hurry. The dimensions need to reflect that use, not the diner’s.
One naming note: “booth” and “banquette” are used interchangeably in home design contexts. Technically, a booth has two fixed seat-backs facing each other across a table. A banquette is a longer continuous bench, typically built against a wall.
Most home kitchen installations use banquette-style construction, with one built-in wall bench and a freestanding bench or chairs on the open side. The dimensions in this guide apply to both configurations. The first step is calculating whether the space can actually fit one.
Calculate the Total Floor Footprint of your Dimensions
Most people measure the bench. They don’t measure the room.
Every individual booth measurement is meaningless until you know whether the kitchen can physically accommodate a booth at all. The total floor footprint is the number that answers that question, and it’s the one most planning guides skip entirely.
The Footprint Formula
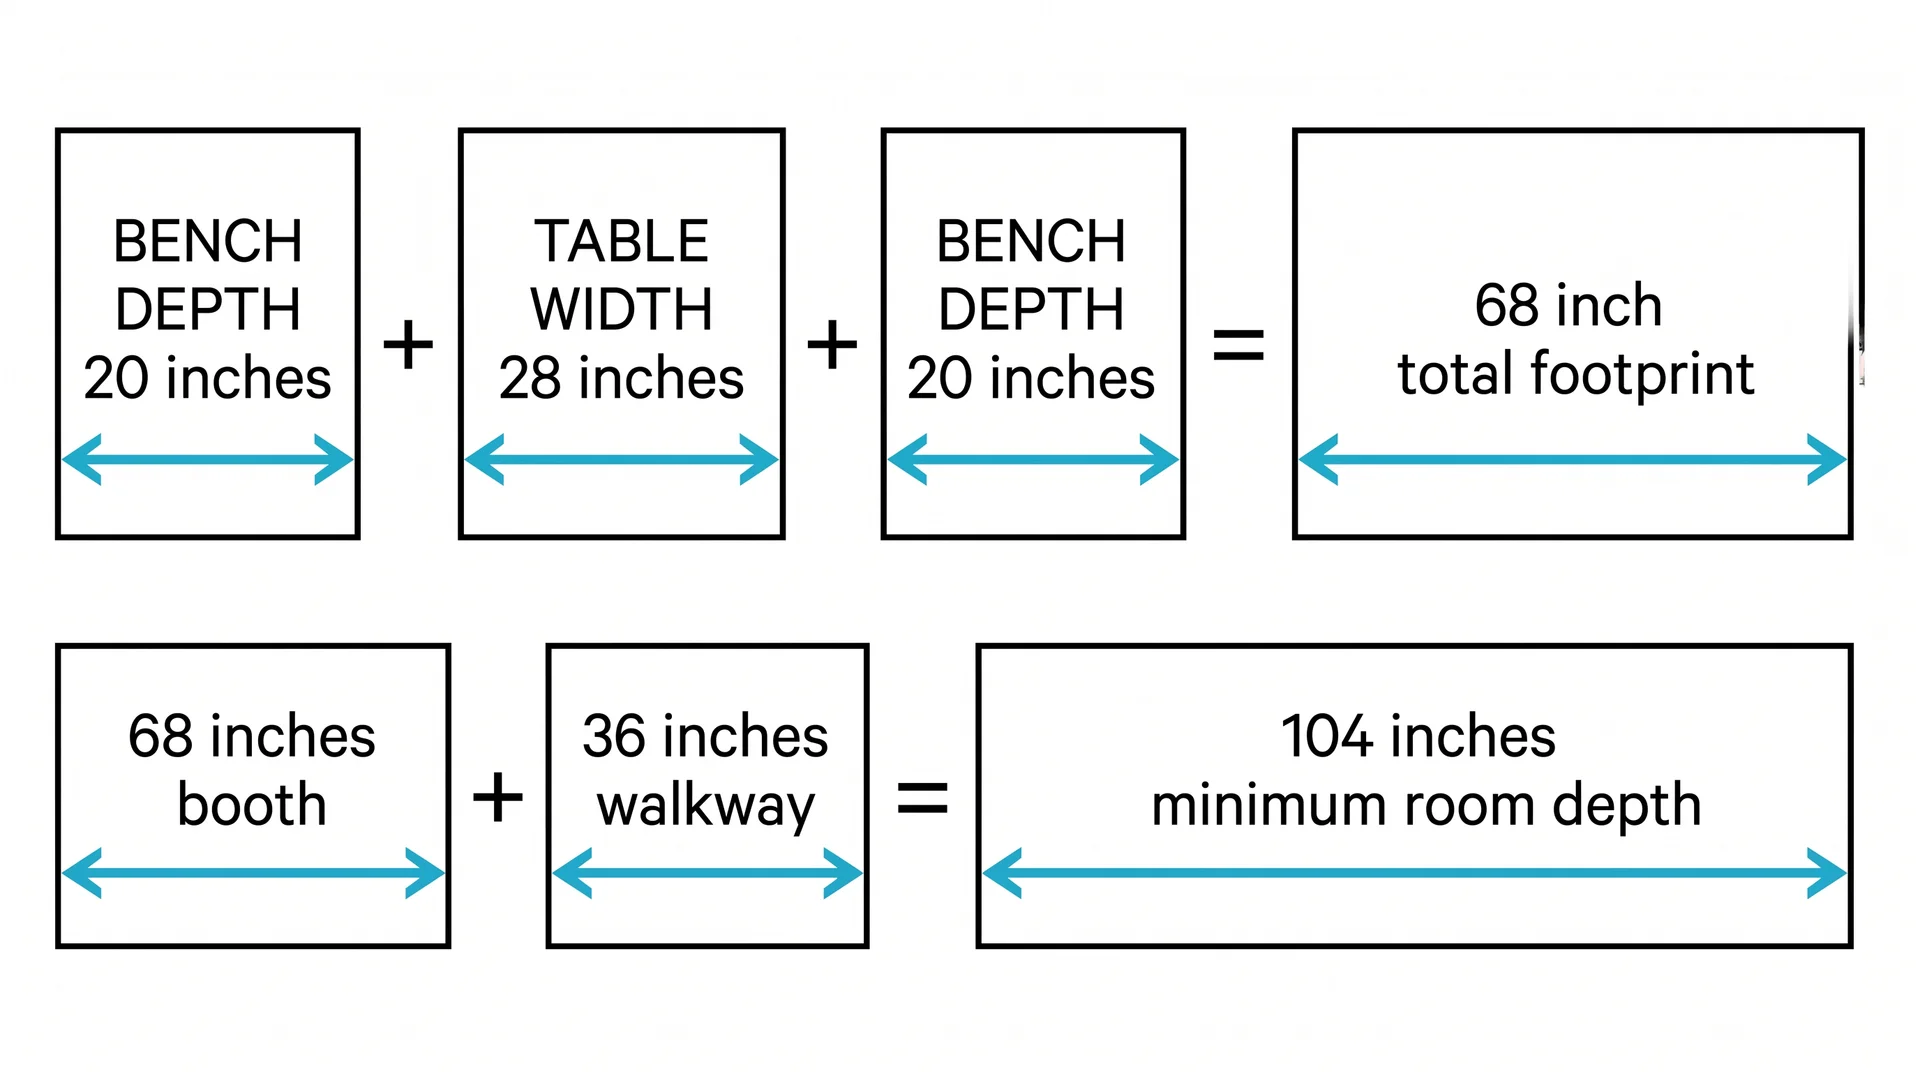
The total floor depth a booth requires equals bench depth, plus table width, plus bench depth on the opposite side.
Here is how the math works. If each bench is 20 inches deep and the table is 28 inches wide, the booth footprint is 68 inches from back wall to back wall. That is 5 feet 8 inches of floor depth before you account for anything else.
For a four-person booth, you also need enough wall length. Plan for 24 inches of bench per person. A bench seating two people per side needs 48 inches of run, plus 4 inches of clear space at each open end for comfortable entry and exit.
The footprint calculation is the first thing I work through on any booth project. It is the number most homeowners have not run before they reach out.
| Component | Home Kitchen Range |
|---|---|
| Bench depth, each side | 18–21 inches |
| Table width (the depth dimension) | 24–28 inches |
| Total floor depth: both benches plus table | 60–70 inches |
| Bench length per side, two people | 48–54 inches |
| Wall length needed, including end clearance | 56–62 inches |
Why 6 Feet Is the Minimum, Not the Target
Six feet of floor depth fits the booth structure. It doesn’t leave room to move around it.
You need at least 36 inches of clear walkway on the open side of the booth. Without it, people squeeze past the bench end to reach the sink, the stove, or the back door. In a working kitchen, that is a friction point every single morning.
Add that to your footprint calculation. A 68-inch booth requires 36 inches of walkway clearance beyond it. That is 104 inches of total room depth, roughly 8.5 feet. Smaller kitchens are not automatically disqualified.
Smaller rooms that cannot fit the straight booth footprint are not a design problem to solve around. The constraint is where the real decision lives. The layout section below covers how the numbers change for corner and L-shaped configurations.
Seat Height and Depth: The Two Dimensions That Matter
Get the seat height and depth wrong, and nothing else you do will fix it.
These two numbers determine whether the booth is comfortable for 20 minutes or for two hours. They also set the table height. Seat height comes first in every case.
Getting Seat Height Right, Including Cushion Compression
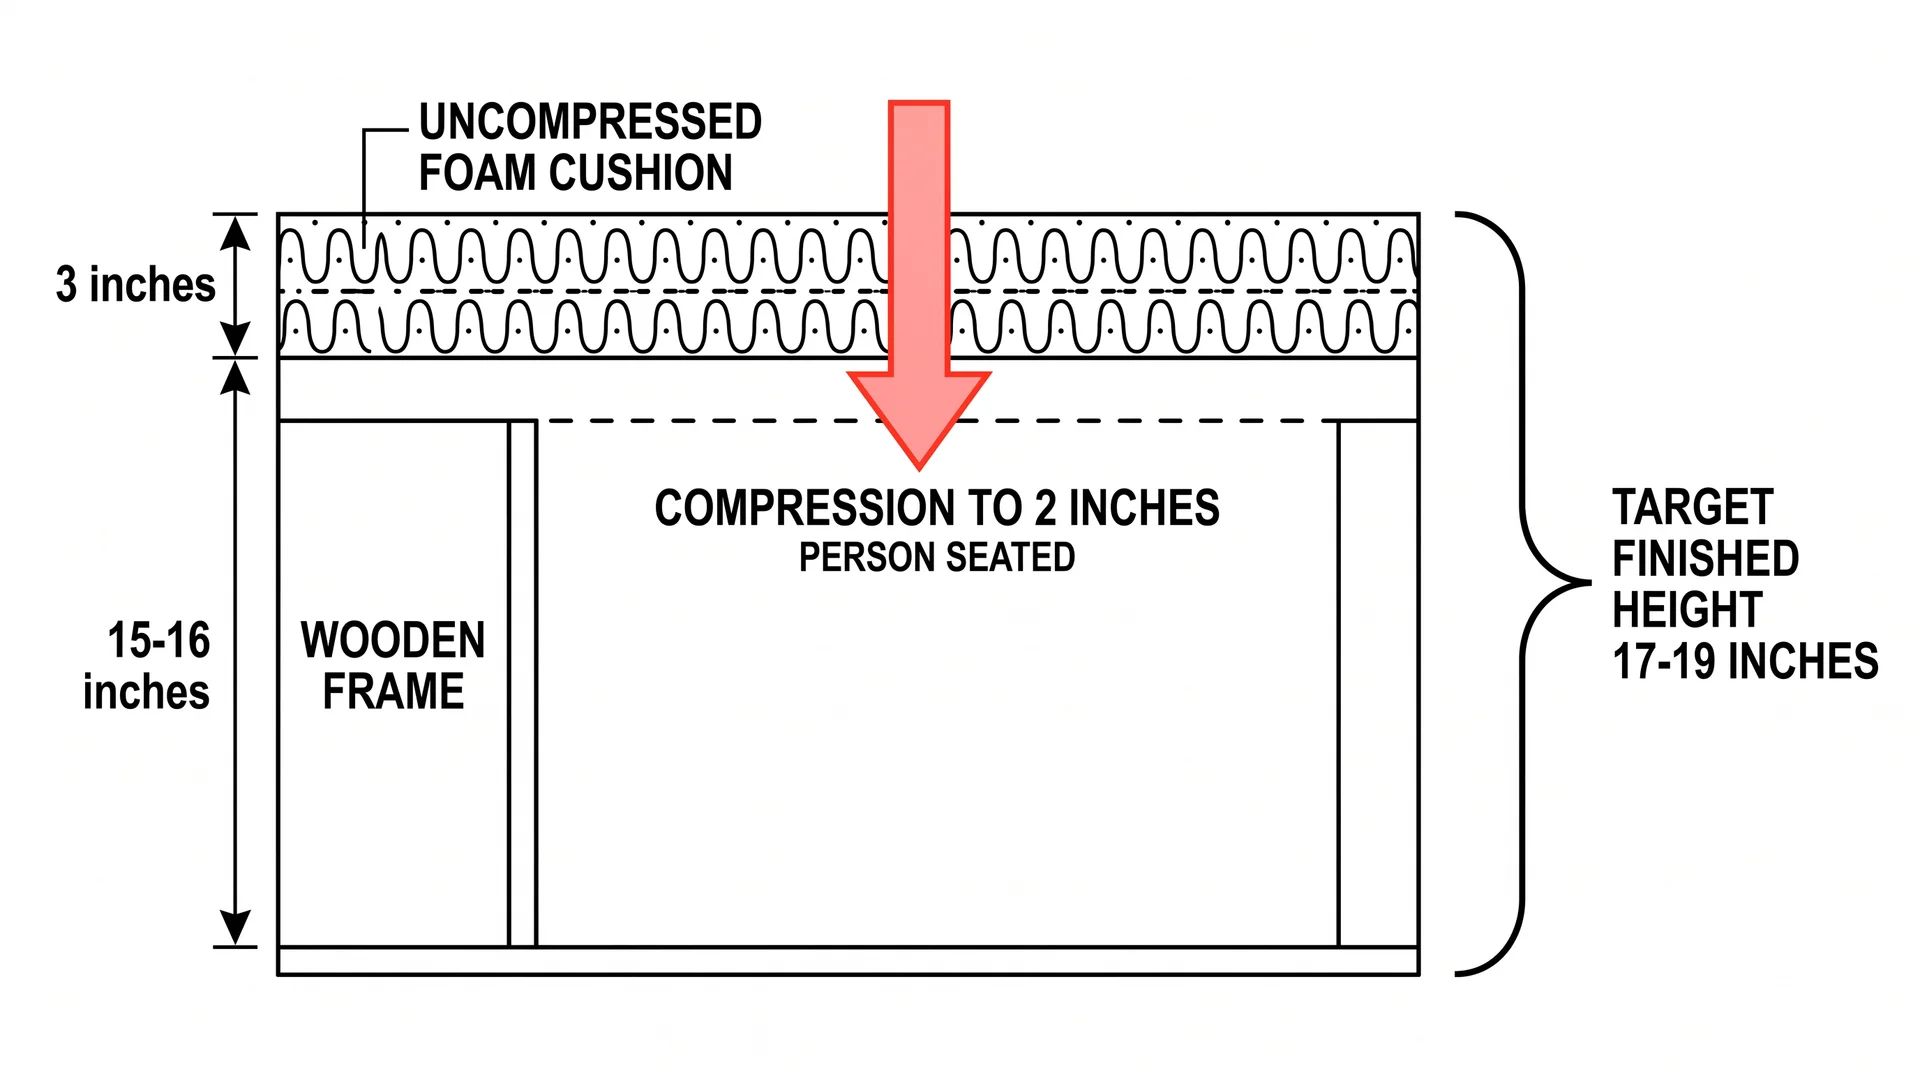
Target a finished seat height of 17 to 19 inches, measured to the top of the compressed cushion, not the top of the uncompressed foam.
This is where most DIY booths go wrong. A builder frames the bench to 16 inches, adds a 3-inch foam cushion, and assumes the finished height is 19 inches. A 3-inch cushion does not give 3 inches of finished height.
A standard 3-inch cushion compresses to approximately 2 inches under body weight. Build the frame to 17 or 18 inches and add a cushion on top, and the seat ends up at 21 or 22 inches. That is too tall for the table, and tearing the bench down is the only real fix.
Build the bench frame low. Let the cushion make up the difference.
Corn Upholstery fabricates custom booths commercially, and measures finished seat height to the cushion crown, meaning the foam curve under load.
Build the frame to 15 to 16 inches, add a 3-inch cushion, and the compressed height lands in the 17 to 18-inch target range. For a 19-inch finished target, frame to 17 inches.
If you are building with storage under the seat, the lid and framing thickness add height. Account for that before cutting the frame.
Seat Depth for Home Use vs. Commercial Standard
Restaurant seat depth runs 16 to 18 inches. For a home kitchen booth, aim for 18 to 21 inches.
Commercial specs assume quick-service dining. At 16 to 18 inches, guests sit for a 45-minute meal and exit efficiently. That is designed for turnover, not for a Saturday morning with coffee.
- At 18 to 20 inches of seat depth, most adults can sit with their back against the backrest and their feet flat on the floor.
- Below 16 inches, shorter adults feel like they are sliding forward off the seat.
- Above 22 inches, shorter adults cannot reach the backrest without slouching.
Interior designer Joshua Jones, who specializes in banquette seating for residential projects, puts the working home range at 18 to 24 inches. Most household configurations fall in the 18 to 20-inch range.
I will be direct about the limit of that guidance: the right seat depth depends partly on who is actually using the booth. A household with young children has different thresholds than two adults. If the household is mixed, 19 inches is a reasonable middle ground. Once the seat height is set, the table height follows directly from it.
Table Height and Clearance: How the Numbers Stack
In a kitchen booth, the seat height sets the table height. The seat comes first in the planning sequence, and the table has to match it.
Once the finished seat height is established, the table height and clearance requirements follow directly. There is less flexibility here than most people expect.
The Clearance Rule
Allow 10 to 12 inches between the top of the seat surface and the underside of the table.
If the finished seat height is 18 inches, the table underside needs to sit between 28 and 30 inches from the floor. Standard dining table height is 29 to 30 inches, which aligns well with a standard booth seat height. Counter-height tables at 36 inches are generally too tall for standard booth seating.
Less than 10 inches of clearance, and knees press against the table underside. More than 12 inches, and the table sits too high relative to the seat.
The comfortable window is narrow, which is why seat height comes first in the sequence and why changing it after the table is in place creates compounding problems.
Table Width, Overhang, and the Slide-In Test
The table edge should sit approximately level with the outer edge of the bench, not extend past it.
For a two-person-per-side booth, 24 to 28 inches of table width is the practical range. Narrower than 24 inches, plates, glasses, and elbows compete for the same surface. Wider than 30 inches, sliding into the booth becomes awkward, especially for shorter people and children.
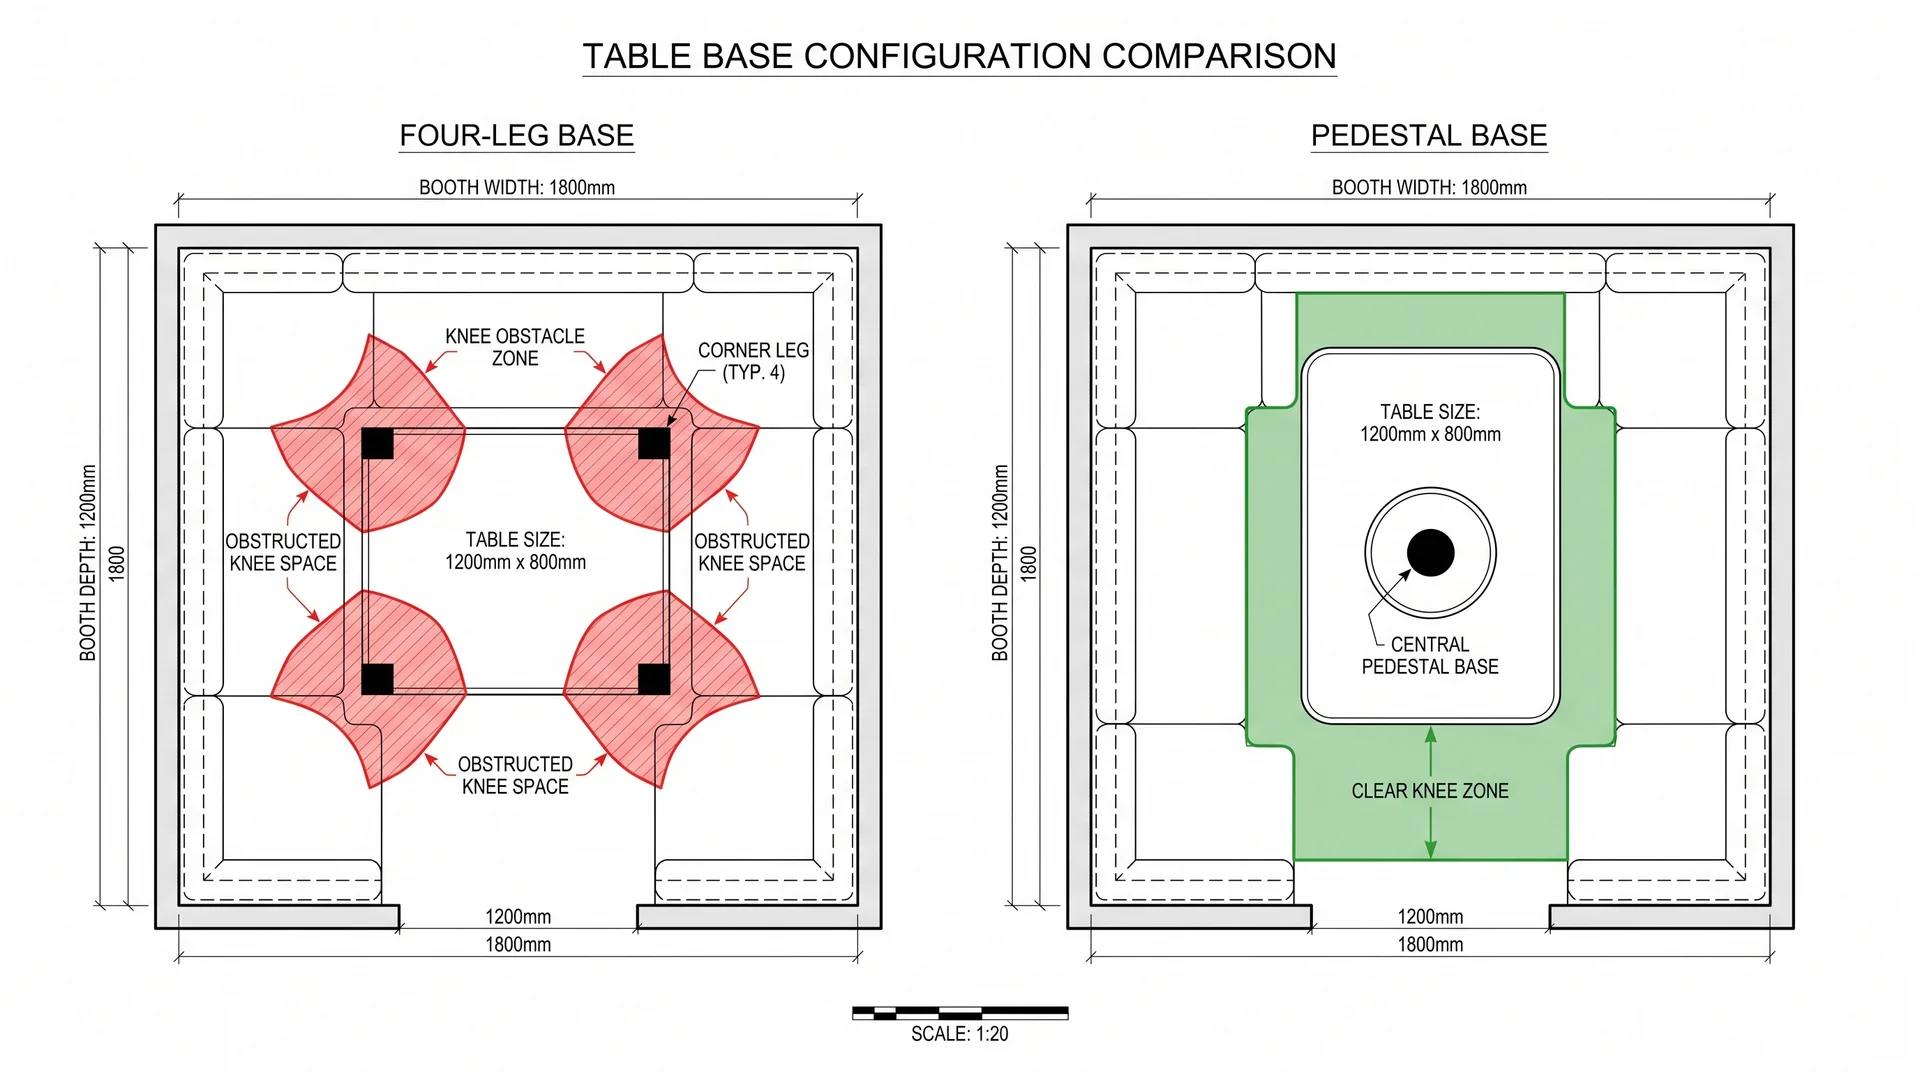
The table base matters as much as the table size. A four-legged table in a booth creates a knee obstacle for everyone who slides in. The leg is just there, in the way, at every meal.
A pedestal base removes the obstacle entirely.
I have recommended pedestal bases in nearly every kitchen booth project I have worked on. Not one client has wished they had chosen a four-leg table instead. This is a usability decision, not a style preference, and it has a larger daily impact than almost any other table choice.
The overhang should extend 2 to 3 inches past the bench edge on each long side. This creates visual separation between the bench and the table surface. More than 3 inches of overhang, and the table becomes a visual barrier.
Less than 2 inches, and the bench and tabletop read as one continuous horizontal mass, which makes the whole setup look heavier than it is. Back height is the last major spatial decision before the build starts.
Back Height and What It Actually Feels Like
Back height is where most home booths get over-designed.
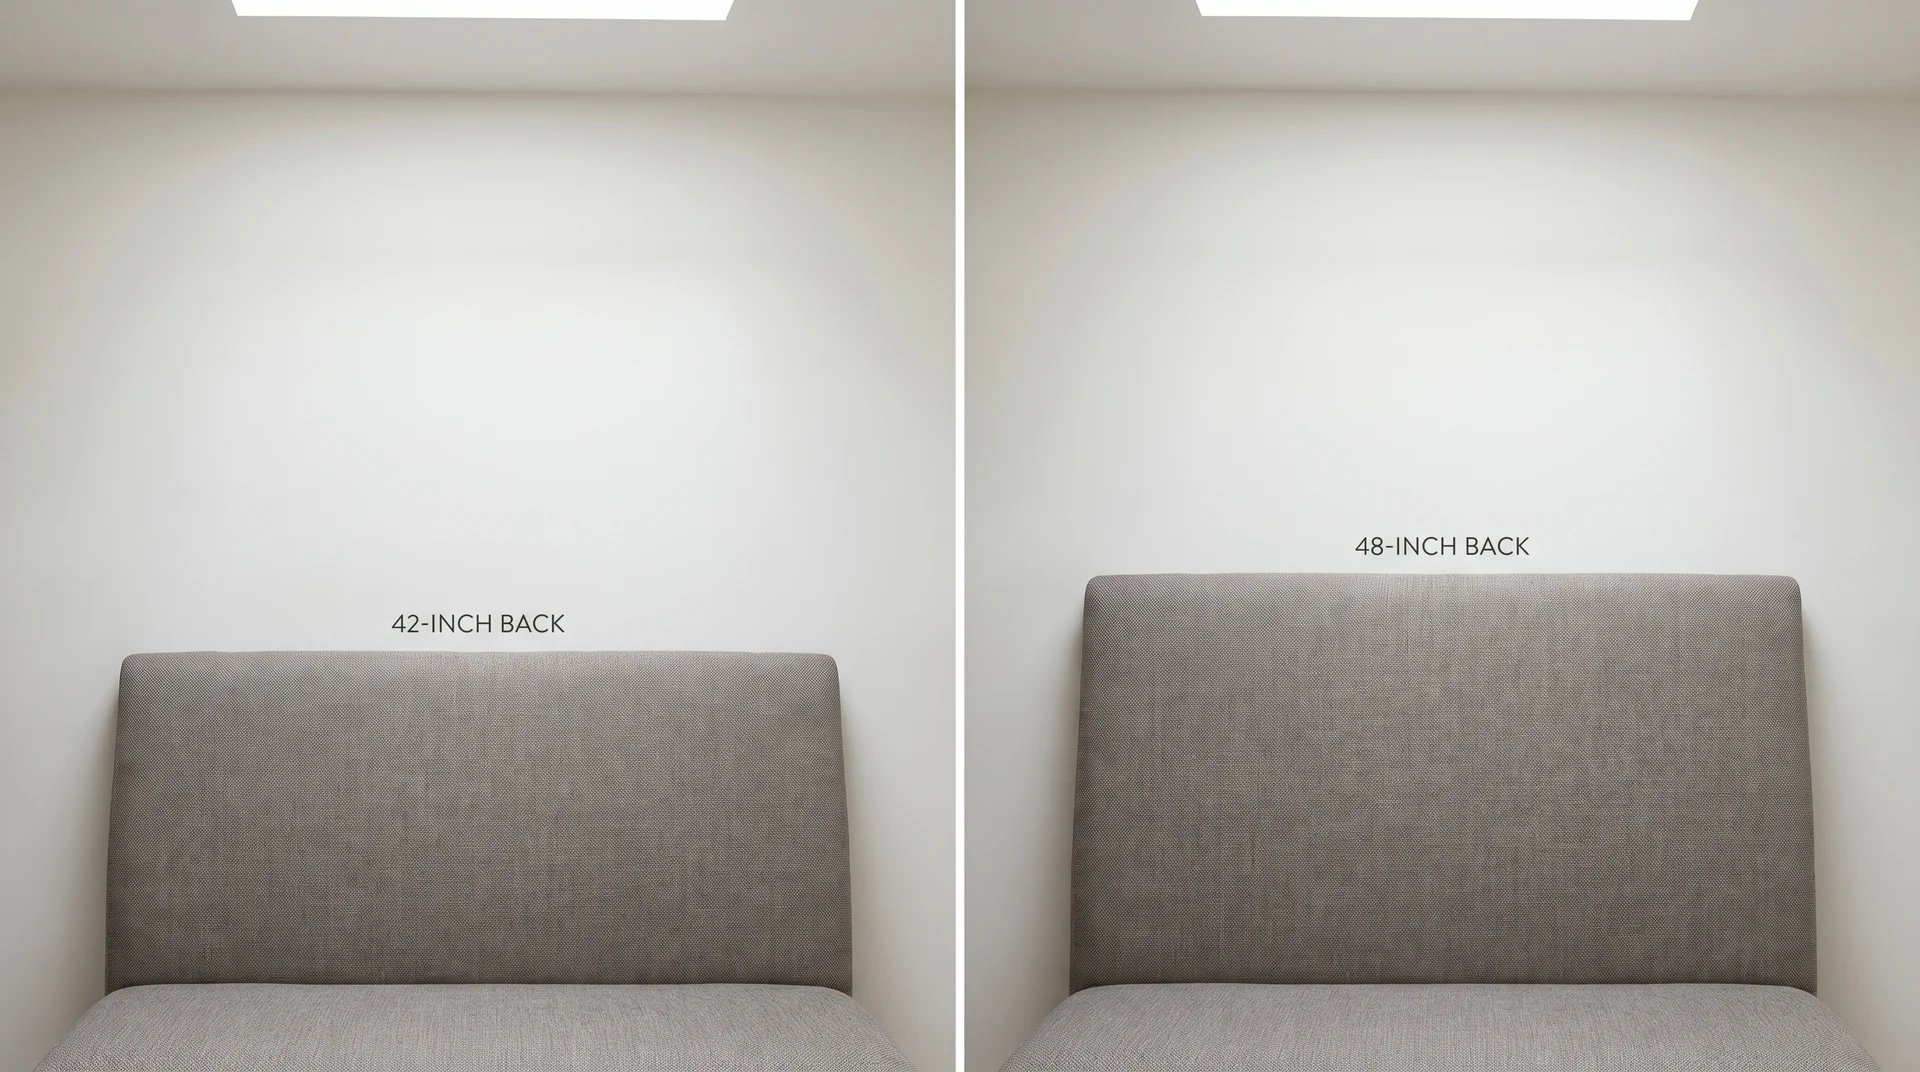
The three common back heights are 36, 42, and 48 inches, measured from the floor to the top of the seat back.
- At 36 inches, the booth reads as furniture and does not block sightlines through the kitchen.
- At 42 inches, there is enough enclosure for a comfortable family meal without the space feeling closed in.
- At 48 inches, the booth becomes genuinely intimate. In a large kitchen with 9-foot ceilings, that reads well. In a kitchen with 8-foot ceilings, a 48-inch back starts to dominate the room.
The booth is already the visual hero of the kitchen. Most people’s mistake is trying to make it more heroic.
At 48 inches in a standard residential kitchen, the seat back stops reading as seating. It starts reading as a partition wall. That is a proportional problem, not a style choice.
The one-hero rule came from a project I got badly wrong. I over-specified every finish and compared every surface against every other surface. My client cried at the reveal, and the redesign cost me $6,000 out of my own pocket.
When one element is already the dominant statement, everything else supports it.
A 42-inch back in a standard kitchen does that work without visual competition? A 48-inch back tends to fight the room.
On the build side, a 42-inch back needs a sturdy wall anchor and a clean finished top cap. A 48-inch back requires additional structural framing and careful attention to how the cap line reads against the ceiling sightline.
Layout Types and the Space Each One Requires
Layout type determines how people enter and exit the booth.
That affects daily use more than almost any other decision. An entry point that works fine for a dinner party can become a problem every weekday morning with three people and a school schedule.
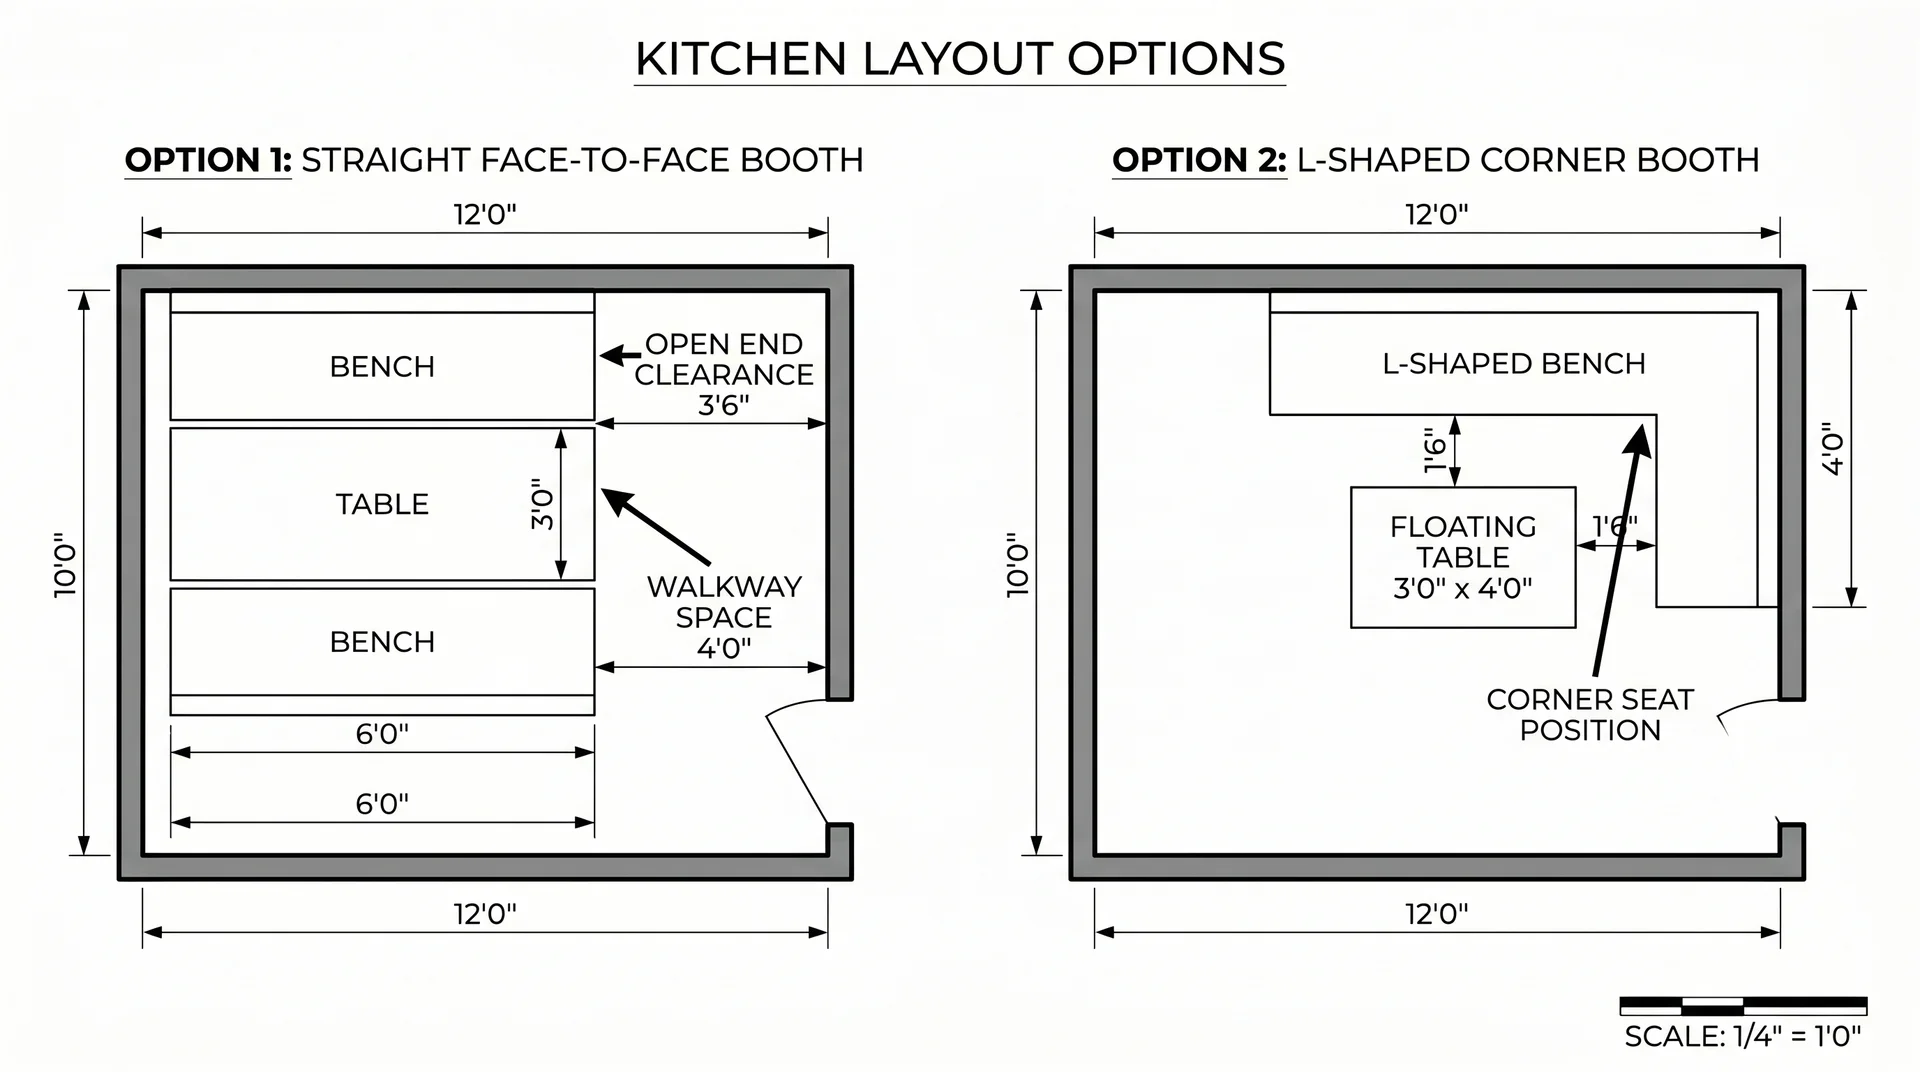
Straight Booth (Face-to-Face)
Two benches face each other across a table, each running along its own wall or structural element.
Picture yourself standing at the kitchen entry. The booth sits in the far corner of the eat-in area. Two benches run parallel to each other, the table spanning the gap between them, with people sliding in and out from the open ends.
Those open ends are the critical requirement. A bench that runs wall-to-wall on both ends with no open exit creates a trap. End clearance of 4 to 6 inches between the last inch of the bench and any adjacent wall, cabinet, or counter edge is the minimum for comfortable entry.
Add to that the footprint formula from the earlier section: 60 to 70 inches of floor depth for the booth, plus 36 inches of walkway clearance on the open side. The total room depth requirement for a comfortable straight booth is roughly 8 to 9 feet.
L-Shaped and Corner Booth
One bench runs along one wall and turns the corner. The table floats in the open space that the L creates.
Walk into the corner of the room. The bench wraps two adjacent walls, one arm running to the left and one running behind you. The table sits centered in front of the open side, with a freestanding bench or two chairs completing the arrangement.
This layout saves wall length compared to the straight booth. It suits kitchens where a 5-foot-plus straight bench run is not available on two parallel walls. Smaller rooms that cannot fit the straight footprint are not a design problem to solve around.
The person sitting at the apex of the L cannot exit without everyone on at least one side sliding out first. For a household with consistent seating arrangements, that is manageable. For a space used regularly for casual entertaining, it becomes an inconvenience worth thinking through before the bench is built.
If anyone in the household has limited mobility, the straight face-to-face booth is the more practical layout. The corner seat in an L-shaped configuration can create real difficulty for anyone who has trouble sliding across a bench. It is worth testing the entry and exit before the framing starts.
Corner configurations also offer the best opportunity for built-in storage under the seat. A 20-inch-deep bench section framed with lift-up access holds a meaningful volume. The build method changes, but the seating dimensions stay the same.
One other layout option exists: the curved or semicircular booth. It works well in restaurant installations and in very large residential dining rooms. In a standard home kitchen, the floor depth a curved booth requires typically exceeds what a straight or L-shaped configuration needs.
It is worth knowing it exists, but it is rarely the right call in a kitchen renovation.
The Most Common Dimension Mistakes in Home Booth Seating
Most booth mistakes are made before a single piece of wood is cut.
These are the ones I see repeatedly in projects that have already gone sideways before I am brought in.
- Building the bench frame to the uncompressed cushion height. A 3-inch foam cushion compresses to roughly 2 inches under body weight. Frame the bench to 15 to 16 inches, add the cushion, and the finished height lands in the right range. Frame to 18 inches and add a cushion on top, and the seat ends up too tall for the table, with no easy fix.
- Copying restaurant seat depth specs. At 16 to 18 inches, commercial seat depth works for quick-service dining. At home, where the booth gets used for long breakfasts and unhurried meals, a shallow seat feels like it is pushing you out. Aim for 18 to 21 inches for home kitchen use.
- Calculating bench dimensions without calculating the total room footprint first. Individual component dimensions can each be correct, and the booth can still not fit in the kitchen. Do the footprint math first: bench depth plus table width plus bench depth, then add 36 inches of walkway clearance on the open side.
- Choosing a four-legged table instead of a pedestal base. Table legs create a knee obstacle that makes sliding into the booth uncomfortable for everyone at the table. A pedestal base removes it. This is a usability decision that gets mistaken for a style preference, and it has a larger impact on daily use than almost any other choice in the setup.
- Installing a 48-inch back height in a standard residential kitchen. In a room with 8-foot ceilings, a 48-inch back takes over the space. The booth stops reading as a seating area and starts reading as a wall. For most home kitchens, 42 inches is the right call, and the room will look better for it.
This guide covers residential kitchen booth seating only. Commercial ADA compliance, service aisle requirements for licensed food service premises, and building codes for restaurants are different standards with different purposes.
