

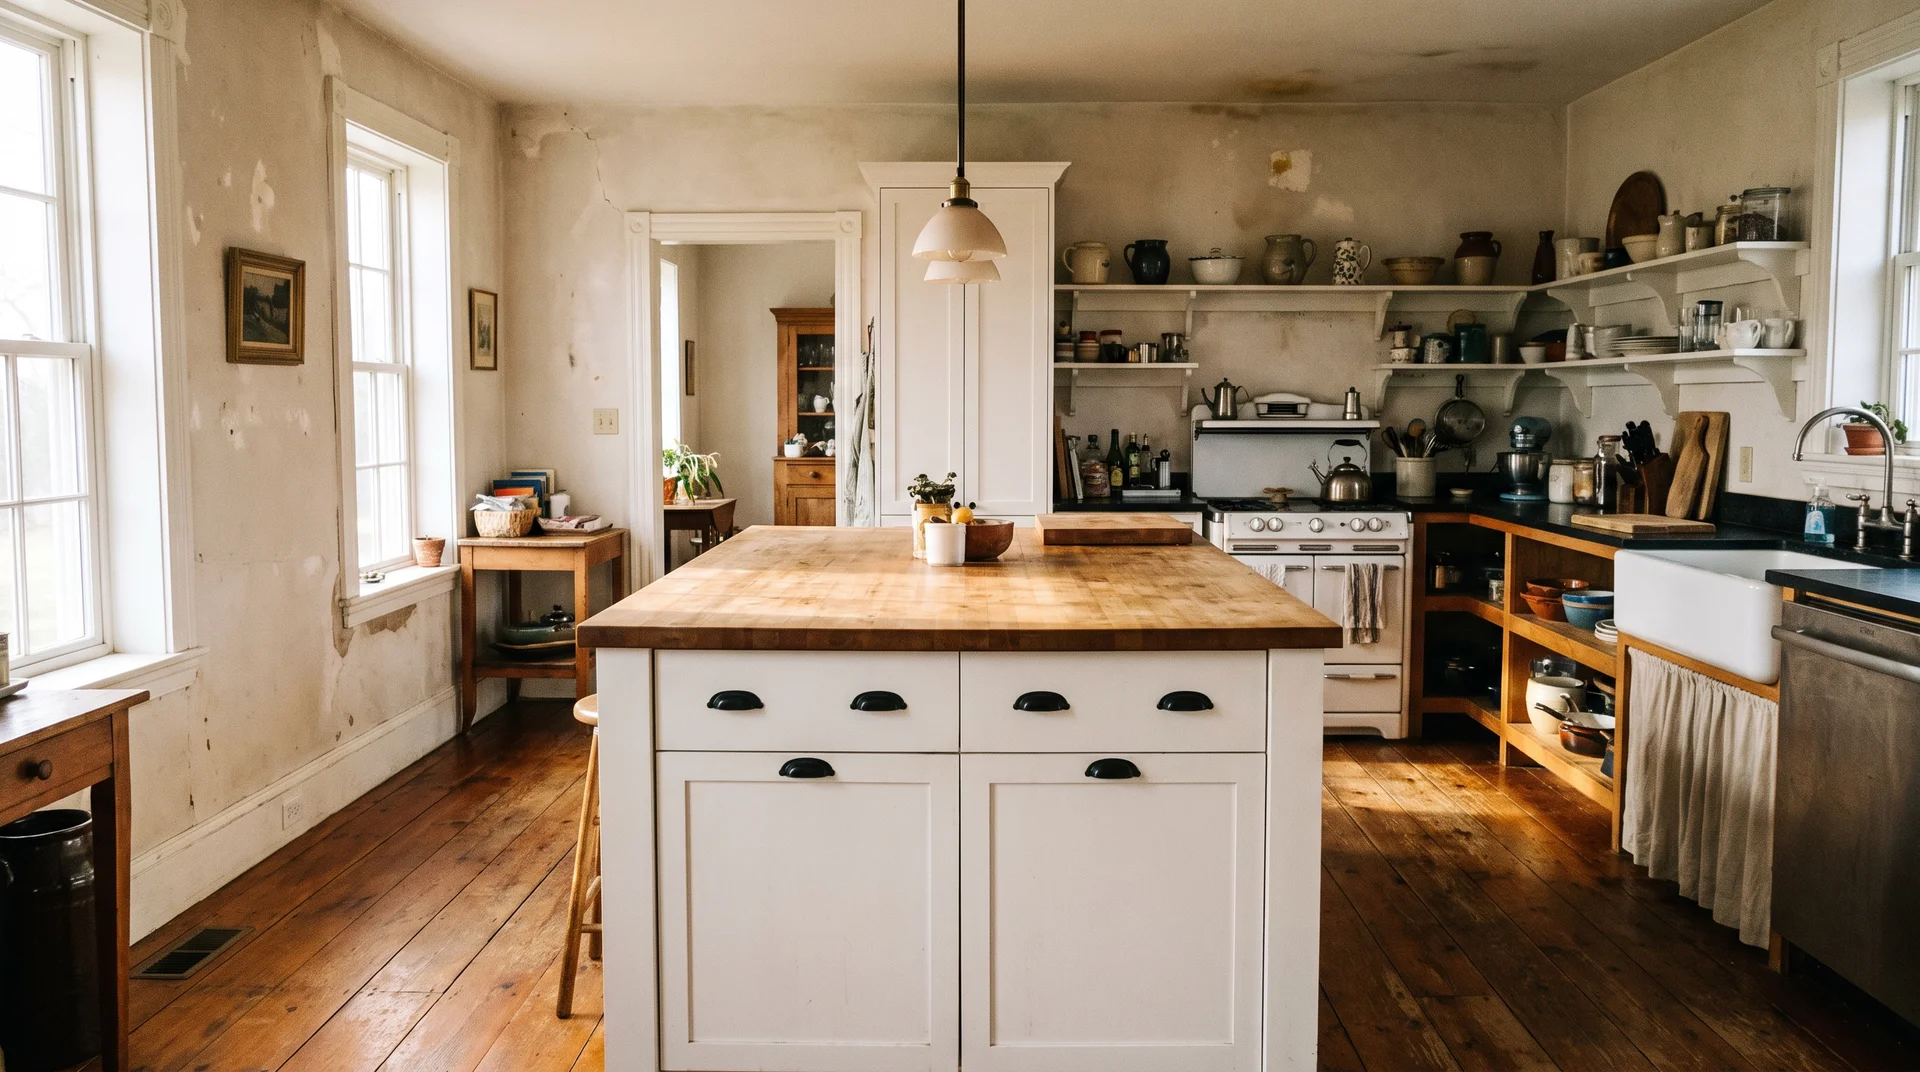
Most people get here with forty-something saved pins and no way to choose between them.
You’ve seen butcher block tops, navy shaker bases, and reclaimed wood panels. You’ve also seen shiplap island ends, black iron hardware, and furniture-style bases with turned legs.
Every image was labeled farmhouse. None of them explained which elements define the look and which are optional extras.
The framework I use comes from a mistake I made in 2014. I over-specified a client’s kitchen: patterned backsplash, brass hardware, dark cabinets, marble counters, and open shelving, all competing at once. I redesigned that kitchen at my own cost. That experience gave me a rule.
Every kitchen needs one dominant visual statement, and everything else submits to it. One hero.
That rule is the filter for this list. Each of the 25 ideas includes what it requires to work, not just what it looks like.
Before You Choose Any Farmhouse Kitchen Island Idea
No island aesthetic works in a kitchen that can’t physically fit an island.
The National Kitchen and Bath Association (NKBA) sets minimum aisle clearances for any kitchen with an island. These numbers are not suggestions.
They are the working clearances that determine whether the island helps the kitchen or blocks it.
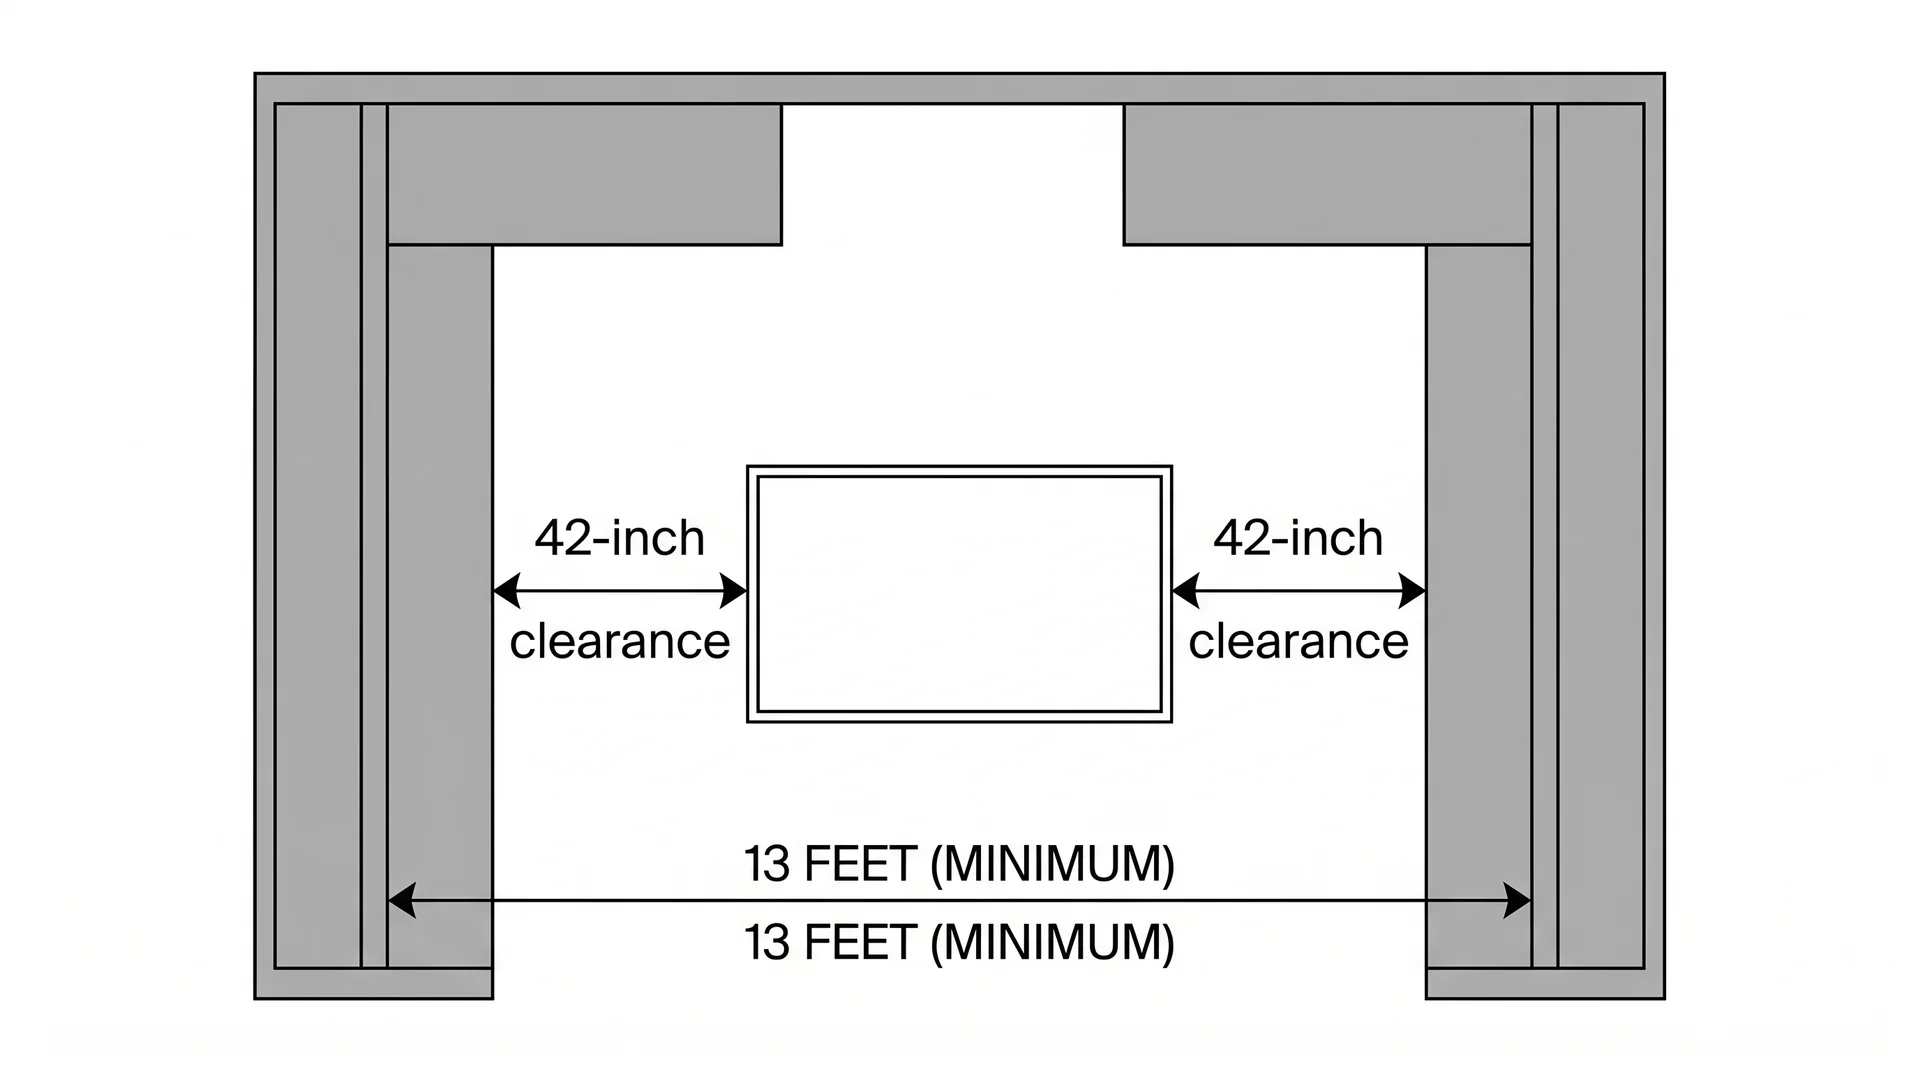
Here’s what NKBA requires:
- 42 inches between the island and any parallel counter, wall, or appliance in a two-cook kitchen
- 36 inches minimum aisle clearance on that same side for a single-cook kitchen
- At least 12 to 13 feet in one direction as the minimum kitchen footprint to fit a fixed island with adequate clearance on both working sides
Those numbers come first. The aesthetic choices come after.
Stand at your range and look across to the opposite counter run. If that gap is under 42 inches, a built-in island will make your kitchen harder to use.
In a kitchen under 12 to 13 feet across, the freestanding farmhouse table in idea 23 is your actual option. It’s not a compromise.
If a prep sink or microwave drawer is part of the plan, those decisions happen at rough-in. Rough-in is the construction phase before walls close, and flooring goes in. The ideas below flag those requirements when they come up.
The number is the decision. Everything else follows.
If the island footprint isn’t rectangular, clearance planning changes. The island shapes guide covers how curved, L-shaped, and angled configurations affect the aisle requirements.
Read: Unique Kitchen Island Shapes
Kitchen Island Countertop Ideas
The island countertop carries more visual weight than any other single surface in the space.
It’s also the most expensive element to change after the fact. The aesthetic choice and the maintenance commitment happen in the same decision. These five options range from the most recognizable farmhouse surface to the most underused one.
Butcher Block Countertop
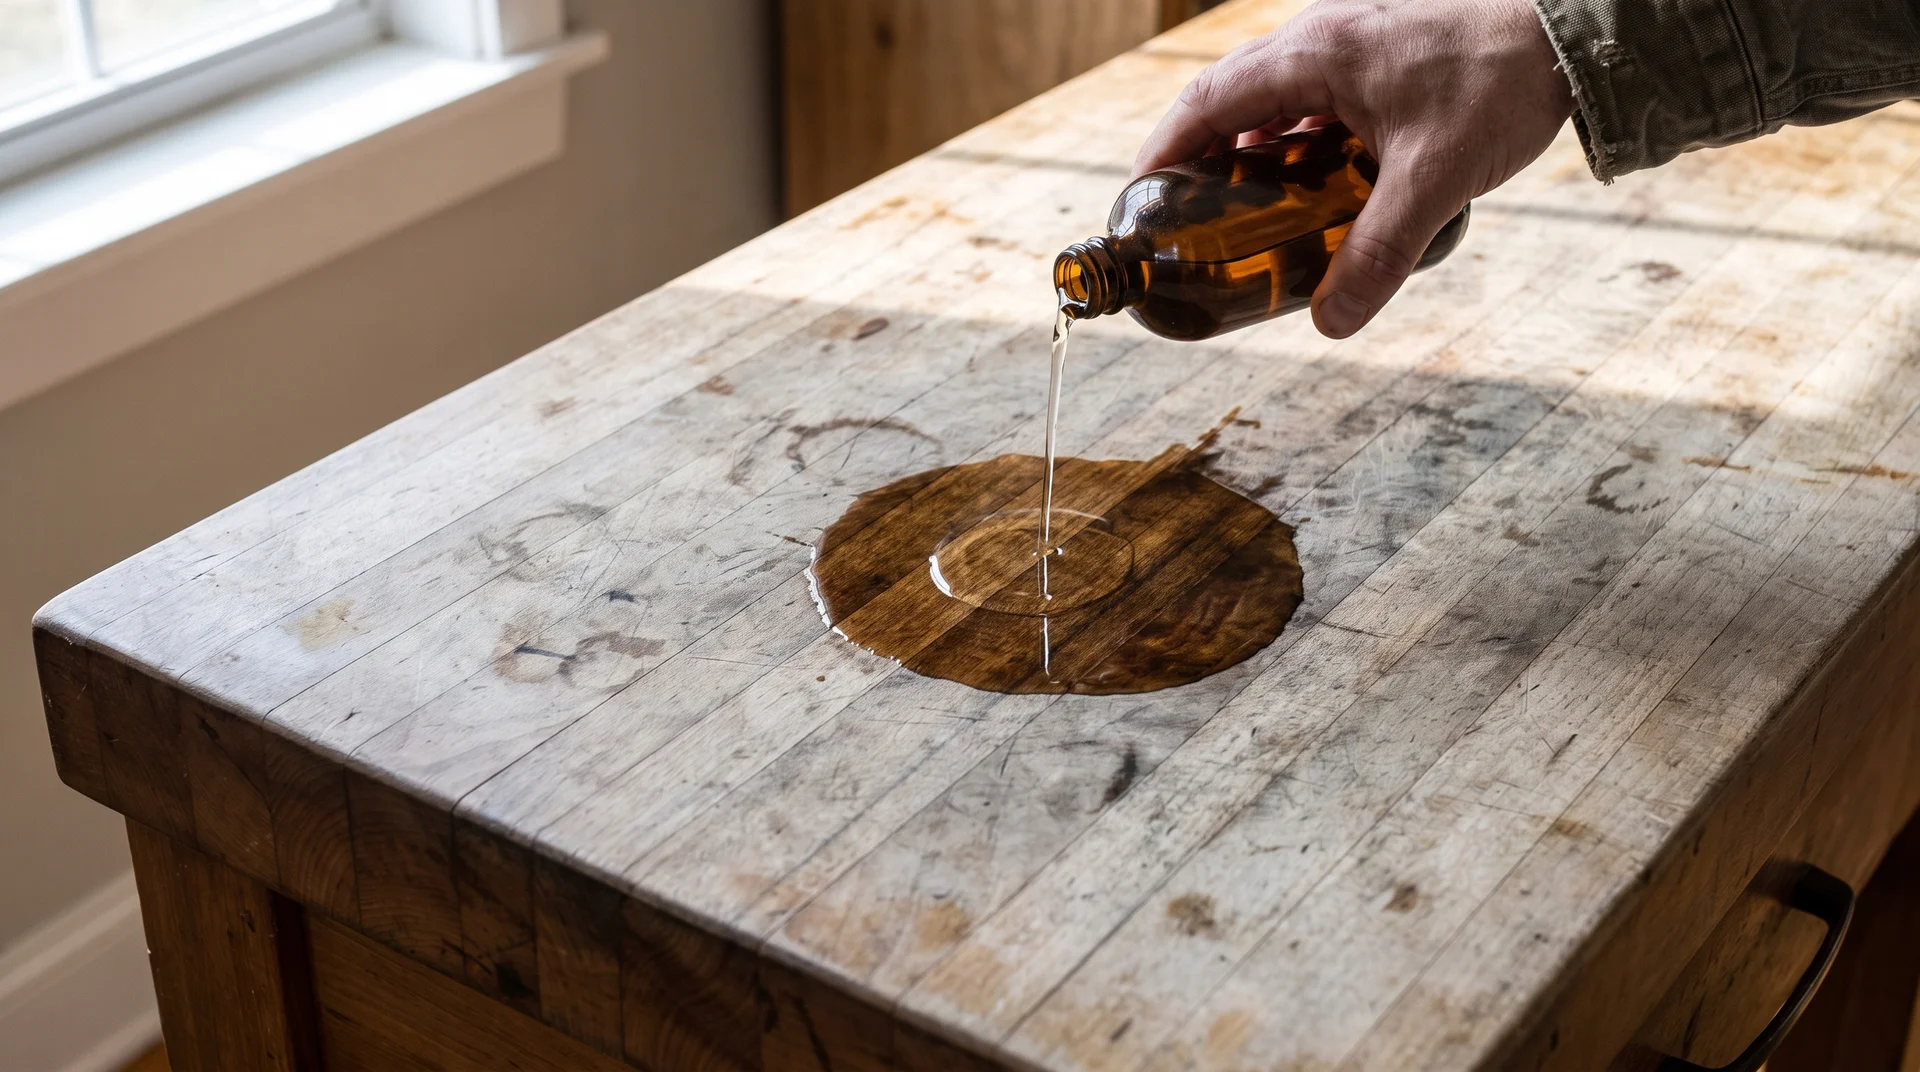
The most recognizable farmhouse island surface, and the one most people maintain incorrectly.
You’re standing at this island six months after installation. The surface has gone dry, gray at the edges, and starting to crack at the seam.
It’s what happens when the oiling schedule is ignored. Not a normal wear pattern.
Butcher block needs food-safe mineral oil applied monthly for the first year, then quarterly after that. End-grain cuts absorb faster than edge-grain and need more frequent attention. If you choose butcher block, you’re also choosing a maintenance routine.
If the island will have a prep sink, slope the countertop slightly toward the sink opening. Seal the edge nearest the sink separately.
Unmanaged water exposure at that edge will cause delamination within a year. This happens regardless of how well the rest of the surface is maintained.
I’ve tracked butcher block performance across client kitchens for several years. The oiling product matters less than the regularity of application. A standard mineral oil applied on schedule outperforms a premium product applied twice a year.
Reclaimed Wood Slab
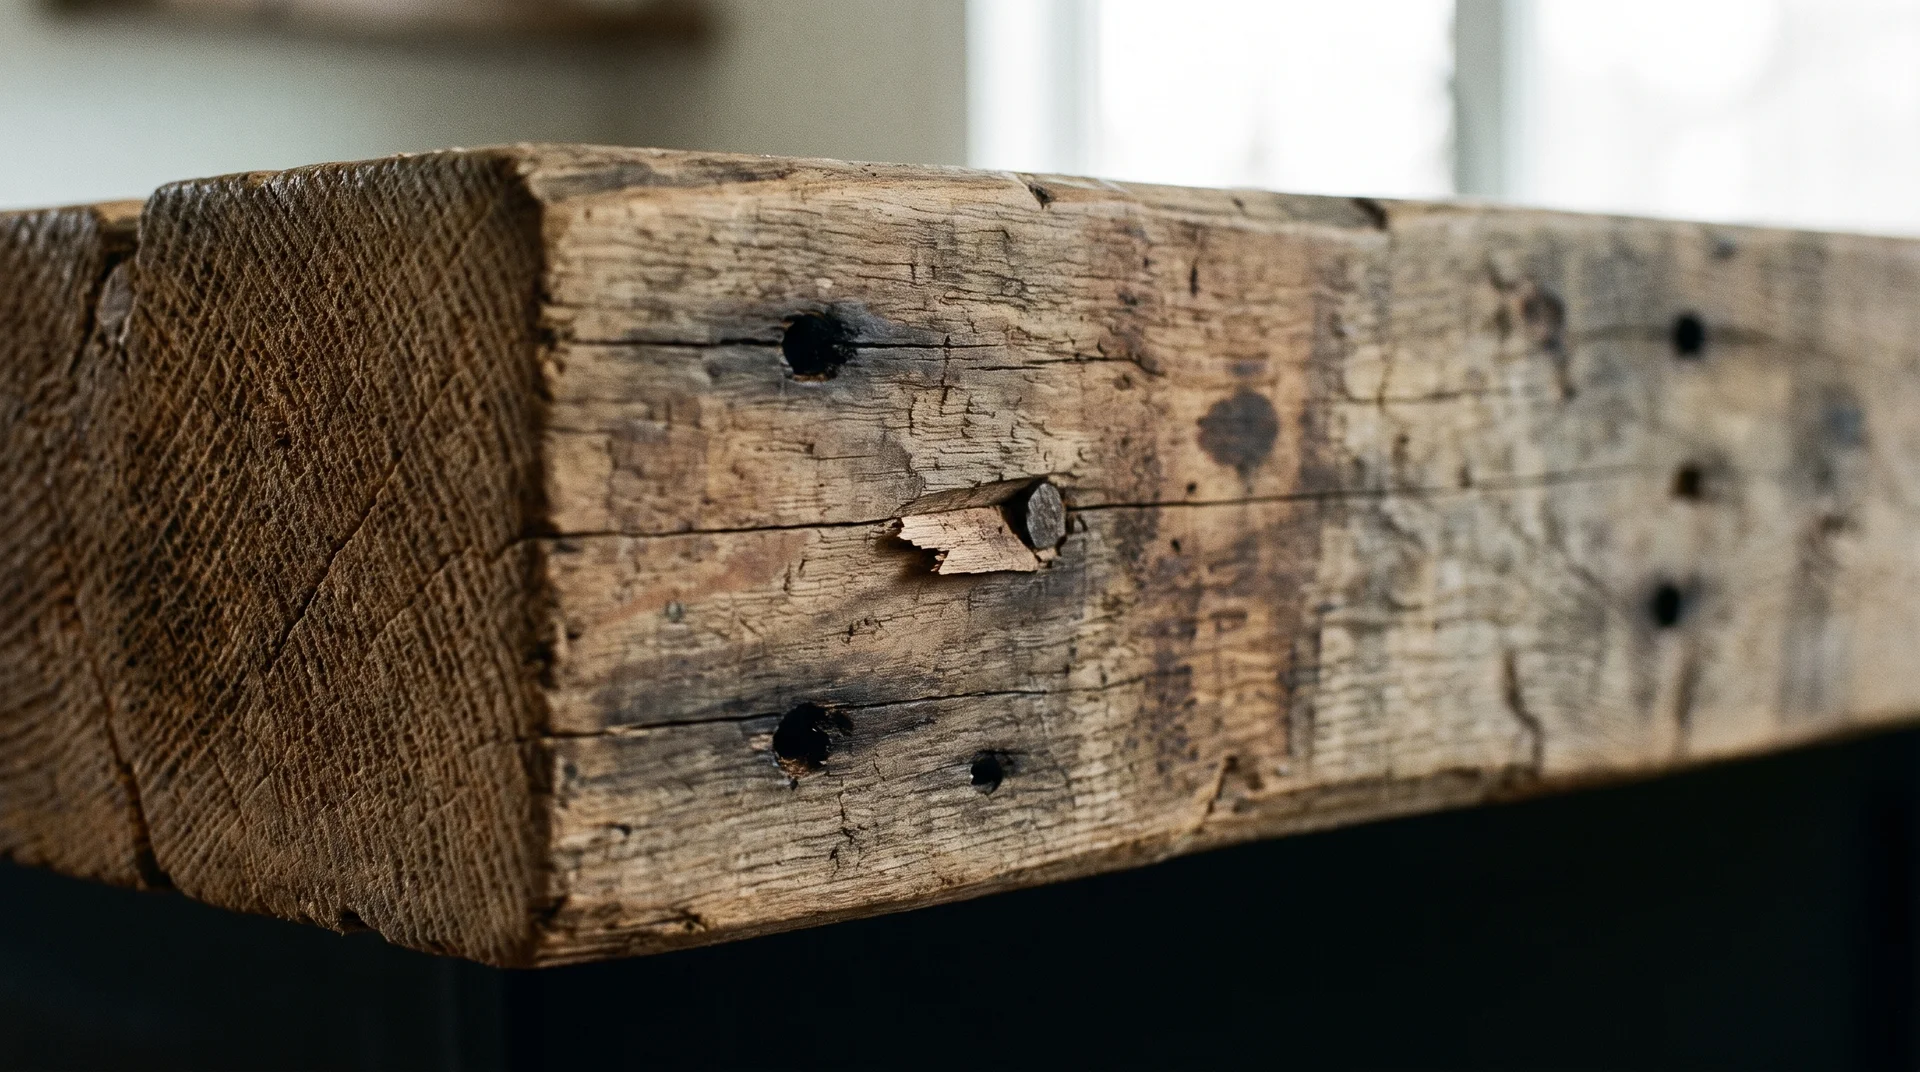
A single reclaimed wood plank as the island surface is the strongest individual farmhouse statement on this list.
Sourcing matters more than aesthetics here. Kiln-dried reclaimed wood is stable. Green wood or insufficiently dried stock will move as it acclimates.
That movement opens gaps at the seams and warps the surface over the cabinets below. Ask for the moisture content reading before purchasing. Anything above 8 percent for an interior horizontal surface is a risk worth understanding.
Fabrication at this thickness is specialist work. Most reclaimed slabs that read correctly on an island are 2 to 3 inches thick. Cutting and fitting stock at that weight requires a professional with the right equipment.
Budget the fabrication cost separately from the slab cost. They are not the same number.
I’ve specified reclaimed wood slab tops in a handful of projects. The most common regret isn’t the material. It’s sourcing from a yard that didn’t certify the moisture content.
The material looks like it came from somewhere. That’s the point of it. Make sure it came from somewhere dry.
Honed Quartz with Veining
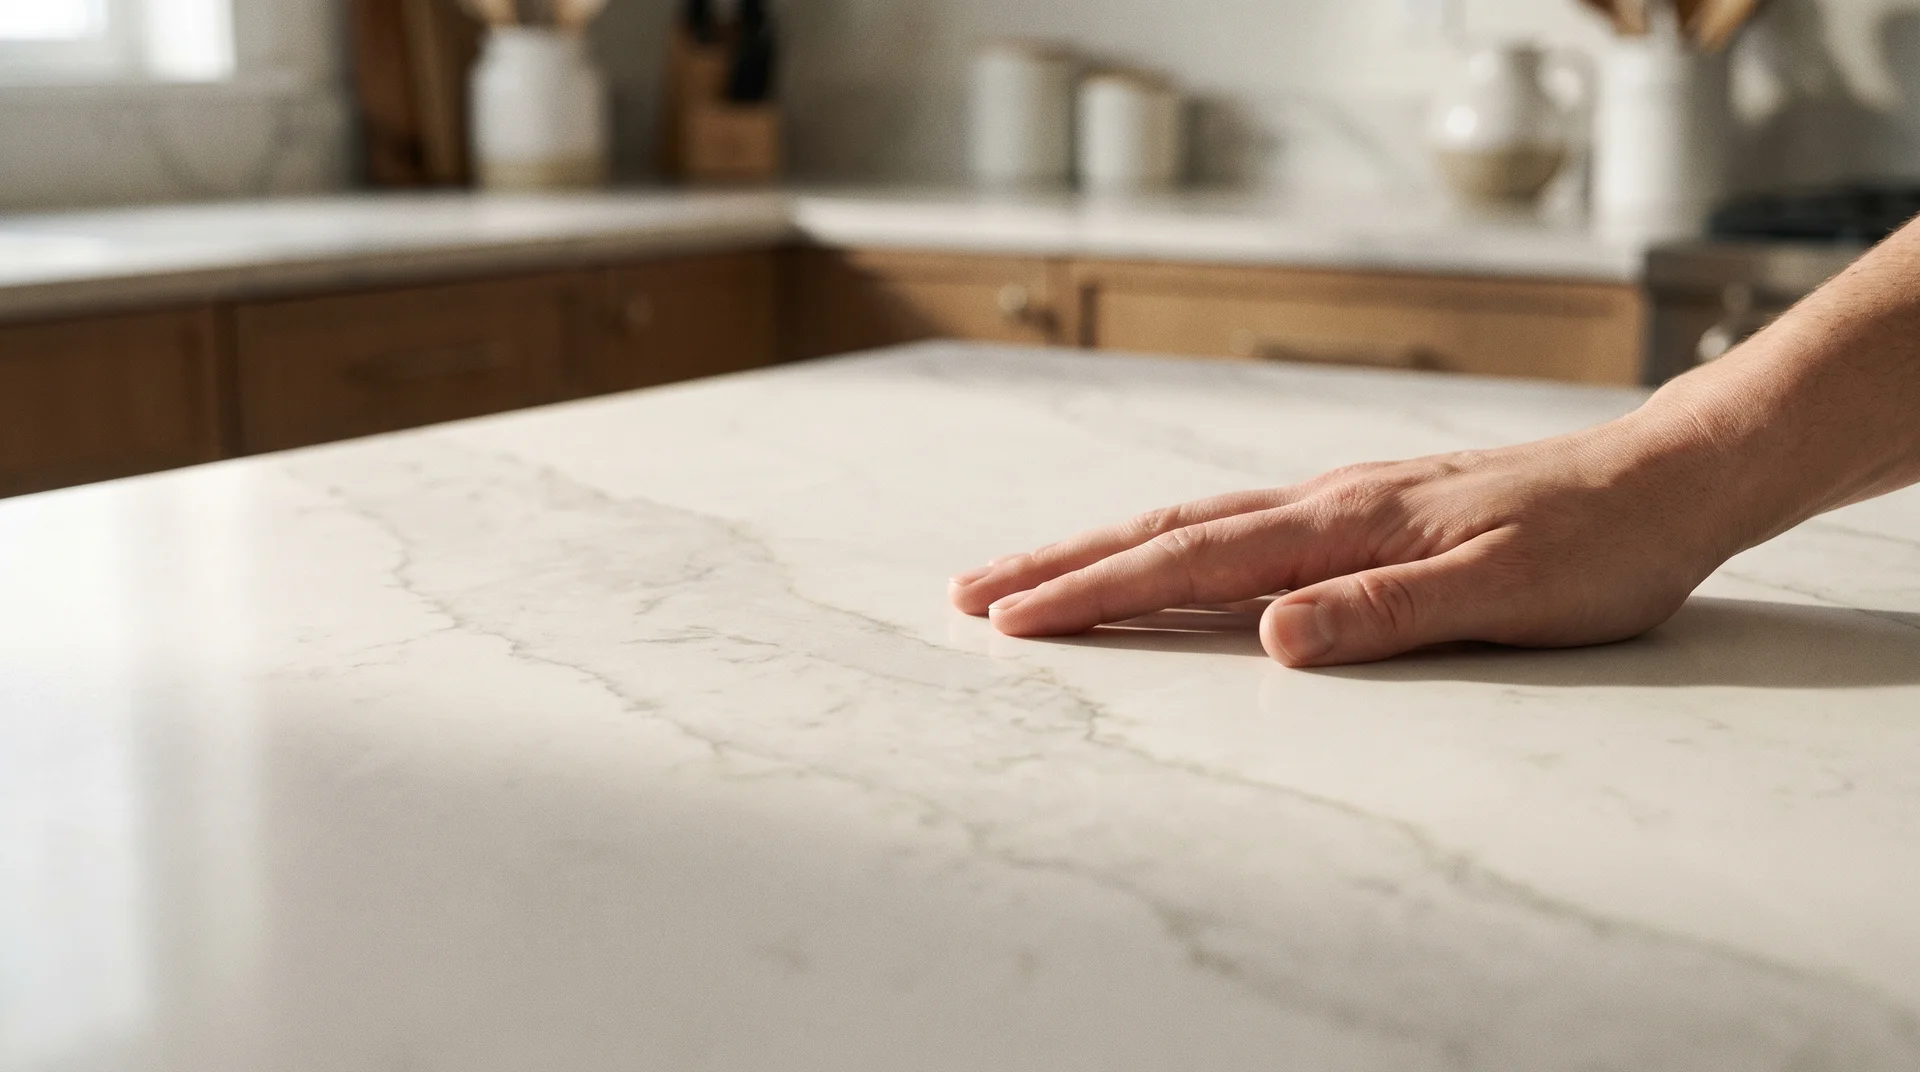
The farmhouse-adjacent surface choice that carries less maintenance commitment and works hardest in smaller kitchens.
A light surface with natural veining adds movement without requiring the care of real marble. Honed, or matte, finish reads period-appropriate. A polished, or gloss, finish reads contemporary regardless of the pattern.
Choose the finish based on what the rest of your kitchen is doing. Which veining looks most dramatic at the showroom is not the right question.
If the countertop is the hero, a strong veining pattern can carry that role. If the base color or the hardware is the hero, keep the countertop quieter. A heavy veining pattern competes with a two-tone painted base.
One of them needs to step back. It’s easier to decide that before fabrication than after.
Painted Concrete
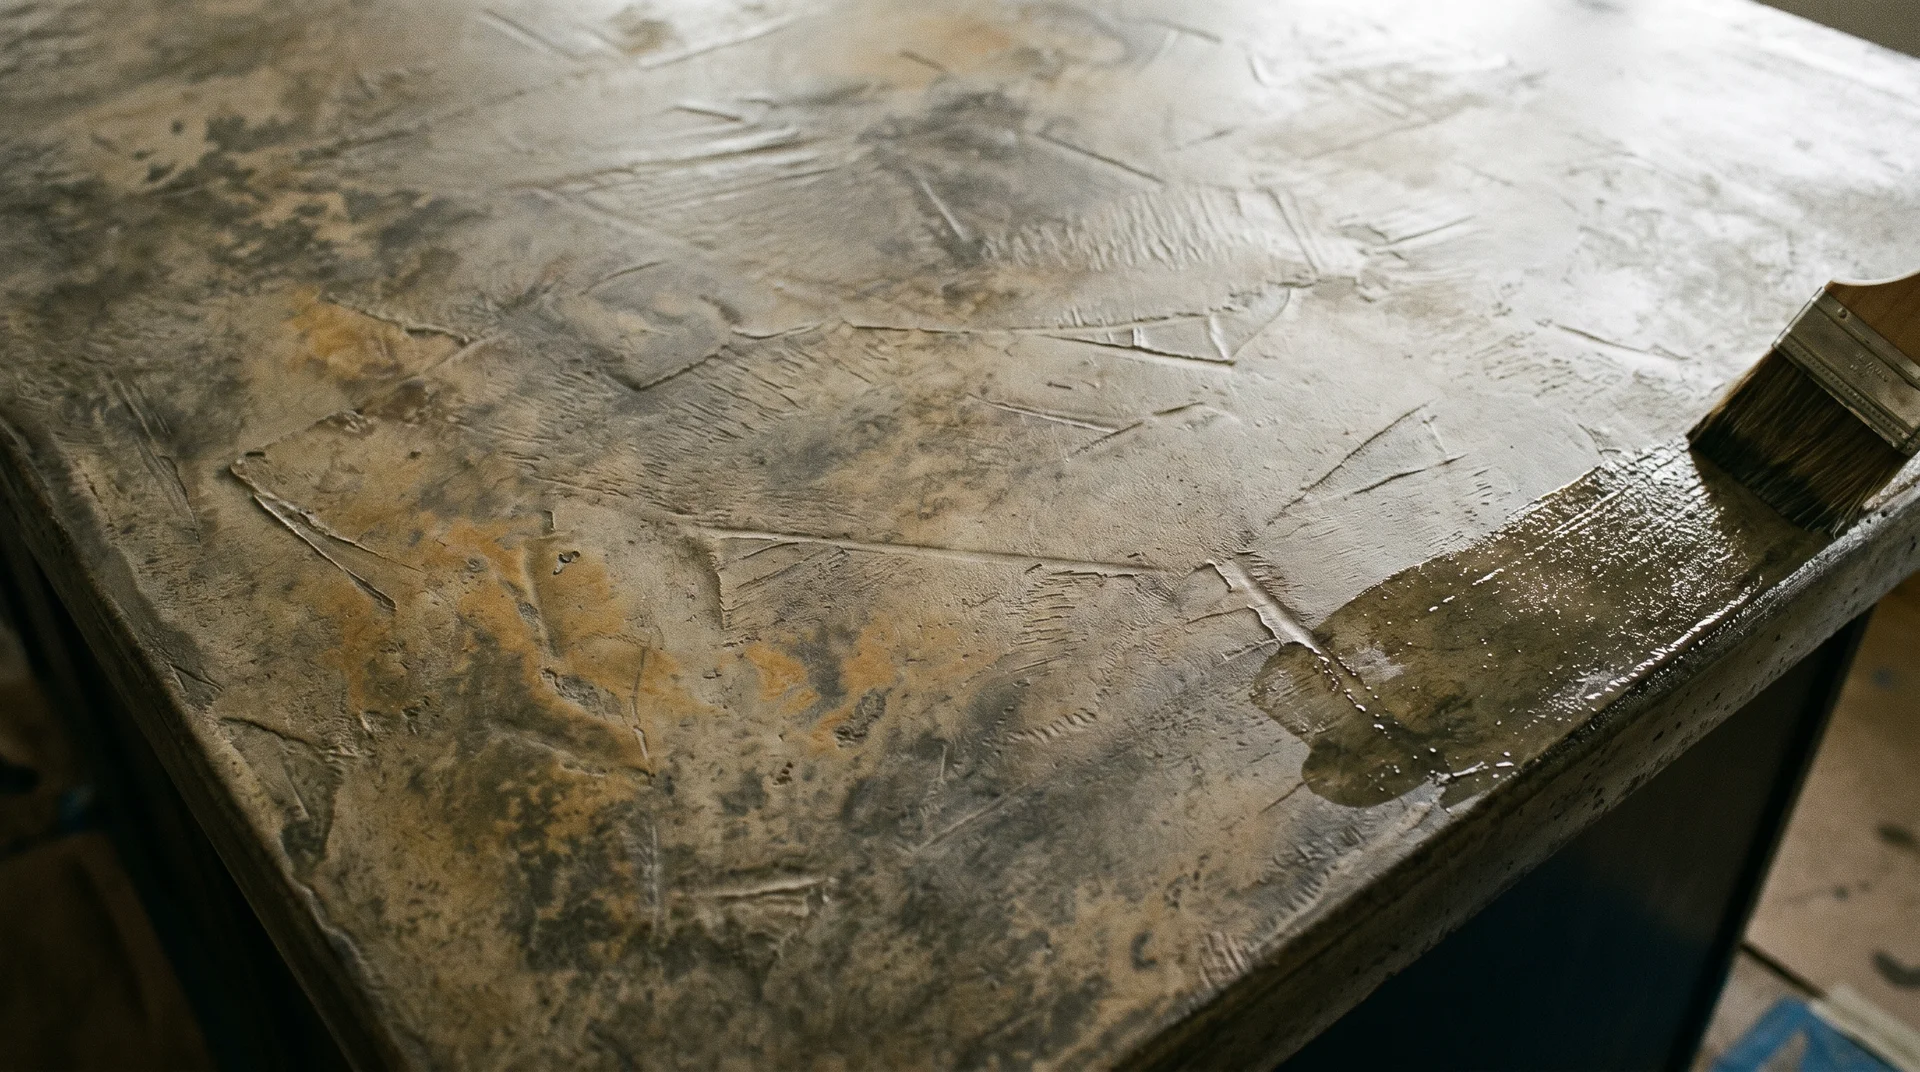
Rarely shown in farmhouse content, but period-correct for 19th-century American farm kitchens.
Painted or pigmented concrete shows tool marks, color variation, and small surface imperfections. That’s the aesthetic. More durable than it looks when properly finished.
It’s DIY-able with patience and the right penetrating sealer.
Sealing schedule: two coats of penetrating concrete sealer at installation, then reseal annually. Skip the annual coat and the surface will absorb stains within weeks in a working kitchen.
I’ve recommended painted concrete in two projects where budget and period-correctness were both priorities. Both clients were glad they chose it. The maintenance schedule is the only real conversation worth having upfront.
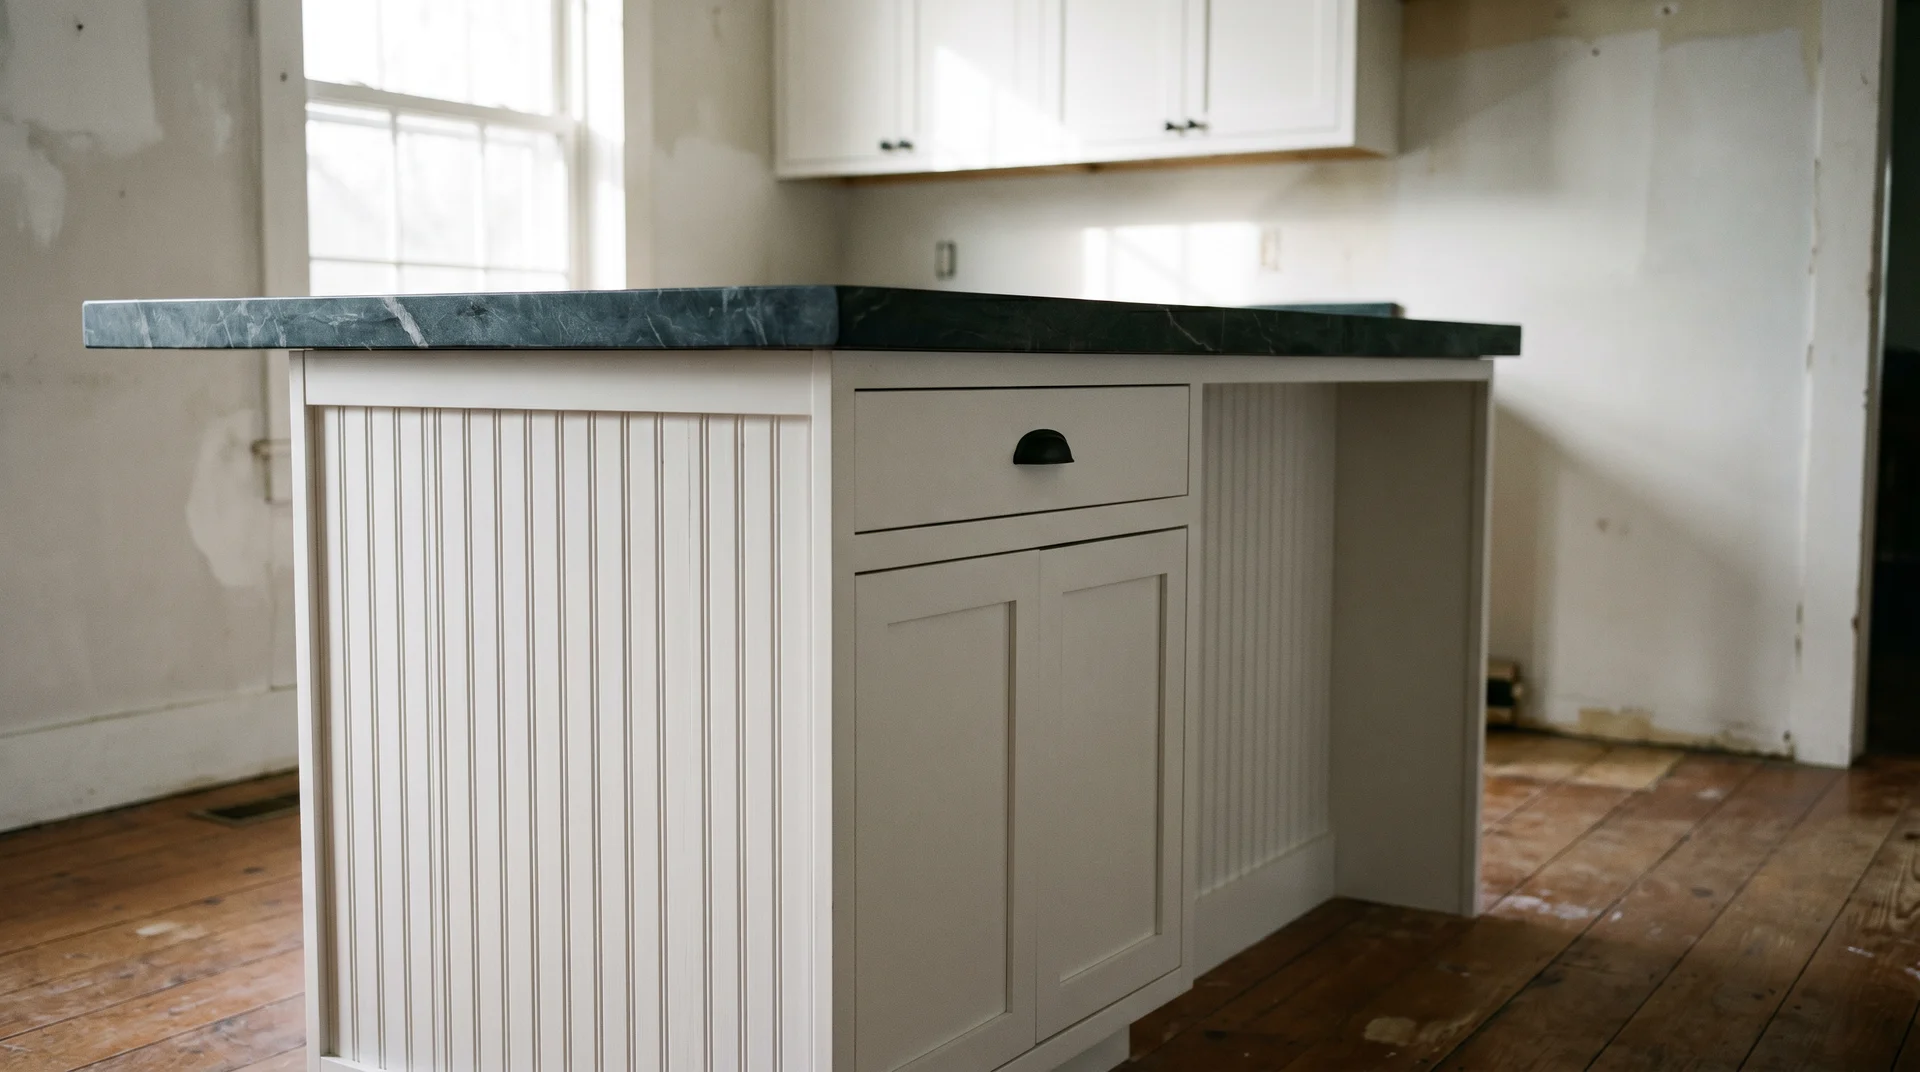
Soapstone in Dark Gray

Soapstone has been in American farmhouse kitchens longer than butcher block. Most buyers today still read it as contemporary.
The material is naturally antimicrobial and soft under a knife. It darkens with each application of mineral oil, developing a deep charcoal surface over time. Scratches easily, and that’s intentional.
The material is designed to develop patina. A buyer who wants an unmarked countertop after five years needs a different material.
One genuine uncertainty here: the final depth of color after mineral oil aging is hard to predict before installation.
The quarry source and the slab’s mineral content affect how dark it goes. Ask for a sample, oil it three times, and assess the final tone before committing.
Kitchen Island Base and Cabinet Ideas
The island base is where the contrast question gets answered.
The most common question here is whether the island should be lighter or darker than the surrounding cabinets. That question has a structural logic behind it.
These five ideas cover the range of farmhouse base configurations, with what the contrast logic actually means for each one.
White Shaker Base with Beadboard Panel Ends
The most-used farmhouse island base, and the most forgiving configuration in smaller or lower-light kitchens.
Walk into a kitchen with a white shaker island against white upper cabinets.
Your eye has no clear landing point unless the countertop or the hardware is doing the defining work. That’s the contrast problem with an all-light kitchen: every surface reads as one continuous plane.
A white shaker base works when the countertop provides the contrast.
Dark soapstone, butcher block, or a veined stone gives the island visual definition against that white base. Beadboard end panels are the period-correct farmhouse end panel choice.
Shiplap has largely been replaced with beadboard and vertical fluted paneling in newer builds.
If the base is light, the countertop still has to earn its position.
On the lighter-vs-darker question: a light island in a light kitchen works when the countertop defines it. A dark island against light upper cabinets creates definition through color. Both are correct.
The mistake is choosing one based on a photograph. Your countertop and hardware choices have to support whichever direction you go.
Navy or Sage Two-Tone Island Base
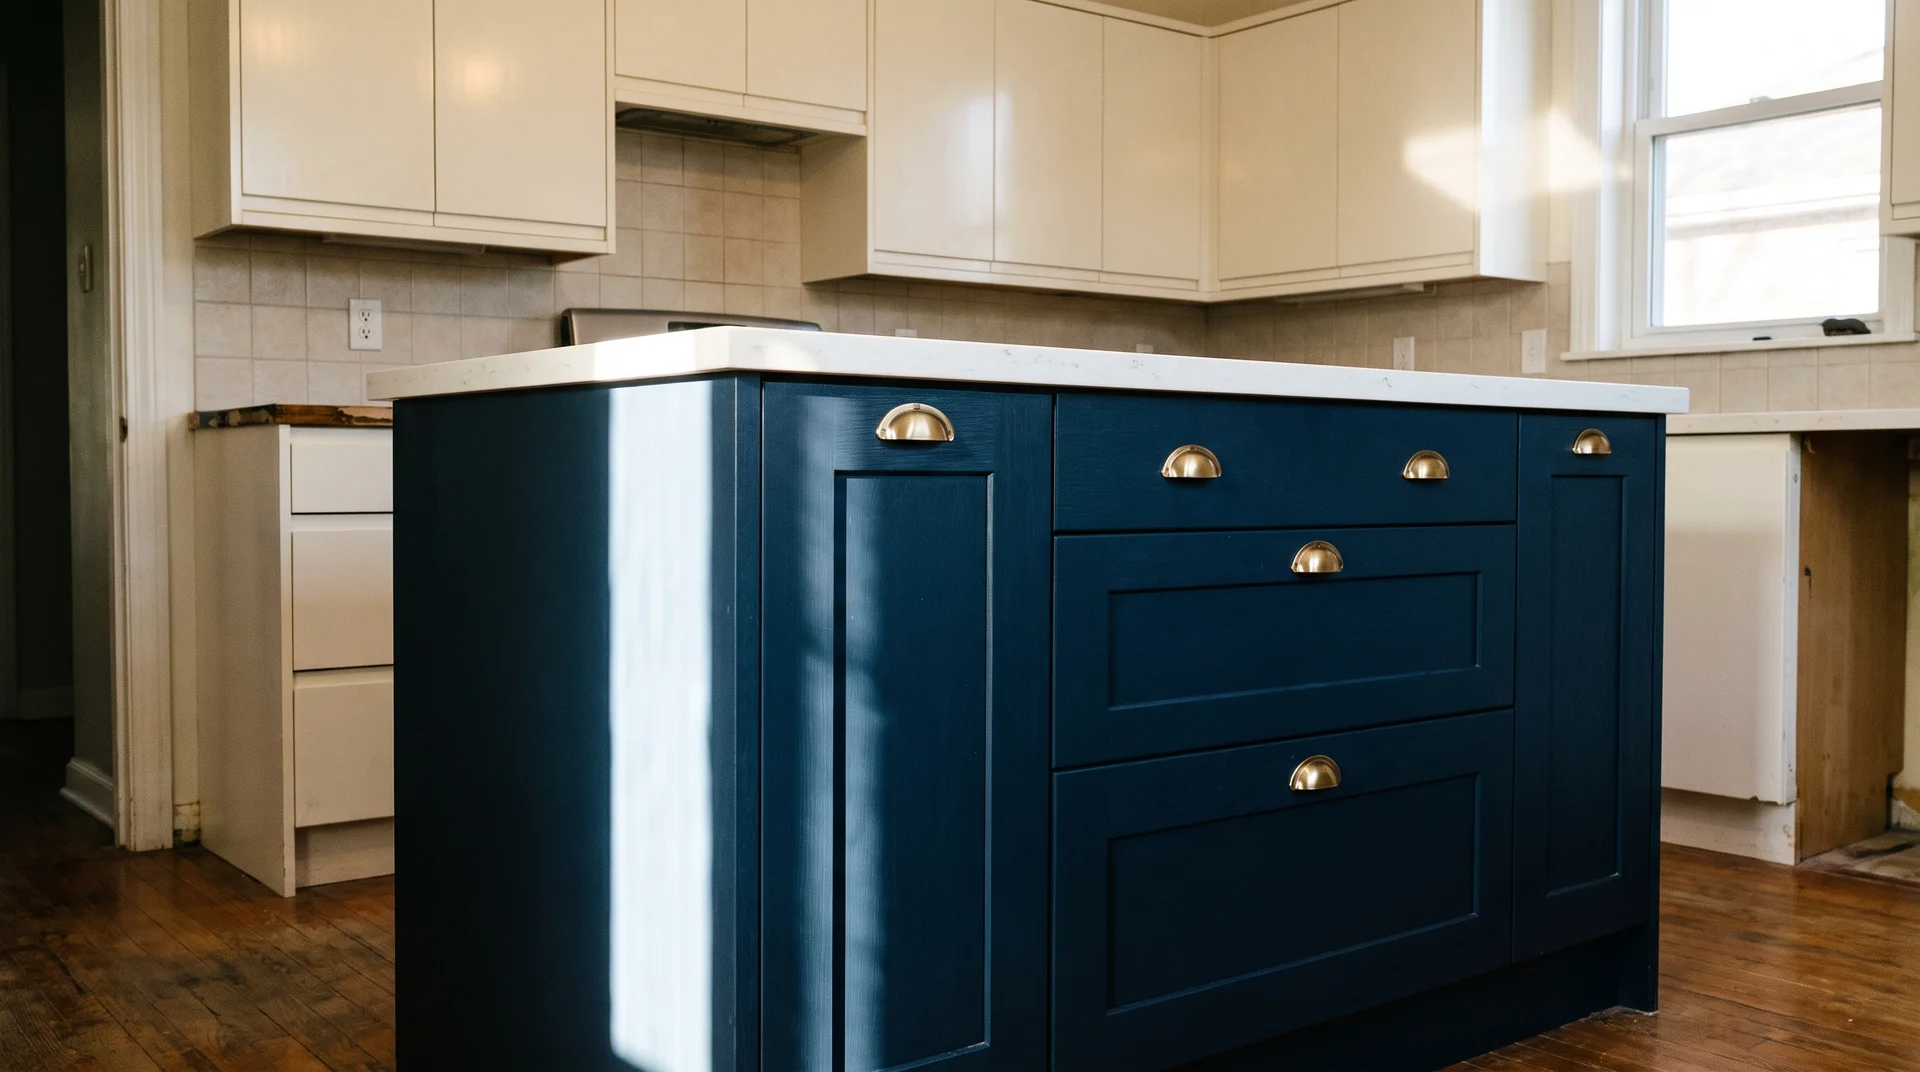
The painted contrast base and the configuration most often done wrong in one specific way.
A painted island base in navy, sage, or dusty blue against white or cream upper cabinets is now common. It works. The most consistent mistake I’ve seen across finished projects is mismatched sheen levels between the island and the surrounding cabinets.
Use the same finish on both surfaces: flat or eggshell on millwork, not satin or gloss. Gloss on painted cabinet doors reads cheap regardless of the color.
Keep the hardware metal family consistent across the island and the rest of the kitchen.
Mixing brass island pulls with chrome perimeter pulls is the one combination I’ve seen look unresolved every time.
Furniture-Style Base with Turned Legs
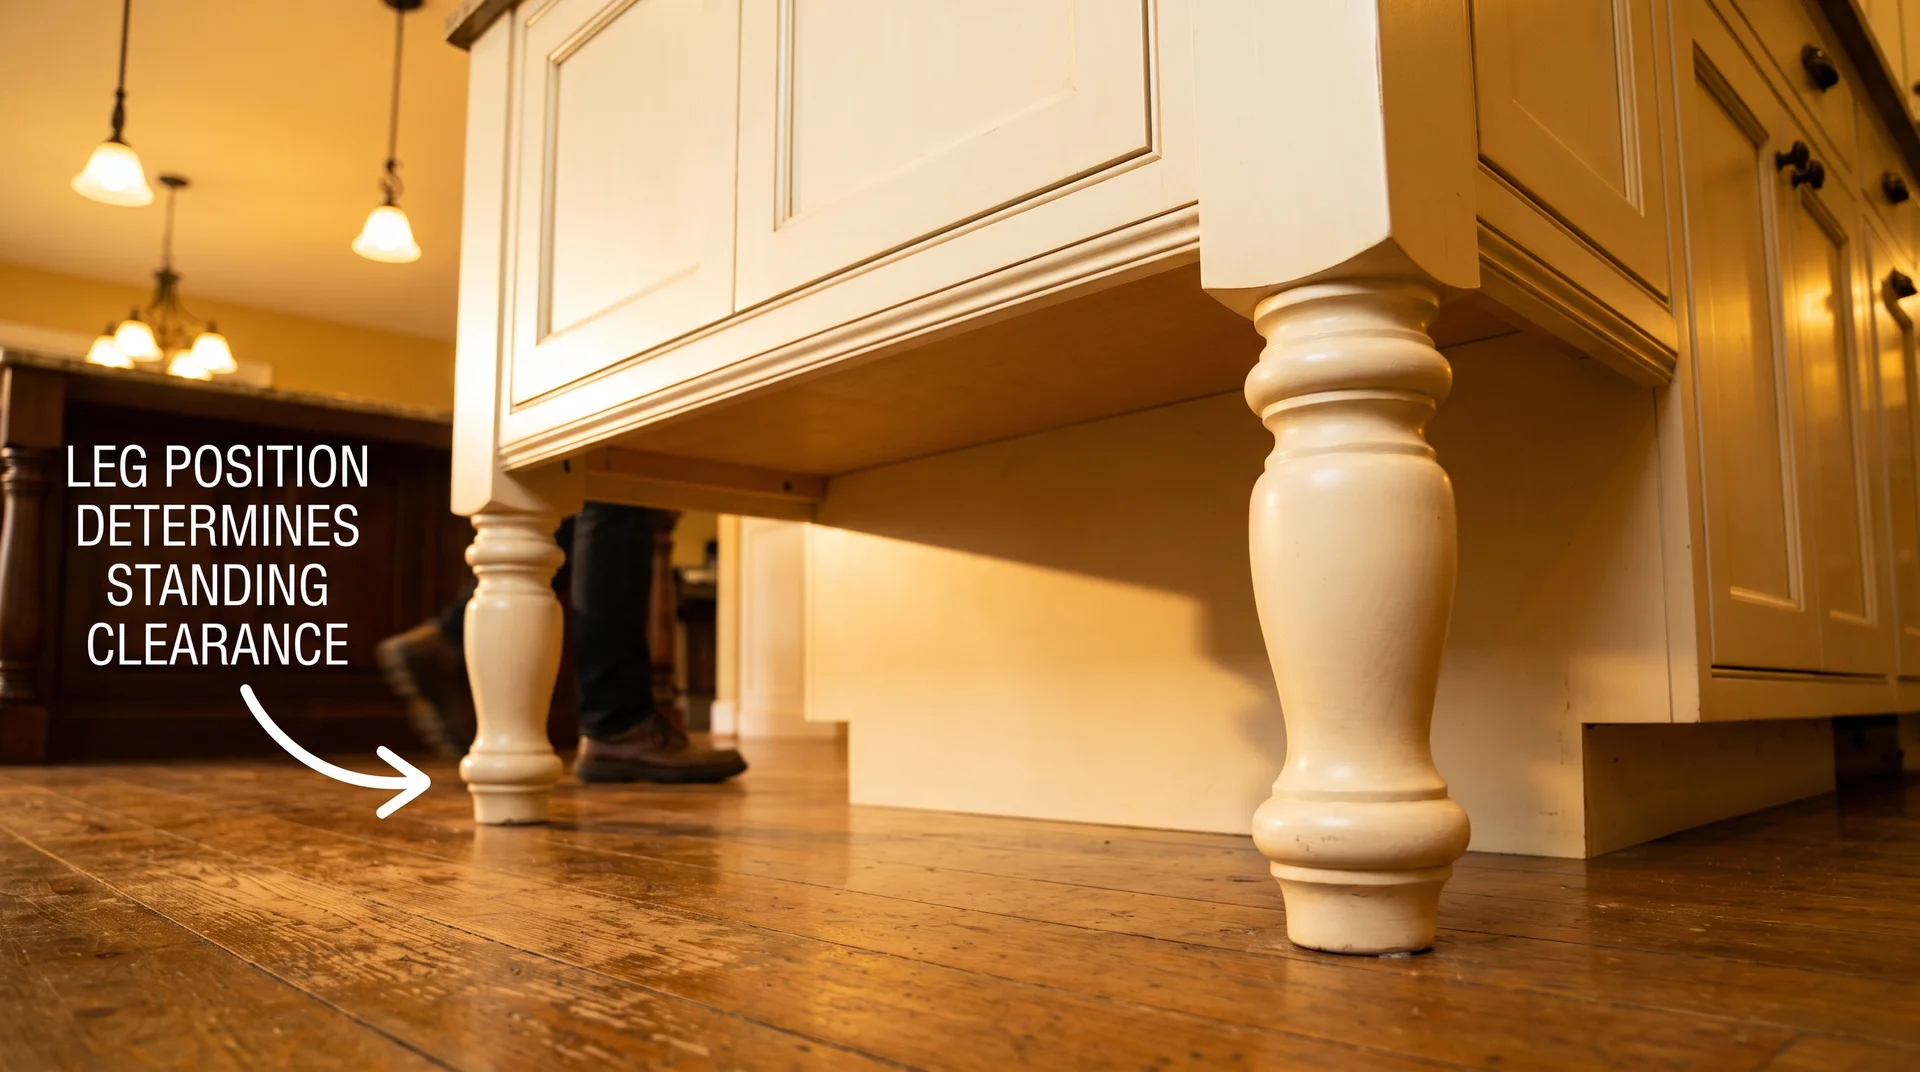
The antique-dresser-converted-to-island look, and the configuration that requires the most spatial planning of any base style on this list.
Turned legs visible to the floor read as freestanding furniture rather than built cabinetry. That’s the aesthetic goal: the island looks like a piece that belongs in the room, not something that was installed.
It’s a strong move. It also has clearance implications that a standard cabinet base doesn’t.
The legs take up the space that toe-kick would otherwise occupy. Toe-kick is the recessed base at the bottom of a standard cabinet, typically 3 to 4 inches deep. On the working side of the island, leg placement determines where you can stand comfortably.
On the seating side, the legs must clear where someone’s knees will sit. Plan both positions before specifying or ordering the base. I’ve seen this oversight in enough projects to know it costs the most to correct after the fact.
Practical note: most furniture-style island bases are anchored to the floor during installation. The look is furniture-style. The installation is cabinetry-standard.
Open Shelf Base on the Seating Side
One side of the island is left as open floating shelves instead of cabinet doors.
This is usually the seating-facing side. It looks intentional when consistently maintained and loses that quality quickly when daily accumulation takes over. Open shelving in a kitchen collects grease film and airborne dust faster than cabinetry does.
The island is near the cooktop and in the path of cooking activity. Plan for weekly wiping of the shelves and whatever sits on them.
That’s not a criticism of the choice. It is the use condition of the choice.
Repurposed Antique Sideboard or Buffet
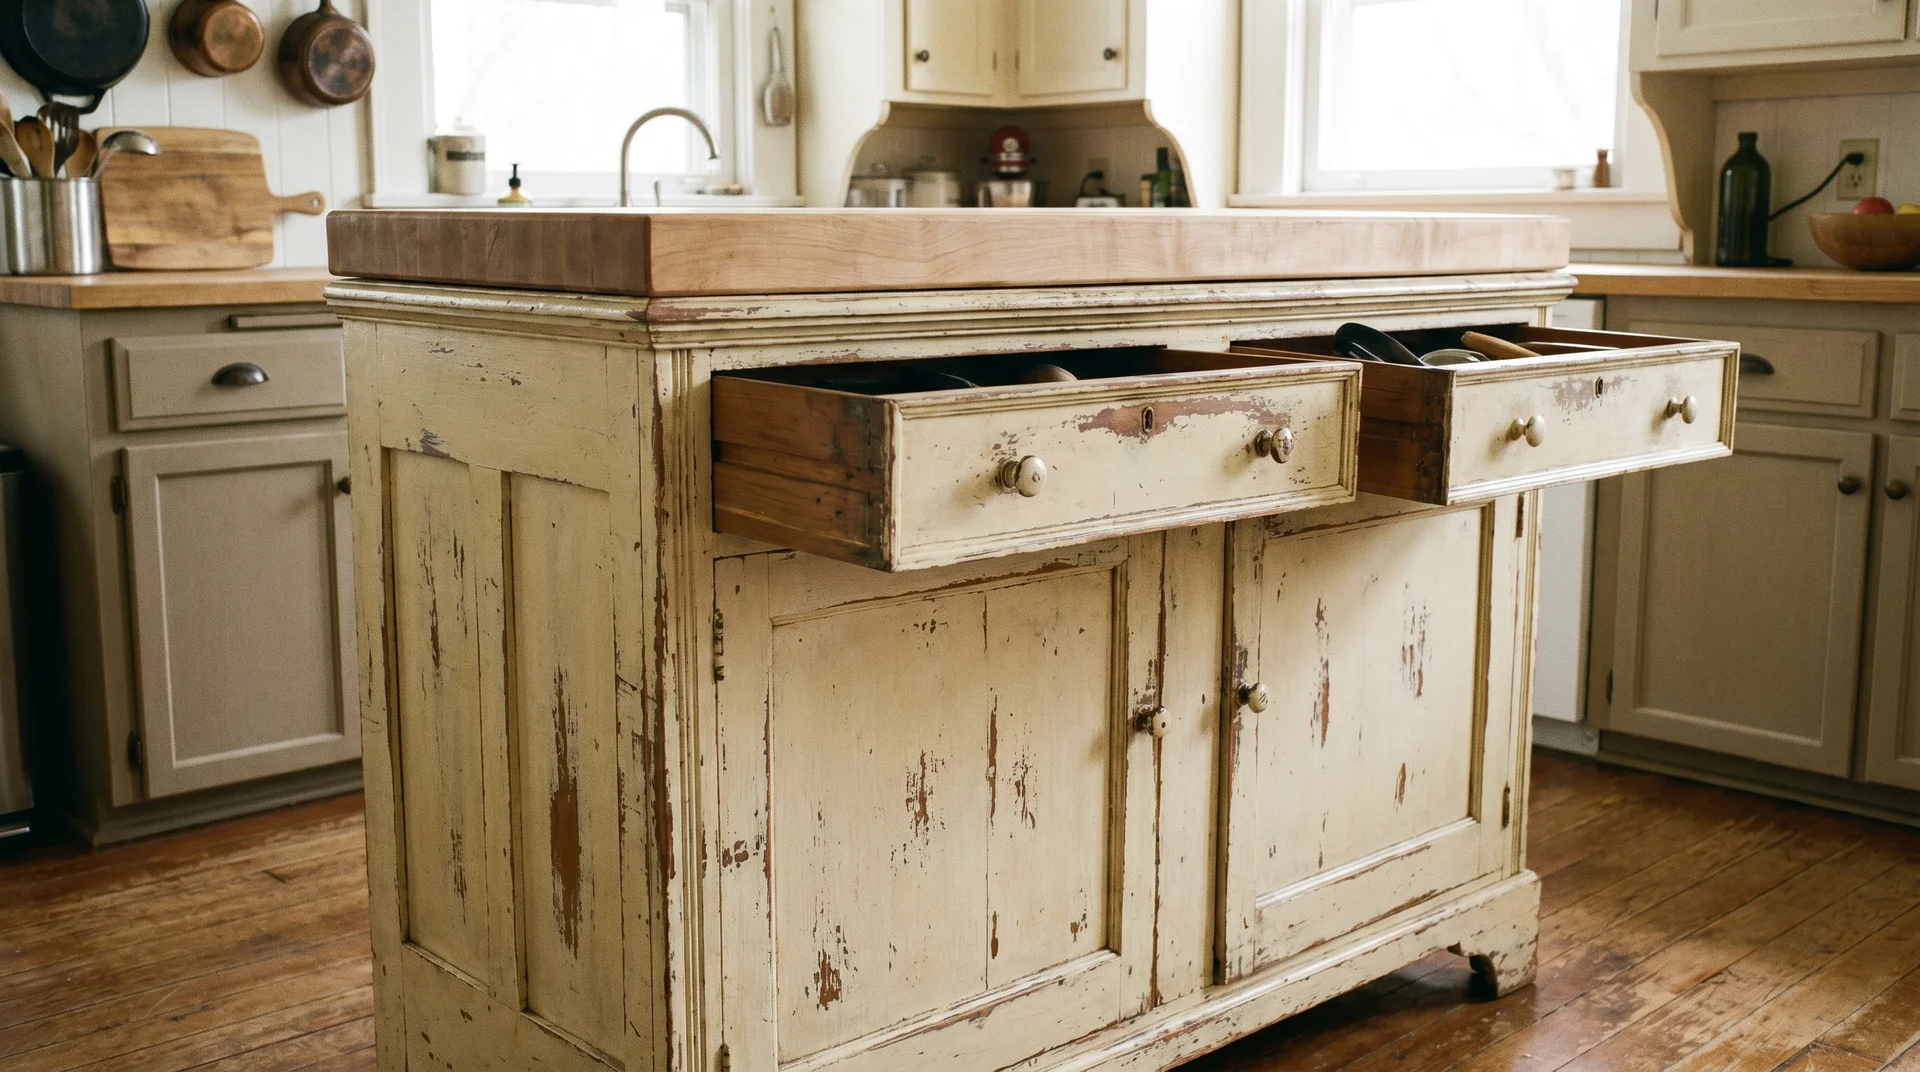
The higher-storage alternative to the farmhouse table island, with the widest budget range of any idea here.
A sideboard or server used as an island works in kitchens where a full built-in would violate clearance. The storage depth is better than a dining table, and the surface height is closer to counter height. Both factors matter in a space that carries prep work.
Check the drawer slide quality before purchasing. Original antique drawer slides are often wooden and built for lighter use than a daily working kitchen. Retrofitting with modern metal slides is straightforward.
The cost is low. Skipping it becomes frustrating within a year.
The constraint is where the real decision lives here. A sourced piece at $200 to $400 from an estate sale requires more evaluation at purchase.
A dealer piece at $1,500 and up typically arrives in better condition.
The budget determines which kind of vetting you’re doing, not which outcome you get.
Kitchen Island Hardware Ideas
Hardware is where the farmhouse look either lands or reads as generic.
More hardware options don’t help here. One metal family, consistently applied across every pull and knob on the island, is what makes the look land. I’ve documented enough real kitchen choices to know the pattern: mixing hardware families makes a well-specified base look unfinished.
For finish selection, sizing, and how to resolve the metal hierarchy across the whole kitchen, the cabinet hardware guide covers each decision point in full.
Read: How to Choose Kitchen Cabinet Hardware?
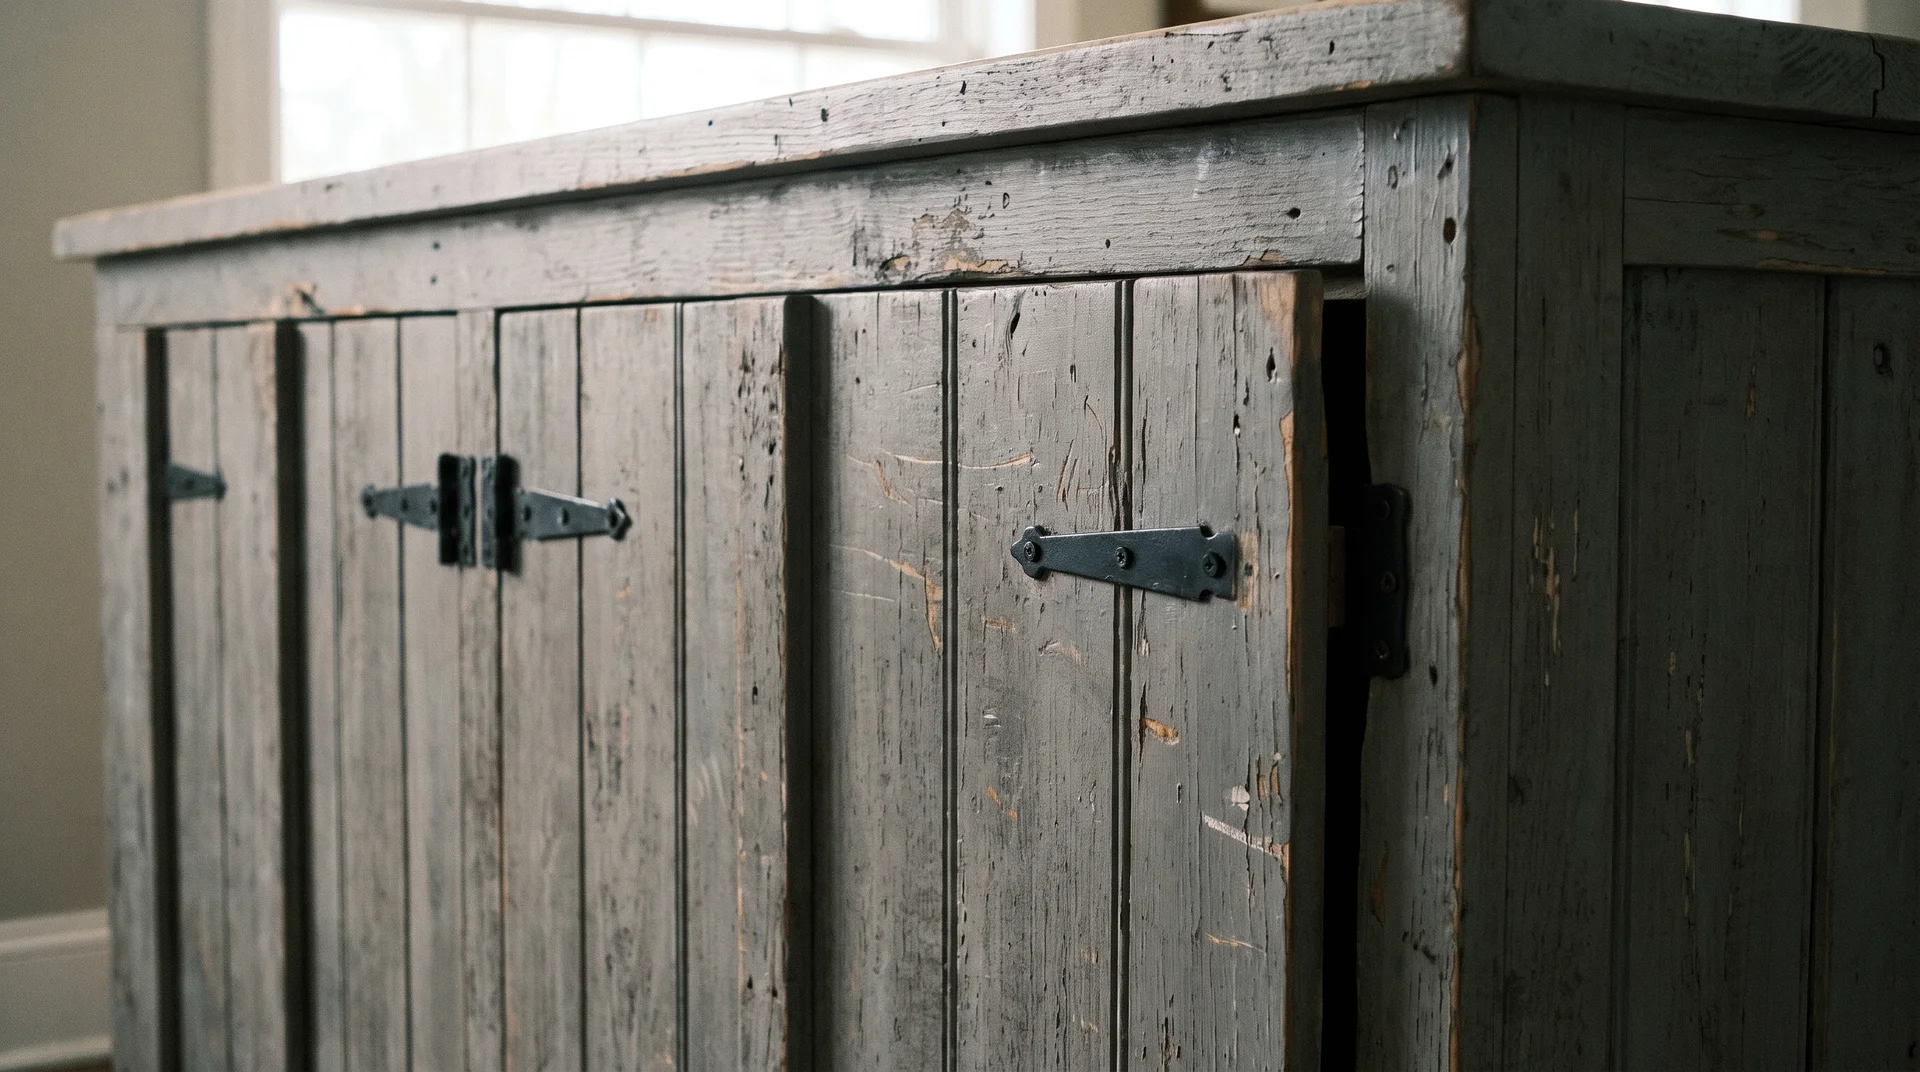
Black Iron Bin Pulls
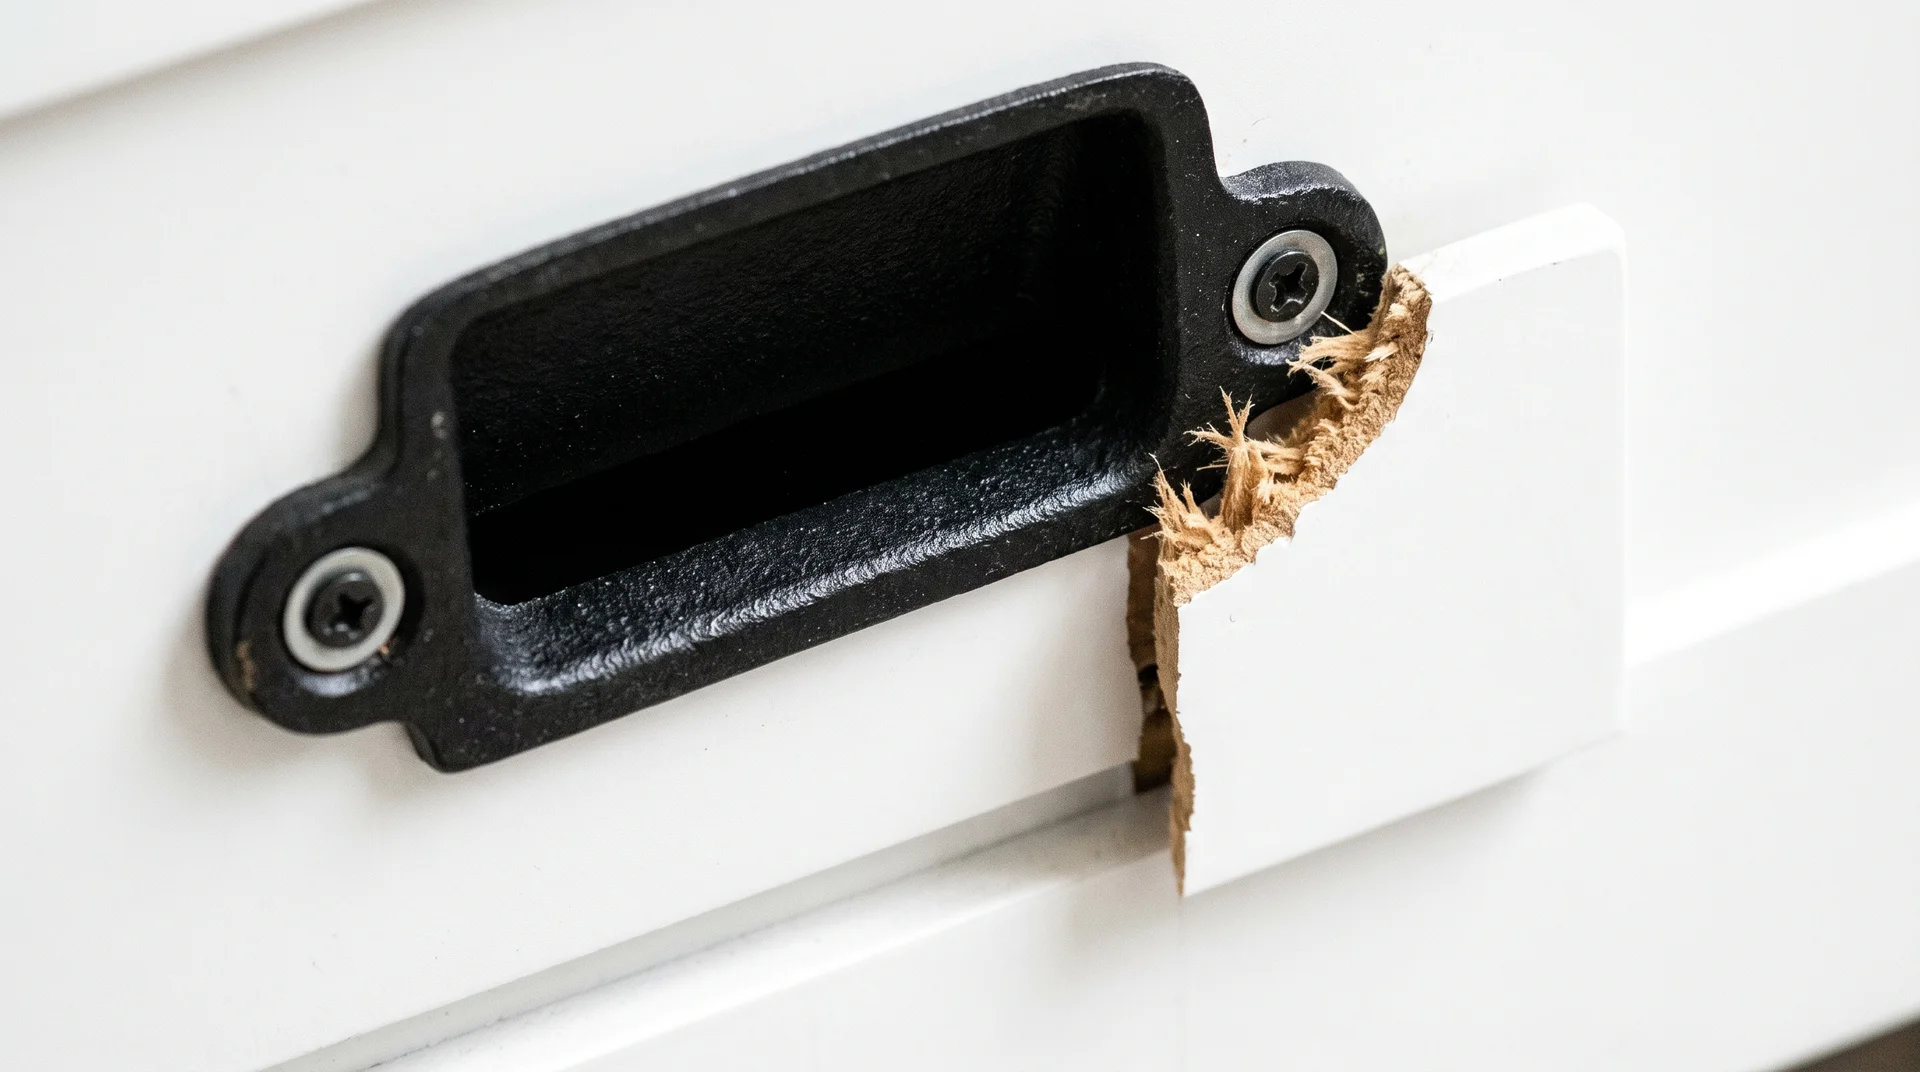
The hardware most associated with modern farmhouse, and the one most often specified for the wrong door material.
Black iron bin pulls work on white, navy, and wood-tone island bases. The visual weight reads well at island scale. It’s heavy enough to register on a large cabinet panel.
The problem is usually the door, not the pull.
Bin pulls exert more stress on a cabinet door than cup pulls or knobs. The geometry creates leverage at the screw points. MDF doors, or medium-density fiberboard doors, need a reinforcing plate behind the screw location if the door is thin.
A pull that installs cleanly can loosen within six months on an under-reinforced door. Confirm the door material and thickness before specifying the pull.
Unlacquered Brass Hardware

Unlacquered brass develops a natural patina within months of regular touching. That aging process is the entire point of choosing it.
Lacquered brass stays uniformly bright and reads more contemporary. Unlacquered brass darkens where hands touch it daily and stays lighter in the recessed areas. The result after a year of use looks like it has always been in that kitchen.
That’s the goal.
The most common conflict point is unlacquered brass island hardware paired with stainless steel appliances. Warm metal against cold metal reads unresolved in many kitchens. Lean into the contrast deliberately, or choose brushed gold, which bridges the two finishes.
I’ve sourced enough vintage brass at flea markets to know that found patina reads differently from new unlacquered patina. The found piece almost always looks more convincing.
A deeper hardware sourcing guide for farmhouse kitchens is something I’m building separately. I’ll link to it when it’s live.
Handmade Ceramic Knobs

Period-correct and available in both production and handmade versions. The difference between them is immediately felt on daily contact, not just seen.
Handmade ceramic knobs are heavier than production versions. The glaze has more variation: slight color shifts, texture at the edges, and small imperfections that read as hand-produced. Production ceramic knobs are more uniform.
Both are correct choices. The question is whether you want the knob to read as handmade or manufactured.
I make my own ceramic drawer pulls in a pottery class when I can get a slot. Working with the material has taught me one consistent thing. The weight in your hand at first contact tells you whether a pull is well-made.
A knob that feels substantial now will still feel that way in five years. One that feels light and hollow won’t. That difference doesn’t show up in a product photo.
Technical note: confirm the post length matches your door thickness before ordering. Most handmade ceramic knobs use a 1-inch post. Standard cabinet doors are 3/4 inch.
A spacer corrects the gap. Most buyers don’t know to ask for one when ordering, and the knob sits incorrectly until they do.
Decorative Corbels on the Seating Overhang

Corbels are the decorative brackets under a cantilevered countertop overhang, and most people install them expecting structural work.
They don’t do structural work. The support of a cantilevered overhang comes from the substrate: the plywood, stone, or countertop material itself.
Corbels are visual. They signal farmhouse or craftsman style and complete the look of a seating overhang.
If the overhang is bowing or cracking, replacing or adding corbels will not fix it. The substrate is the problem. That’s a conversation with a fabricator, not a hardware order.
I’ve seen this misunderstanding on nearly every corbel installation I’ve been called in to review. Install corbels because they look right for the kitchen. Don’t expect them to hold the counter up.
Kitchen Island Seating Ideas
Seating at an island is a spatial decision before it’s an aesthetic one.
The stool height, the number of seats, and the overhang clearance all depend on island dimensions. What looks right in a photograph has nothing to do with it. Most farmhouse island seating mistakes happen before a single stool is purchased.
NKBA, the National Kitchen and Bath Association, requires 24 inches of counter space per seated person. The minimum overhang for comfortable knee clearance is 12 inches. Both numbers apply before any stool is selected.
For a fuller breakdown of counter-height versus bar-height versus dining-height dimensions, this reference on table and counter heights covers the full range.
Read: How High is a Counter Table?
Counter-Height Stools for Standard Islands
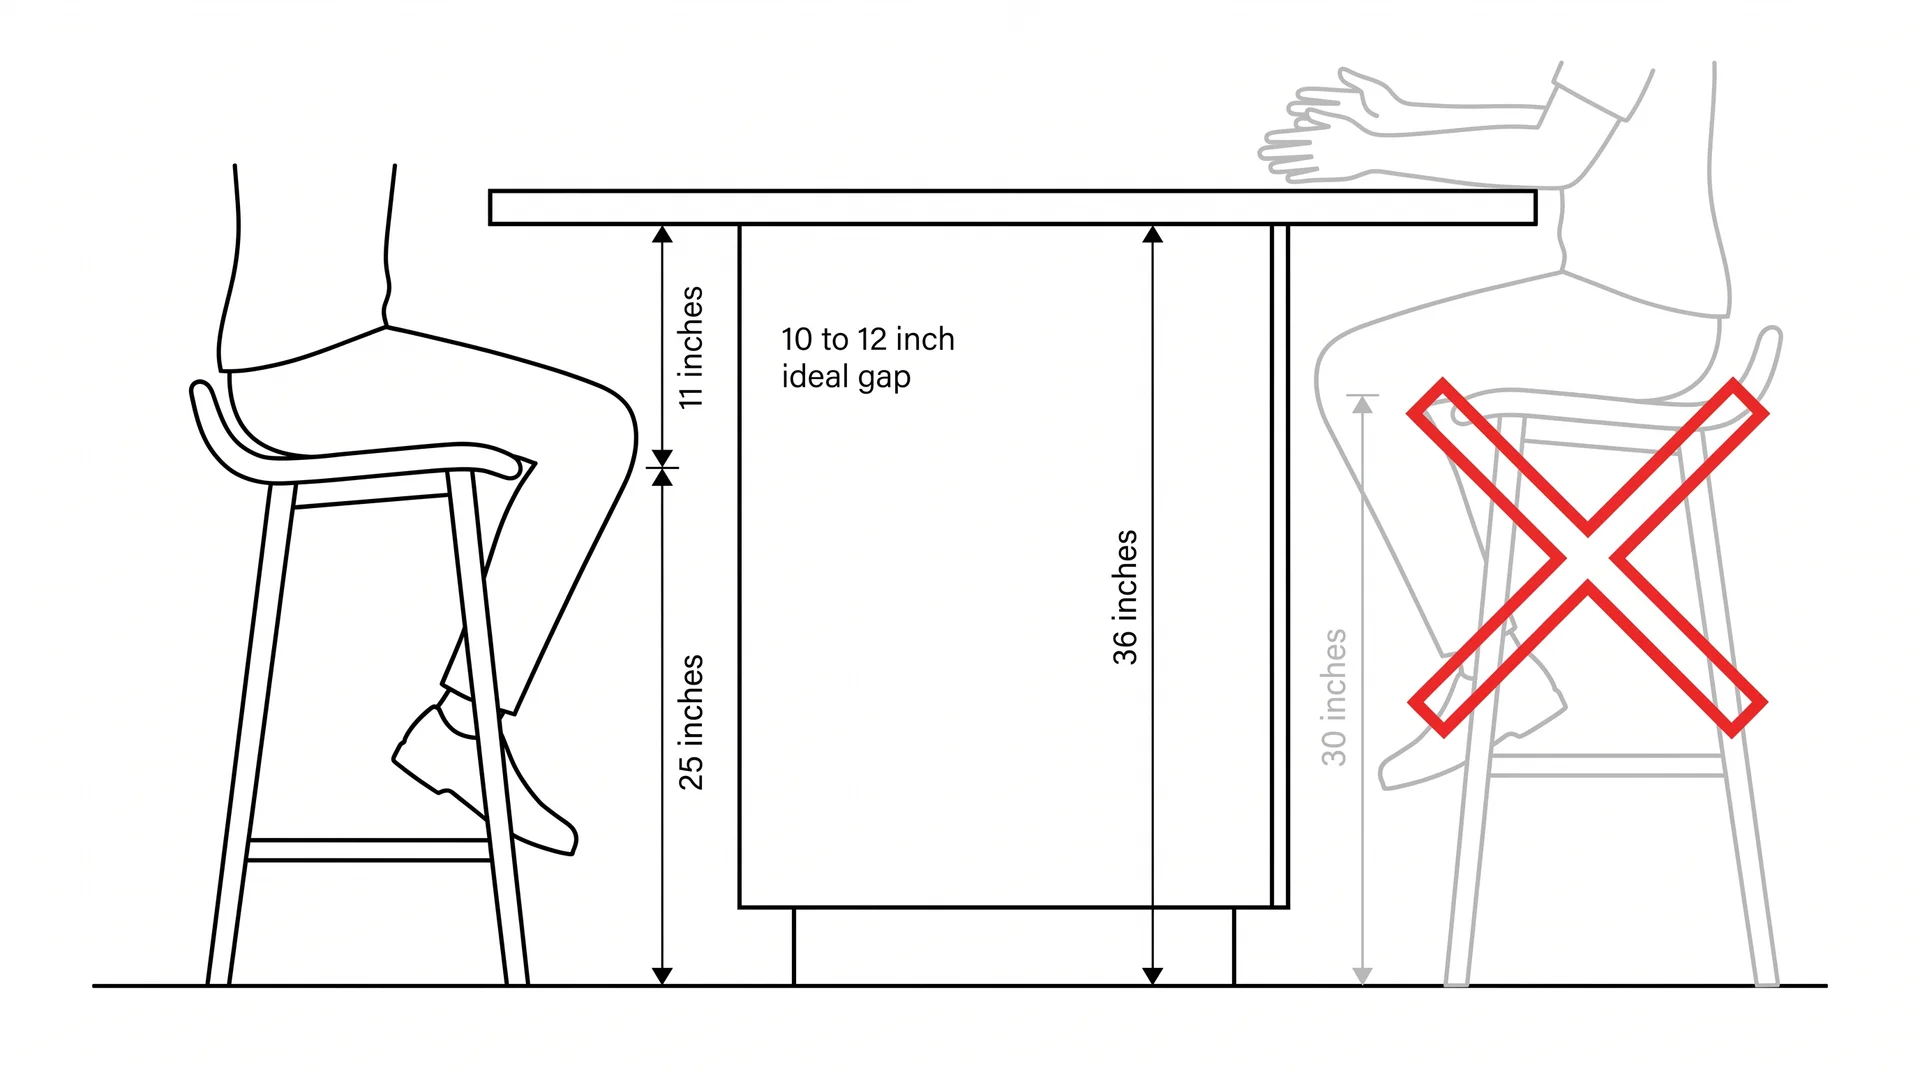
Standard kitchen islands sit at 36 inches, and they require counter-height stools, not bar-height stools.
Counter-height stools have a seat height of 24 to 26 inches from the floor. Bar-height stools have a seat height of 28 to 30 inches. Retail labels are inconsistent.
Measure the island height and choose a stool seat that sits 10 to 12 inches below the counter surface. The label doesn’t tell you that. The dimension does.
A stool set too high puts the seated person’s arms above the counter surface. A stool set too low jams their thighs underneath it.
Bar-Height Stools for a Raised Overhang Section
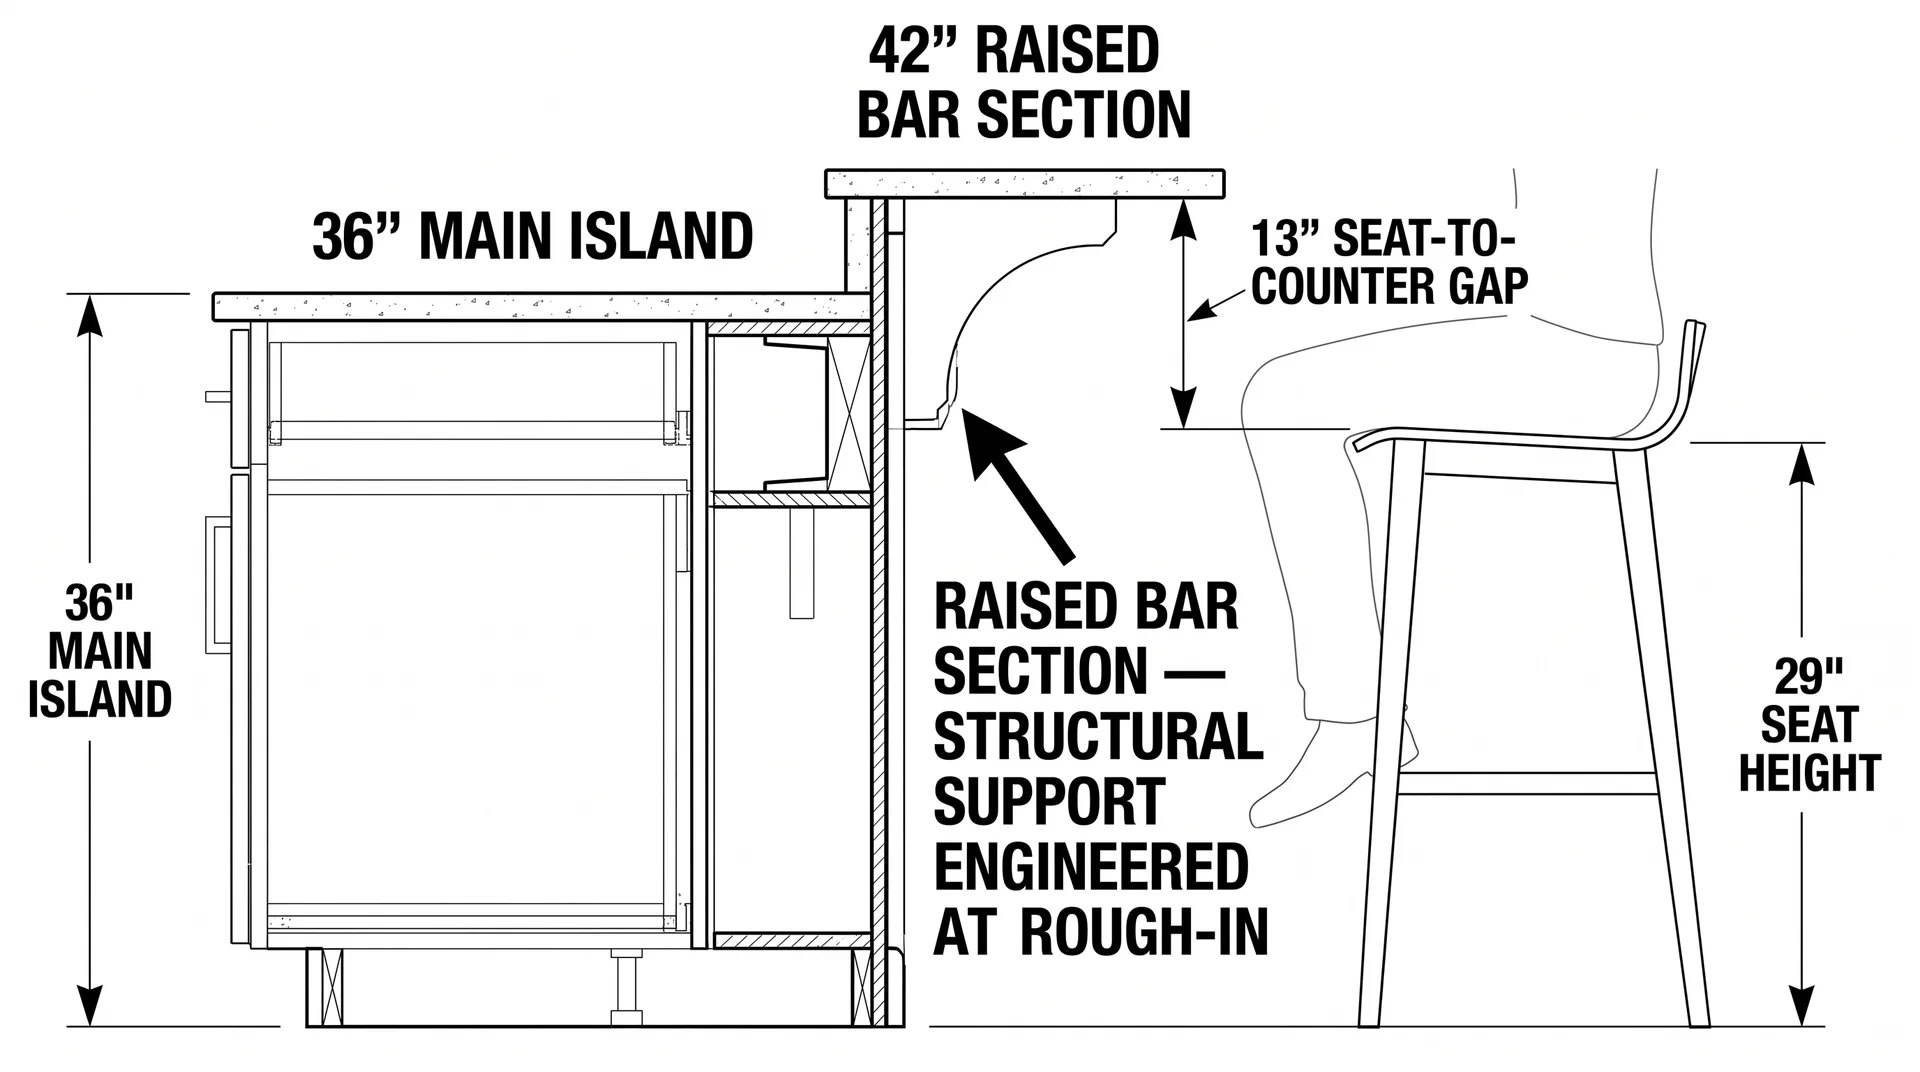
A 42-inch raised section on the seating side takes bar-height stools at 28 to 30 inches.
The raised section serves a functional purpose beyond the look. It screens the cook’s prep surface from the seated area. It hides the active mess of cooking from anyone sitting at the island.
In a kitchen that opens to a dining or living space, that screen matters.
Execution requirement: a 42-inch raised counter section is not simply a taller cabinet top. The structural support for that height has to be built into the island design.
That happens at rough-in, not after the base is built. It has to be part of the original specification.
Woven Rattan or Natural-Fiber Stool Seats
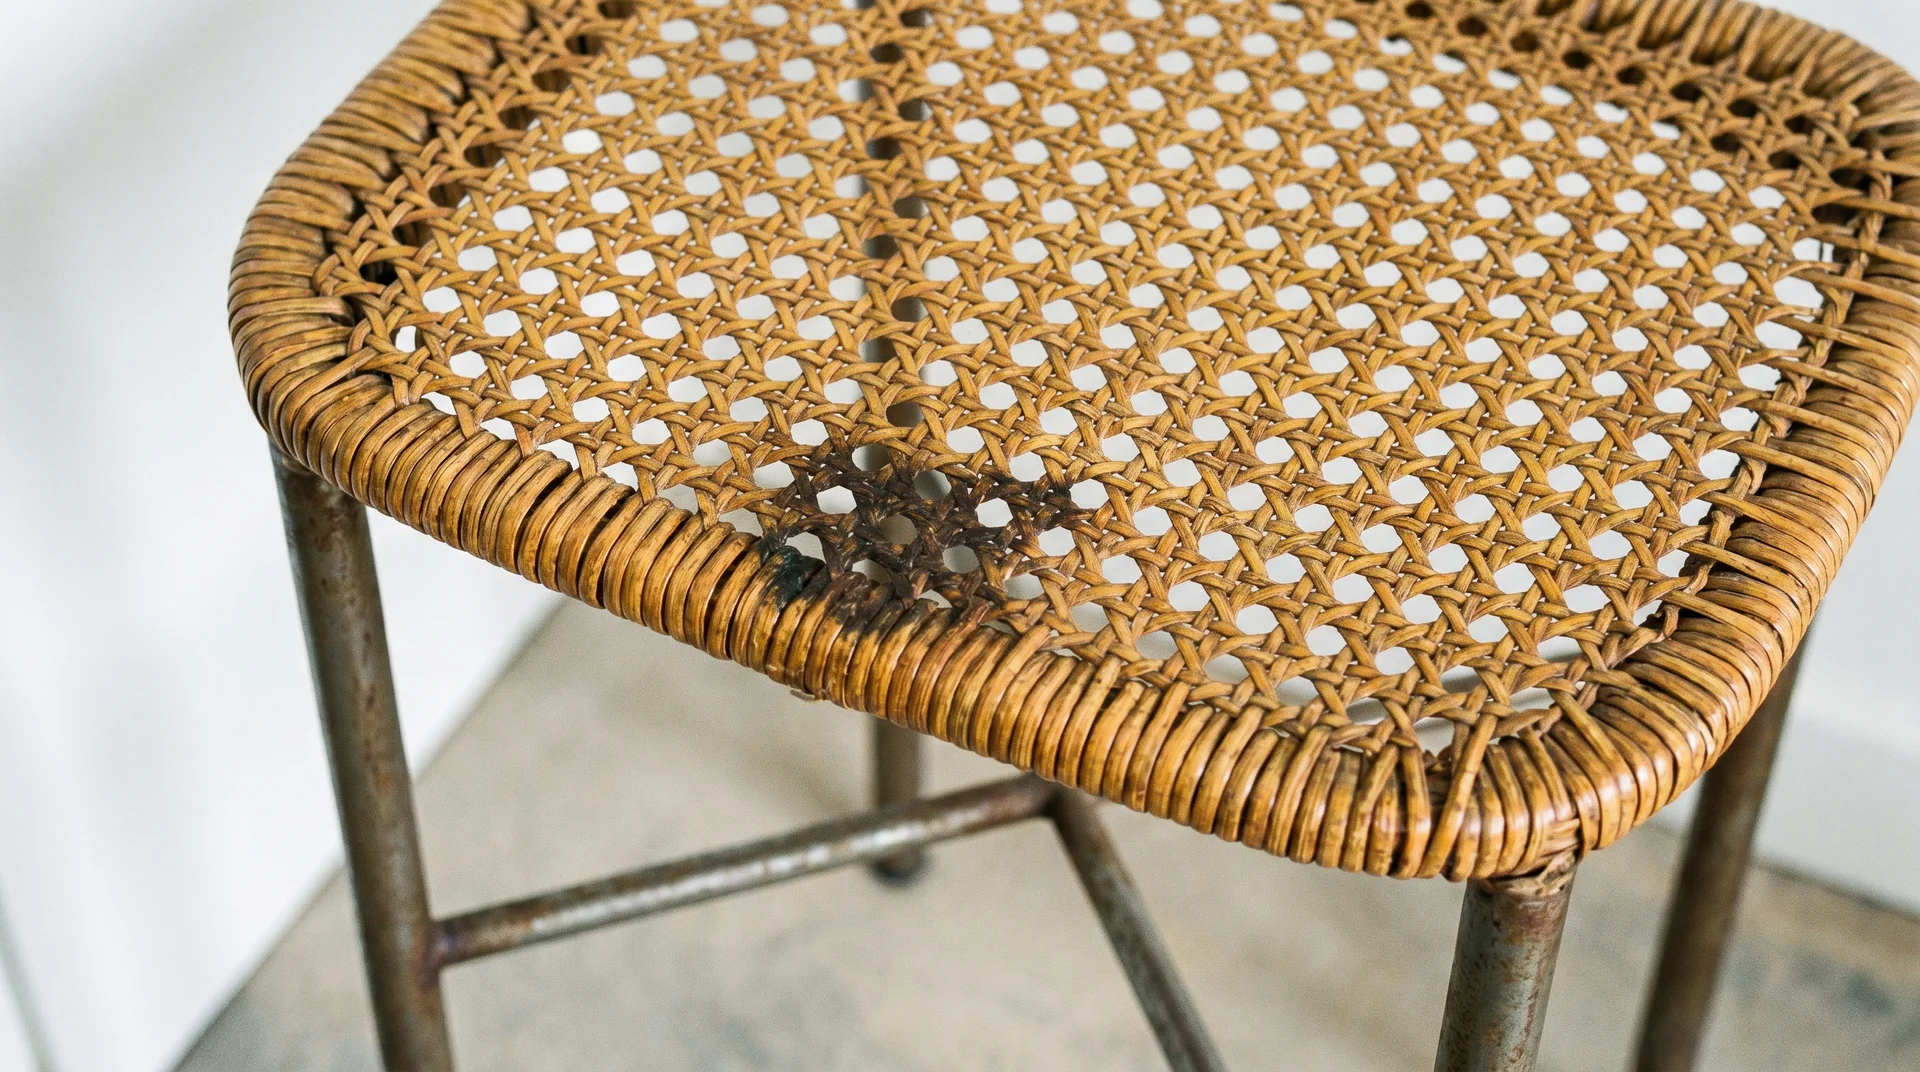
The seat material signals farmhouse faster than any stool leg style or finish.
A rattan or woven seagrass seat on a painted wood or metal leg reads farmhouse at a glance.
An upholstered seat in any fabric reads more contemporary. A plastic seat reads wrong regardless of what the legs are doing.
The seat surface carries the visual classification.
Maintenance note: natural fiber seats in a working kitchen need either a waxed or sealed surface or a removable cover.
Untreated rattan and woven seagrass absorb cooking grease and are difficult to clean once saturated. Know which finish you’re purchasing before the stools arrive.
A Single Long Bench Along the Island End
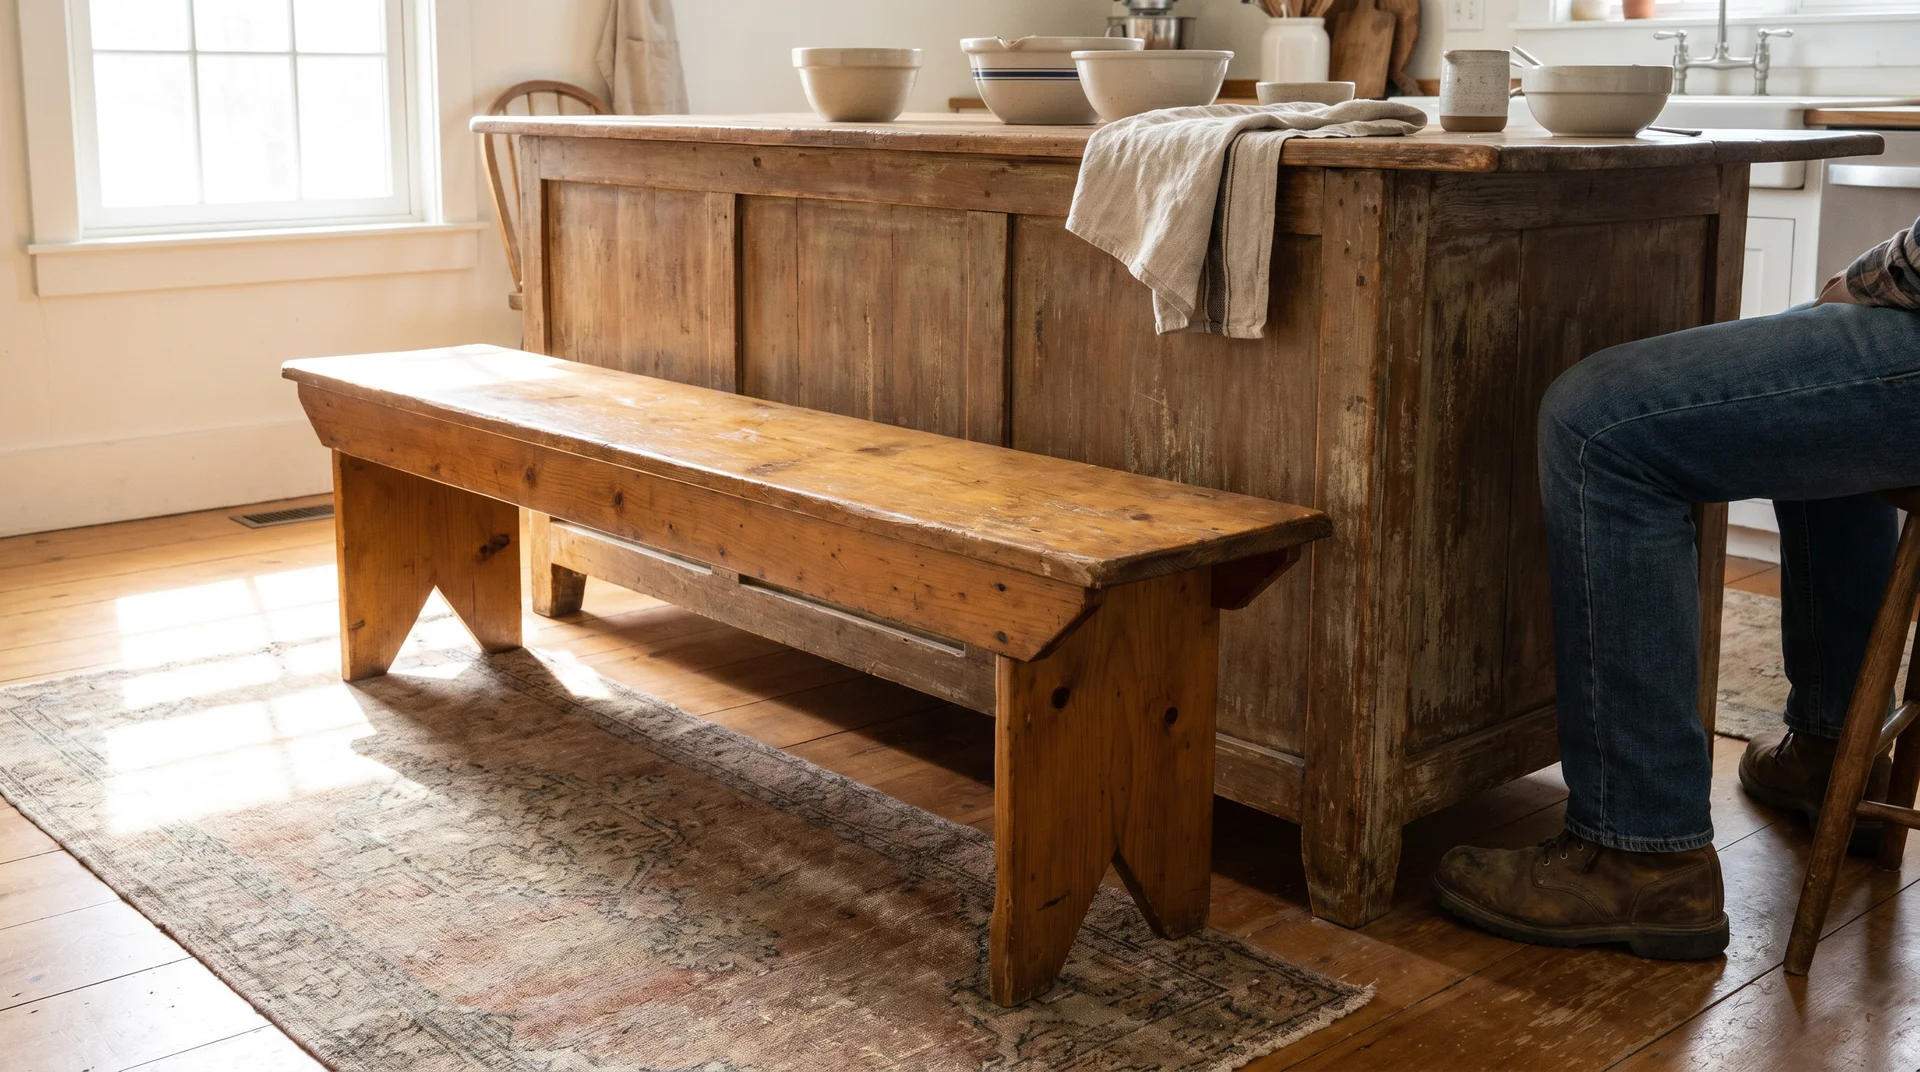
A bench at one short end of the island instead of a row of stools along the long side.
- This works best on furniture-style islands at table height, 30 inches, rather than counter height, 36 inches.
- A bench at a 36-inch island requires a seat height of 24 to 26 inches. That height makes getting in and out awkward for most adults.
At a 30-inch table-height island, a standard bench seat works correctly.
Clearance check: the bench legs must sit far enough back that a seated person’s knees clear the island base. Twelve inches of knee clearance under the overhang is the minimum for comfortable use. Measure this before buying or building the bench.
Storage and Layout Ideas: Earning the Island’s Footprint
An island earns its floor space when it makes the kitchen work better.
If the island is only providing counter surface, it’s a large object to navigate around. These five ideas are about storage configuration and layout decisions.
Every configuration below still has to clear those NKBA aisle minimums before any aesthetic decision applies.
Barn Door-Style Panels on Island Ends
A recognizable farmhouse identifier on island ends, and almost always decorative rather than functional in practice.
Real sliding barn door hardware on an island end travels along a 4-to-6-inch track. It catches on adjacent cabinet faces when opened fully. In practice, most installations use fixed panels designed to look like barn doors.
The aesthetic is achieved. The actual sliding function is not present. That’s not a problem. It’s useful to know before ordering hardware.
I’ve seen functioning barn door hardware on an island end exactly once. That client needed 8 inches of clear travel space they hadn’t anticipated.
If you want the visual without the mechanism, a skilled carpenter can build a fixed panel that reads identically. Know which one you’re specifying.
Full-Depth Drawer Bank on the Work Side
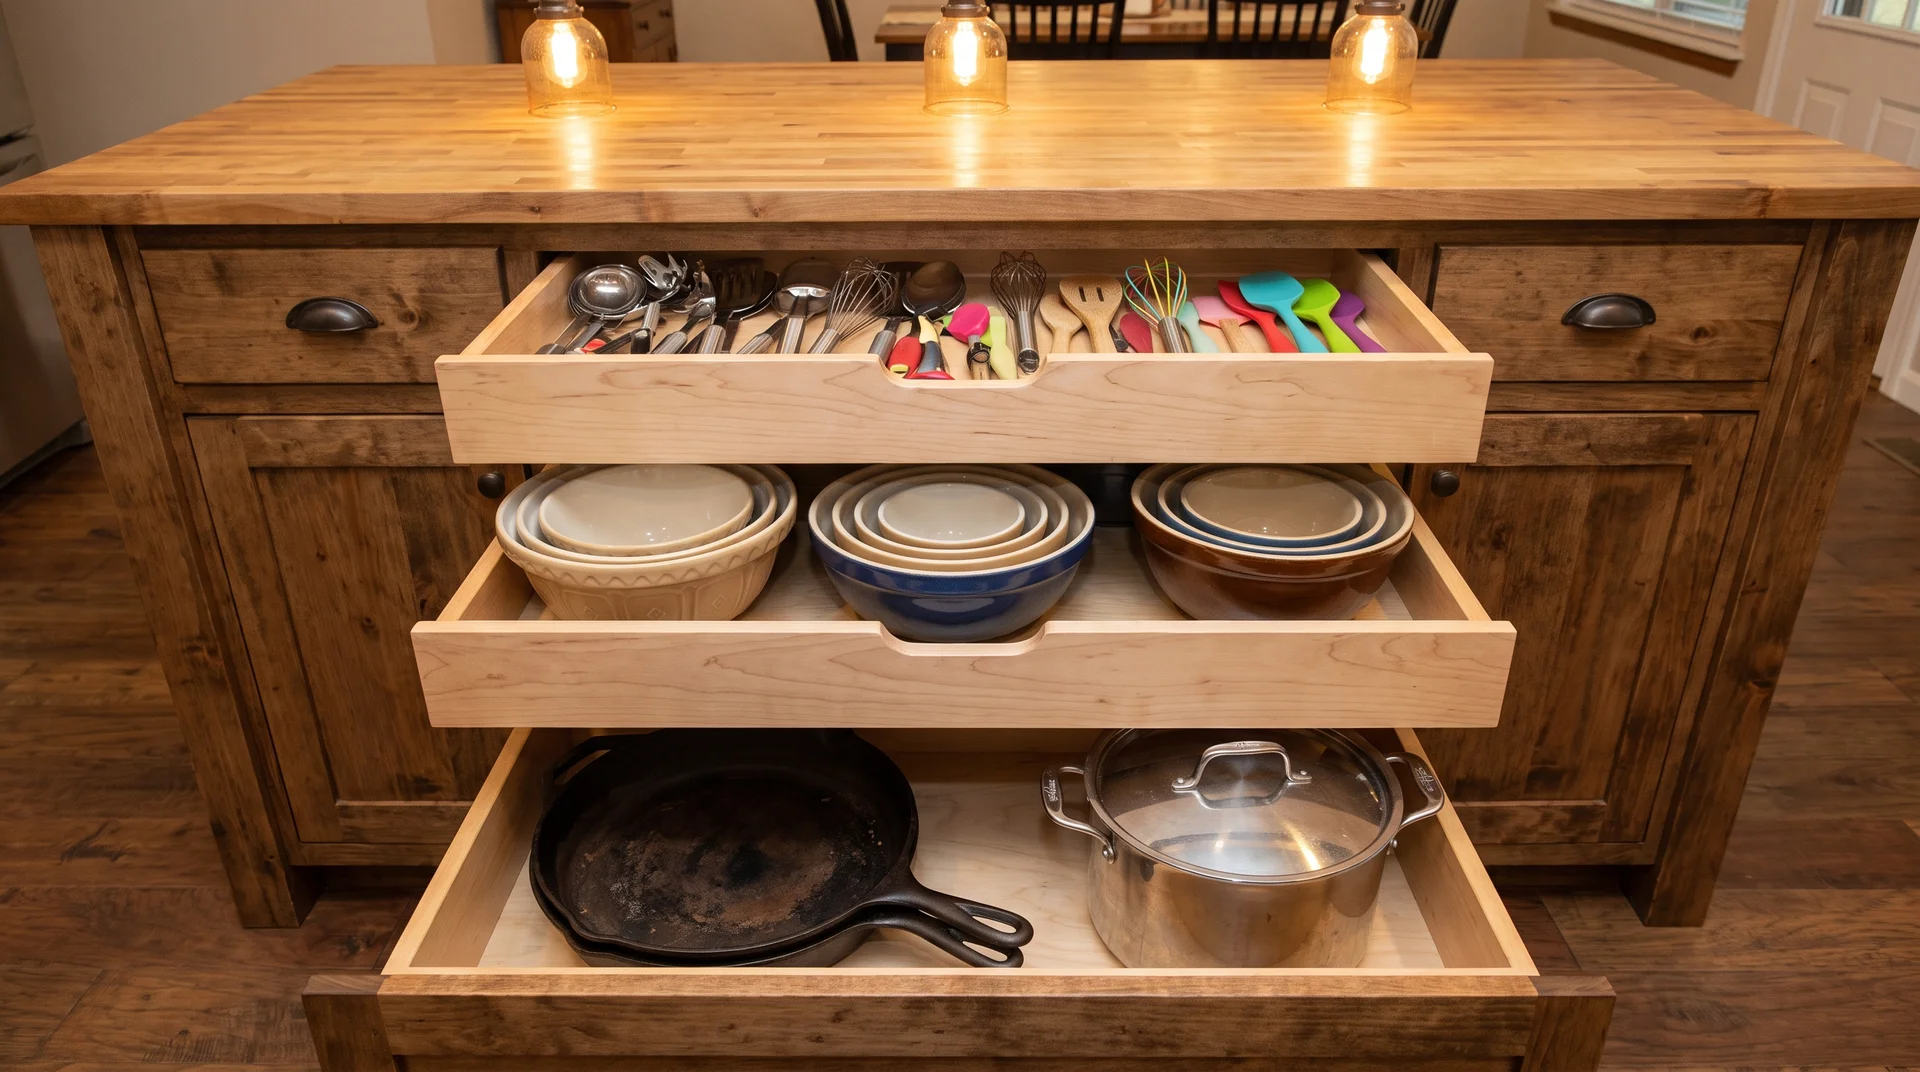
A full-depth drawer bank on the cook-facing side is what most working cooks wish they had specified sooner.
Drawers show you everything when opened. Cabinet doors with interior shelves require crouching, reaching, and moving items to find what’s behind other items. In a kitchen used daily for real cooking, the ergonomic difference between those two access patterns accumulates fast.
I’ve watched clients choose cabinet doors on the work side based on cost, then regret it within months. The drawer bank costs more in most configurations. It’s the one specification I would argue for in almost every working kitchen, regardless of budget.
The constraint is real. So is what happens when you don’t solve it.
Woven Basket Shelving on the Seating Side
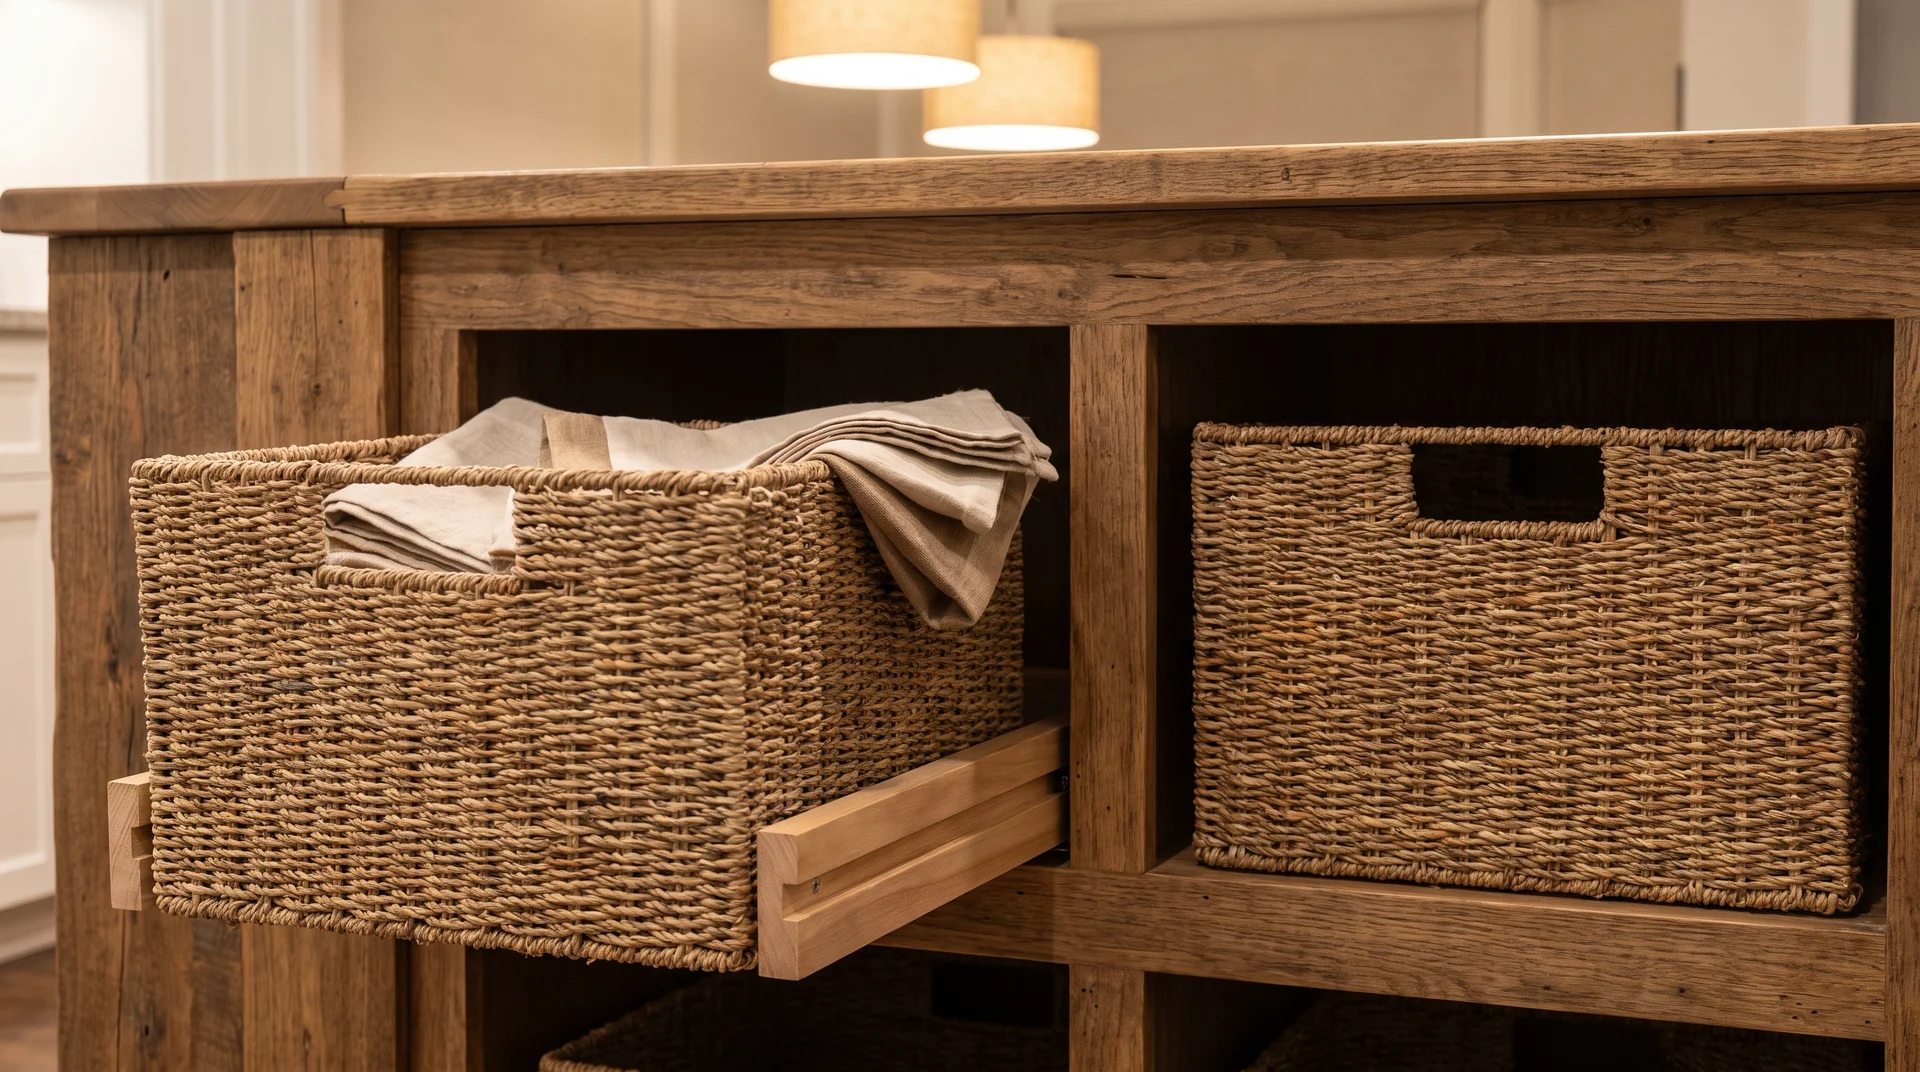
Open shelves with woven or wire baskets on the seating-facing side of the island.
The farmhouse pantry version of open island storage. The basket contains the clutter that open shelves accumulate.
It’s easier to maintain than open shelving because you pull out a basket rather than style a visible surface weekly.
Sizing: leave at least one inch of clearance on each side of the shelf opening. A basket that fits flush-to-edge is difficult to remove cleanly when loaded.
Integrated Microwave Drawer in the Island Base
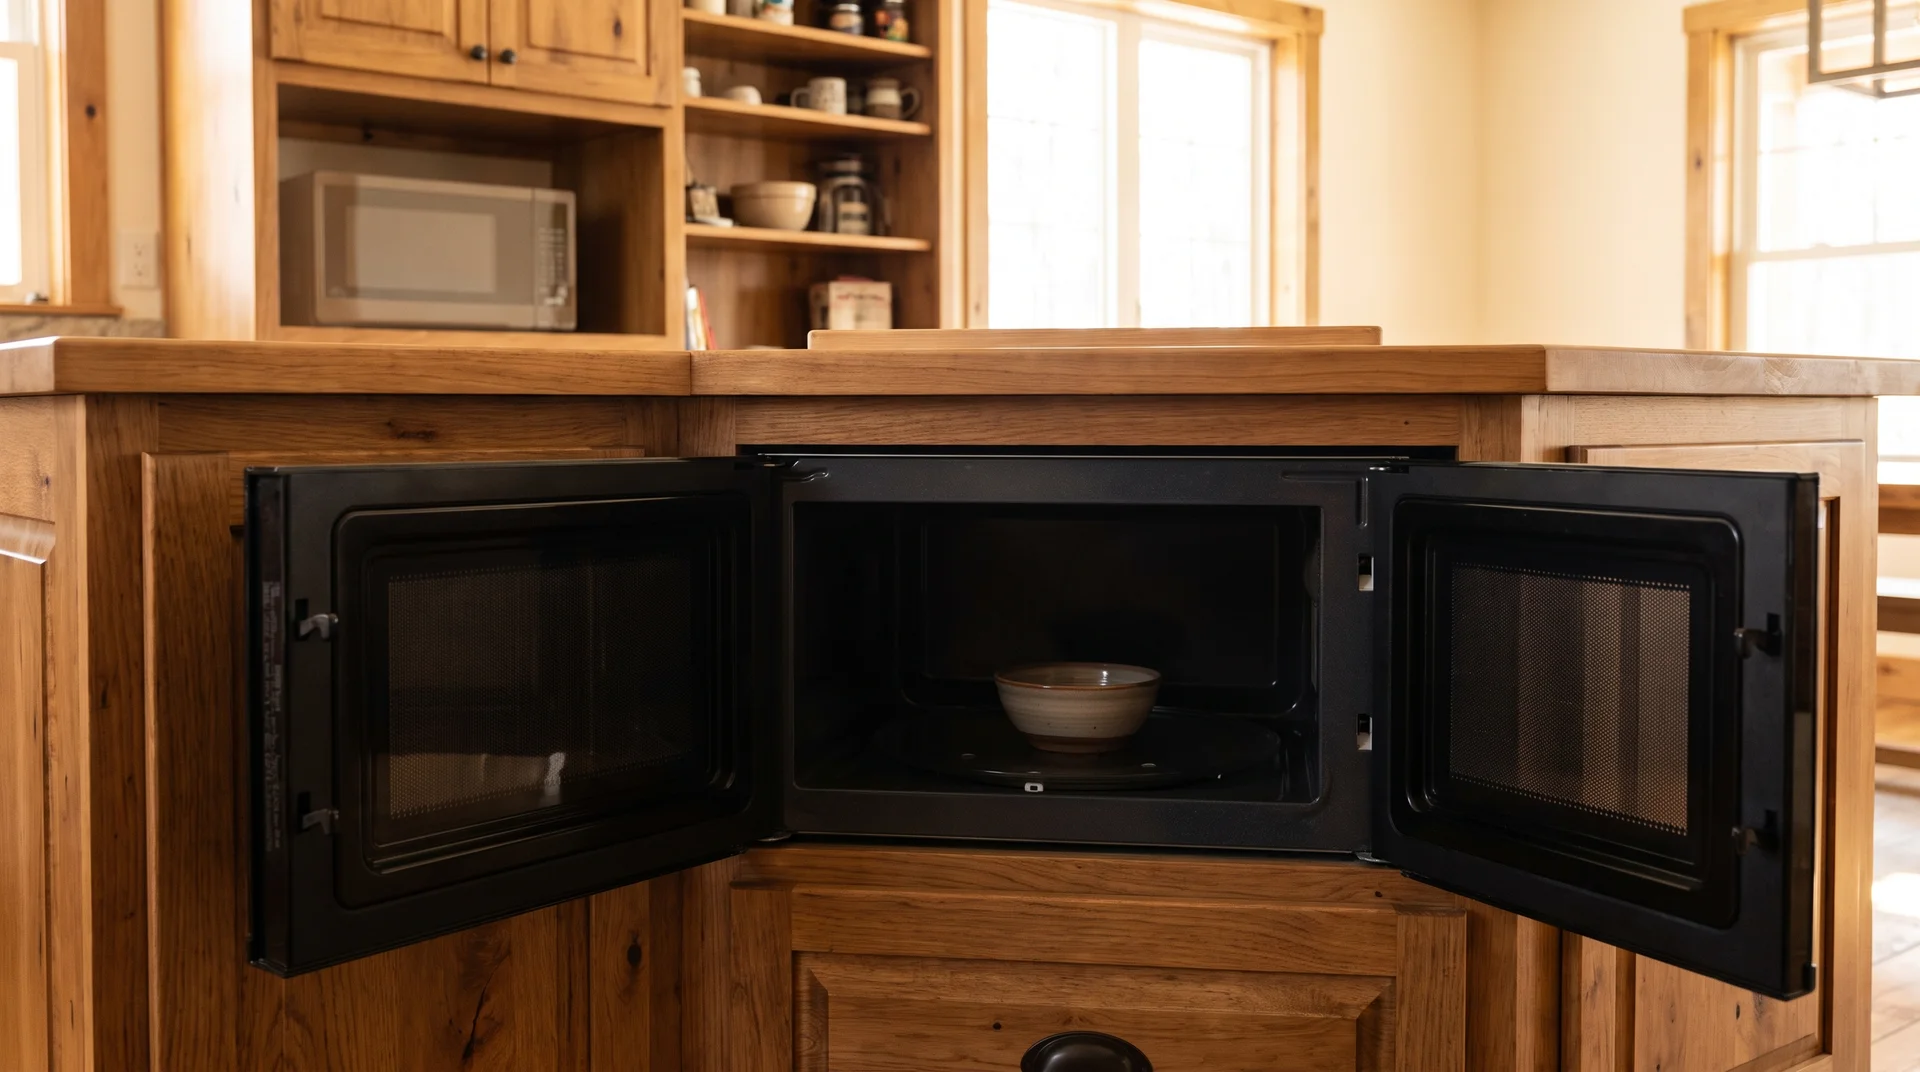
Hiding the microwave in the island base frees a full counter run and upper cabinet space in a single decision.
The island countertop stays clear. The upper cabinet space that would have housed the microwave becomes general storage. The island becomes the prep and cooking hub rather than a prep surface near a microwave mounted somewhere inconvenient.
It’s the renovation addition most clients wish they had made sooner.
A microwave drawer needs a dedicated 15-amp circuit run to the island. Any island over 12 by 24 inches already requires an outlet under National Electrical Code (NEC). The dedicated microwave circuit is the additional step.
It must be planned at rough-in, before the cabinetry is installed. This is not a decision to defer to the finish stage. The cost to add it afterward is significantly higher than the cost to plan it in now.
The Freestanding Farmhouse Table Island

When a fixed island violates NKBA clearance minimums, the freestanding farmhouse table is the practical solution.
Table height is 30 inches. Counter height is 36 inches. Working 6 inches lower changes how prep work feels.
| Task | Counter Height (36 in) | Table Height (30 in) |
|---|---|---|
| Sustained knife work | Standard posture | More effort; shoulder angle is lower |
| Rolling dough, pressing | Standard | Actually easier; gravity helps |
| Casual prep, peeling | Standard | Fine for most tasks |
Know which tasks your kitchen does most before committing to this trade-off.
A vintage farm table from an estate sale or flea market is the authentic version of this piece. Reproduction manufacturers now sell it for $800 to $1,200. A real estate-sourced piece runs $200 to $400, and is typically sturdier than the production alternatives.
The patina is already there. You’re not paying to have it applied in a factory.
For anyone planning to build rather than source, the farmhouse table plans guide covers wood selection, joinery, and the sizing decisions that make a table work as a daily prep surface.
Read: Interesting Farmhouse Table Plans
The freestanding option also solves the permanence question. A table island requires no installation and no permits. If the kitchen layout is still evolving or you’re renting, that flexibility is worth more than it sounds.
Ceiling-Mounted Pot Rack Above the Island
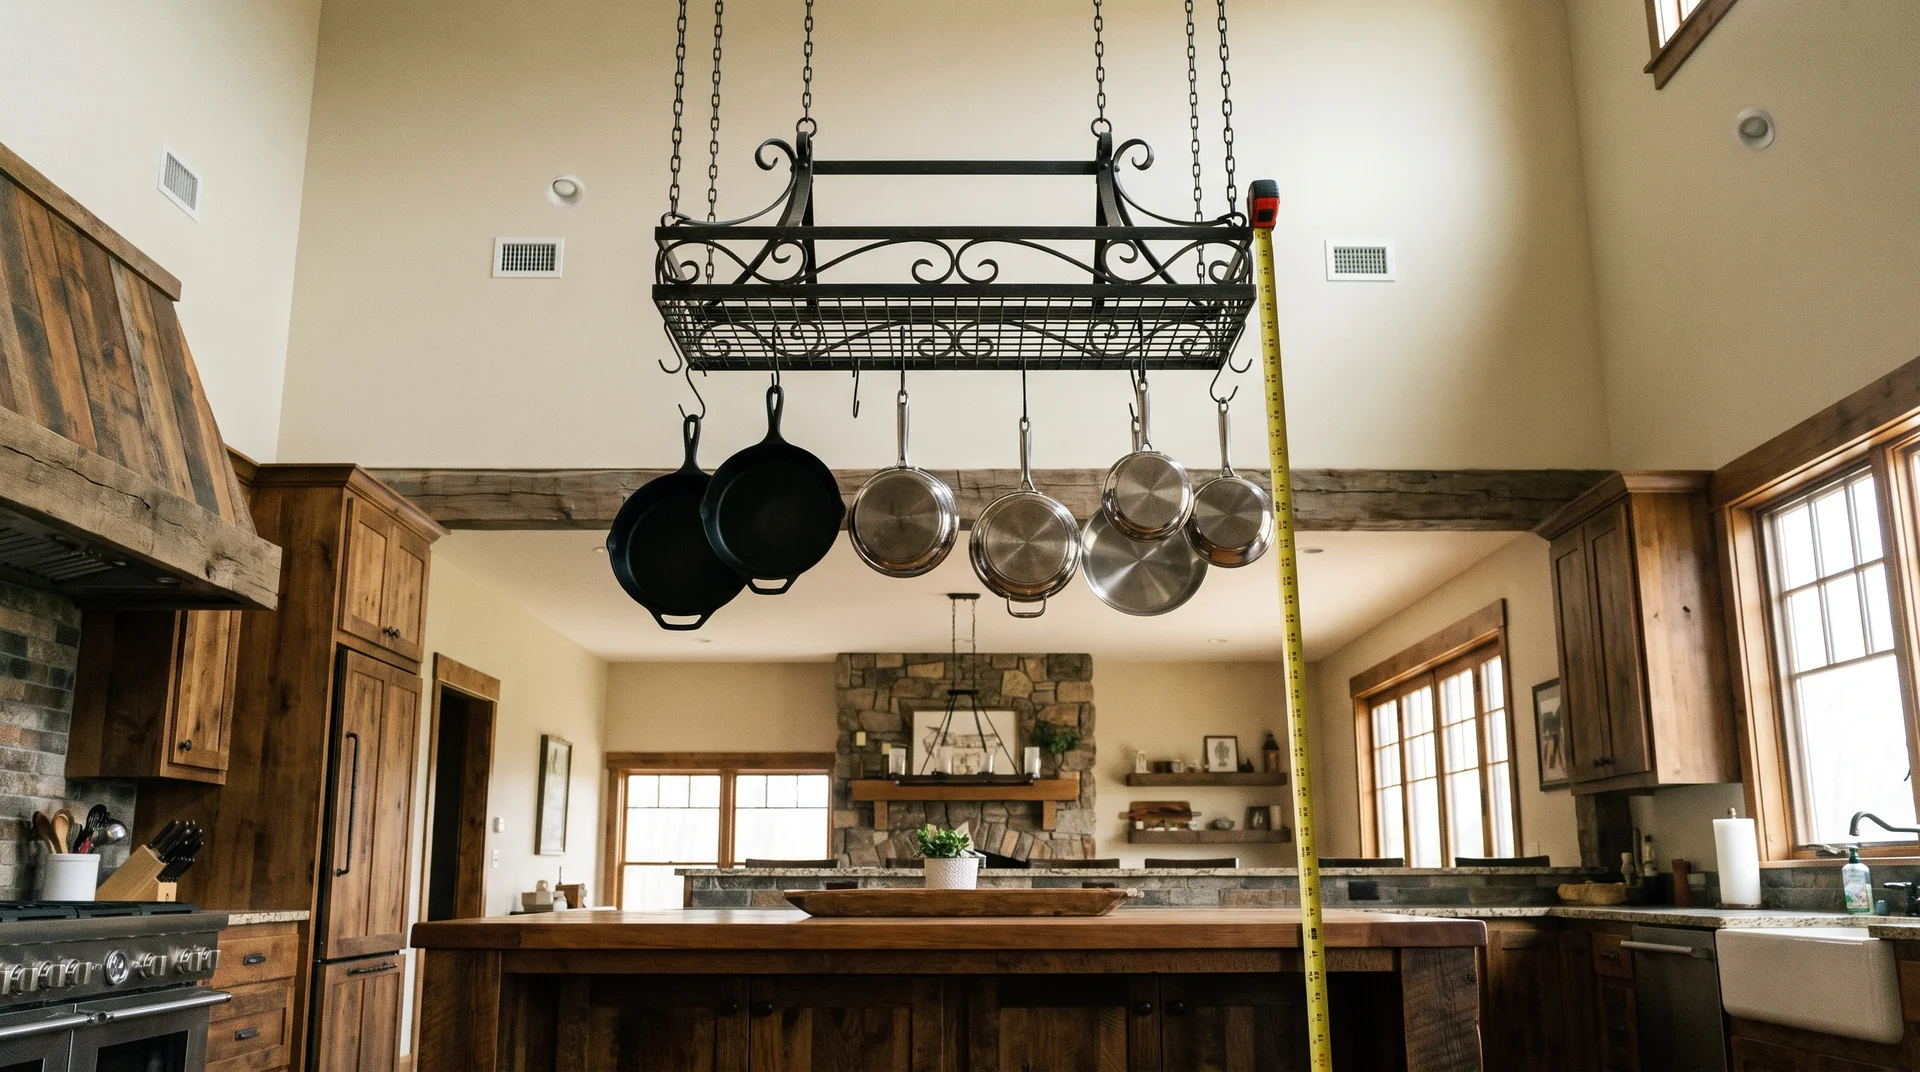
A pot rack centered above the island has the clearest functional payoff of any idea on this list.
Pots move out of cabinet storage and into arm’s reach above the prep surface. The visual effect anchors the island in the room. In a farmhouse kitchen, a ceiling-mounted pot rack reads as part of how the room works.
Clearance requirement: 7 feet minimum from the floor to the bottom of the hanging pots. An 8-foot ceiling is the practical minimum for this to work comfortably. The rack must anchor into a ceiling joist or structural beam.
Drywall anchors are not suitable for suspended pot load.
The lighting plan also has to account for the rack. A rack centered below existing recessed fixtures will block light at the exact point you’re trying to illuminate. Plan the fixture locations and the rack location at the same time.
I’ve recommended pot racks in kitchens with 8-foot ceilings and heard almost nothing but satisfaction a year later. The planning is the work. The result takes care of itself.
Integrated Prep Sink in the Island Countertop
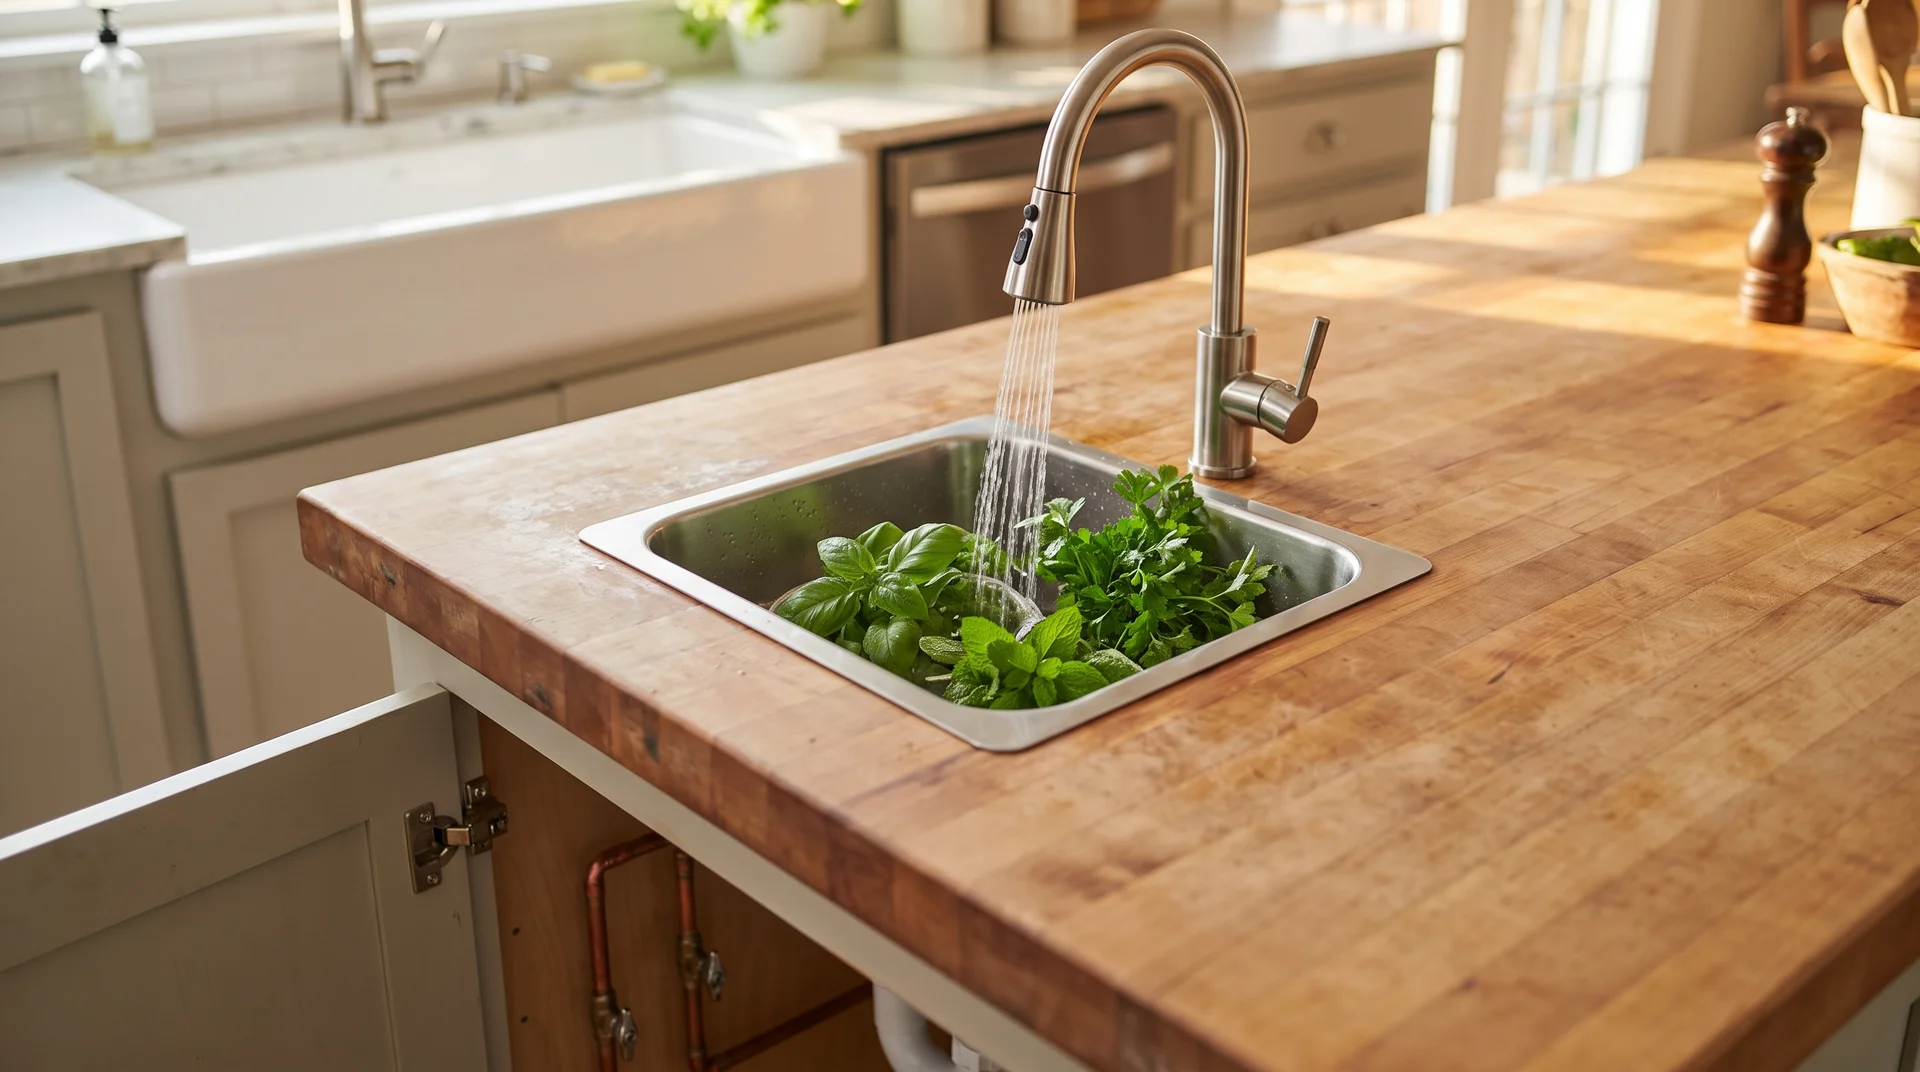
A second, smaller sink in the island surface is the addition most likely to change how the kitchen actually functions.
The main sink becomes the washing and cleaning station. The island prep sink becomes the rinsing, vegetable prep, and task workspace. The bottleneck that happens when one person is washing a colander while another needs to rinse herbs disappears.
In a household where more than one person cooks, the workflow difference is immediate.
The installation requires a licensed plumber. You’ll need a drain line and supply line run to reach the island. They go under the floor or through the adjacent cabinet run.
This is rough-in work. It happens before the flooring and before the cabinetry goes in. Adding a prep sink to a finished island costs three to four times what rough-in costs. That is not an exaggeration.
If a disposal is added, an electrician is also required. Permits apply in most jurisdictions. The plumbing alone runs $800 to $2,500, depending on travel distance from the main stack.
Of all the renovation regrets I’ve heard across client kitchen walkthroughs, a missed prep sink is the most consistent one. Coordinate it at rough-in. It costs a fraction of what the retrofit will.
Which Idea Is Your Hero?
Go back to the measurement at the top before choosing anything from this list.
Confirm the clearance. Confirm the rough-in requirements if a sink or dedicated circuit is part of the plan. Then identify the one idea that will be the dominant visual decision.
Let every other choice on this list serve that one.
The farmhouse kitchens that look intentional are always the ones where something was in charge. That’s what the one-hero rule actually produces. A room where the eye knows where to go, and a kitchen that knows what it’s for.
