

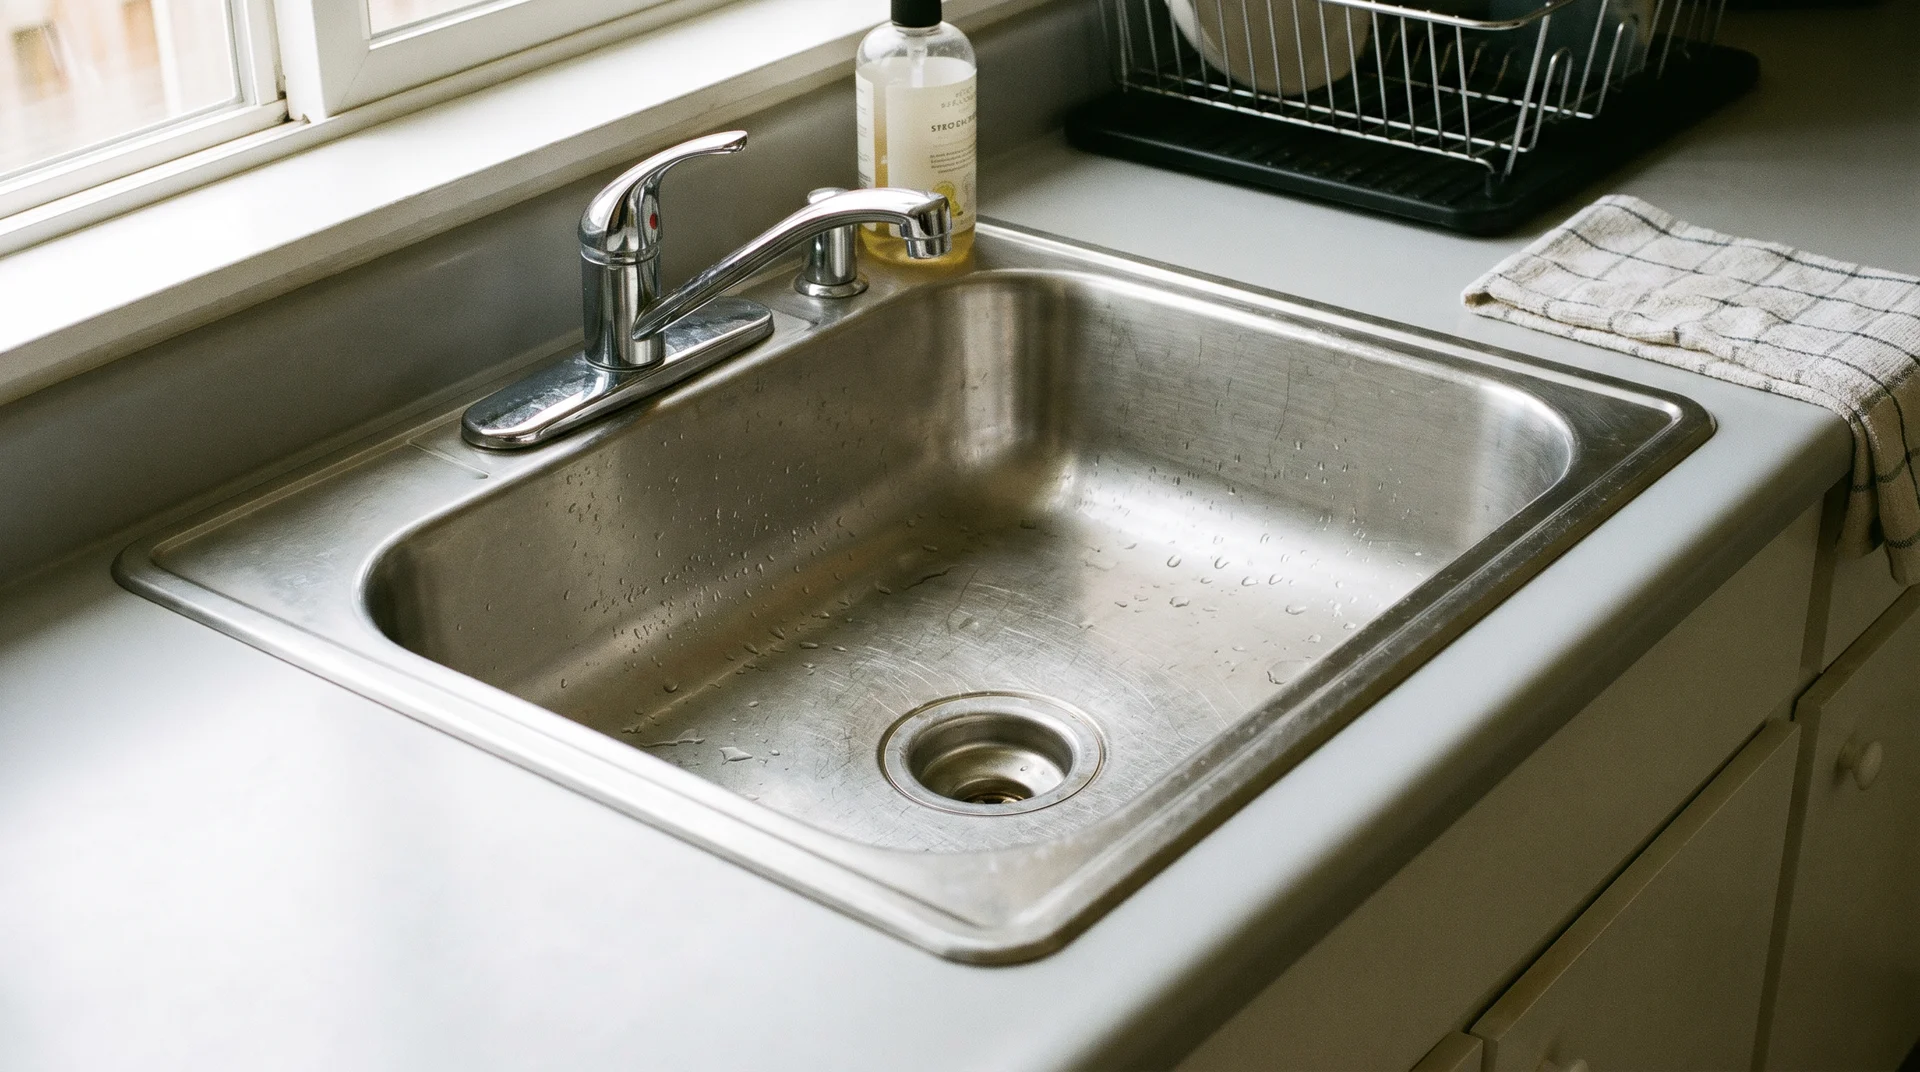
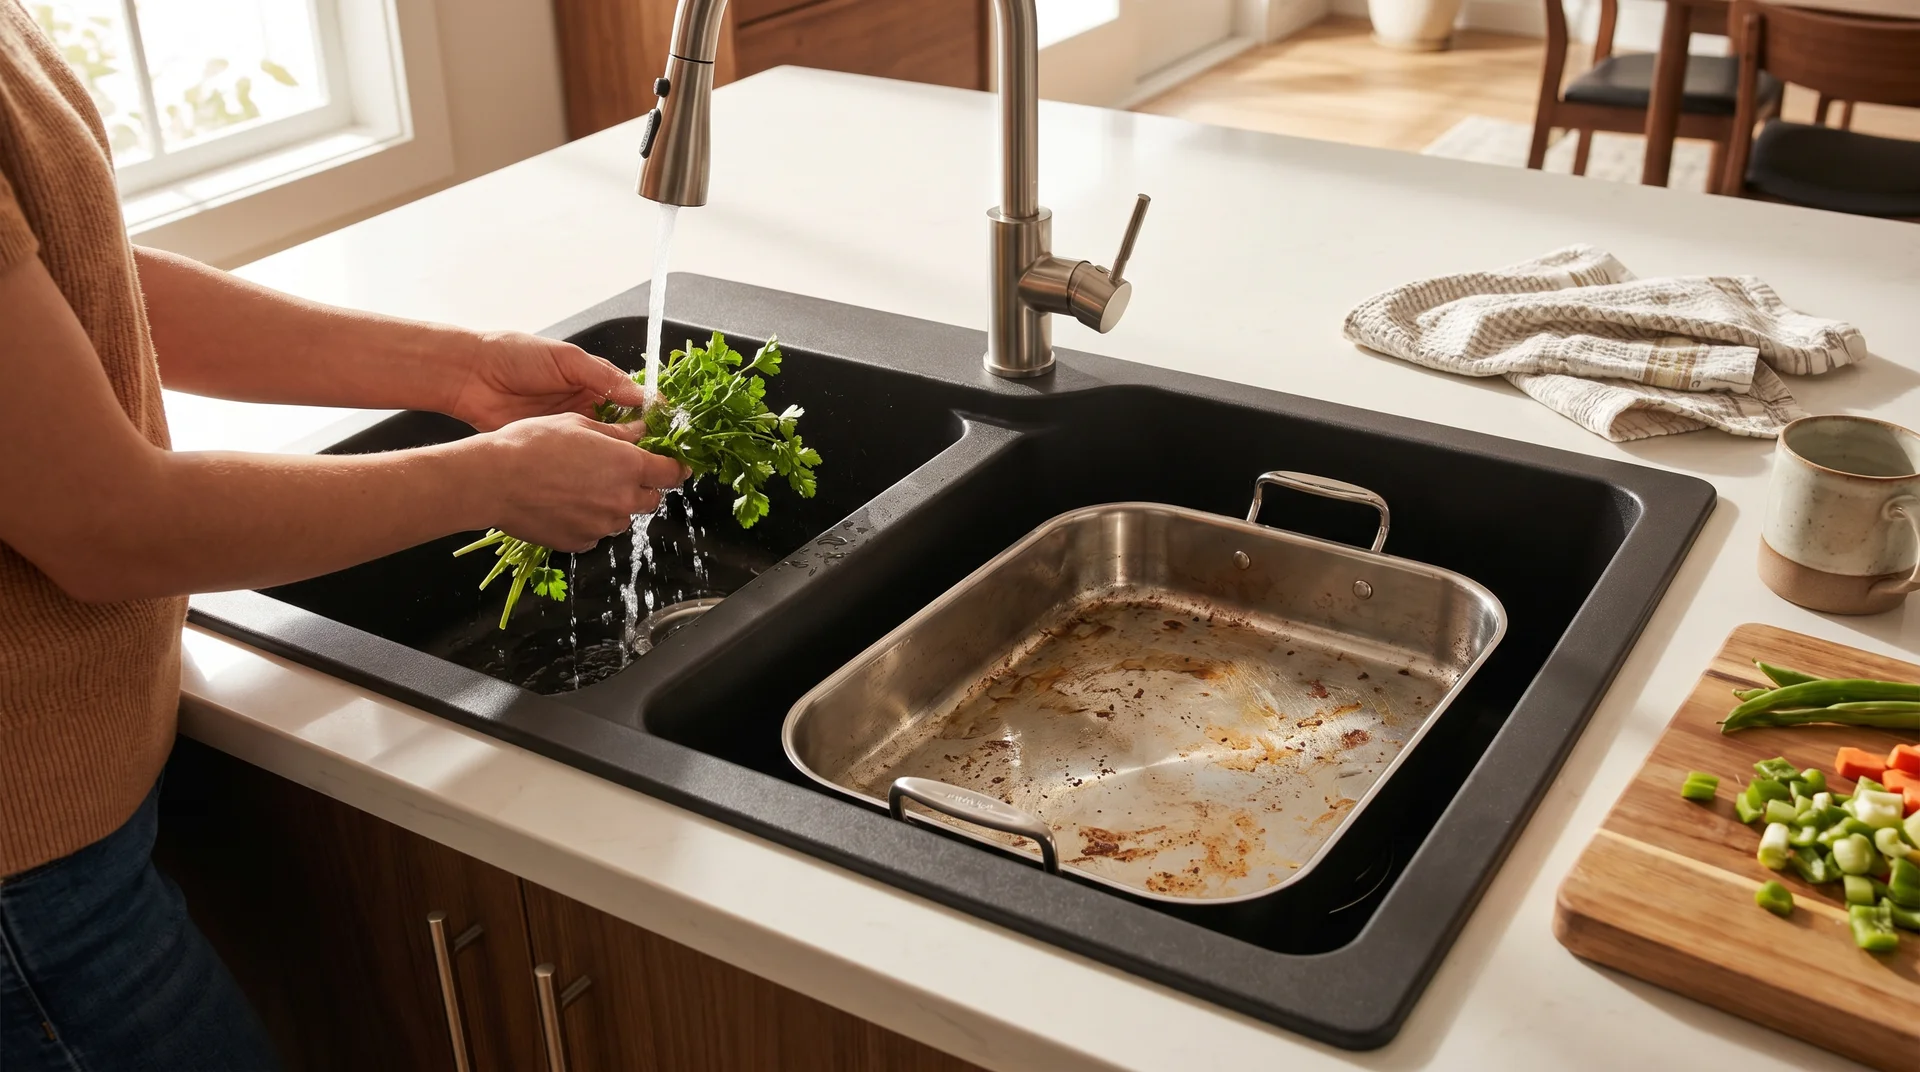
Stand at your kitchen sink and look at the edge where the basin meets the counter. If there’s a rim sitting on top of the counter surface, that’s a drop-in sink.
Clips underneath pull it tight, and a bead of silicone along the rim edge seals out water.
These sinks are also called top-mount sinks and self-rimming sinks. All three names describe the same design.
This guide covers what a drop-in sink is, how it works, and which materials hold up. It also covers where drop-in and undermount sinks genuinely differ, and how to choose one for a real kitchen on a real budget.
What Is a Drop-In Sink?
A drop-in sink is a basin installed through a hole cut from above the countertop.
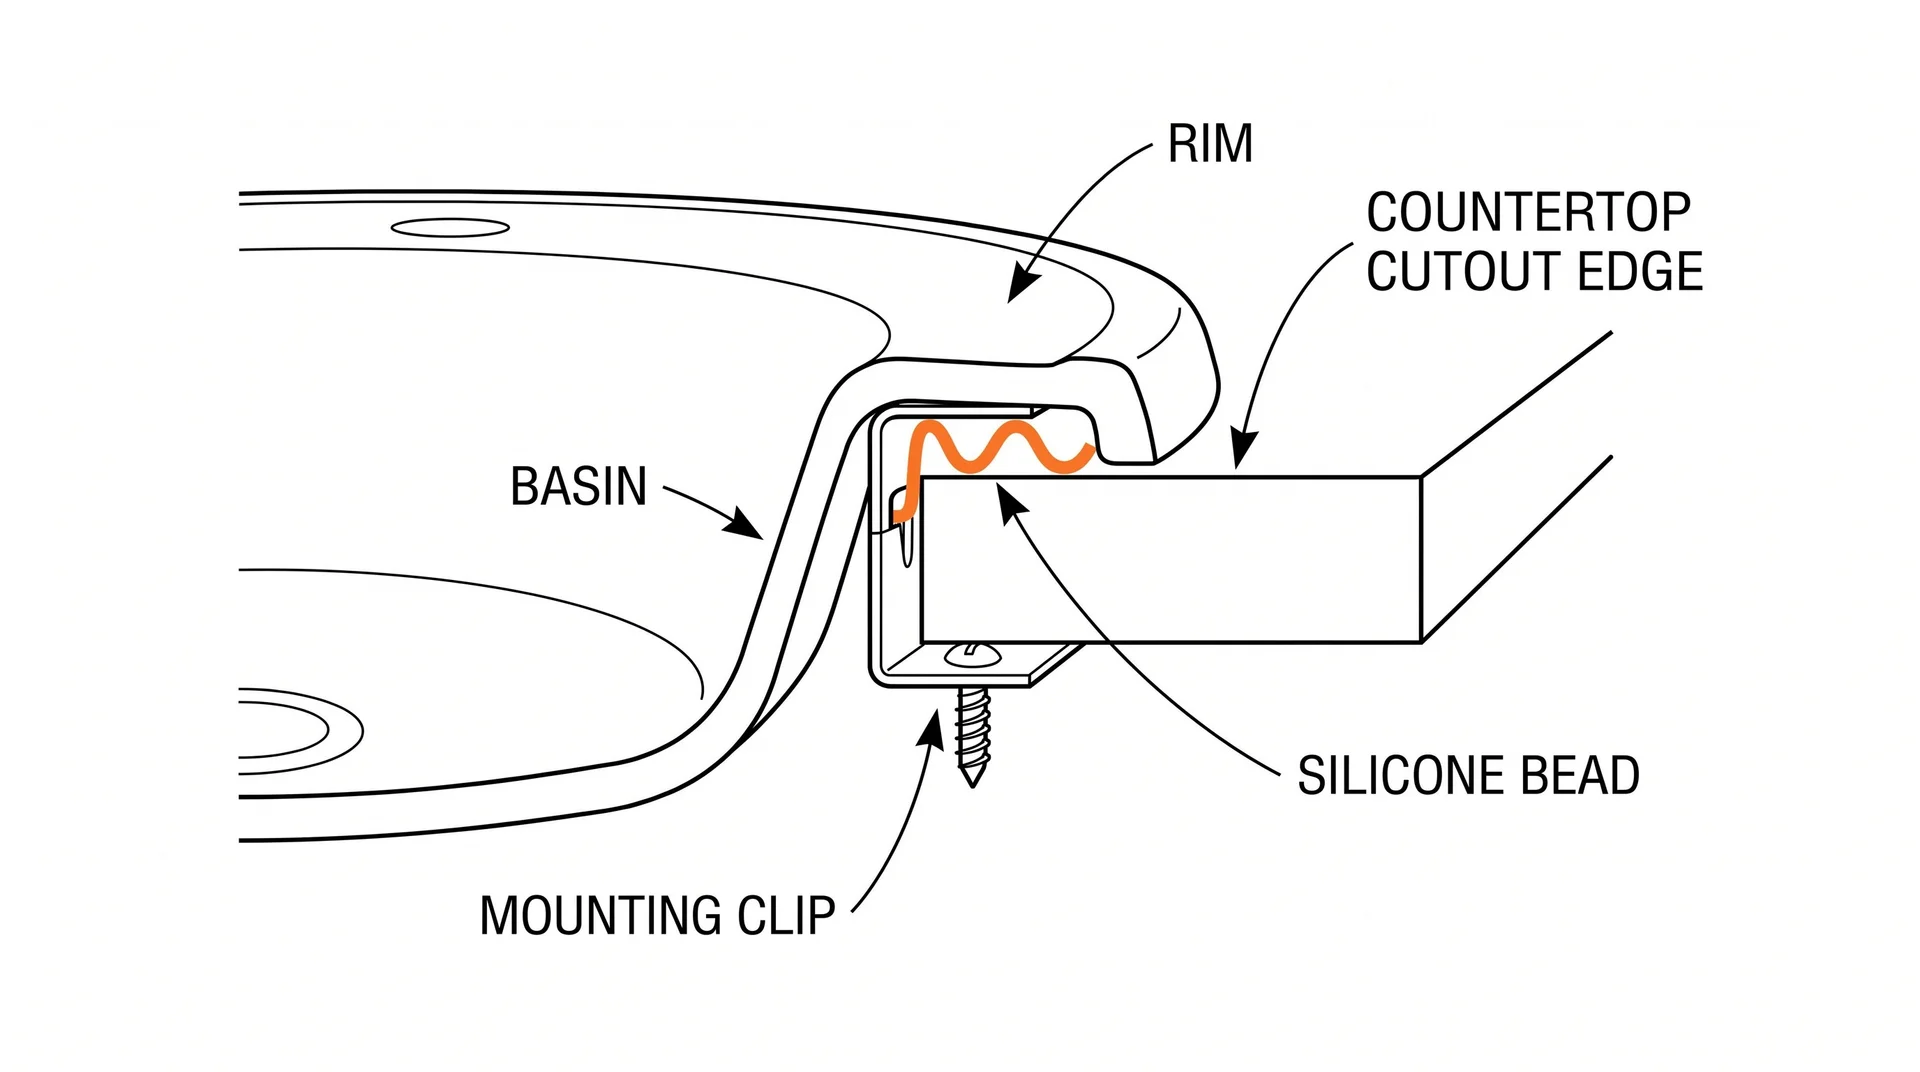
The outer rim extends past the basin opening and rests directly on the counter surface. That rim does two things. It supports the weight of the sink, and it covers the rough edge of the countertop cutout.
Because the rim covers that edge, the hole doesn’t need to be polished or finished. This is why drop-in sinks work on any countertop material.
Mounting clips attach from below, pulling the rim tight against the counter. A continuous bead of silicone sealant along the underside of the rim seals out water. That is the whole installation system.
Drop-in sinks work on any countertop material: laminate, tile, butcher block, concrete, granite, or quartz. That material flexibility is why these sinks are in the majority of American kitchens.
How a Drop-In Sink Works
The installation process has five stages.
Each stage does a specific job. The hole creates the opening. From there, the silicone sealant creates the watertight bond, and the mounting clips hold the rim under compression while it cures. The plumbing is the final connection to your supply lines and drain.
- Cut the hole. Use the template included with the sink to mark the opening. Cut along the inner line with a jigsaw. The rim will cover any slight imperfection in the cut.
- Install the faucet and drain basket first. Do this while the sink is still on a work surface, not after it’s set in the counter. Access is far easier before the sink is in place.
- Apply silicone sealant. Run a continuous, uninterrupted bead around the underside of the rim before lowering the sink. A gap in the bead is a future leak point.
- Drop the sink into the opening. Press it firmly down and align the faucet holes before the silicone starts to set. Do not shift the sink sideways after contact is made. Shifting disrupts the bond before it sets.
- Tighten the mounting clips from below. Work in opposing pairs, not in a circle, to seat the rim evenly. Reconnect plumbing and check every connection for leaks.
Most homeowners finish this project in two to four hours. The rim’s tolerance for a slightly imperfect cutout removes most of the pressure from the jigsaw work.
Drop-In vs. Undermount Sink: What to Choose?
Your countertop material makes this decision before aesthetics do.
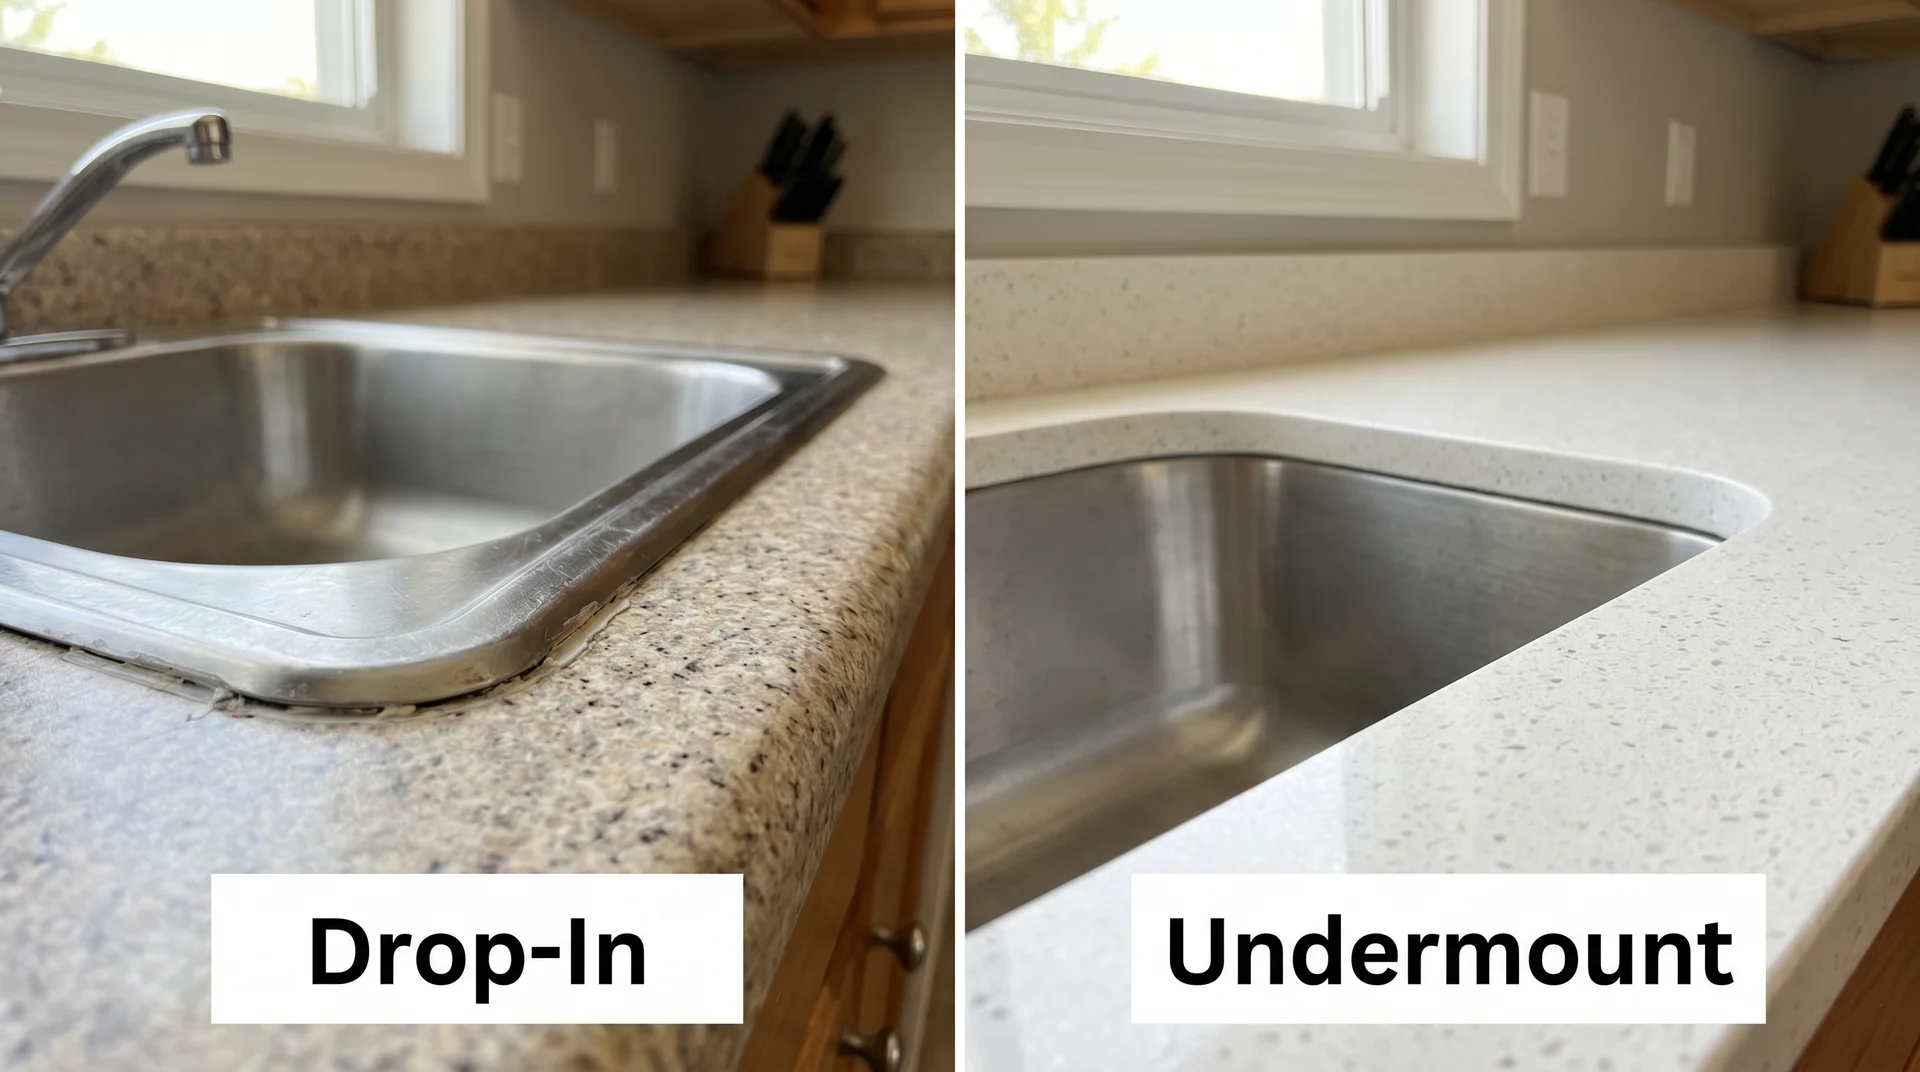
A drop-in sink rests on top of the counter with a visible rim. An undermount sink mounts from below with no rim at all.
If your countertop is laminate, an undermount sink is not a practical option. Laminate cannot support the polished, finished edge that undermount installation requires. Drop-in is the correct answer for that kitchen. That is the right match for the counter you have, not a default.
If your countertop is granite, quartz, or marble, you have a genuine choice between the two types. Work from your countertop material and your budget, and the choice gets clearer.
Here is how the two types compare across every relevant factor:
| Feature | Drop-In Sink | Undermount Sink |
|---|---|---|
| Installation method | Drops in from above; rim rests on counter | Mounted from below; no visible rim |
| Cutout edge | Hidden under the rim; no finishing needed | Exposed; must be polished or finished |
| DIY-friendly | Yes: jigsaw, drill, basic hand tools | No: requires professional installation |
| Countertop compatibility | All materials, including laminate and tile | Solid stone only: granite, quartz, marble |
| Cleaning at the rim | Rim edge can trap debris and water | No rim; wipe directly into the basin |
| Counter space | The rim slightly reduces the usable surface area | No rim; full counter surface around cutout |
| Aesthetic | Traditional; visible rim line | Modern; clean edge-to-basin line, no rim |
| Total project cost | Lower: DIY install, no fabrication required | Higher: pro install plus stone edge finishing |
| Best for | Laminate counters, rentals, DIY, tight budgets | Stone counters, modern kitchens, and higher budgets |
I’ve managed the renovation decisions on more than 220 kitchen projects.
The clients who feel worst about their sink choice chose undermount because it sounded premium. Then they found out mid-project that their laminate counter makes undermount impossible.
Types of Drop-In Sinks
Drop-in sinks come in four bowl configurations and four main room types.
Bowl configuration is the more consequential decision for kitchens. It affects daily workflow, not just appearance.
Single-Bowl Drop-In Sinks

A single-bowl sink is one large, unobstructed basin.
This works well for large pots, roasting pans, and sheet pans that don’t fit around a center divider. If you cook frequently and wash cookware by hand, a single bowl gives you the most working room.
It also reads cleaner in compact kitchens where a divided basin can feel crowded.
Double-Bowl Drop-In Sinks
A double-bowl sink divides the basin into two sections with a center divider.
The most traditional kitchen sink configuration. One side handles active washing; the other holds soaking items, a drying rack, or rinsed produce.
The divider reduces how much space you have for large cookware, but for households that rarely wash oversized pots, it’s a practical split.
Offset Double-Bowl Drop-In Sinks
An offset double-bowl sink has one large basin and one smaller one.
The larger side accommodates pots and pans. The smaller side handles prep, rinsing, and quick handwashing.
For households that cook daily, I find this the most practical bowl layout. You keep the utility of two basins without losing the working depth of the main side.
Triple-Bowl Drop-In Sinks

A triple-bowl sink has three separate basins in a row.
These appear more often in commercial or high-volume prep environments than in residential kitchens. For most home cooks, a triple-bowl configuration is more marketing than necessity.
It also typically requires a base cabinet 42 inches wide or wider, which most standard kitchens don’t have.
Drop-In Sinks by Room
Bowl configuration drives the kitchen decision. For other rooms, the format is usually shaped by the space.
- Kitchen drop-in sinks: The widest variety of sizes, materials, and configurations. Single and double bowls are most common. Workstation sinks, which have an integrated ledge system for sliding cutting boards, colanders, and drying racks, are a growing category that adds genuine prep utility over a standard basin. Farmhouse-style (apron-front) sinks are also available in drop-in format, which is worth knowing if you want that look without an undermount installation.

- Bathroom drop-in sinks: Typically round or oval. They sit inside the vanity countertop. Most vanity countertops are pre-cut or pre-drilled to match standard bathroom drop-in dimensions.
- Bar and prep sinks: Compact, often 15 inches by 15 inches or smaller. Designed for kitchen islands, wet bars, and secondary work stations.
- Laundry sinks: Deeper basins for utility use. Built for soaking, rinsing, and tasks that don’t belong at the main sink.


If you’re outfitting a kitchen island or bar area, shop the bar sink category specifically.
These are designed for the tasks that happen away from the main station. Once you know which type fits your space, the material question is next.
Drop-In Sink Materials: What Actually Holds Up
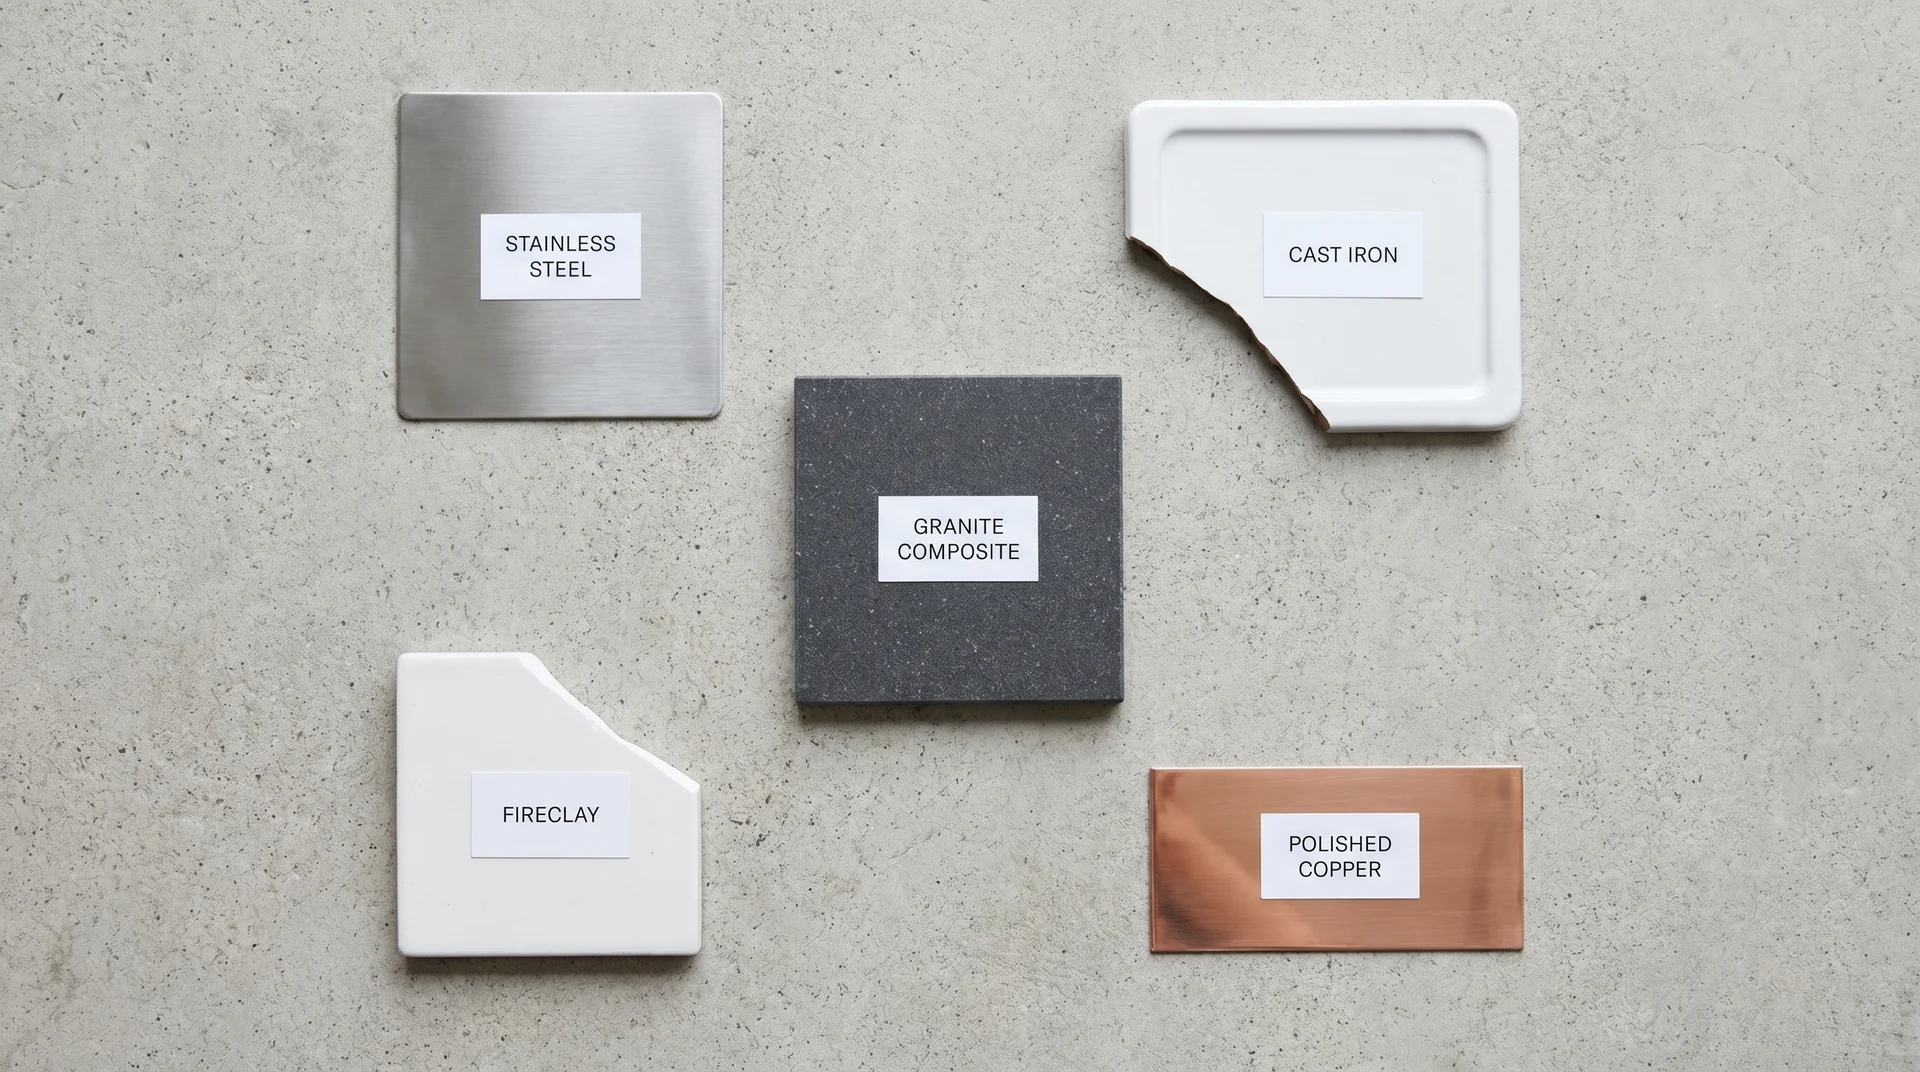
Material choice determines sound, weight, maintenance, and service life.
Stainless steel dominates hardware store shelf space because it’s the most forgiving across all four of those categories. Every material has its own trade-off profile, though. The right choice depends on how you cook, how you clean, and what the room already looks like.
A stainless steel sink in a farmhouse-style kitchen with fireclay tile can look like a mismatch. Material and room need to work together, and in my experience, the material decision is where most buyers change their minds at the last minute.
Stainless Steel
Stainless steel is the most widely used drop-in sink material in American homes.
The number that matters is the gauge. Lower gauge means thicker steel. 16-gauge is the right choice for a kitchen with daily use. 18-gauge is acceptable for a secondary sink or lighter use.
Avoid 20-gauge in any kitchen context. It dents under normal use, rings with every utensil impact, and shows wear faster than any other grade at any price point.
Sound insulation is worth checking before you buy. Stainless steel amplifies noise. Look for models with a spray-on undercoating or rubber sound-dampening pads bonded to the basin floor. That feature costs almost nothing to manufacture and makes a real difference every day.
Price range: $100 to $600 for most residential models, depending on gauge, bowl configuration, and brand.
Enameled Cast Iron
Enameled cast iron is the heaviest option and the quietest.
Some cast iron models exceed 100 pounds. Before ordering, confirm that your base cabinet and countertop can support that load. If the cabinet shows signs of stress, address that first. Look for sagging drawer faces, soft spots in the base, or doors that won’t close squarely.
The enamel coating is durable but not indestructible. A heavy cast-iron pan dropped directly into the basin can chip it. A chip that reaches bare iron will rust.
That’s a material trade-off worth knowing before you commit. It’s not a reason to avoid cast iron.
Price range: $300 to $1,200 and above
Granite and Quartz Composite
Granite and quartz composite sinks are made from 70 to 80 percent crushed natural stone bound with resin.
They’re quieter than stainless steel, more heat-resistant, and harder to scratch. They come in colors that can coordinate intentionally with a stone countertop. Black, charcoal, gray, and white are the most common options.
When the countertop is the visual lead, a composite sink that matches it is often the right call. The sink’s job is to reinforce the countertop’s visual weight, not compete with it. That’s the execution requirement for this material choice.
Price range: $200 to $800
Fireclay
Fireclay is a dense vitreous ceramic (a glass-like material) fired at very high temperatures.
It resists staining and fading better than standard porcelain. The surface gloss holds up for years of daily use. You’ll see fireclay most often in farmhouse-style kitchens, where the weight and finish of the material carry that aesthetic naturally.
Installation weight is significant, similar to cast iron. Run the same cabinet-support check before you commit.
Price range: $400 to $1,500 and above
Porcelain and Vitreous China
Porcelain is most common in bathroom drop-in sinks, not kitchen sinks.
The smooth white surface suits traditional vanity installations. It’s more prone to chipping and cracking under impact than heavier materials. That’s why it rarely appears in kitchen applications where cookware contact is a daily reality.
Price range: $80 to $500
Copper
Copper sinks are primarily a design choice.
They develop a natural patina over time. Some households find that attractive; others find it unpredictable. Copper does have documented antimicrobial surface properties, which are relevant if that factor matters to your household.
Copper is the rare case where the visual decision is really the whole decision.
Price range: $300 to $1,500 and above, with significant variation based on finish and whether the surface is hammered or smooth.
Drop-In Sink Pros and Cons
The honest version of this list is unequal.
Some of these points are minor. Two are not. Installation simplicity and the rim seal matter most. They shape both the buying decision and the long-term condition of the sink.
Why Drop-In Sinks Work Well
The installation is genuinely accessible
There’s no stone fabricator involved, no polished edge requirement, and no under-counter bracing needed. You cut a hole, apply silicone, lower the sink, and tighten the clips from below. The rim covers any slight imperfection in the cut line.
Most homeowners finish this in one afternoon.
Install the faucet and drain basket before the sink goes into the counter. Those connection points are easy to reach when the sink is on a work surface. After the sink is clipped down, access becomes awkward.
Drop-in sinks work on every countertop material
The rim covers the countertop cutout on every surface: laminate, tile, butcher block, concrete, granite, and quartz. None needs a finished edge.
Undermount sinks require a polished stone or solid-surface edge to work. Drop-in sinks don’t. If your counter is laminate, this point alone settles the question.
The total project cost is lower than undermount
The sink itself typically costs less than a comparable undermount model. DIY installation adds $30 to $50 for sealant and hardware. Professional undermount installation runs $150 to $350 in labor alone, before any stone edge finishing.
For budget renovations and rental properties, that difference is meaningful.
Replacement is straightforward
Replace a drop-in sink with any new model whose cutout is the same size or smaller. The rim covers minor discrepancies. An undermount swap often requires a fabricator to adjust the countertop opening, which adds both time and cost.
Where Drop-In Sinks Have Real Limitations
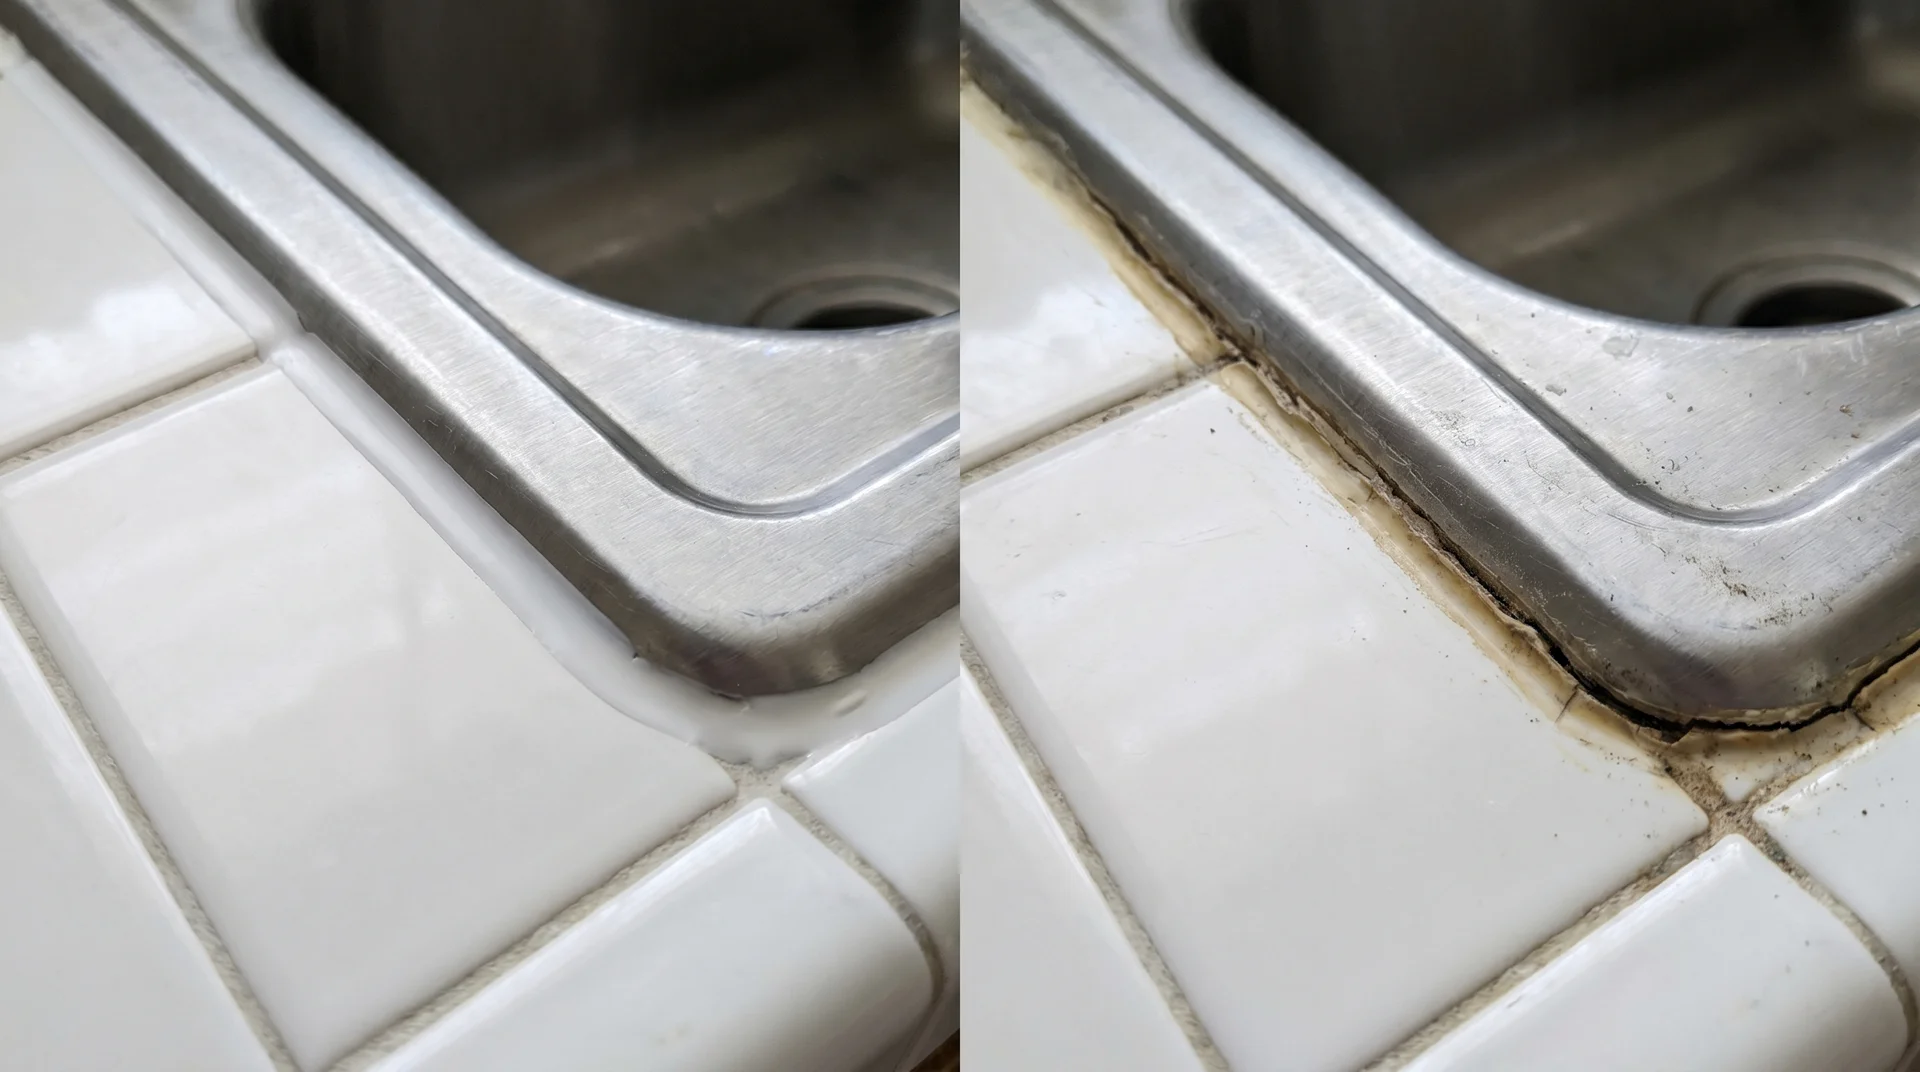
The rim edge traps water, debris, and soap residue
The gap between the rim and the countertop surface collects everything that doesn’t make it into the basin. Left alone, that gap develops mold. The silicone seal prevents moisture from working under the rim.
That seal will degrade over time. It’s a maintenance interval, not a product defect. I can’t give you a confident timeline because it depends on how wet your sink area stays and which sealant was used.
Somewhere between five and ten years is typical. Re-caulking takes about 30 minutes. This doesn’t come up at the hardware store. It should.
A clean, intact caulk line is what keeps a drop-in sink looking and functioning correctly. If that line has gone dark, cracked, or is pulling away from the rim, re-caulking moves to the top of the list.
The rim takes up a small amount of counter space
Typical rims extend one to two inches past the basin opening. In a compact kitchen, that matters. Undermount installation eliminates the rim entirely and gives you the full surface area around the cutout.
The visible rim looks traditional
In a contemporary kitchen built around clean horizontal surfaces and handleless cabinets, a visible rim can work against the visual intention. The rim announces itself. In that kind of space, the sink’s job is to disappear into the counter.
I learned this from a redesign that cost me $6,000 to fix. Too many competing elements in one kitchen, and nothing reads as intentional. I call it the one-hero rule: the kitchen needs one dominant visual statement, and everything else submits to it.
If the countertop is the hero, pick a sink that reinforces it. A visible rim introduces a competing line. In a modern kitchen, that distinction is worth thinking about before you choose.
How to Choose the Right Drop-In Sink

Five questions resolve most drop-in sink decisions.
Work through them in this order. The first one often makes the rest faster than you expect.
Step 1: What Is Your Countertop Material?
If your countertop is laminate, a drop-in is your answer.
Drop-in is the correct match for a laminate counter. If you have granite, quartz, or marble, the choice opens up genuinely.
Then the question becomes whether you want to DIY the installation and what your total project budget looks like. Those two factors usually close the decision.
Step 2: Single Bowl or Double Bowl?
The bowl layout should reflect how you actually cook, not how you imagine you might cook.
If you regularly wash large stockpots and roasting pans by hand, a single bowl gives you the room you need. If you prefer to keep soaking separate from active washing, an offset double bowl works better.
For households that cook daily, I find the offset double bowl the most practical layout. The larger basin handles cookware without compromise. The smaller basin stays available for everything else.
Step 3: Which Material Fits Your Use?
Match the material to how the sink gets used first, then consider how it looks.
Here’s the practical breakdown by use:
- Heavy daily cooking: 16-gauge stainless steel or granite/quartz composite
- Traditional or farmhouse kitchen: Enameled cast iron or fireclay
- Contemporary kitchen with stone counters: Composite or high-quality stainless steel with sound insulation
- Bathroom vanity: Porcelain or vitreous china
- Design statement or specialty installation: Copper or hammered metal
If you’re torn between stainless steel and composite, the tiebreaker is sound. Composite sinks are noticeably quieter. That difference becomes obvious on the first morning of daily use and stays obvious.
Step 4: Measure the Cabinet First
The sink needs to fit inside the base cabinet below it.
Standard US base cabinets come in 30-inch, 33-inch, and 36-inch widths. A 33-inch cabinet fits a 33-inch sink. The sink should never exceed the cabinet opening width.
If you’re replacing an existing drop-in sink, measure the current cutout before you order. The new sink’s cutout dimensions need to be equal to or smaller than the existing opening. Otherwise, you’ll be cutting again.
Step 5: Count the Faucet Holes
The sink’s faucet hole configuration needs to match your faucet before you order.
Drop-in sinks come pre-drilled with 1, 3, or 4 holes or with no pre-drilled holes. A three-hole faucet assembly with separate handles needs 3 holes. A single-hole faucet in a 3-hole sink needs a deck plate to cover the extra openings.
This detail is easy to overlook and annoying to fix after delivery. Check your faucet configuration before you order the sink.
How to Install a Drop-In Sink

This is a two-to-four-hour project for most homeowners.
Gather everything before you start. Running to the hardware store mid-installation disrupts the silicone application window.
You’ll need:
- Jigsaw with a carbide or fine-tooth blade
- Power drill
- Tape measure
- 100% neutral-cure silicone sealant (not standard kitchen-and-bath silicone)
- Adjustable wrench
- Mounting clips (usually included with the sink)
- Drain kit or plumber’s putty
- Safety glasses
Have these on hand before you open the box.
Safety note: Turn off both the hot and cold supply lines before disconnecting any plumbing. The shutoffs are typically under the cabinet below the existing sink. If you can’t locate individual shutoffs, use the main house supply valve. Confirm the water is off before you open any connections.
- Turn off the water supply. Shut off the hot and cold lines at the under-cabinet shutoffs or the main valve.
- Disconnect existing plumbing. Remove supply lines, the drain assembly, and the P-trap. If replacing an old sink, break the silicone seal around the rim edge, remove the mounting clips, and lift the old basin out.
- Position and trace the cutout. Tape the included template to the countertop and trace the cut line. If no template is included, flip the sink upside down on the counter and trace the rim outline. Draw a second line inside that outline, set in by the width of the rim. That inner line is your cut line.
- Cut the countertop. Drill a pilot hole inside the cut line. Insert the jigsaw blade and cut along the marked line. On the last few inches of the cut, support the cutout from below to prevent it from falling and cracking the counter surface.
- Install the faucet and drain before setting the sink. With the sink on a flat work surface, install the faucet and the drain basket assembly. Both connections are much easier to make before the sink is in the counter.
- Apply silicone sealant. Run a continuous bead around the underside of the rim. Aim for roughly 1/4-inch thickness. Do not skip sections. A gap in the sealant bead is a gap in the water seal. Work in a ventilated area. Silicone fumes are strong in an enclosed cabinet space.
- Lower the sink into the cutout. Press it firmly down and align the faucet holes. Do not shift the sink sideways after the silicone contacts the counter. Shifting disrupts the bond before it sets.
- Attach mounting clips from below. Work in opposing pairs around the perimeter rather than in a circle. This seats the rim evenly. Tighten firmly but do not overtorque on laminate, which can crack.
- Reconnect plumbing. Reattach the supply lines, drain, and P-trap. Turn the water back on and check every connection for drips before leaving the area.
- Clean up excess silicone. Wipe any squeezed-out sealant from the top of the rim with a damp cloth. Allow 24 hours of cure time before using the sink.
Do not rush the cure time. Using the sink before the silicone sets can pull the seal loose. Twenty-four hours is the minimum.
How Much Does a Drop-In Sink Cost?
The total project cost depends on the material and whether you’re installing it yourself.
| Sink Type | Typical Price Range |
|---|---|
| Basic stainless steel (18-gauge) | $80 to $200 |
| Mid-range stainless steel (16-gauge) | $200 to $500 |
| Granite or quartz composite | $200 to $600 |
| Enameled cast iron | $300 to $900 |
| Fireclay | $400 to $1,200 |
| Copper or decorative finish | $300 to $1,500 and above |
| DIY installation | $30 to $50 (sealant and hardware) |
| Professional installation (labor only) | $150 to $350 |
A complete DIY project with a mid-range 16-gauge stainless steel sink in a standard 33-inch configuration typically runs $250 to $500 total. That includes the sink, sealant, and any hardware not bundled in the box.
Commercial drop-in sinks for food service environments carry different materials and certification requirements. That’s a different article with different criteria.
Best Drop-In Sink Brands
Brand reputation matters most for warranty terms and parts availability.
- Kohler: Premium cast iron, fireclay, and composite options. Decades of documented durability at a higher price point.
- Kraus: Strong value in stainless steel. Many models were built to 16-gauge specifications at mid-market pricing.
- Elkay: One of the most recognized names in US kitchen sinks. Wide range from entry-level to premium, with good parts availability throughout the line.
- Moen: Broad stainless steel selection with consistent quality and widespread retail availability.
- Ruvati: Well-regarded for thick-gauge stainless and workstation configurations. Sound insulation on most models is notably effective.
- BLANCO: German-engineered SILGRANIT composite sinks. Premium pricing, long service life, and quiet operation.
For most budgets, Kraus and Elkay cover the middle of the market well. Kohler and BLANCO are the right choice if you’re buying once and expecting decades of service.
Frequently Asked Questions About Drop-In Sinks
These questions come up most often when choosing or installing a drop-in sink.
What Is the Difference Between a Drop-In Sink and a Top-Mount Sink?
There is no difference. Drop-in sink, top-mount sink, and self-rimming sink all describe the same installation type. All three refer to a basin installed from above, with the rim resting on the counter. The terms are used interchangeably in hardware stores, product listings, and contractor conversations.
Can I Install a Drop-In Sink in a Granite Countertop?
Yes, but cutting granite requires a diamond-grit blade and a slower, more careful technique than cutting laminate. If you’re not comfortable cutting stone, hire a countertop fabricator to make the opening. From that point, the drop-in installation itself is the same process as on any other surface.
How Long Does a Drop-In Sink Last?
A 16-gauge stainless steel drop-in sink typically lasts 15 to 30 years. Cast iron and fireclay can outlast 50 years with basic care.
As noted in the rim maintenance section above, the limiting factor is usually the silicone seal, not the sink body. Re-caulking when the seal shows wear extends the effective life of the sink indefinitely.
Is a Drop-In Sink Hard to Install?
It’s one of the more accessible home improvement projects. The rim’s tolerance for a slightly imperfect cutout removes most of the precision pressure. If you can operate a jigsaw and tighten a wrench, you can install a drop-in sink in an afternoon.
Can I Switch from Drop-In to Undermount?
You can, though it involves more than a swap. A stone fabricator needs to re-cut and re-polish the countertop opening to a finished edge suitable for undermount installation. On a laminate counter, the switch is not practical. If you have a laminate counter and want the undermount look, the countertop would need to be replaced first.
What Gauge Stainless Steel Is Best for a Kitchen Sink?
16-gauge for daily kitchen use. It resists denting under normal cookware contact and absorbs sound better than thinner steel. 18-gauge is acceptable for a secondary or low-use sink. A 20-gauge is not recommended for any kitchen application.
Why Does My Drop-In Sink Leak Around the Rim?
A rim leak is almost always a failed silicone seal. Remove the old caulk completely using a utility knife and a silicone remover product. Clean the surface with rubbing alcohol to remove any residue that would prevent adhesion. Apply a fresh bead of 100% neutral-cure silicone sealant and allow 24 hours to cure before using the sink.
Conclusion
A drop-in sink works because it matches how most kitchens are actually built.
Laminate countertops are common. Renovation budgets often rule out stone fabrication and professional undermount installation. A drop-in sink fits both of those realities. The only real trade-off is the silicone seal, which needs periodic re-caulking. That’s manageable once you know it’s coming.
If your countertop is granite or quartz and the clean edge-to-basin look matters to you, undermount is worth the added cost. For most kitchens, a well-chosen drop-in sink installed correctly will serve the space for decades.
