

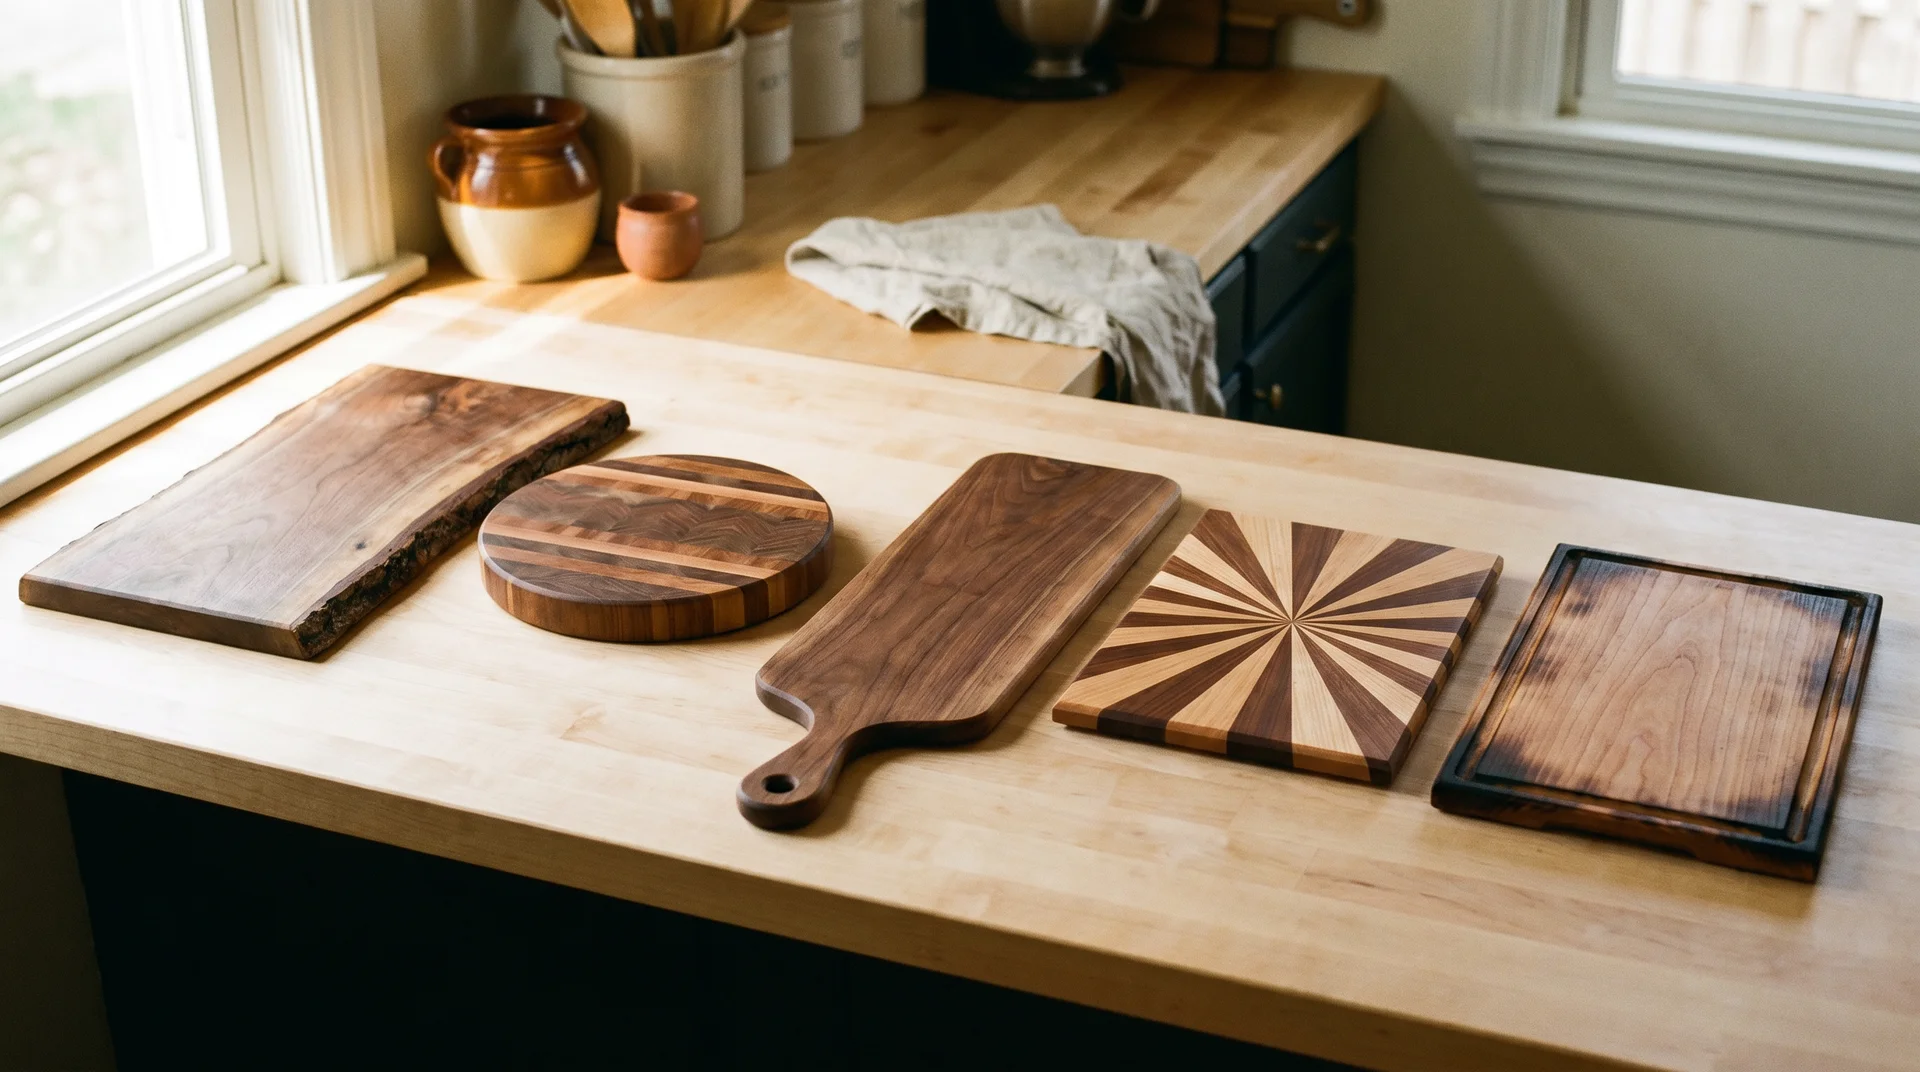
Most cutting board design lists offer the same idea in seventeen variations: end-grain rectangles cut into different grid patterns.
These 17 ideas are organized by design type instead, because form, material, surface treatment, and function each produce a board that looks like nothing else here.
Before You Build Your DIY Cutting Board
The wood and finish decisions apply to every idea below.
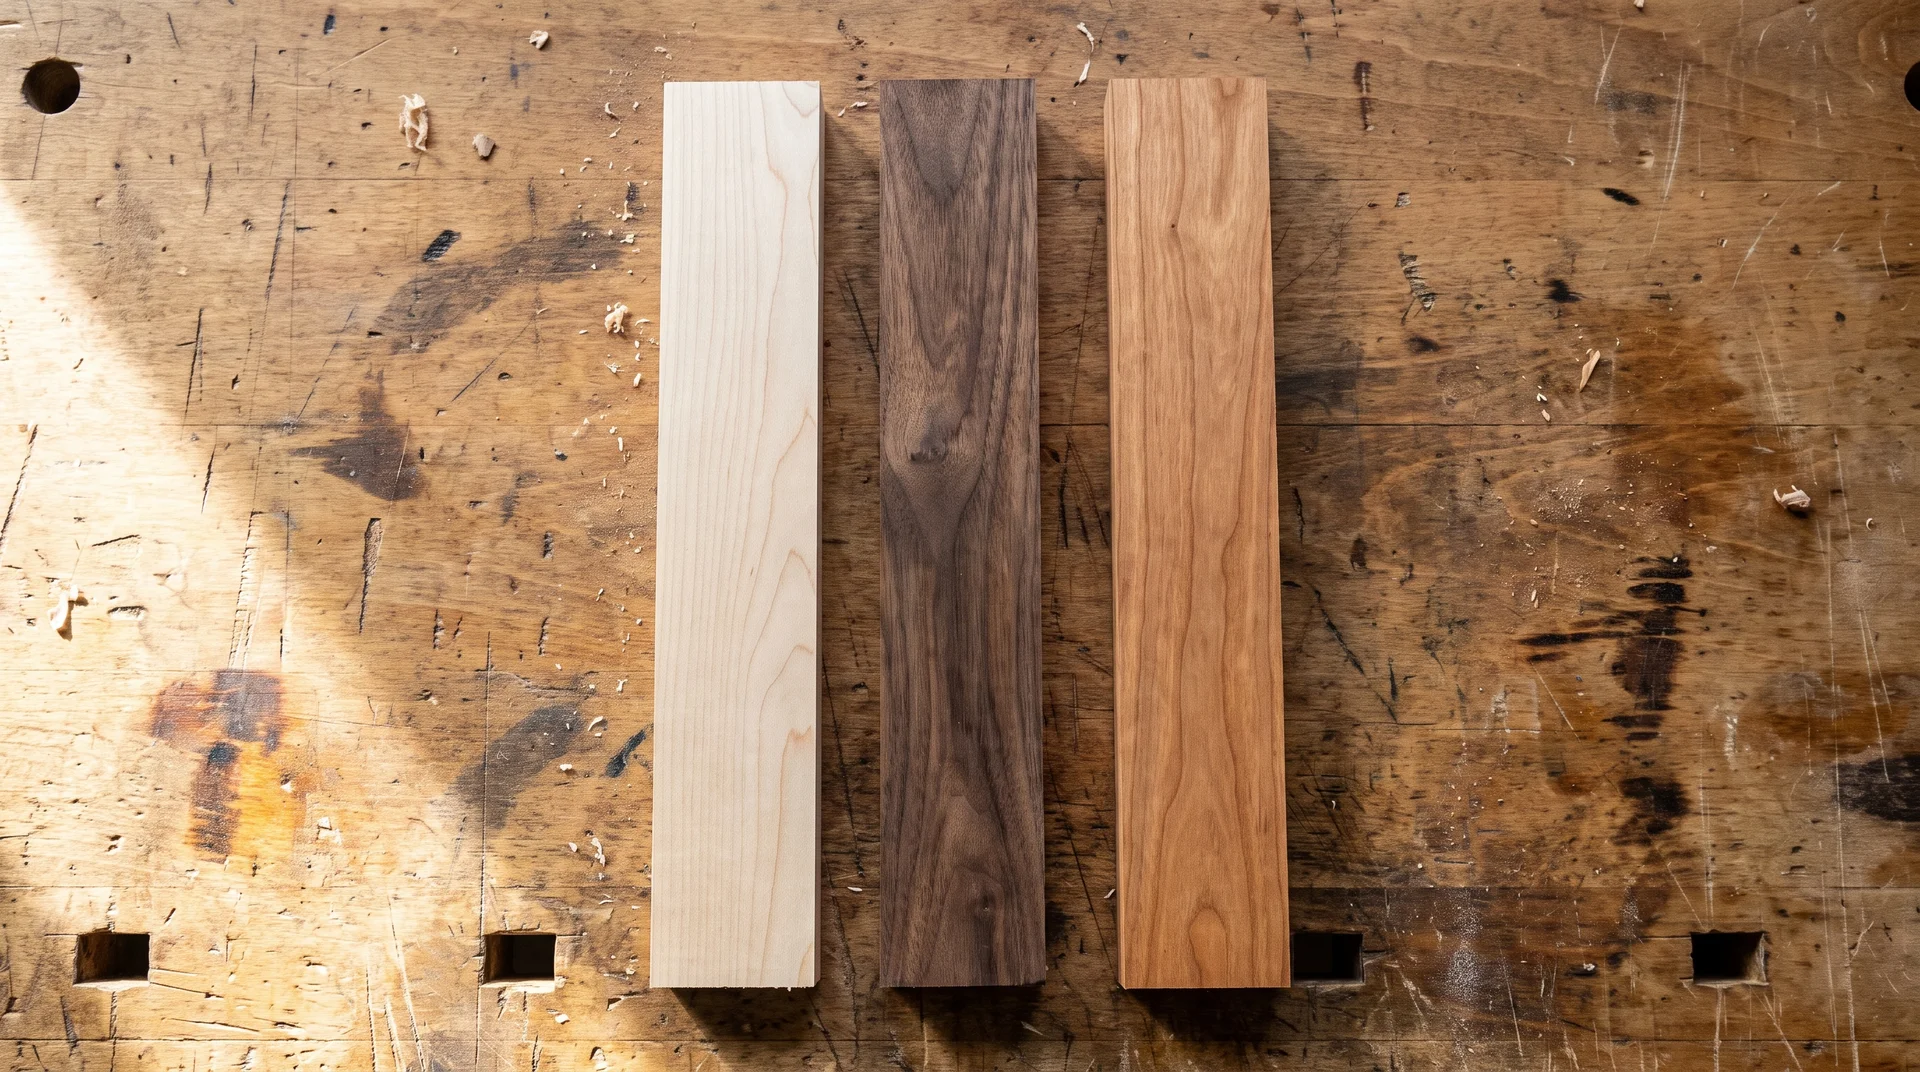
Three hardwoods cover almost every build here: hard maple, black walnut, and cherry.
Maple is light, walnut is dark, and cherry sits between them as a warm reddish-brown.
Cherry is the most underused of the three. Its color deepens significantly with age and regular oiling, and most people don’t discover that until year two.
All three are close-grained, stable, and hard enough for a daily-use cutting surface. They finish well and stay dimensionally stable once properly dried.
Open-pore hardwoods like oak and ash are wrong for any food-contact surface. Softwoods are, too, regardless of how they photograph.
The full reasoning behind that is in the safest cutting board materials, which covers why construction type matters as much as species selection.
Read: Safest Cutting Boards
In the end, food-grade mineral oil is the right starting point. Apply in thin coats and let each absorb fully before the next. The board tells you when it needs another coat: it goes noticeably pale compared to freshly oiled wood.
A complete wood finishing workflow covers what happens after the oil coats are applied.
Read: How to Finish a Wood Dining Table?
The table below maps each design category to its skill level and core tool requirement. Use it to identify which category is actually available to you before picking an idea within it.
| Category | Ideas | Skill Level | Core Tool Requirement |
|---|---|---|---|
| Form | 1–3 | Beginner to intermediate | Bandsaw; slab source for Idea 1 |
| Material and Construction | 4–6 | Beginner to intermediate | Table saw, bandsaw for Idea 6 |
| Geometric Patterns | 7–11 | Intermediate to advanced | Table saw with precise jigs |
| Surface Treatments | 12–14 | Beginner to intermediate | Pyrography pen/torch/router |
| Functional Builds | 15–17 | Intermediate | Router with straight bit |
Form Designs: When the Shape Is the Idea
A different form changes what the board says before it says anything else.
These three ideas shape the primary design decision. The construction underneath each one is simple. The form does the work.
Live Edge Slab Board
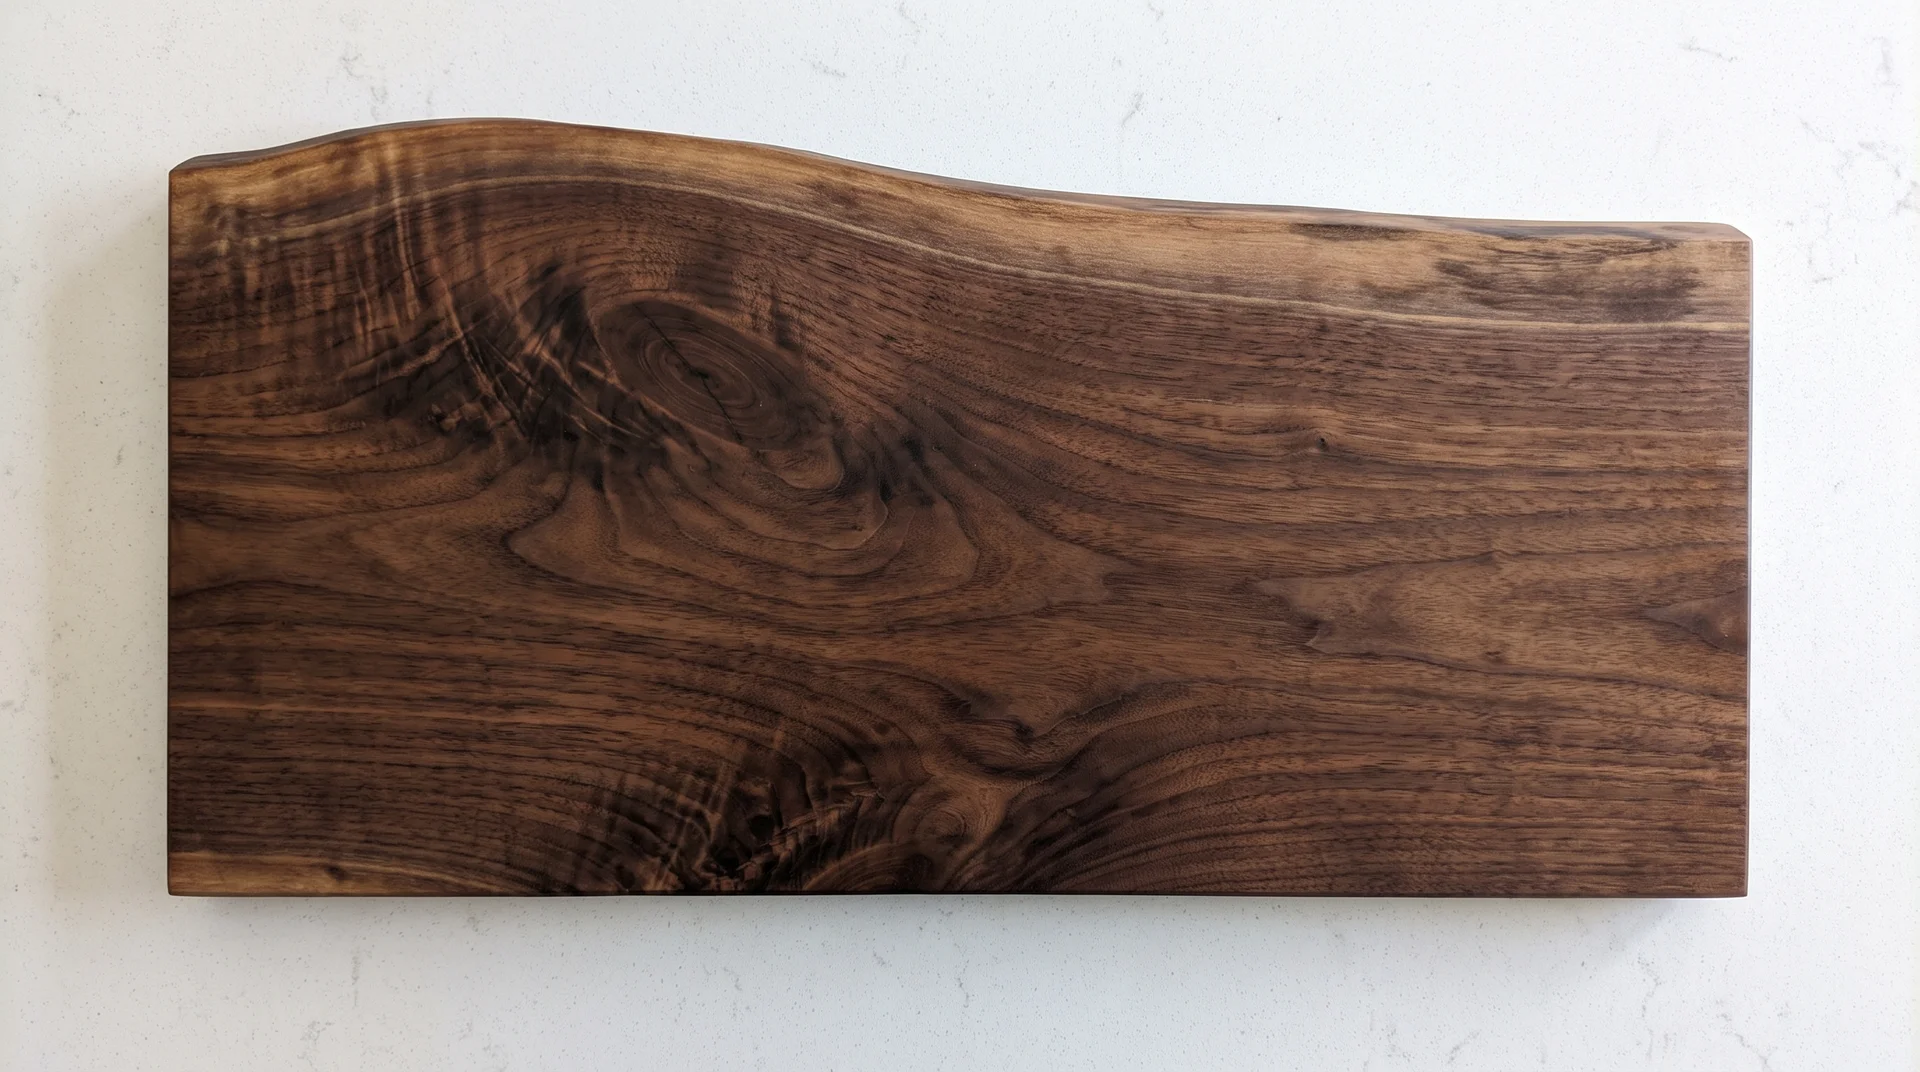
This is the most underrated cutting board form on this list.
You’re holding a piece of wood whose silhouette was determined by the tree, not by a table saw fence. No two live-edge boards look identical. That distinction is built in before you pick up a tool.
Source a live-edge slab at a hardwood dealer or a local sawmill. Offcuts from slab furniture builds are often sold cheaply and work well at a cutting board scale.
Remove any loose bark and leave the organic edge profile intact. Flatten the board using a router sled or hand planes.
- Tools: router sled or hand planes for flattening, sander, optional bandsaw for cutting to length
- Best wood: walnut and cherry slab offcuts are the most commonly available at a reasonable cost
- Build time: one session, 3 to 5 hours, depending on the flattening method
The tool setup here is minimal compared to anything in the geometric pattern category. One decision to make before cutting: does one edge stay live, or do both?
One live edge against one straight edge reads as deliberate. Both live edges read as found objects. Decide before you mark anything.
Round End-Grain Board

A circle changes everything about how end grain reads on a counter.
Build any end-grain panel first using any two-species pattern. Let it cure and flatten it fully. Then cut the circle.
A router trammel jig is the most controlled cutting method. Fix a center point, set the radius, and rout the circumference in passes of increasing depth. A bandsaw circle jig works too, with sanding afterward to clean up the edge.
- Tools: jointer, planer, table saw for the panel; router, trammel jig, or bandsaw circle jig for the circle cut
- Minimum diameter: 10 inches for practical cutting use; 8 inches works as a serving board
- Edge treatment: rout a chamfer or roundover on the top perimeter edge before finishing
The circle cut exposes end grain around the board’s full perimeter. That perimeter absorbs oil faster than the face. Apply a second coat to the edge within an hour of the first. The face can wait.
Long Paddle Serving Board
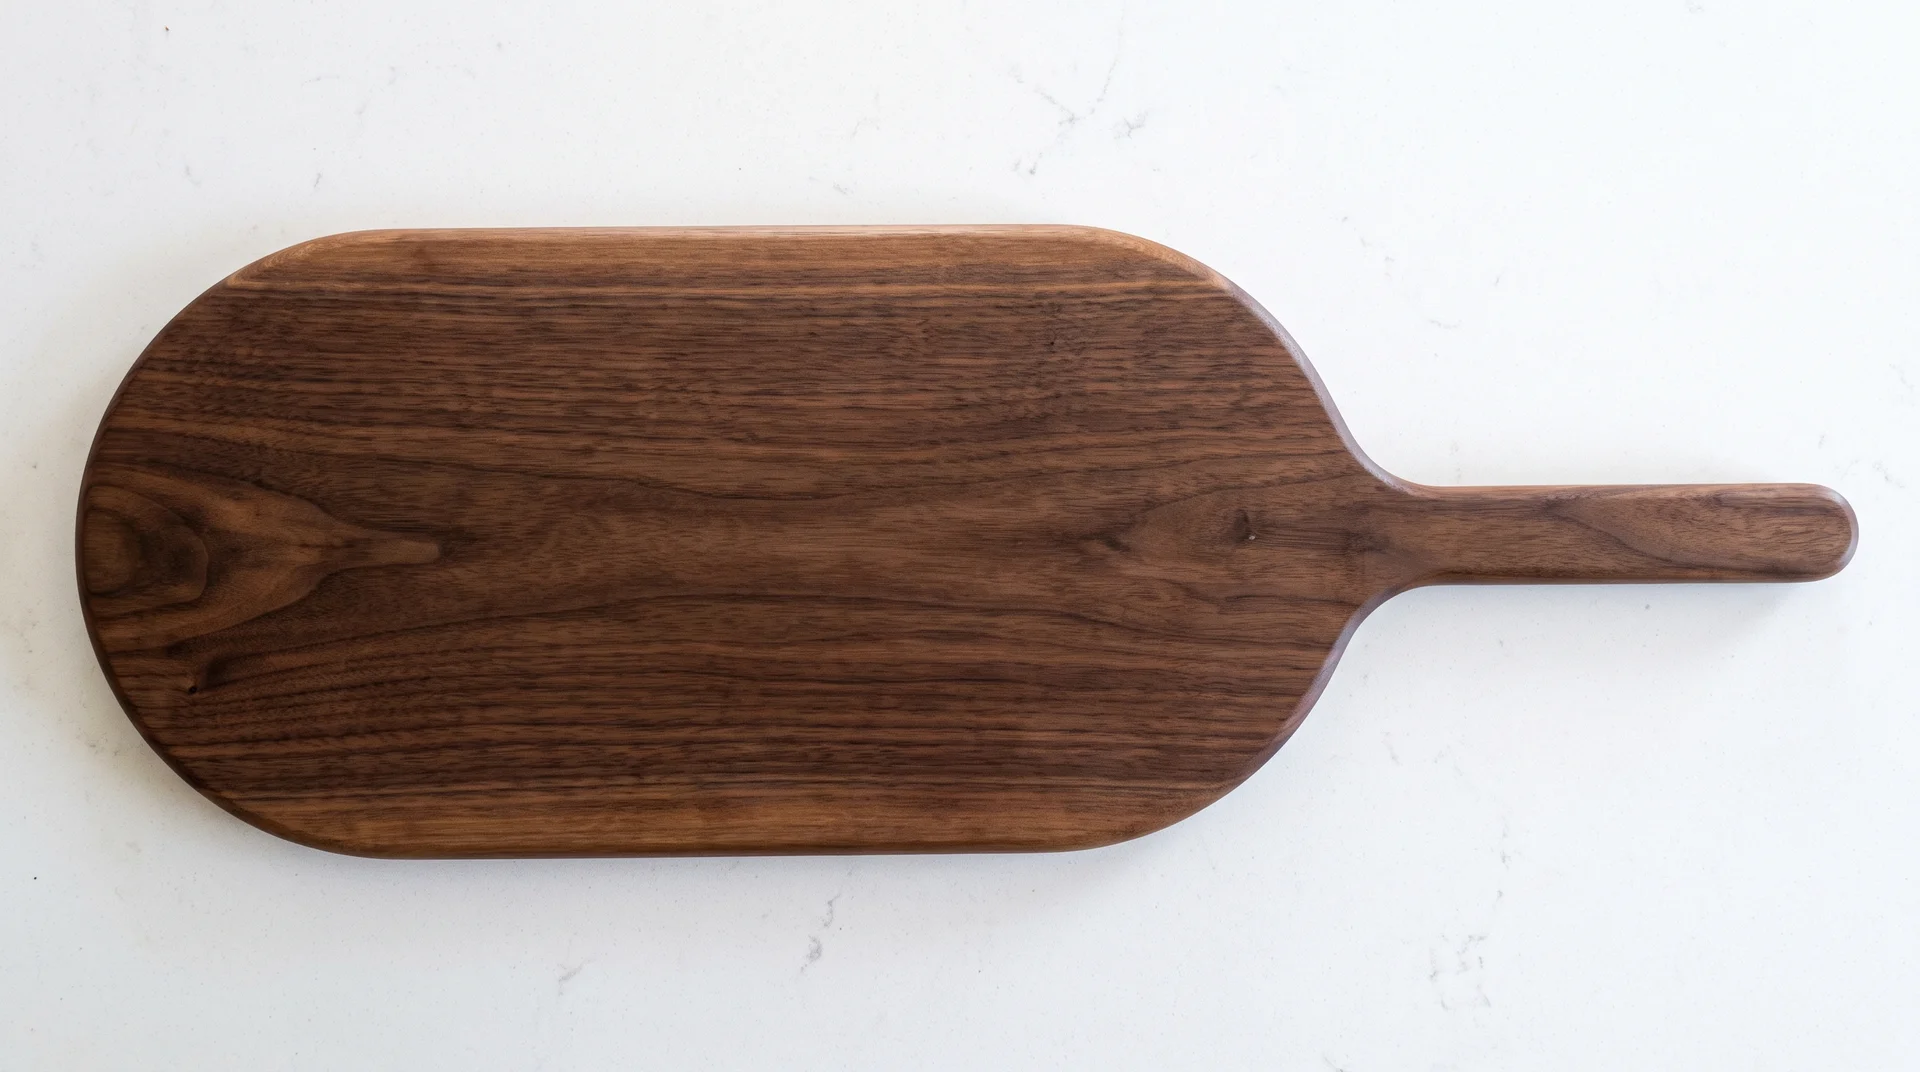
The paddle form makes the board’s purpose visible from across the room.
Walk yourself through where this board lives before you settle on a shape. It moves from counter to table and back. The handle makes carrying comfortable.
That same thin profile makes it unsuitable for heavy chopping. These are serving boards. Make that distinction before you decide whether this is the build your kitchen actually needs.
Build a flat edge-grain panel in any species or a two-tone stripe. Cut the paddle silhouette on a bandsaw. Route all edges to a roundover profile, including around the handle transition.
- Tools: bandsaw, router with roundover bit, sander
- Handle width: most woodworkers keep the narrowest section at or above 3/4 inch; below that, the wood is likely to crack under regular carrying stress
- Choice of wood: walnut is the most common choice; its density makes the finished board feel substantial in hand
Sketch the profile at actual scale on paper before you mark any wood. The first handle design almost always needs adjustment before anything gets cut.
The next three ideas take any of these forms as their starting point.
Material and Construction
These three ideas let the material carry the visual weight.
No complex pattern cuts or geometric precision required. The design lives in the species contrast, the wood’s character, or the grain symmetry itself.
Wide Two-Plank Board
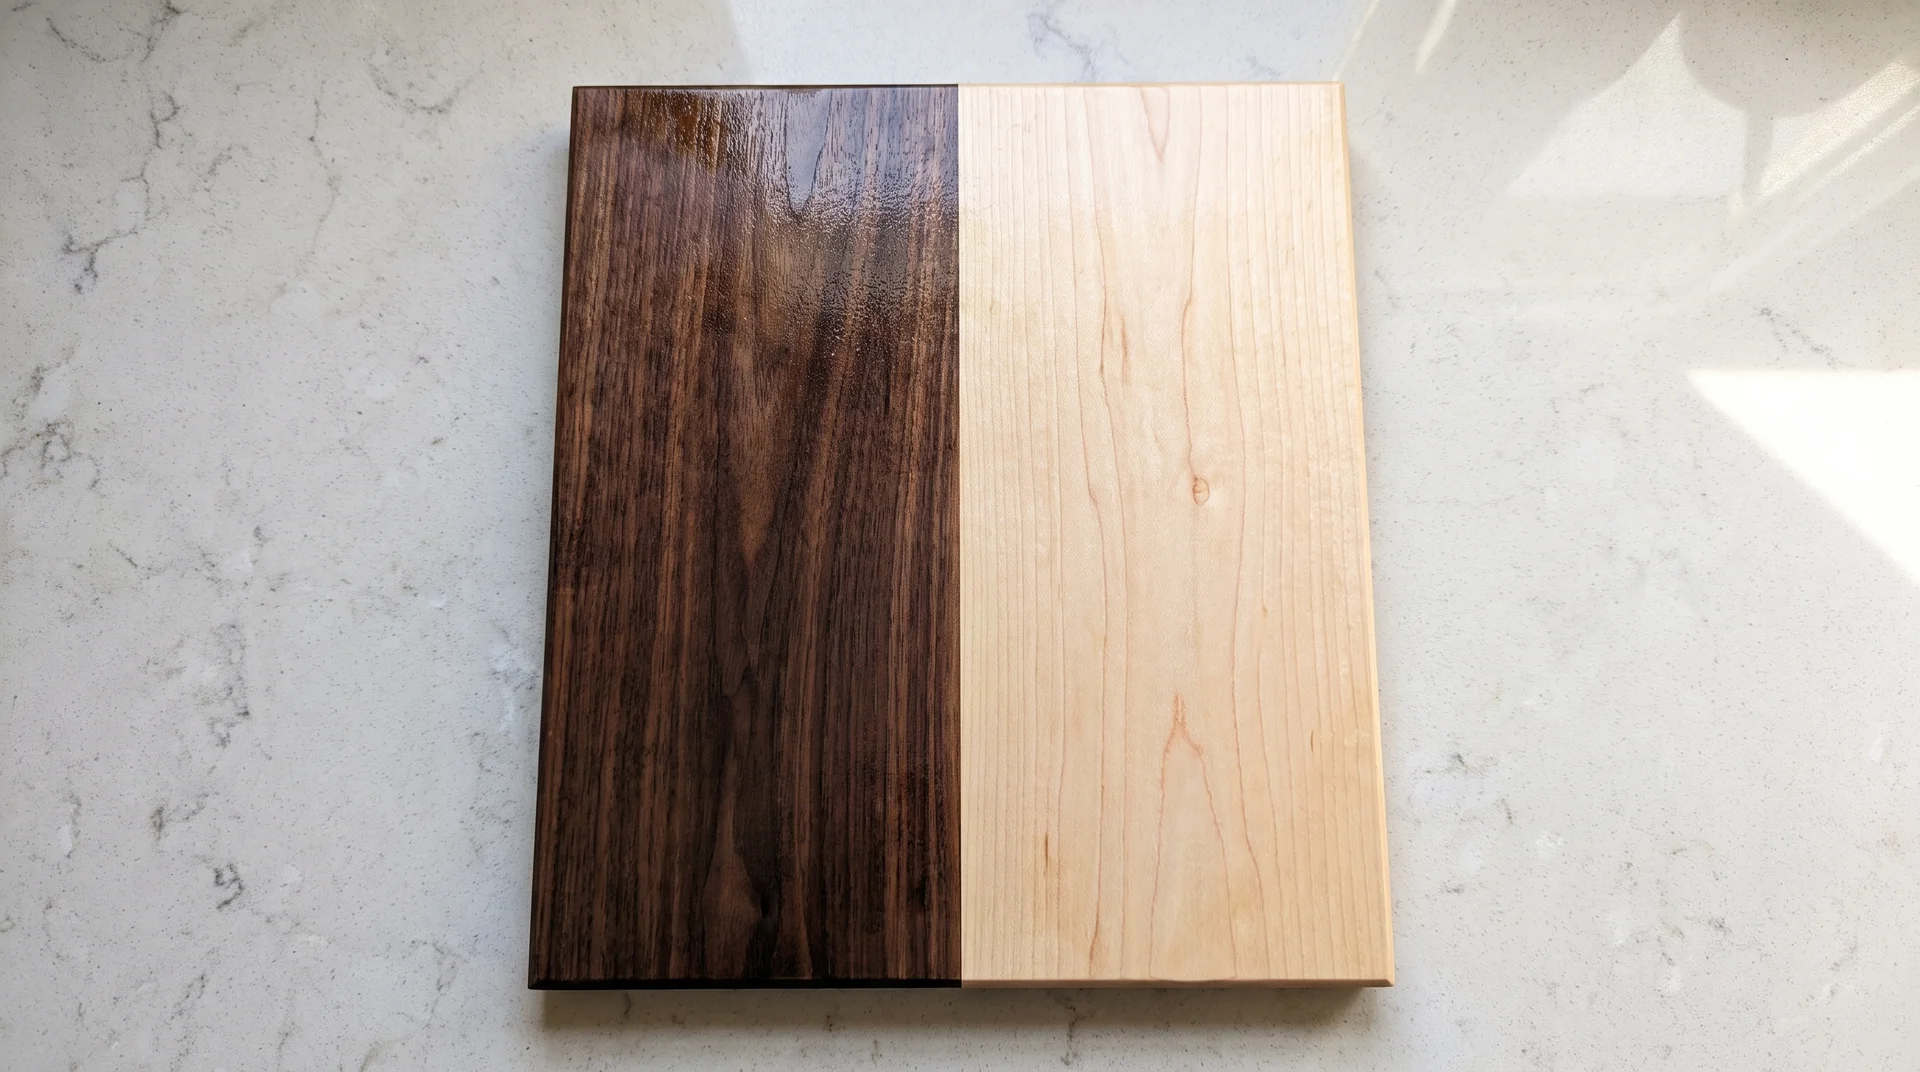
Half dark, half light, one glue line between them.
Use two wide planks, five inches or more each, in contrasting species. Walnut and maple are the standard combination. The single joint runs down the center of the board.
There’s nowhere to hide a poor glue line here. Join the mating edges until they close with no light visible along the full length.
One joint, full length, visible from any angle. Get it right before the glue goes on.
Glue, clamp, cure fully, then flatten and sand to 220. Budget 20 percent extra board footage for selection and waste. That figure is the real starting constraint on this build, and it usually shifts the final dimensions down from what you first sketched.
- Tools: jointer or hand plane for edge prep, clamps, belt sander or hand plane for flattening
- Species: two with strong tonal contrast; walnut and maple, or cherry and maple
- Key failure point: the single glue line; a gap you can feel after sanding is a gap that shows in the finish
Run your fingernail across the glue line after sanding. Any catch means the joint needs more work.
Reclaimed Salvaged Wood Board
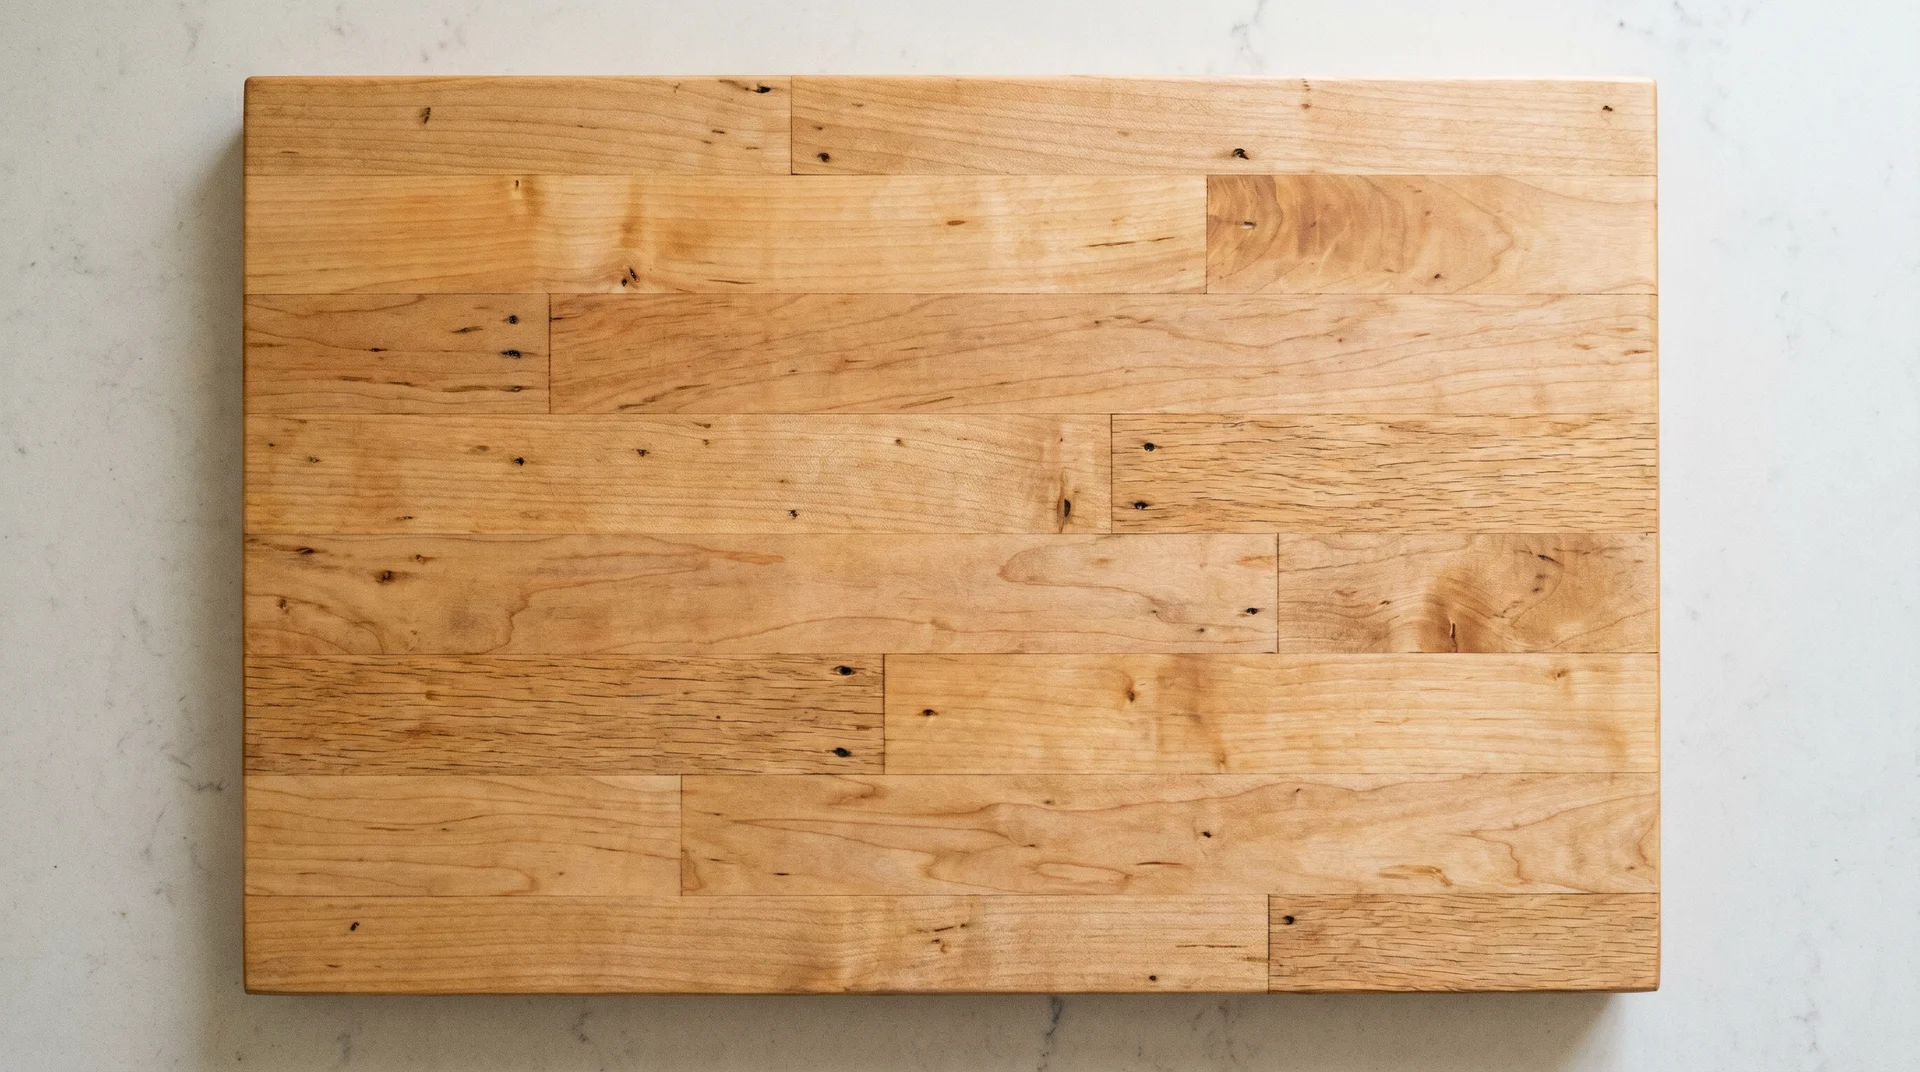
Old barn wood, salvaged flooring, and hardwood timbers from demolition carry a visual character that no new lumber replicates.
Nail holes, color variation, visible patina, and grain with decades of history: these are features of reclaimed wood, not defects. A finished board from 80-year-old maple flooring looks like nothing available at a hardwood dealer.
The sourcing is the real design problem here.
Reclaimed maple and walnut flooring are the best food-contact appropriate options when you can find them. Pine, fir, oak, and ash are all wrong for cutting surfaces regardless of character.
Run a metal detector over the full board before any machine work.
- Tools: metal detector before machining, jointer, planer or router sled, sander
- Sources: salvage yards, architectural salvage dealers, Habitat for Humanity ReStore locations, hardwood flooring removal jobs
- Surface prep: significant material removal is often needed; plan an extra session before finishing sanding
A router sled handles boards too wide or too rough for a standard planer. It’s the more reliable tool for reclaimed stock with unpredictable surface variation.
Bookmatched Board
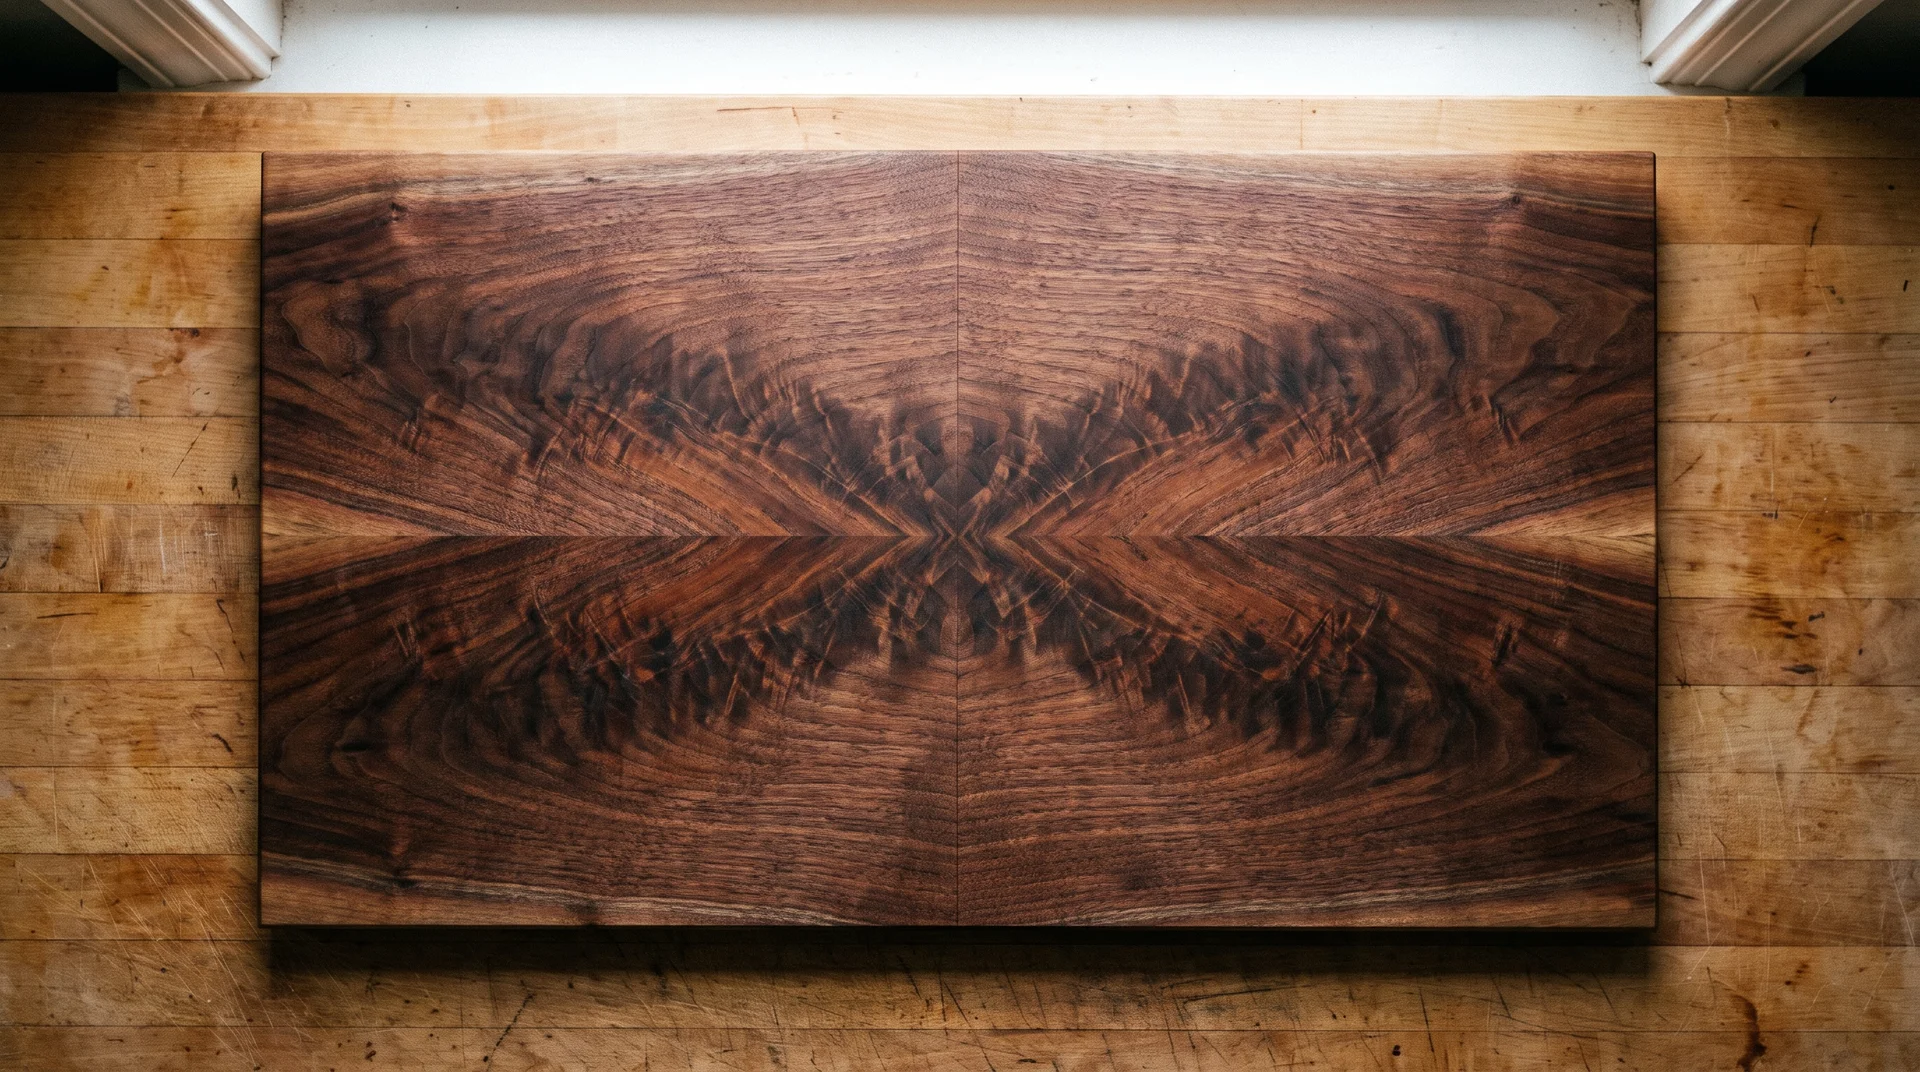
A bookmatched board produces mirrored grain symmetry from a single cut.
Resaw a single plank through its thickness on a bandsaw. Open the two halves like a book. Natural figure in walnut or cherry unfolds from the center as a mirror image.
The join line disappears into the symmetry. That effect either works immediately or it doesn’t, and it depends entirely on the evenness of the resaw.
Both sawn faces must be flat and square before gluing. Nothing covers that gap after the clamps come off.
- Tools: bandsaw with resaw fence, jointer or hand plane to flatten the sawn faces, and clamps
- Best species: walnut (figure reads most dramatically), cherry (warmer and more subtle), or figured maple
- Best use: serving board; the visible center join makes this a presentation surface rather than a heavy-use cutting board
Resaw as close to the plank’s center as possible. A thickness difference between the two halves shows as a slight color variation in the finished board. The jointing and glue-up skills this builds depend on.
Read:How to Glue-up a Wood Tabletop?
The geometric patterns below work on a bookmatched base, but the grain symmetry usually does more than any added surface pattern would.
Geometric Patterns: Five That Actually Look Different
Five patterns, five distinct visual families.
None of these are end-grain grids. Twelve years of documented design failures have shown me the same thing: the boards that stop people are the ones where a genuine decision is visible.
Epoxy resin pours aren’t in this group. The pour workflow belongs in its own dedicated piece. What follows covers what you can do with a table saw, a bandsaw, and precise jig work.
Face-Grain Chevron
![]()
Two species cut at 45 degrees and arranged so the angled strips meet at a center V.
The V is what draws the eye. Everything in this design is about whether it closes exactly at the center. A variation of 1/32 inch across multiple strips accumulates into a visible gap at the apex.
A precise 45-degree crosscut sled is the only way to hold tolerances across a full board’s worth of strips. Set the sled, verify the angle on a test piece, and hold that setting for every strip before gluing anything.
- Tools: table saw with a precise 45-degree crosscut sled, clamps
- Species: two with strong tonal contrast; the V only reads clearly when the difference is visible at a glance
- Key failure point: angle and width variation compound across every strip in the glue-up
I’ve seen boards where this closes perfectly and boards where it almost does. The difference is always in the sled setup, not the wood or the species combination.
Sunburst or Pinwheel Board
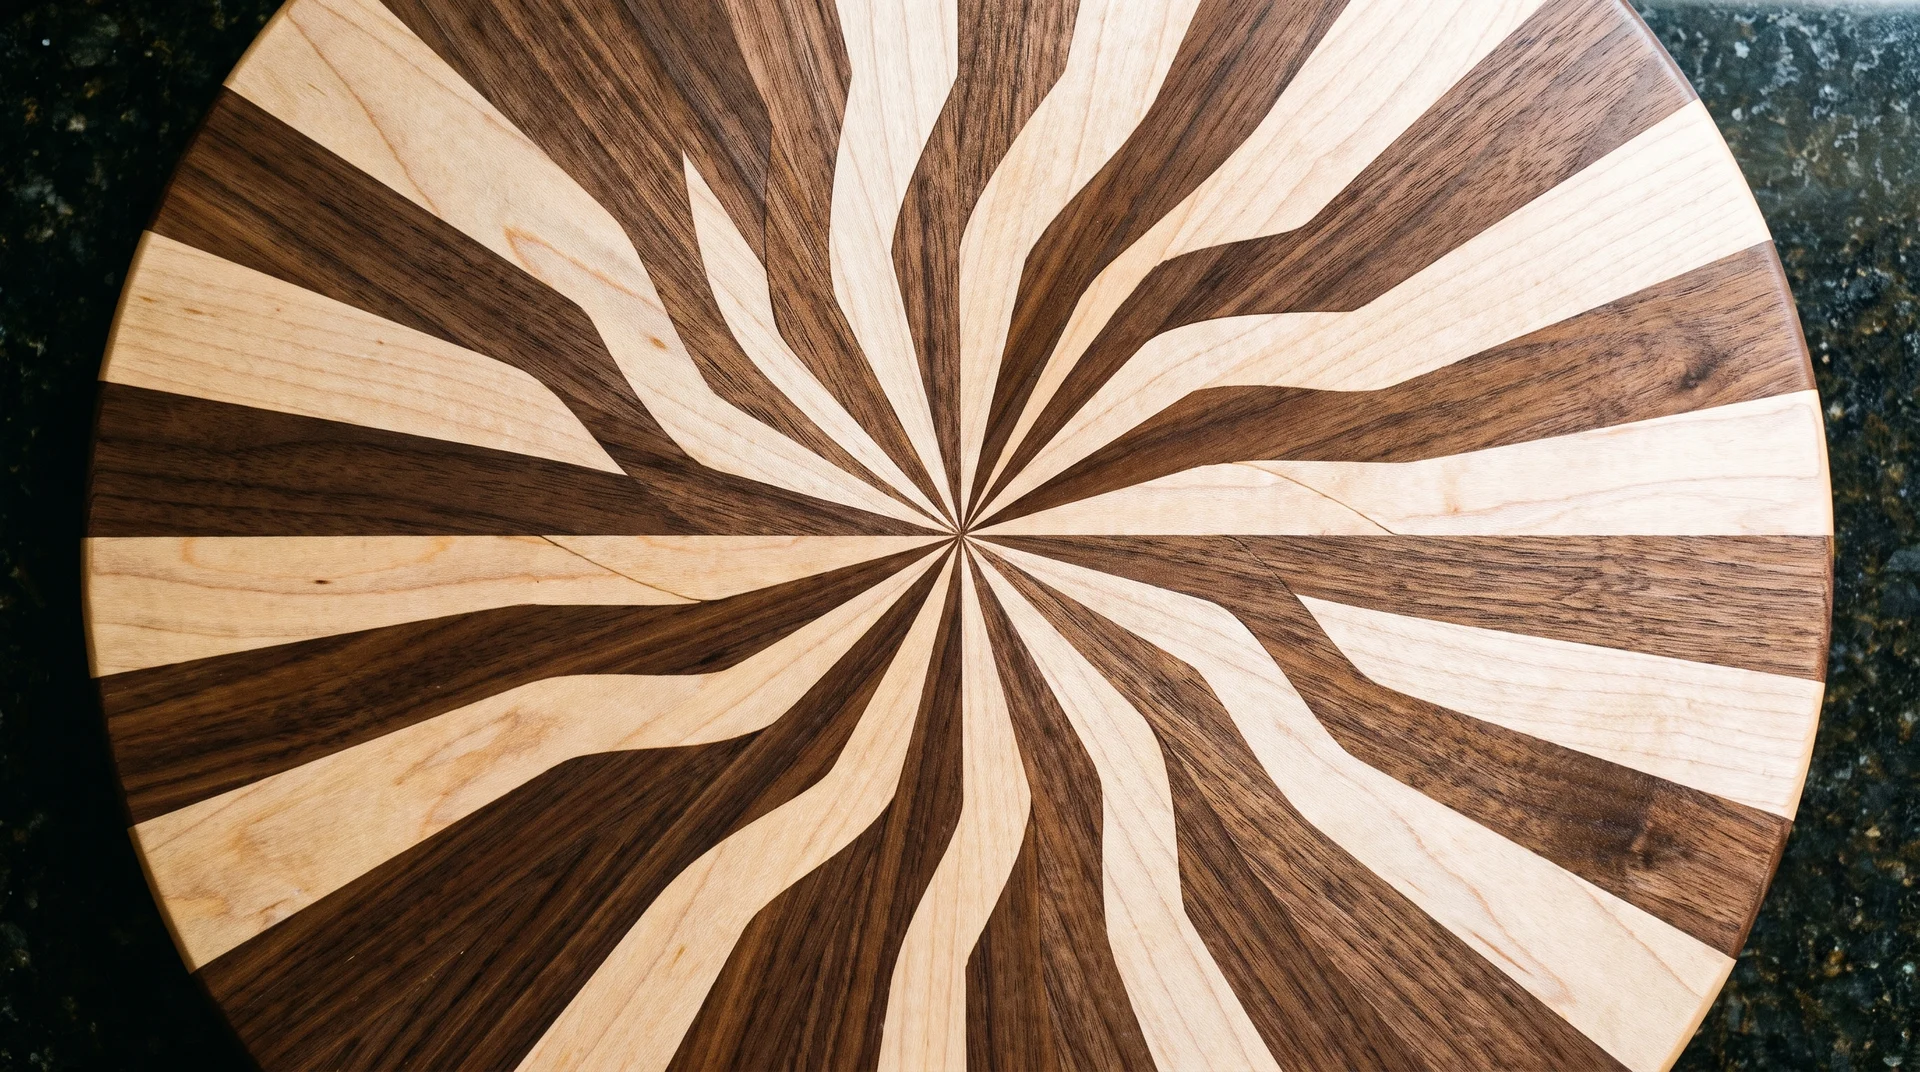
Strips radiating outward from a center point produce a starburst with no parallel lines anywhere on the surface.
Stand at the bench and set the math before you touch the wood. Each piece is a trapezoid: narrower at the center, wider at the perimeter. The long grain of each strip runs outward from the pivot point.
A dedicated wedge-cutting sled on the table saw determines the cut angle for every piece. Eight strips need 22.5-degree angles on each side. Twelve strips need 15-degree angles. Fix the number of strips before you build the sled.
- Tools: table saw with an adjustable wedge sled, clamps, and a center dowel for assembly alignment
- Species: two alternating for visual contrast, or a gradient from dark at the center to light at the perimeter
- Build time: two sessions minimum; jig setup alone takes an hour on the first attempt
Dry-assemble the full pattern before any glue goes on. Number every piece in order. Glue opposite pairs first to build a symmetric structure, then add pieces outward in stages.
Gluing all pieces at once produces a chaos of sliding trapezoids under clamp pressure. I’ve watched that happen. It’s not recoverable.
Wave-Cut Between Species
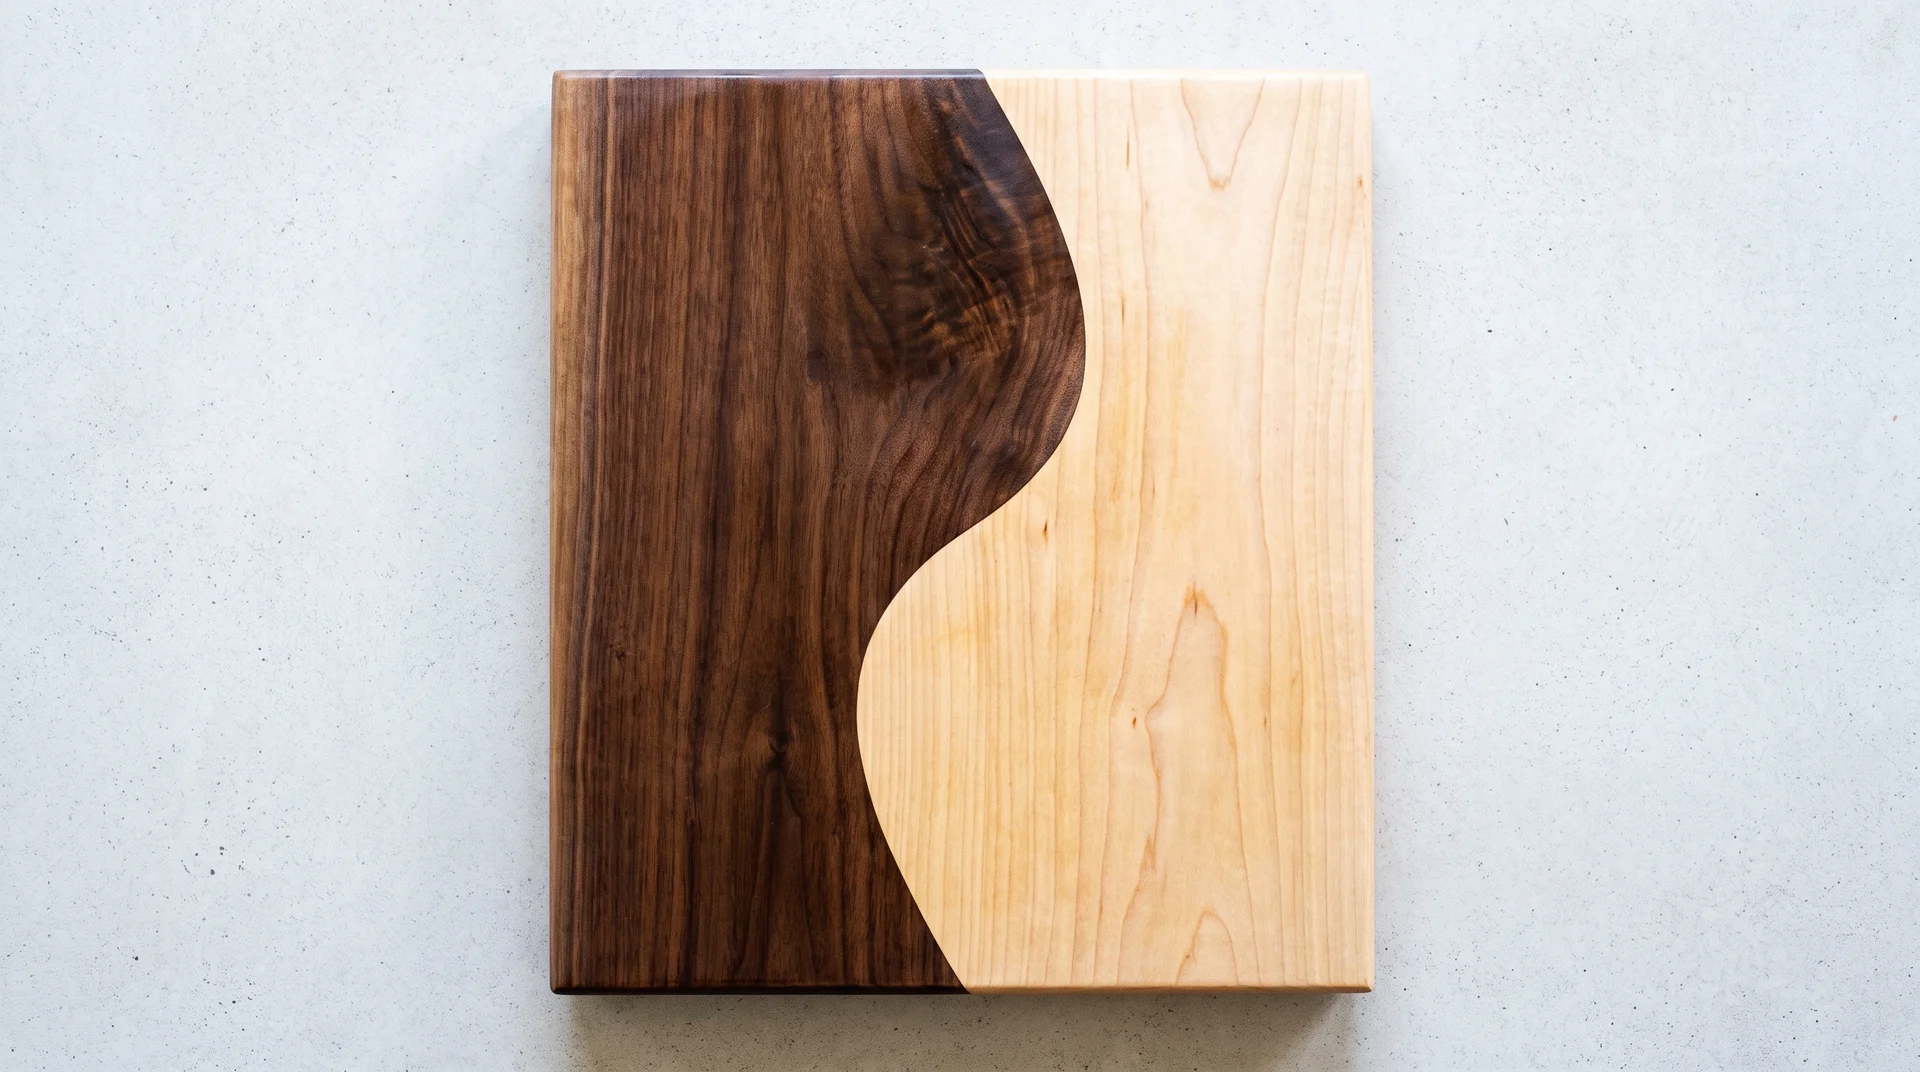
A bandsaw S-curve through a two-species panel, halves swapped and re-glued, creates a curved organic boundary that no jig produces.
Glue two species edge-to-edge in a standard two-plank arrangement. Let it cure fully and flatten the surface. Then run a freehand S-curve through the board on a bandsaw, cutting directly through the glue line.
Swap the two halves. What was on the left goes right. The wave cut now registers as a matching positive and negative pair. Re-glue along the curved joint, clamp carefully, let it cure, and flatten the surface again.
- Tools: bandsaw with a smooth blade in good tension, clamps
- Species: strong tonal contrast; the curve reads most clearly when dark meets light at the boundary
- Key variable: blade condition and tension determine the quality of the curve; a dull or loose blade wanders
The curve the bandsaw produces has an organic quality no template can replicate. Whether it reads as graceful or hesitant depends almost entirely on how the blade tracks that particular day.
That’s part of what makes this design feel alive rather than mechanical.
Diamond Argyle Inlay
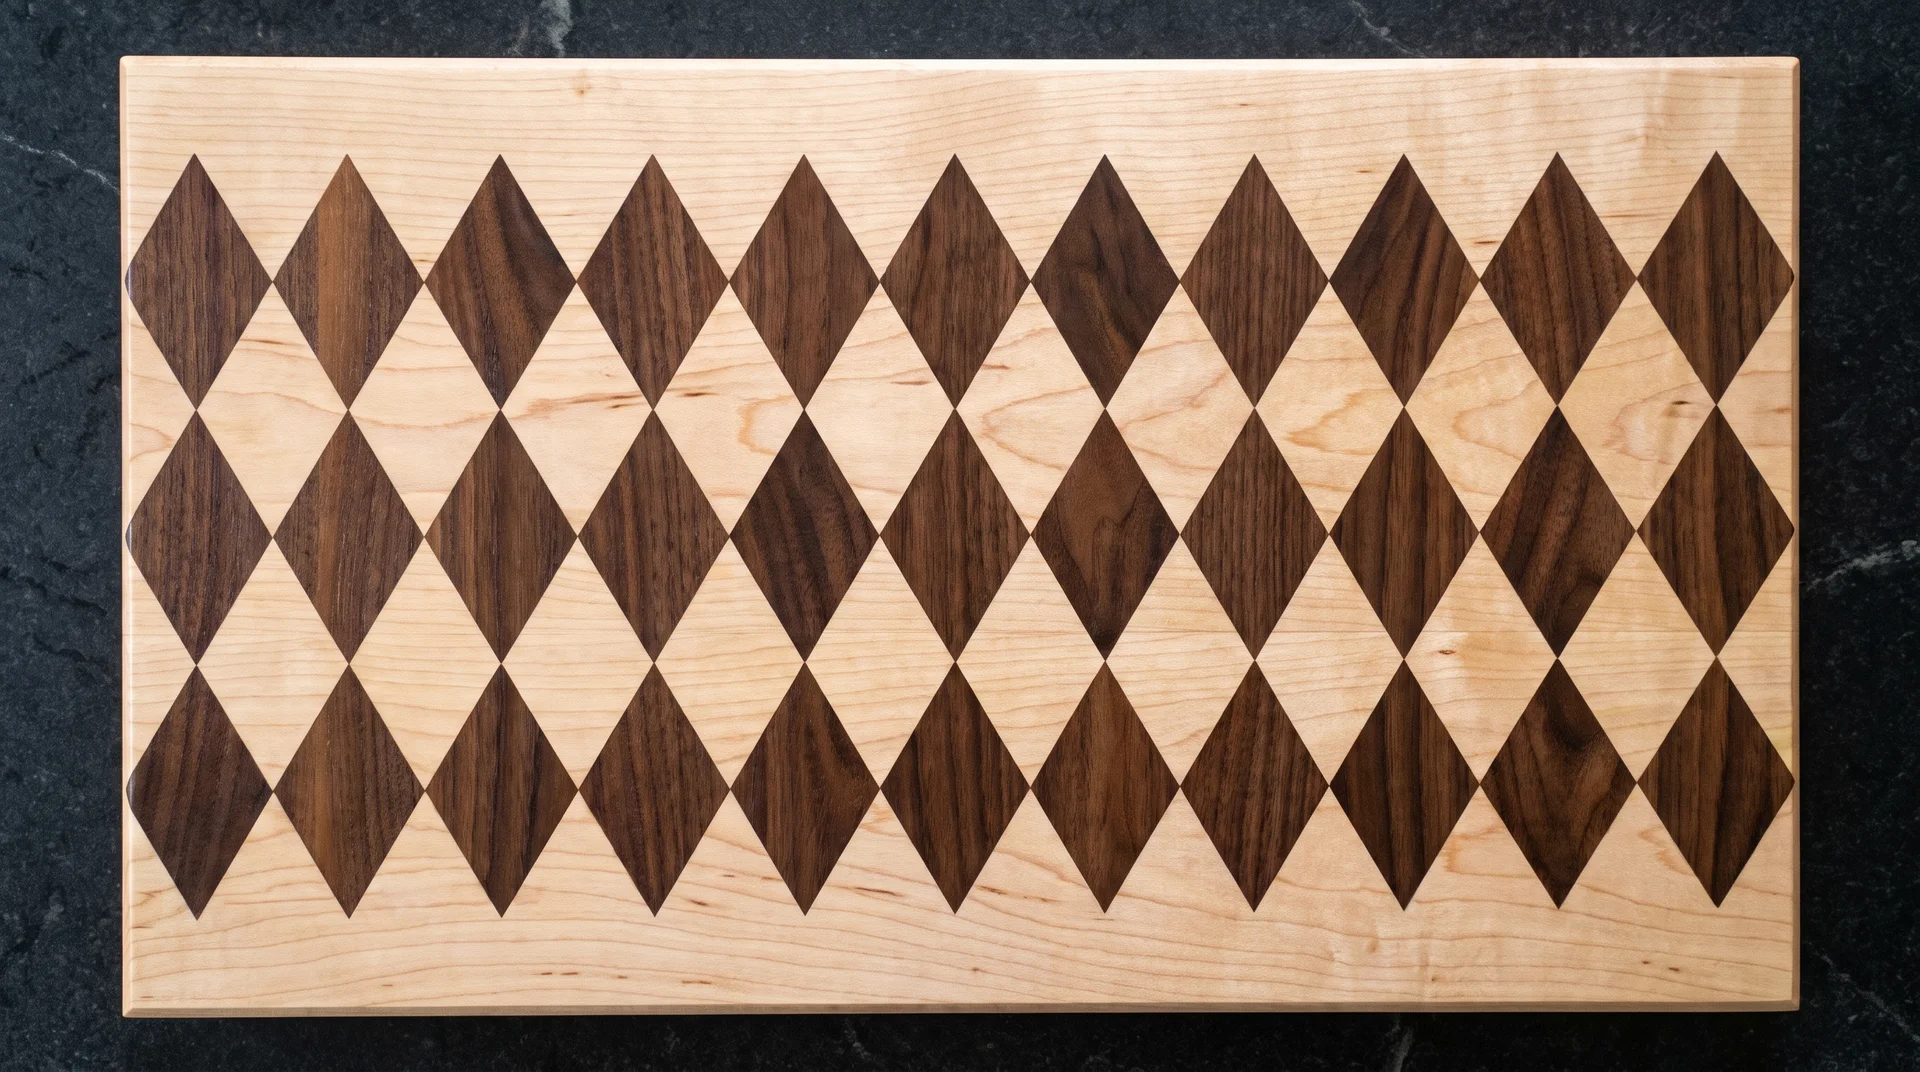
Individual contrasting wood diamonds routed into a plain hardwood field create isolated shapes rather than a repeating stripe or grid.
Build a flat hardwood baseboard first. Make a diamond routing template from thin MDF. Clamp the template to the board and rout each cavity to a consistent depth of about 1/4 inch.
Cut contrasting wood diamonds fractionally oversized. Glue them into the cavities and let them cure fully. Flush-trim each one with a router, then sand the full surface level.
- Tools: router with a template guide bushing, sharp chisels for corner cleanup, flush-trim router bit, sander
- Species: maple field with walnut diamonds, or a light shape on a dark walnut field
- Template accuracy: the diamond template determines every cavity; make it from stable MDF and verify angles before cutting into the board
A router with a template guide produces rounded corners inside each cavity. Sharp chisels square them to match the diamond piece. This detail work slows on the first board and speeds up considerably on the second.
Face-Grain Brick Layout
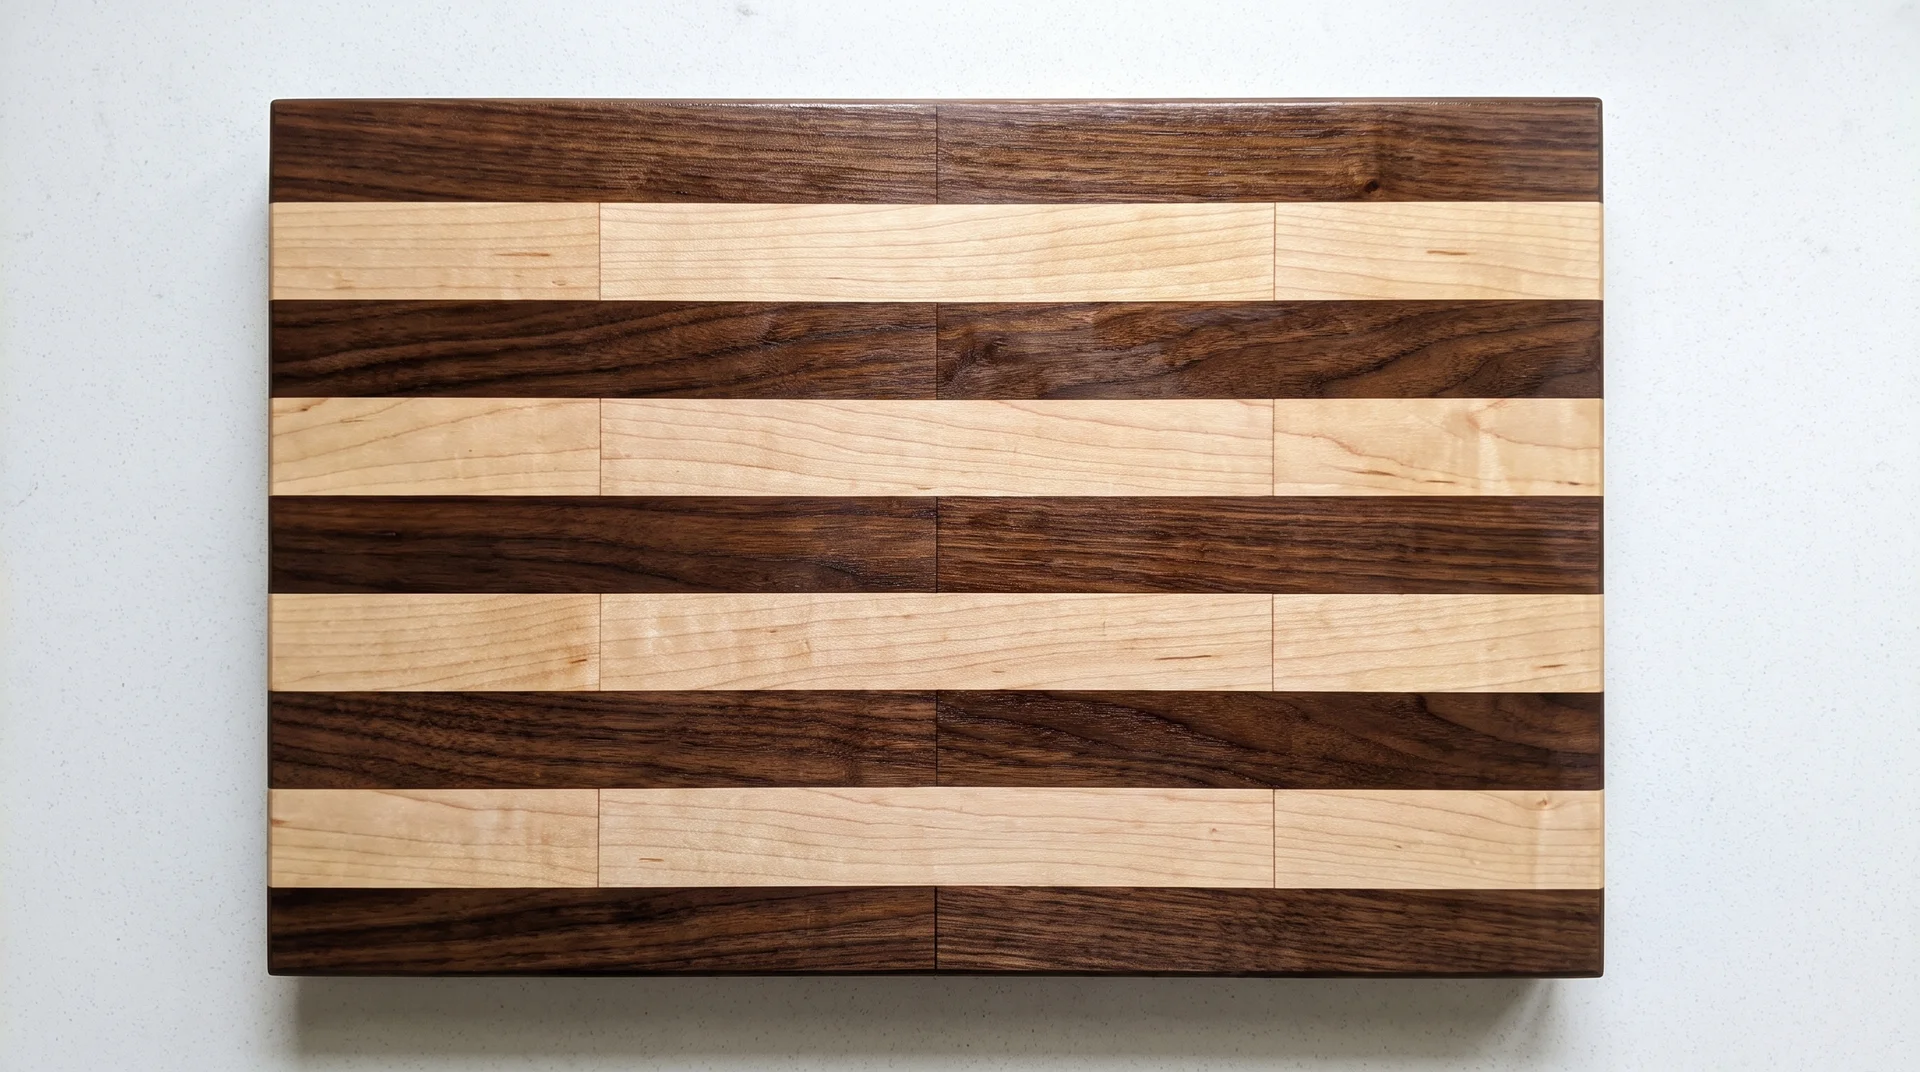
Face-grain strips in a brick-offset arrangement read as surface texture, not geometric grid.
The long grain of each strip is visible on the surface. The pattern reads in the length variation and horizontal stagger. It’s a quieter design than anything else in this category, and it works because of that.
Cut all strips into two lengths: full and half. Alternate those two row types through the full glue-up. The half-length pieces start and finish alternating rows at each end.
- Tools: table saw, clamps
- Species: two alternating for the clearest brick distinction; single species depends entirely on the offset for visual rhythm
- Critical detail: cut all strips from one fence setting without moving it; any width variation breaks the row alignment
This is the geometric idea best suited to a first pattern build. The cuts are straight. The jig is simple. The result is more interesting than it sounds in print.
Surface Treatments
These three ideas go on top of any flat hardwood board sanded to 220, regardless of which category it came from.
Build the base first. All three of these are committed decisions. None of them is reversible once applied.
Pyrography Illustration
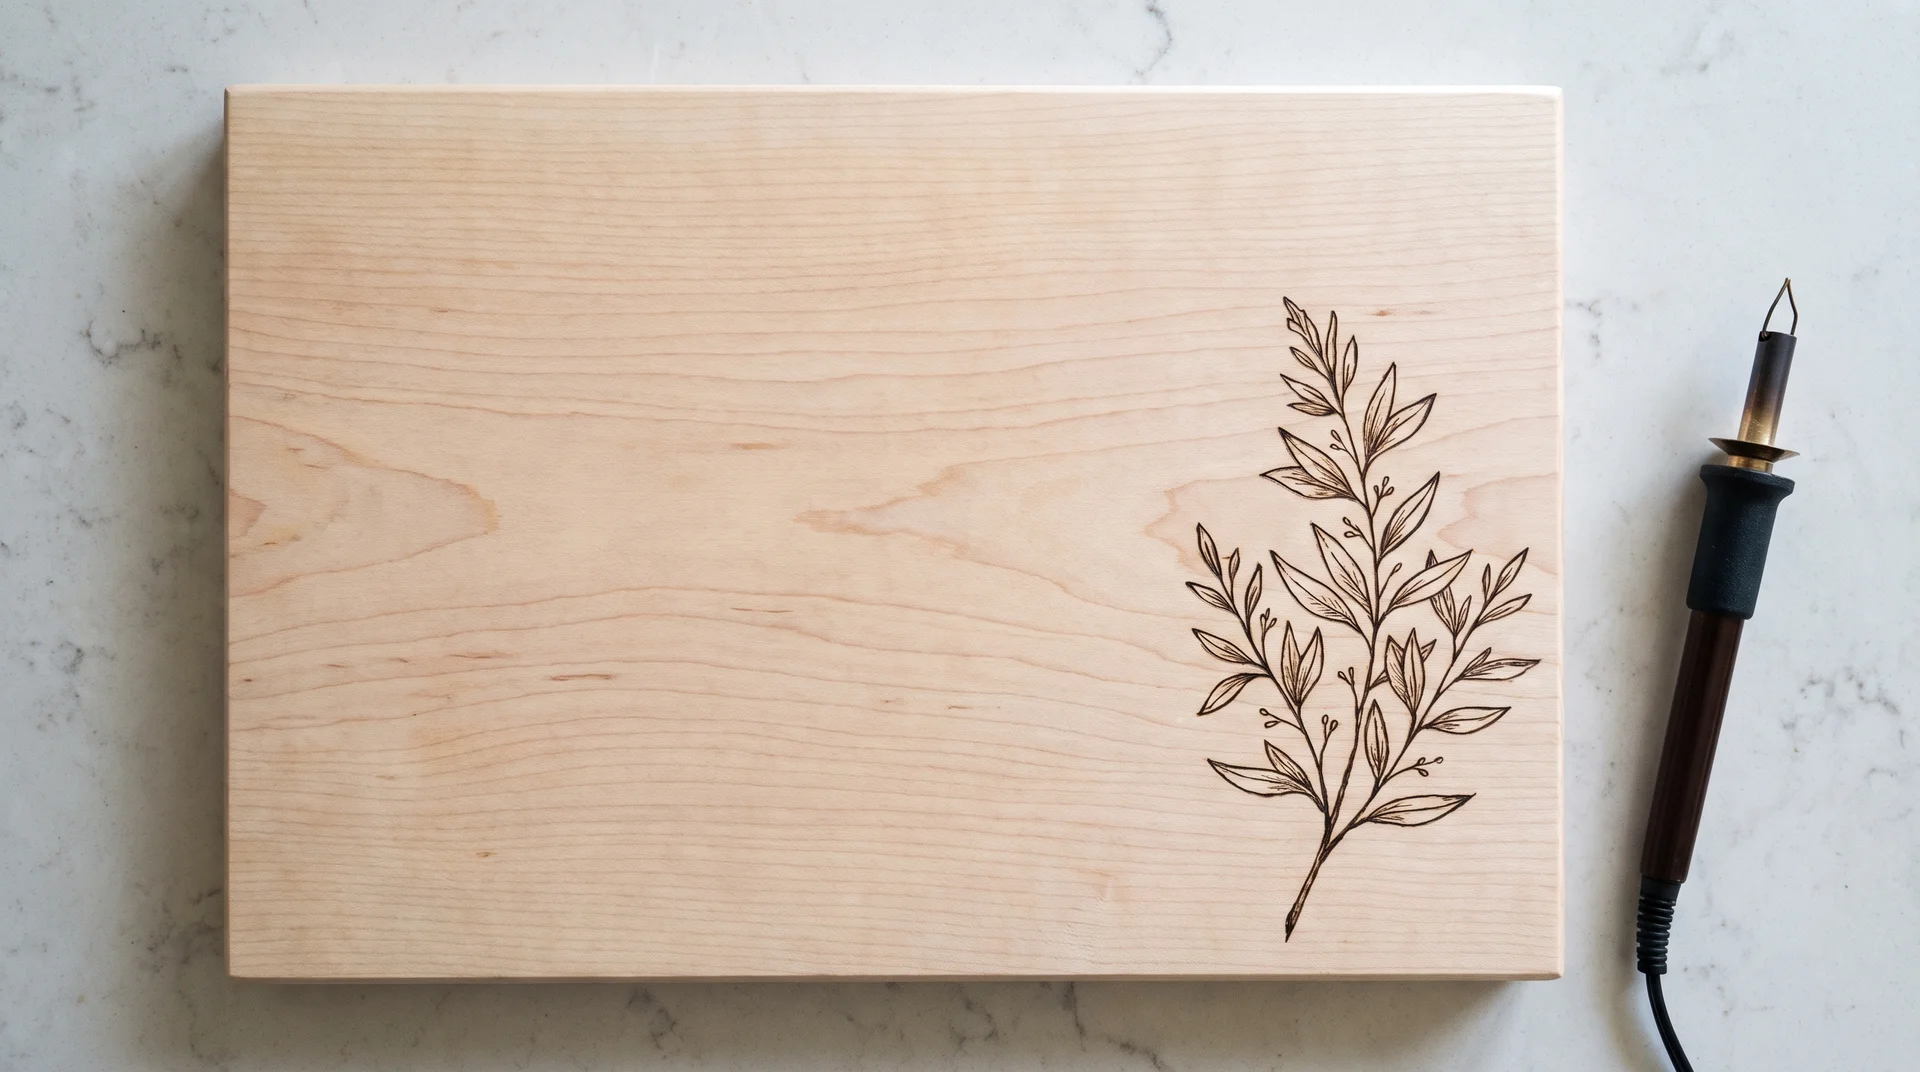
A pyrography pen draws any design directly into the board surface without touching the construction underneath.
Light-toned species show the burned line most clearly. Maple is the standard choice. Dark species like walnut absorb the visual contrast and make the design hard to read.
Print the design at full scale, transfer the outline to the wood with carbon paper, and burn along the transferred lines. Burn the full design before any finish goes on. Oil applied over charred wood seals the char permanently.
- Tools: pyrography pen with a selection of tip sizes; a fine tip for detail work, a heavier tip for outlines
- Safety: work in a ventilated space; burning produces particles and fumes that concentrate quickly in a closed room
- Practice: work on a scrap piece of the same species first; tip temperature, movement speed, and grain direction all affect how the line reads
A single botanical sprig in one corner of a plain maple board reads more deliberately. A design that fills the whole surface rarely does.
Carved Monogram Inlay
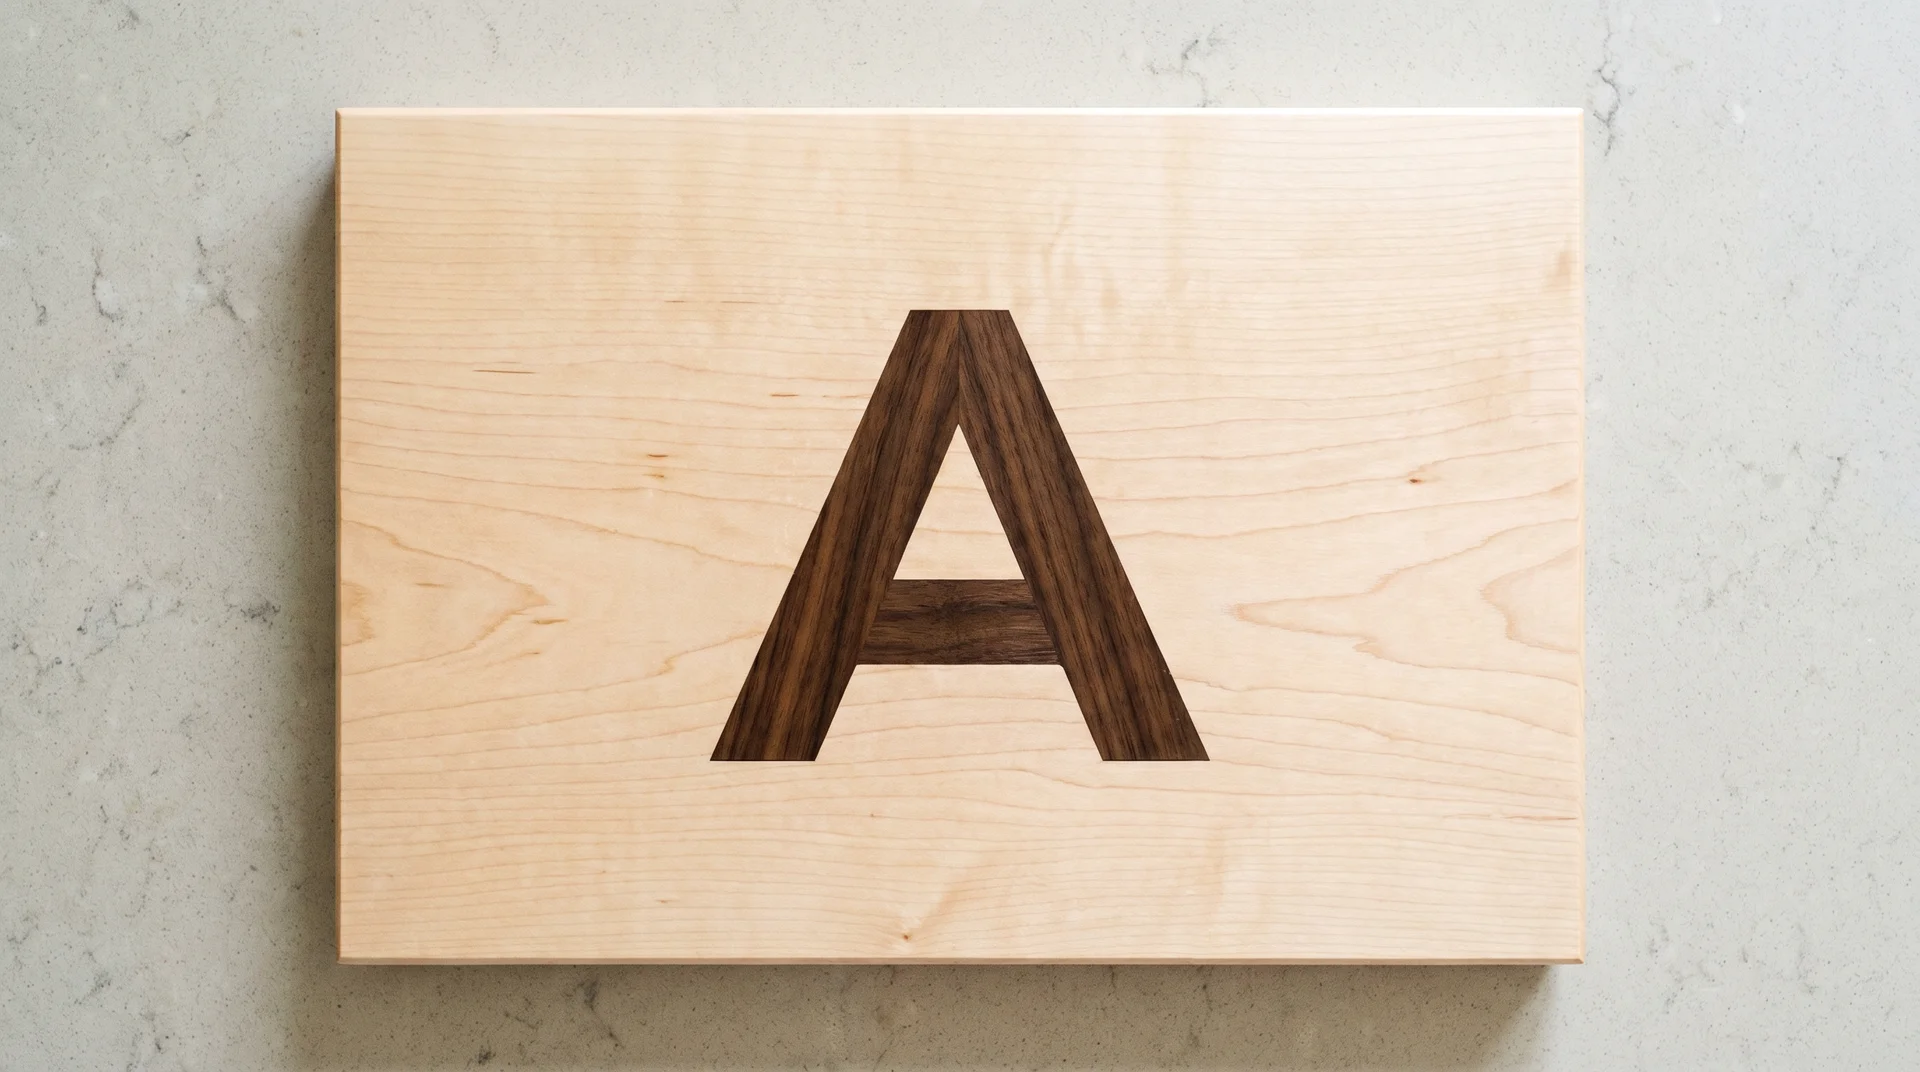
A letter routed out of a flat board and filled with contrasting wood is more permanent-looking than burning and more demanding to execute cleanly.
Print the letter at the final size and transfer it to the board. Rout the shape to a consistent depth of about 1/4 inch. The router produces rounded interior corners that need chiseling square before the inlay piece can seat.
Cut the matching letter from a contrasting species slightly oversized. Fit it into the cavity with chisels until it seats without gaps. Glue, clamp, cure fully, then flush the inlay level with the surface.
- Tools: router with a small straight bit, sharp chisels, sander or hand plane to flush the inlay after curing
- Species: maple board with walnut inlay for the clearest contrast; walnut board with maple inlay for a light letter on a dark field
- Letter choice: clean geometric letterforms rout and fit more cleanly than script or ornate type
Script letterforms require hand-cut curved cavities along every line. A clean sans-serif capital is the better starting point.
Charred Edge Treatment
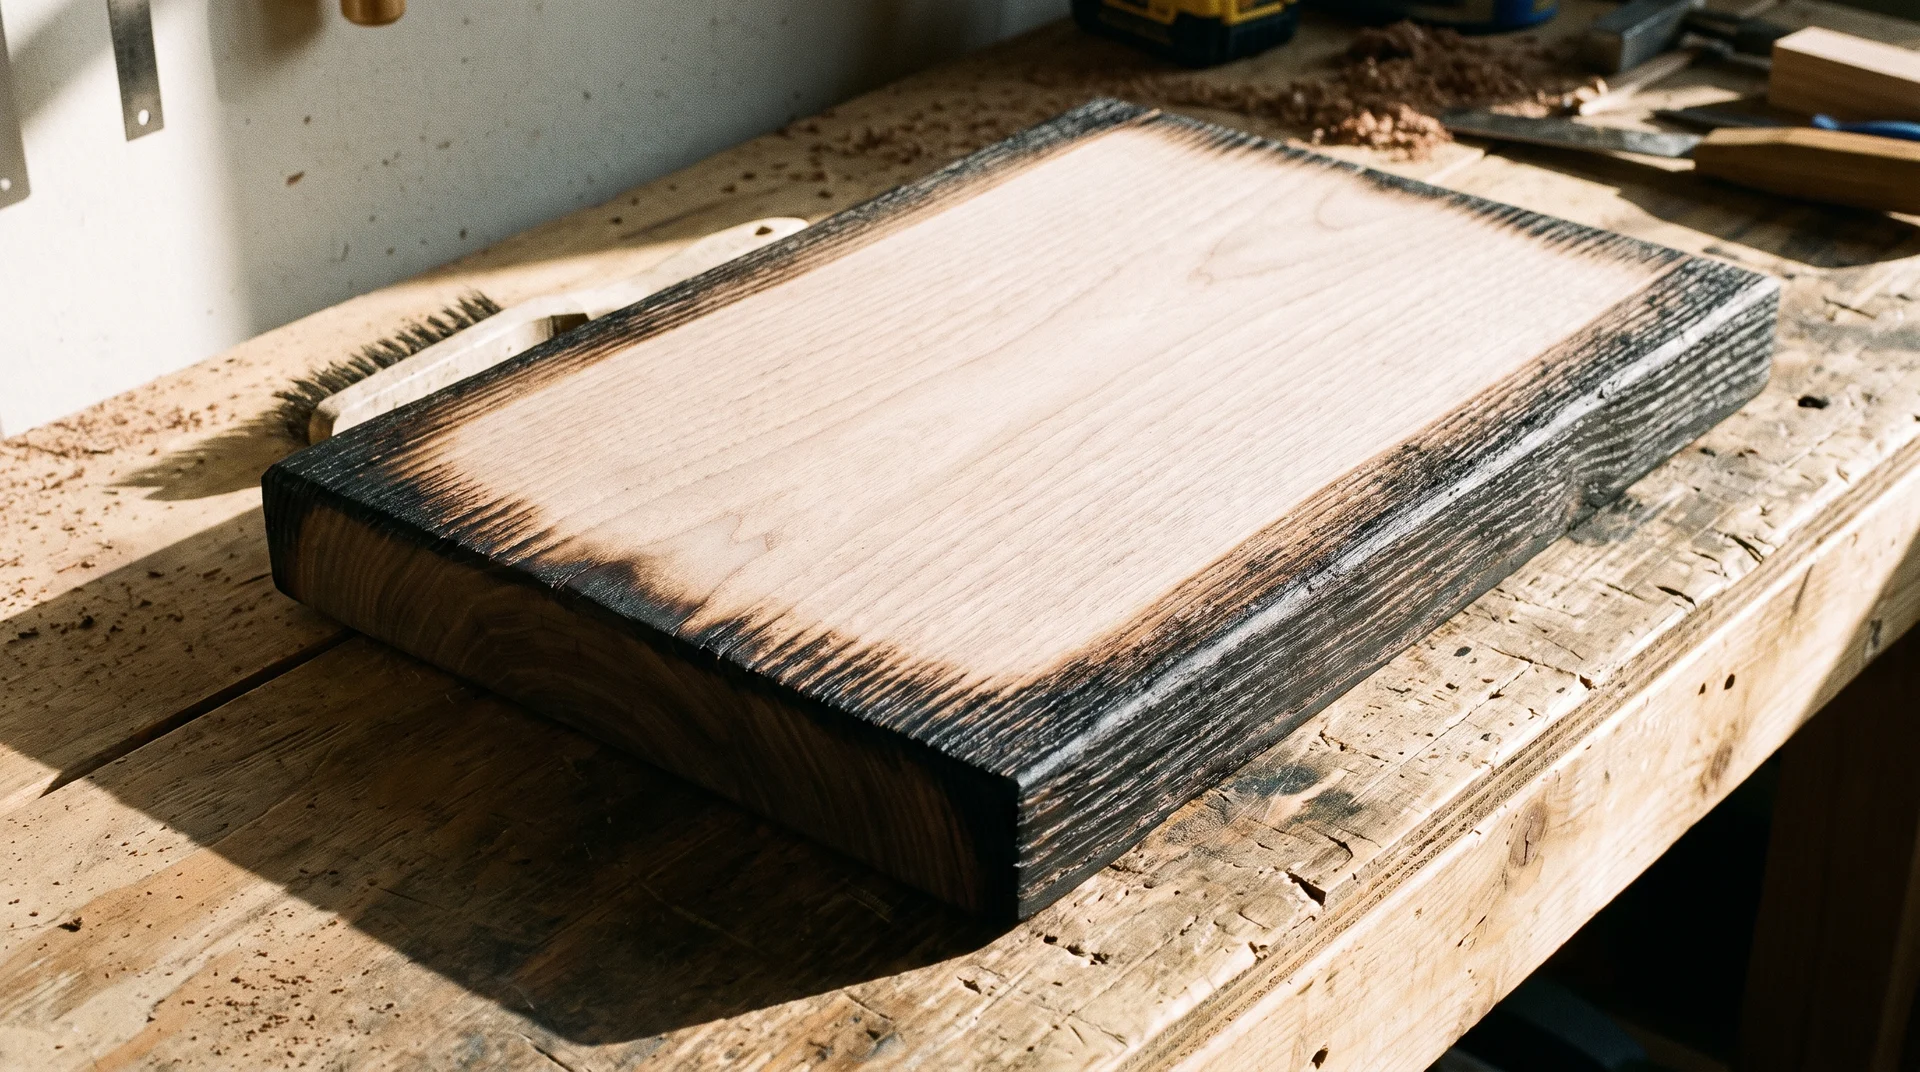
Torch-darkening the edges and end-grain faces of a finished board produces a dark perimeter that makes any board read as more resolved.
A dark perimeter changes how a board reads from across the kitchen before you get close enough to see the surface. That effect costs about twenty minutes of torch work and requires no construction changes.
Hold a propane torch six to eight inches from the edge and move it continuously. Stop before the wood ignites. Wire-brush the charred surface after it cools. The brushing removes the loose char and reveals the grain structure below, which has darkened but not carbonized.
- Tools: propane torch, wire brush, heat-resistant gloves
- Safety: work outdoors or in a well-ventilated workshop with water nearby; the board needs time to cool fully before handling
- Finish: apply a thin coat of mineral oil to the charred edges after wire-brushing; the cutting face receives the standard oil treatment separately
Apply the torch to the edge and end-grain faces only. The cutting surface is unaffected by this process throughout.
The functional builds below each start with a plain flat board and a single router decision that changes how the board performs.
Functional Builds
These three ideas start with a functional problem and build the solution into the board.
The design is the function. Each one requires a router and a specific decision made before the board is finished. Set router bit depth in passes, not all at once. A single deep pass risks kickback on any of these operations.
The functionality stays invisible until the board is in use, which is where good functional design belongs.
Bread Board with Crumb Trough
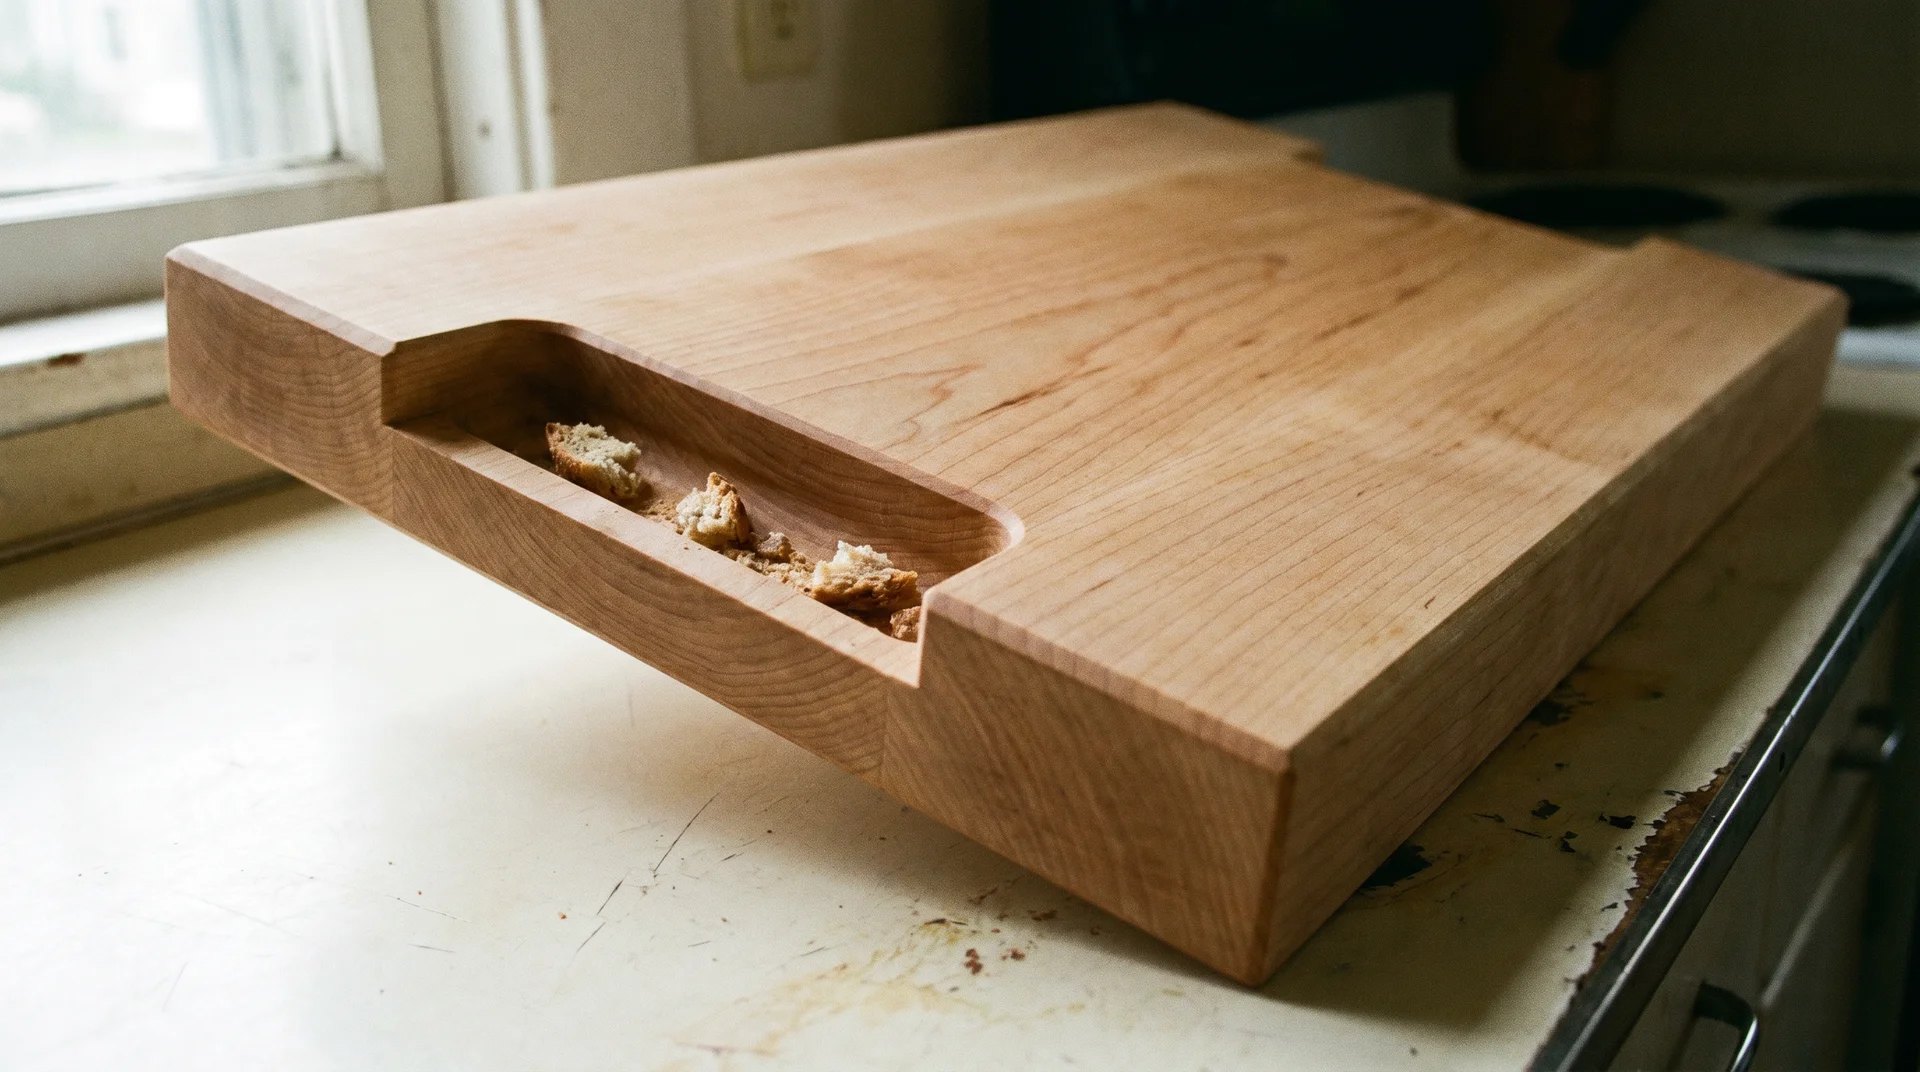
A routed channel on the underside near one end collects crumbs when the board tilts, without affecting the flat cutting surface on top.
Build a standard edge-grain board with the surface you want on top. On the underside, rout a channel approximately 1.5 inches wide and 1/4 inch deep, positioned about 1.5 inches in from one short end.
When you tilt the board toward that end, crumbs roll off the cutting face and collect in the trough rather than landing on the counter. The cutting surface above stays completely flat and uninterrupted.
- Tools: router with a straight bit and edge guide, sander
- Design decision: which end the trough goes on depends on how you hold the board when tilting; think through the motion before routing
- Channel depth: 1/4 inch catches crumbs without weakening the board at that section
The trough doesn’t show when the board sits flat on the counter. It shows when the board is in use. That’s the same thing this category said at the start, and this board delivers on it.
Juice Well Board
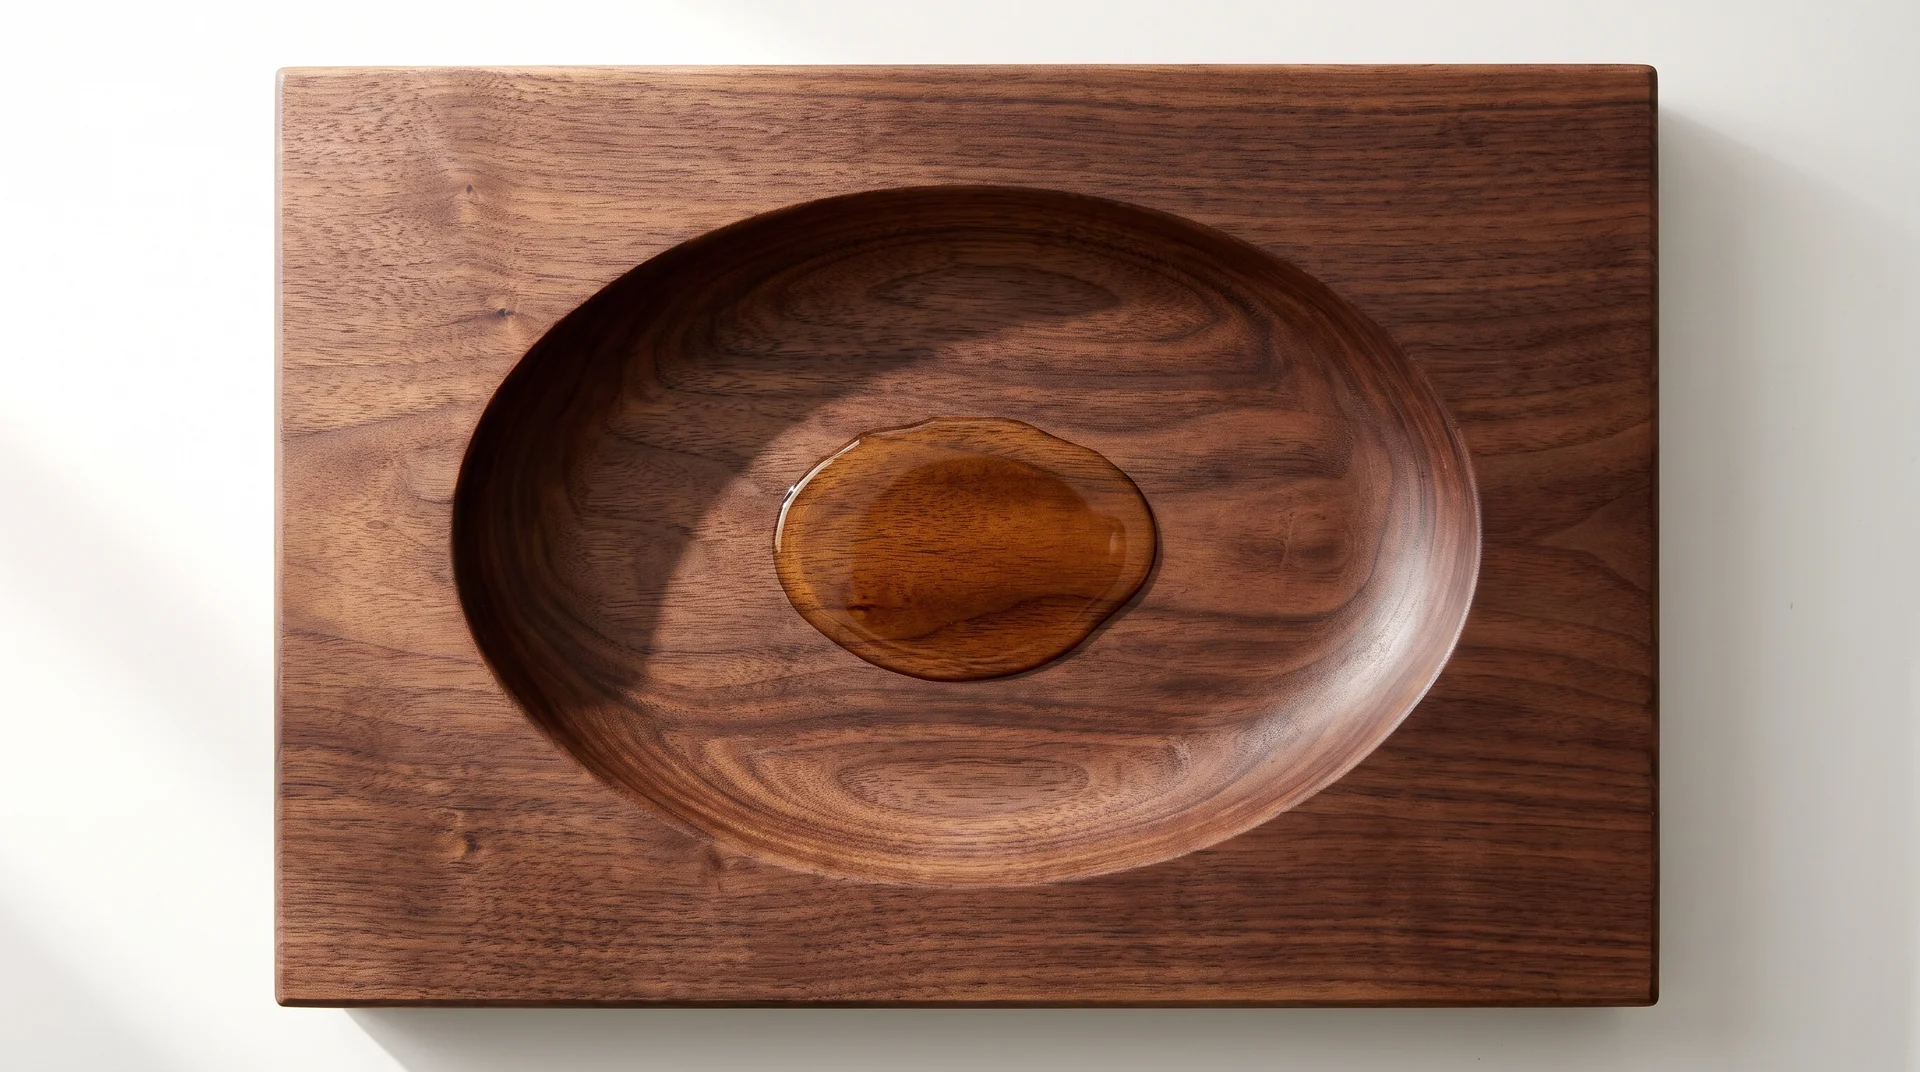
A central depression in the cutting surface holds liquid at the source rather than letting it travel to the edge.
A perimeter juice groove catches liquid that has already traveled to the edge. A well holds it where it forms. For a roast or a whole bird, the difference in actual containment is real.
Rout the well after the board is built and sanded. A template clamped to the surface guides the router in passes of increasing depth. Work to a minimum depth of 3/8 inch.
A 6-by-10-inch oval works for most carving tasks.
- Tools: router with a template and straight bit; chisel to clean corners if a rectangular well is preferred
- Template material: MDF or plywood cut to the well shape, clamped securely before routing begins
- Face decision: the well creates a permanent depression in one face; decide which face is the carving face before routing anything
The well commits this face permanently to carving use. Idea 17 handles that constraint differently, which is why both belong in this group.
Reversible Two-Face Board
![]()
One face is decorative and serves for presentation; the other is plain hardwood for everyday cutting use.
Flip the board at the counter and decide which face is out today. That’s the only operation the reversible design asks of you. Neither face is a compromise because each was built for its specific role.
Build the decorative face as a thin panel, approximately 1/2 inch thick. Use any pattern from the geometric or surface treatment categories for that face. Build the base from a single-species hardwood at full cutting board thickness, typically 1.25 to 1.5 inches.
- Tools: depend on the decorative face pattern chosen; base construction needs only a table saw and clamps
- Total thickness: 1.75 to 2 inches gives the board good weight and a solid feel underhand
- Species pairing: the base and decorative face don’t need to match; a walnut base with a maple-and-cherry decorative face is a strong combination
Add four small rubber feet recessed into the decorative face. When that face is down, the feet keep it stable and protect the surface from counter debris.
Without them, the decorative face sits flat on the counter and scratches over time.
Frequently Asked Questions
These four questions come up in every cutting board build discussion I have ever had.
How do I choose between the five design categories?
Start with your tools, then your use case. Form designs need a bandsaw or a slab source. Surface treatments need almost nothing beyond a finished base board. Functional builds need a router. Geometric patterns need a table saw with precise jigs. Pick the category your current setup supports, then choose the idea within it that interests you most.
What wood is best for a cutting board?
Hard maple is the most practical starting point. It’s widely available in the US, affordable, and hard enough for a surface that holds up to daily use. Walnut and cherry work alongside it for any design that needs tonal contrast. Avoid open-pore hardwoods like oak and ash, and avoid all softwoods.
Can I combine ideas from different categories?
Yes, and some combinations are natural. A paddle serving board (Idea 3) with a pyrography illustration (Idea 12) works because the form fits the surface treatment. A reversible two-face board (Idea 17) works with any geometric pattern from Ideas 7 to 11 on the decorative face. Build the base idea fully before adding a surface treatment or functional build on top of it.
What’s the easiest idea on this list?
The wide two-plank board (Idea 4) offers the clearest visual impact from the simplest construction. The live-edge slab (Idea 1) is a great choice if you want something genuinely unique without any pattern work. Pyrography on a flat maple board (Idea 12) is the easiest way to add personalization without complex joinery.
