

Did you get confused with something like 8×10 or 9×12, and you’re trying to figure out what it means for your small kitchen floor plan?
That number determines which layouts are physically possible and which ones only look possible on a drawing. The layout decision comes before cabinet selection, appliance brands, and renovation costs.
What “Small Kitchen” Actually Means in Floor Plan Terms
A small kitchen is typically 70 to 100 square feet.
That puts you roughly in the range of a 7×10 or an 8×10 room. That size eliminates certain floor plan options before you even draw a single line.
Most articles use a 10×12 room as their “small kitchen” reference. A 10×12 kitchen is 120 square feet, and that is not small. If your kitchen is genuinely 70 to 100 square feet, advice written for a 10×12 room will mislead you about what’s possible in yours.
The average US kitchen is around 161 square feet. Nearly everyone searching for small kitchen floor plans has something significantly tighter.
- Under 70 sq ft: one-wall or partial galley only; very limited options
- 70–100 sq ft: small; galley, one-wall, or L-shaped, depending on room shape
- 100–130 sq ft: compact; most layout types become possible
- 130–160 sq ft: small-to-medium; a fixed island becomes a realistic option
The size determines which options are open. Your room’s shape determines which one wins.
The Four Small Kitchen Layouts Worth Considering
Your room’s shape determines which layout works, not your style preference.
Peninsula Layout

The layout gives you an island function without needing island clearance on all four sides.
A peninsula is a counter run attached to the wall on one end and open to the room on the other three sides. It works like an island for prep and seating, but because one end is fixed to the wall, it only needs clearance on three sides instead of four.
- Room size: 10×12 ft minimum
- Peninsula depth: 24 inches, matching the main counter depth
- Peninsula length: 36 to 60 inches
- Clearance on the open walkway side: 42 inches minimum
- Clearance between peninsula and any opposite cabinetry: 42 to 48 inches
The peninsula works where a fixed island doesn’t because it borrows support from the wall instead of standing alone. That single attachment point changes the clearance math in a meaningful way.
In a room that’s 10 feet wide, a freestanding island with 42-inch clearance on all sides is almost impossible. A peninsula in the same room is workable.
The seating overhang is the part most people get wrong.
- A 12-inch overhang gives you a place to perch but not to sit comfortably.
- Build 15 inches of overhang minimum for real stool seating, and allow 24 inches of peninsula length per stool.
- Two stools need at least 48 inches of peninsula. Measure that before the peninsula length is finalized, not after.
The peninsula also defines space in open-plan kitchens. Walk into a room where the kitchen is part of a larger living area. The peninsula becomes the visual edge of the kitchen zone without needing a wall to do it.
Narrow Galley (Under 8 Feet Wide)
The adapted galley for rooms too narrow for standard counter depths on both sides.
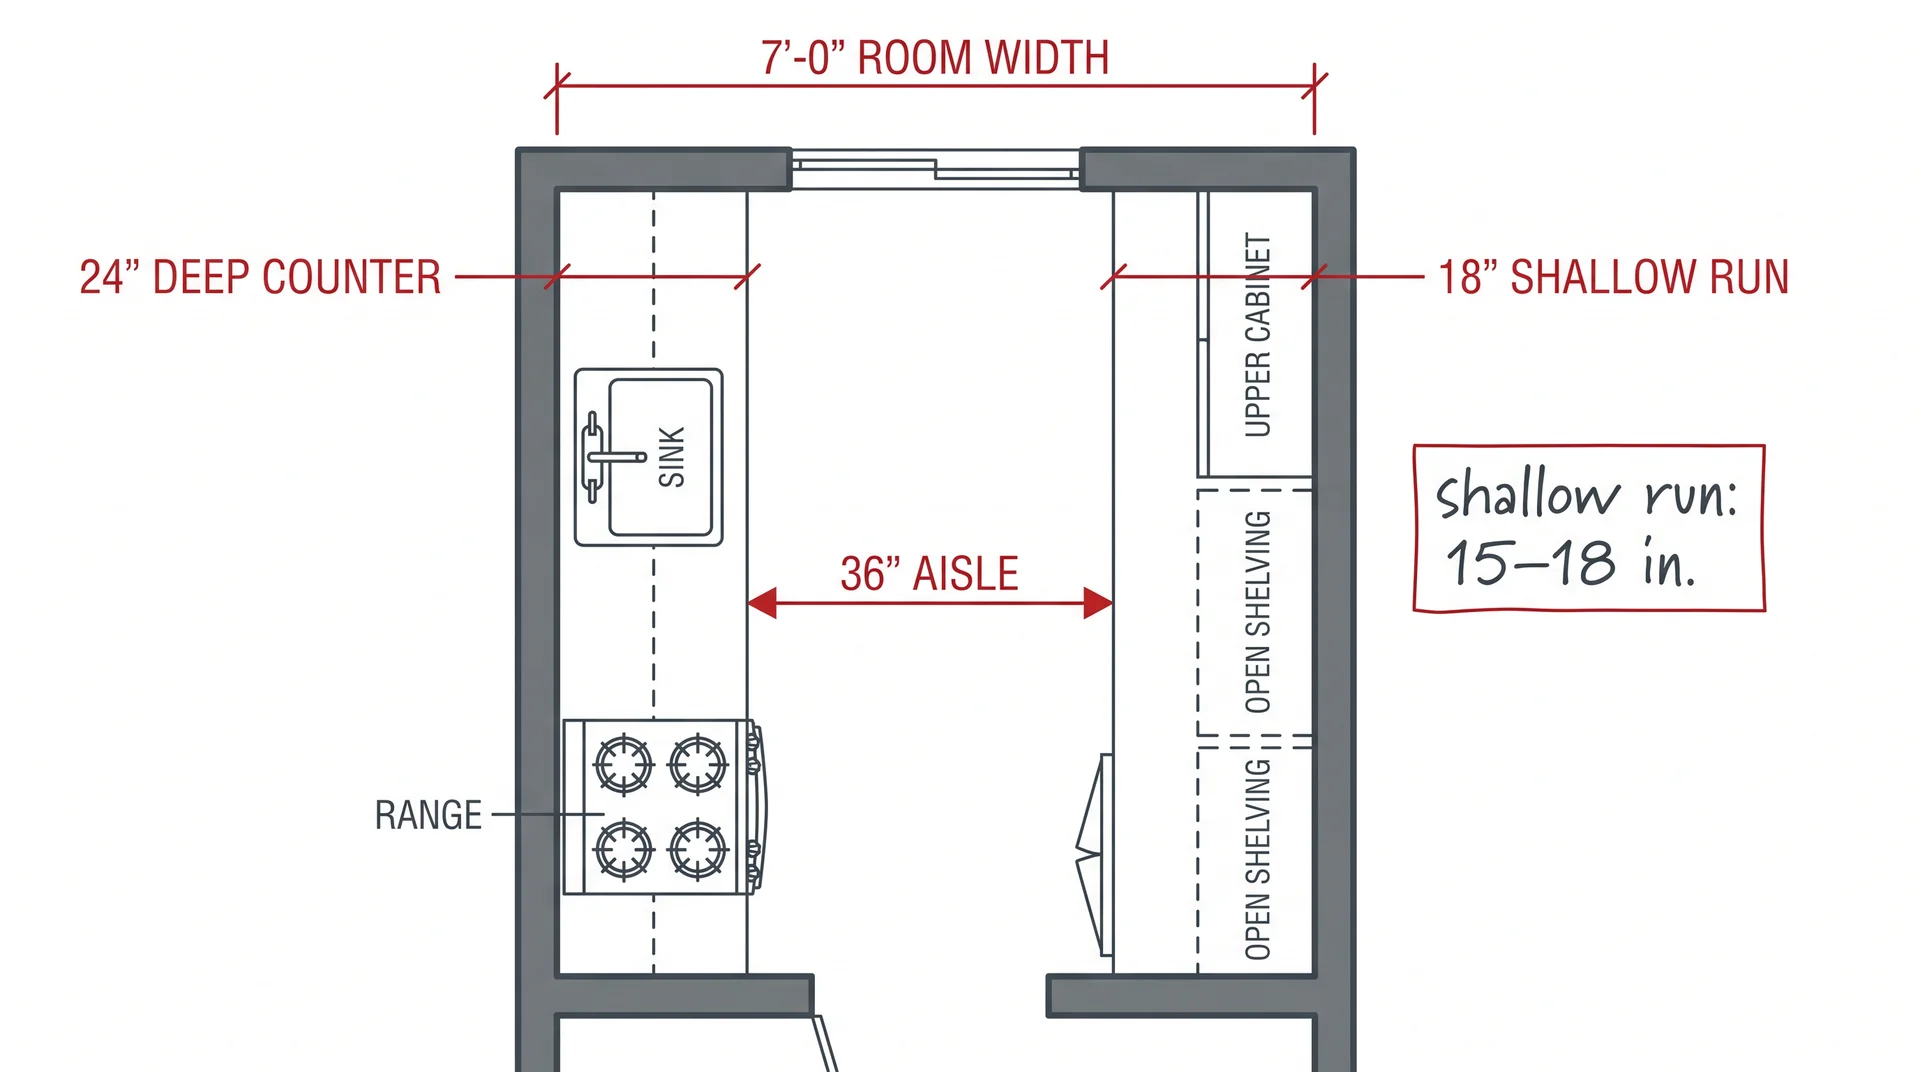
A standard galley assumes 24-inch counters on each wall with a 36-inch aisle between them. That math needs 84 inches of total room width, or 7 feet. If your room is under 7 feet wide, something has to give. In a narrow galley, that something is the depth of one counter run.
- Room width: 6 to 8 feet total
- Primary counter run: 24 inches deep (standard base cabinets)
- Secondary counter run: 15 to 18 inches deep (shallow base or wall-mount only)
- Aisle with this configuration: 36 to 40 inches
- Household limit: one cook at a time
The shallow run handles storage differently. Standard base cabinets don’t come at 15 inches deep, so this side is typically upper cabinets mounted low, open shelving, or a mix of both. That’s a limitation and an opportunity.
Open shelving on the shallow wall eliminates the visual weight of a second full cabinet run and makes the corridor feel wider than it is.
The 6 inches saved by going from 24 to 18 inches on the secondary run is the difference between a kitchen that functions and one that doesn’t.
That’s not a decorating decision. It’s a spatial one, and it needs to be made before cabinets are ordered, not during installation.
The shallow wall is a design constraint. Work with it deliberately.
- Dedicate the shallow side to non-cooking functions: storage, display, a mounted microwave, and a small wine rack.
- Put the range, sink, and refrigerator on the deep side where standard appliance depths work.
This keeps the cooking workflow on one run and removes the need to reach across a narrow aisle with hot pans.
Walk-Through Galley
A galley open at both ends, designed for kitchens that sit between two living zones.
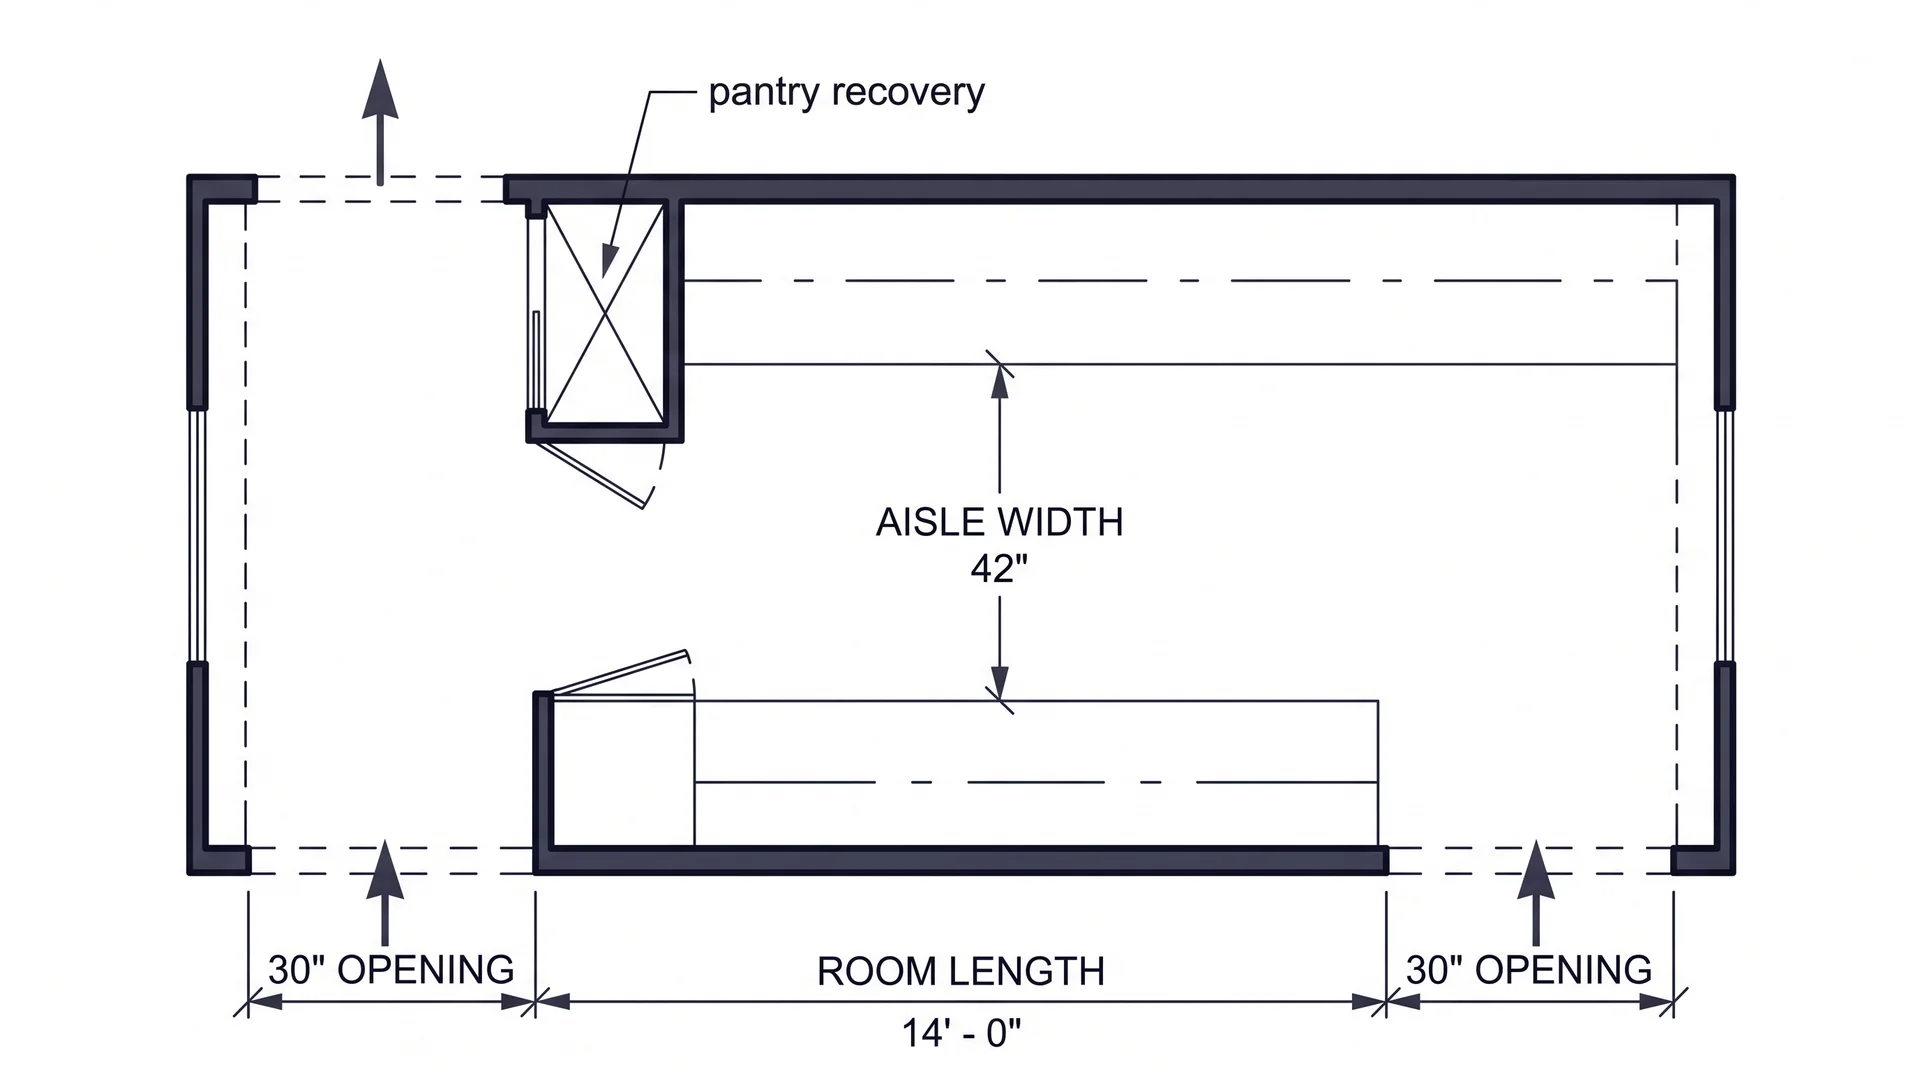
Most galley kitchens are dead-end: one wall, one entry. A walk-through galley has openings at both ends, connecting two rooms. The layout is efficient and less enclosed than the standard galley, but the open ends cost you a cabinet run.
- Room length: 9 to 12 feet preferred
- Room width: 8 to 10 feet
- Storage loss per open end: 24 to 36 inches of wall run
- Net cabinet run: approximately 2 to 3 feet shorter than a dead-end galley of the same length
- Aisle: 42 inches standard; same rules as any galley
The open ends change the storage math significantly.
A 10-foot galley with 30-inch openings at each end loses 5 feet of potential cabinet run. That storage has to be recovered somewhere, and the most effective place is vertically. Floor-to-ceiling pantry cabinets positioned where the run meets each opening reclaim most of what the openings take away.
The walk-through galley also changes traffic patterns. With two entry points, foot traffic moves through the kitchen rather than into it and back out. That’s better for households where the kitchen is a path between rooms, not a destination.
It’s worse for households where kitchen traffic interrupts someone cooking alone.
Decide which scenario describes your household before choosing between walk-through and dead-end. The floor plan looks similar on paper. The daily experience is quite different.
L-Shape with Rolling Island
An L-shaped layout with a movable cart that adds prep surface without committing to fixed clearances.
The L-shape opens a corner of the floor that a fixed island could occupy. Most of the time, that island is the wrong call.
A rolling cart in the same space gives you the prep surface without surrendering the aisle when you need it.
- Base room: 9×11 ft minimum, same as a standard L-shape
- Cart dimensions: 24 inches deep × 36 to 48 inches wide is the functional range
- Clearance with cart in position: 36 inches on all working sides
- Cart height: 34 to 36 inches to match counter height
The clearance math with a movable cart is more forgiving because the cart moves. You can push it against a wall during a dinner party, roll it into the aisle when you need a second prep surface, and move it entirely when you need to clean the floor.
A fixed island gives you none of that flexibility.
The cart needs locking casters. A prep surface that drifts when you press down on it is not a prep surface. It’s an inconvenience with wheels.
Locking casters cost almost nothing extra and are the difference between a cart that earns its place and one that gets pushed against the wall permanently.
One more thing. The top matters more than the base. A butcher block surface on a basic cart is more useful for actual cooking than a marble-effect surface on a premium cart. Specify the top for the work you do, not for the photograph.
One-Wall with Peninsula Breakfast Bar
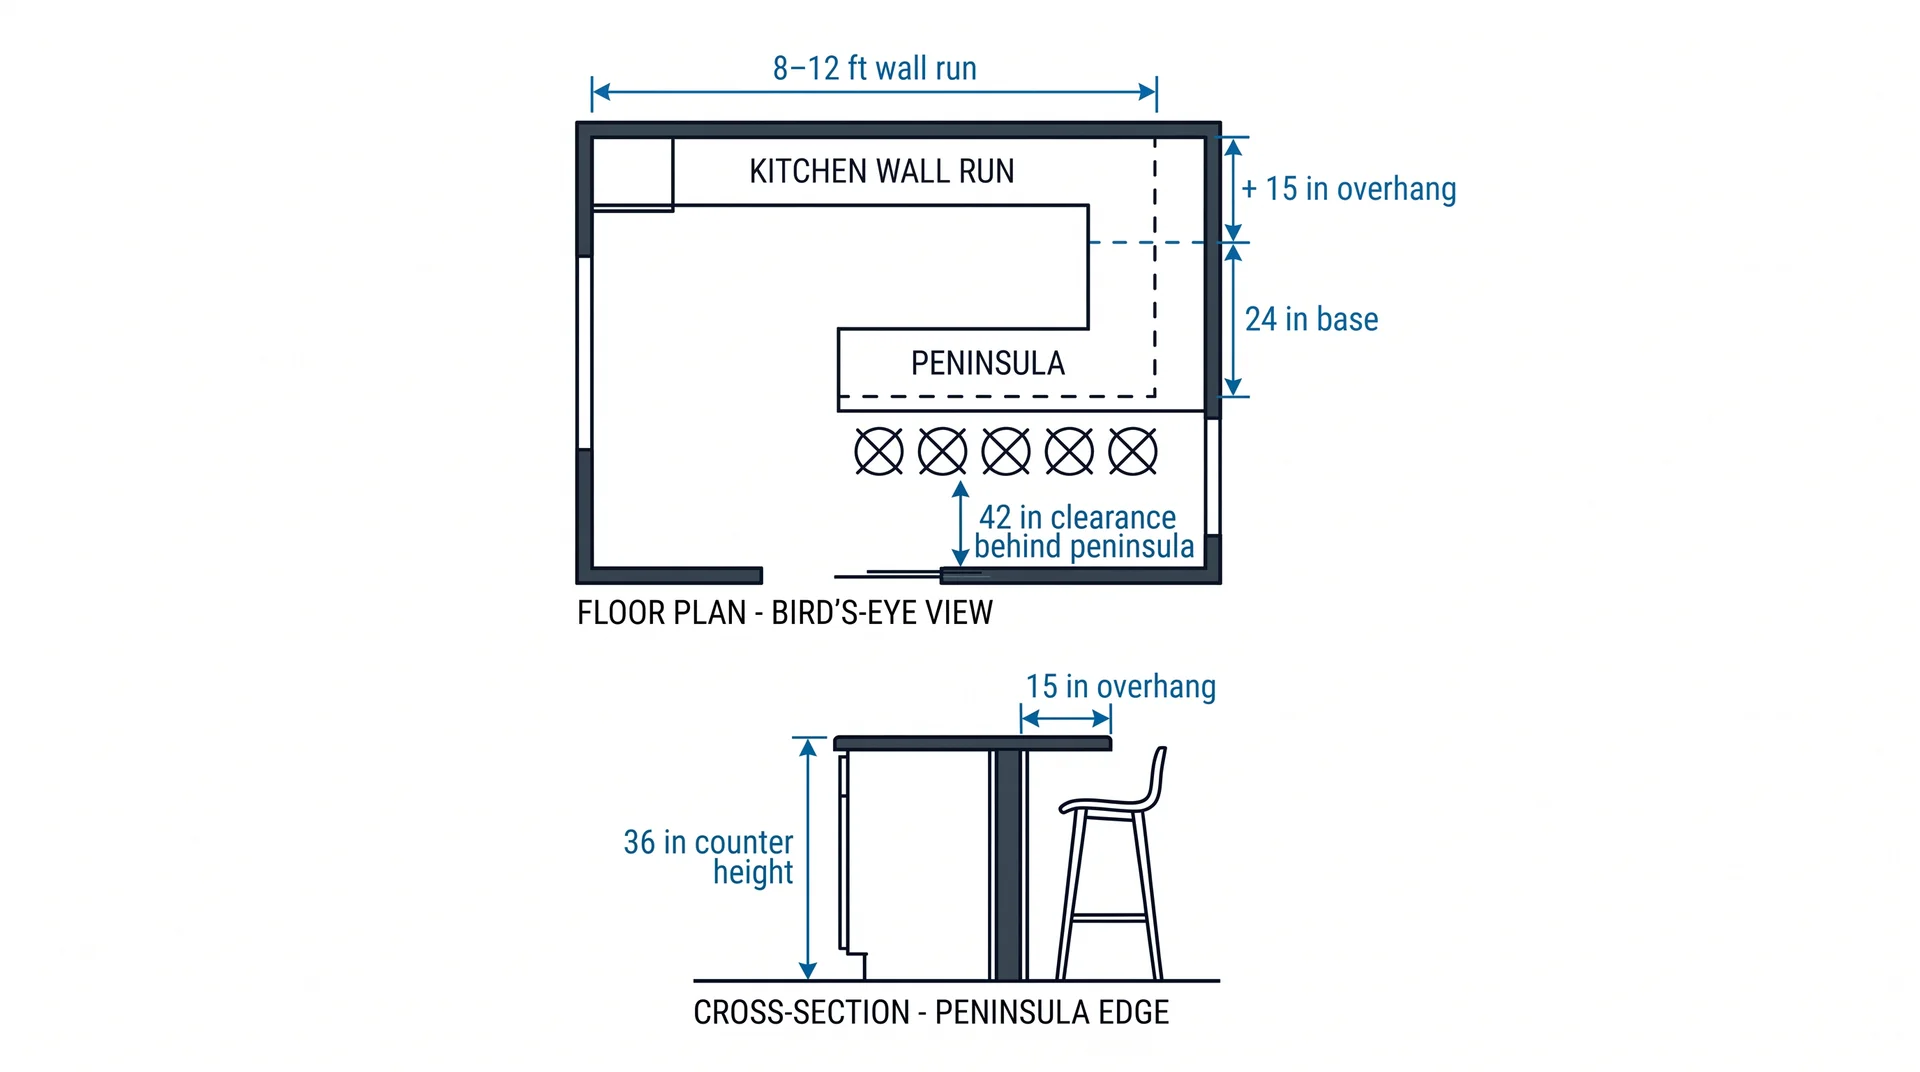
A one-wall kitchen is extended by a perpendicular peninsula that adds seating and defines the kitchen zone.
Stand at the counter and turn ninety degrees toward the room. That’s where the peninsula goes: perpendicular to the main wall run, extending into the living or dining space, with seating on the room-facing side.
- Main wall run: 8 to 12 feet
- Peninsula depth: 24 inches base cabinet plus 15-inch seating overhang (39 inches total)
- Peninsula length: 36 to 48 inches, allowing for 2 stools at 24 inches each
- Clearance between the peninsula and any opposite wall: 42 inches minimum
- Counter height: 36 inches (bar stools) or 42 inches (counter-height stools)
The peninsula does two things at once.
- It adds prep space and seating.
- It also acts as a visual divider between the kitchen zone and the room beyond it, without using a wall.
In a studio apartment or open-plan space, that definition is valuable. You get a breakfast bar and a room boundary in the same footprint.
The seating height decision matters more than most people expect.
- A 36-inch counter with barstools is comfortable for most adults.
- A 42-inch peninsula requires counter-height stools, which are taller and can feel elevated and slightly formal. Choose based on who sits there daily, not on what looks proportional in a showroom.
The execution requirement that comes with this layout: the underside of the peninsula overhang needs to be finished.
When guests sit at the bar, they look directly at the underside of the countertop and the cabinet below it. That surface gets specified last and noticed first. Specify it early.
Square Room Kitchen
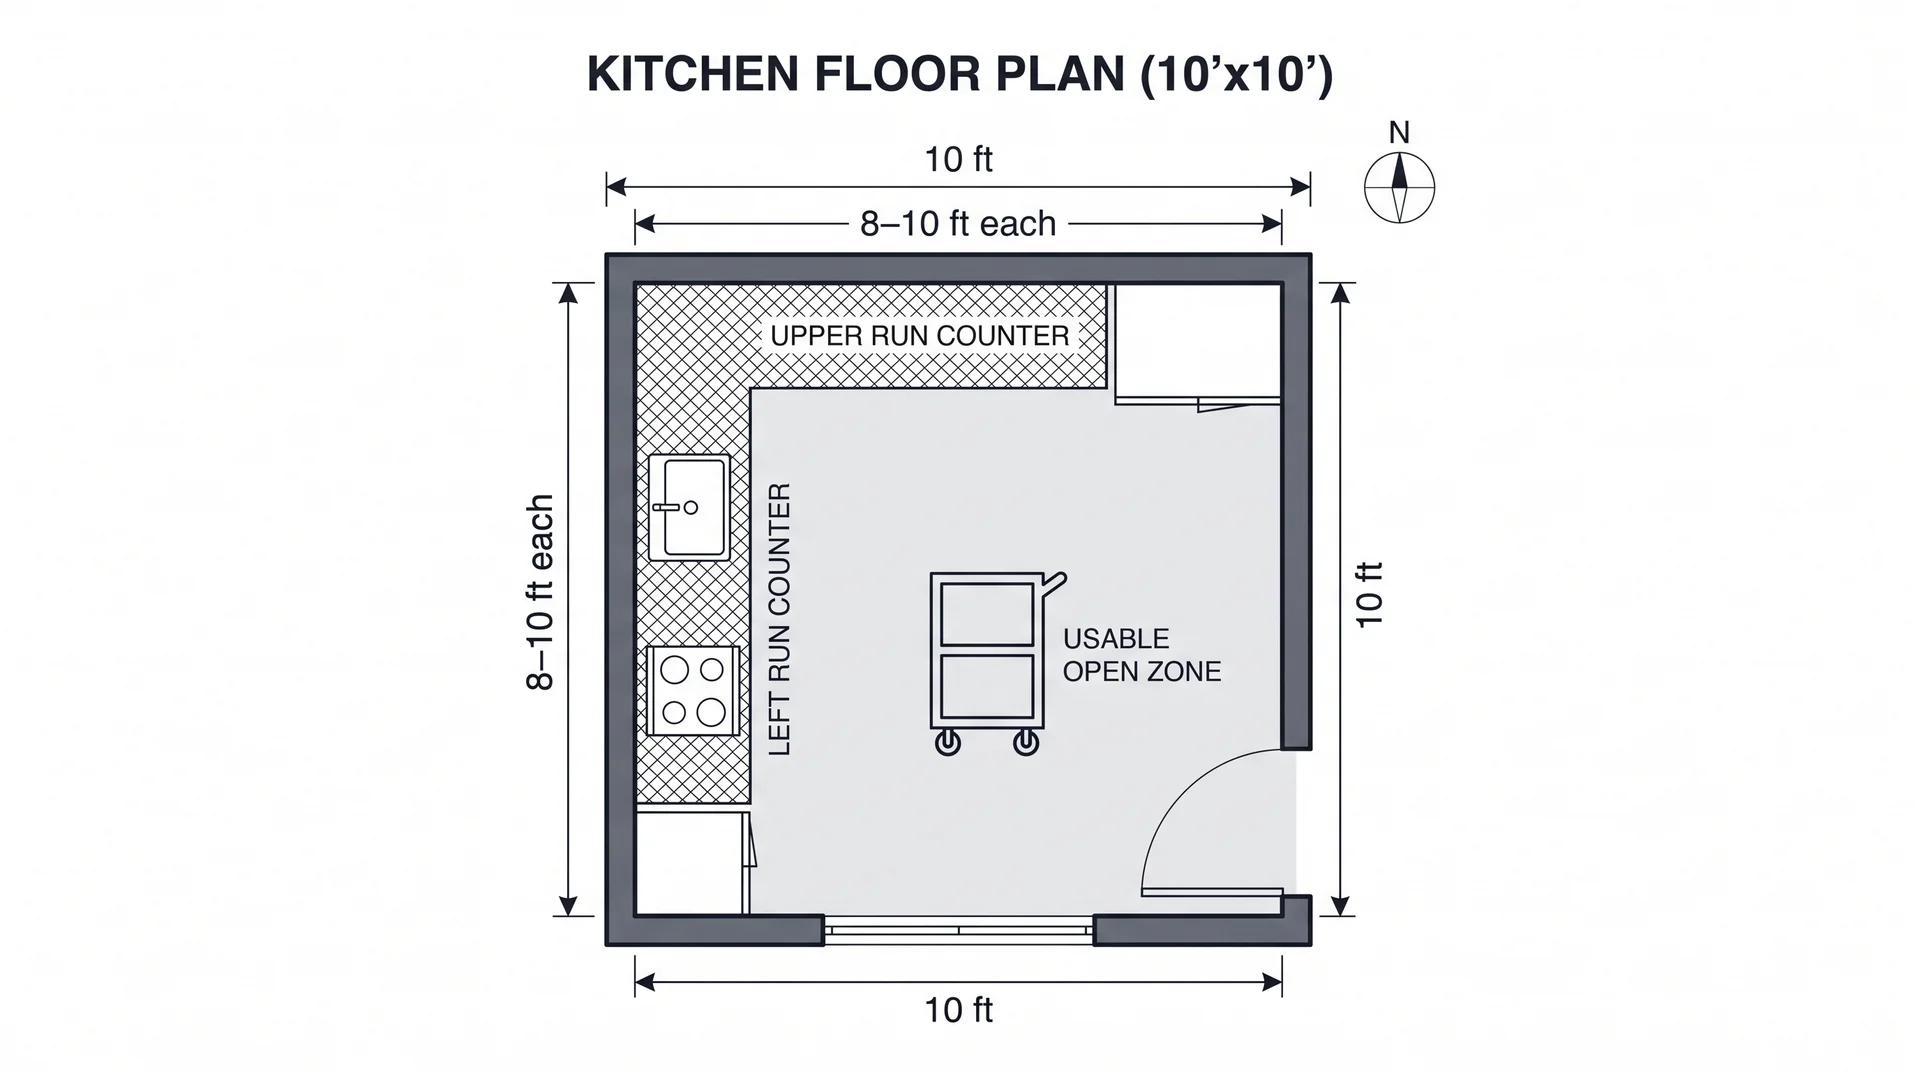
The hardest small kitchen footprint to plan well, and the one most articles skip entirely.
A square room with equal dimensions on all sides gives no natural direction to a kitchen layout. Every option leaves a significant portion of the floor unused or creates awkward traffic patterns.
There is no clean answer here. There is only the least-wrong one.
- Room size: 9×9 to 10×10 ft (81 to 100 sq ft)
- Best starting layout: L-shape in one corner with 8-foot legs
- Open floor area with L-shape: approximately 6 to 7 feet across the diagonal
- Second option: galley along one wall, single shallow run on a perpendicular wall
- Island threshold: a 10×10 room is the absolute minimum; a rolling cart is the better call
The L-shape is the right choice in most square rooms.
It uses two walls efficiently and leaves a large open floor area. That open area is not wasted if you make a deliberate decision about it.
A small table, a rolling cart, or simply a clear landing zone all make better use of that floor than trying to fill it with cabinetry that closes the room down.
The mistake I see consistently in square rooms is trying to use all four walls. Walk into a kitchen that has cabinetry on every wall and barely enough floor to stand in. The storage gain is not worth the loss of function. A kitchen you can’t move through easily is a kitchen you’ll stop enjoying within six months.
The square room often has a door on one wall and a window on another. That leaves two usable walls for the L-shape.
Place the sink under the window if possible, the range on the wall with the best ventilation path, and the refrigerator at the end of one leg, where it doesn’t interrupt the workflow. The square room fights you. Work with the two walls you have.
Open-Plan Kitchen Zone
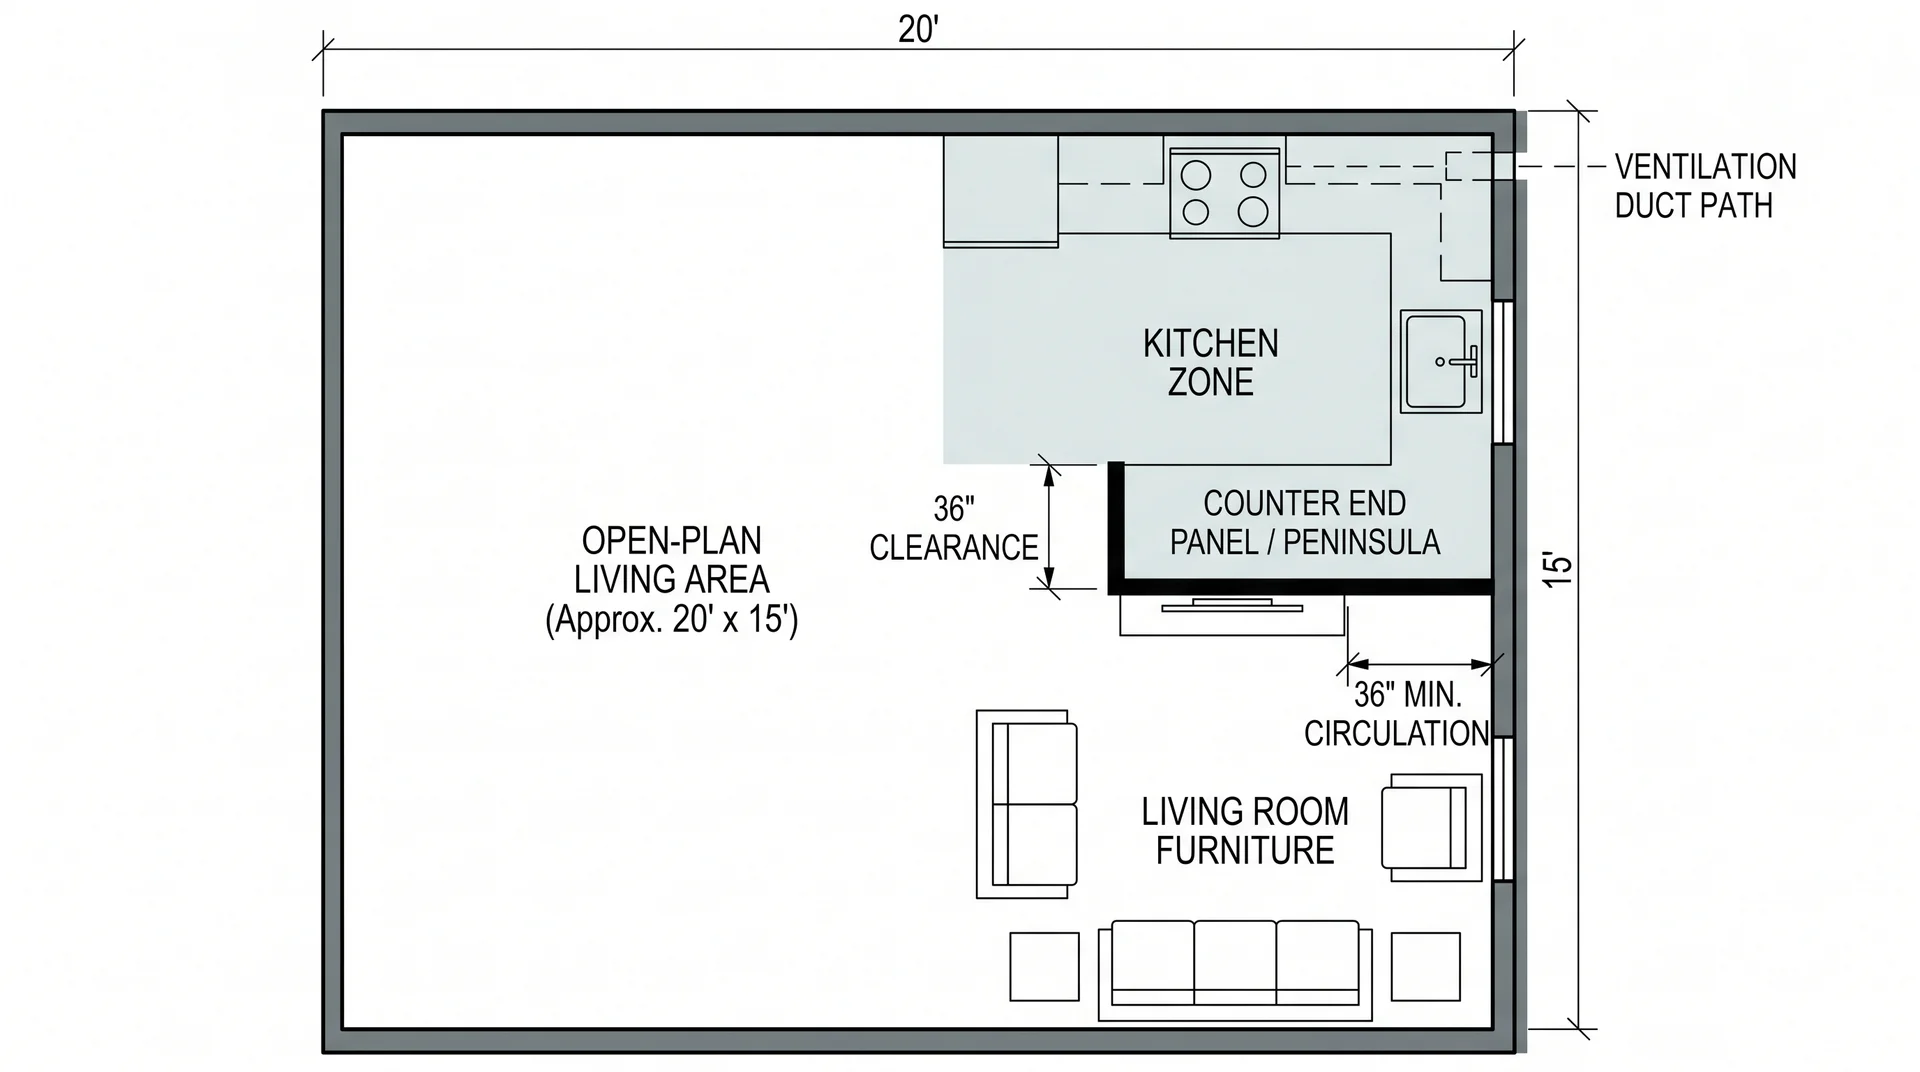
A kitchen that lives within a larger open space, defined by counters and cabinetry rather than walls.
Look at the room and find the kitchen. In an open-plan space, the kitchen zone is a designated area within a larger room, typically sharing square footage with living or dining functions. The layout challenge is the same as any small kitchen.
The design challenge is different: the kitchen has to define itself without walls to contain it.
- Kitchen zone size: 80 to 120 sq ft within the larger room
- Most common layouts within the zone: L-shape or one-wall, both of which have a clear back edge
- Zone boundary on the open side: peninsula, counter end panel, flooring change, or all three
- Clearance between kitchen zone and living furniture: 36 inches minimum
- Ventilation: the range must still be on or near an exterior wall, regardless of the open plan
The back of a counter run is unfinished cabinetry unless you specify otherwise.
In a walled kitchen, that back faces a wall and nobody sees it.
In an open-plan zone, the back of your base cabinets faces the living room. That surface needs a finished panel, a waterfall countertop end, or a design decision that makes the edge intentional.
Specifying the back of the cabinetry is not a detail. It’s the moment the kitchen either reads as a room or as a construction site that was never completed.
The one-hero rule applies here more than anywhere. In an open-plan kitchen zone, the eye travels across the whole room and lands on the kitchen as part of the view.
One strong visual decision, a counter material, a distinctive hood, a color on the cabinetry, holds the zone together. More than one and the kitchen competes with the room around it instead of sitting within it.
Ventilation is the practical constraint that overrides every aesthetic preference in this layout. The range needs to vent to the outside, which means the range position is largely determined by the ventilation path.
Decide where the range goes based on the duct route first. Then design the rest of the kitchen zone around that fixed point.
One-Wall Layout
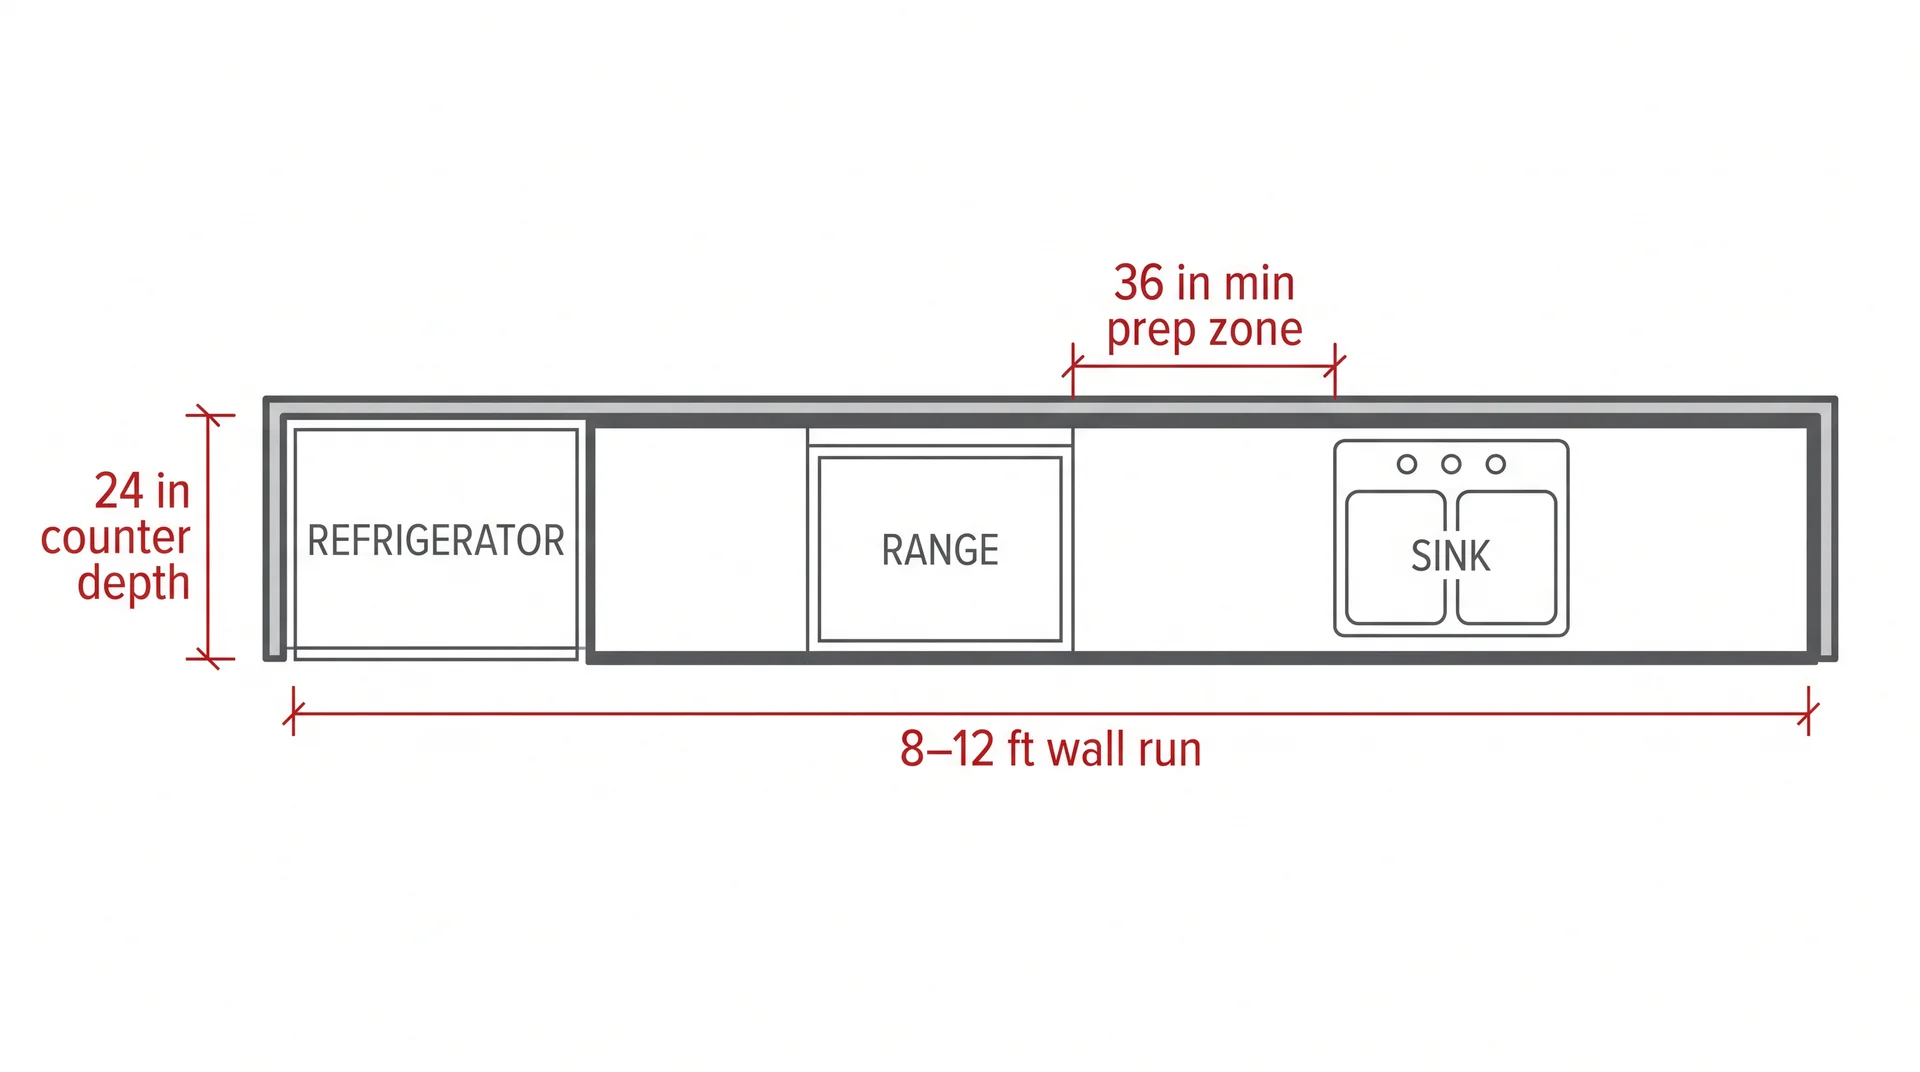
Best for long, narrow rooms where the kitchen opens into a dining or living space.
Stand at the entry point and look straight ahead. There’s one long wall, and everything runs along it: sink, range, refrigerator, and cabinetry in a single line. The rest of the floor stays open.
- Wall run: 8 to 12 feet minimum for a functional layout
- Counter depth: typically 24 inches, so the run doesn’t take much from the room’s depth
- Minimum prep zone: at least 36 continuous inches of counter between the range and the refrigerator
The real constraint is the prep surface. Subtract the appliance widths from your total wall run and see what’s left. If that gap is under 36 inches, meal prep means constant reshuffling of whatever’s on the counter.
Honestly, the one-wall layout has a worse reputation than it deserves. A well-planned version with full-height cabinetry and good under-cabinet lighting can be genuinely excellent. The problem is almost always under-building the storage, not the layout itself.
Galley Layout
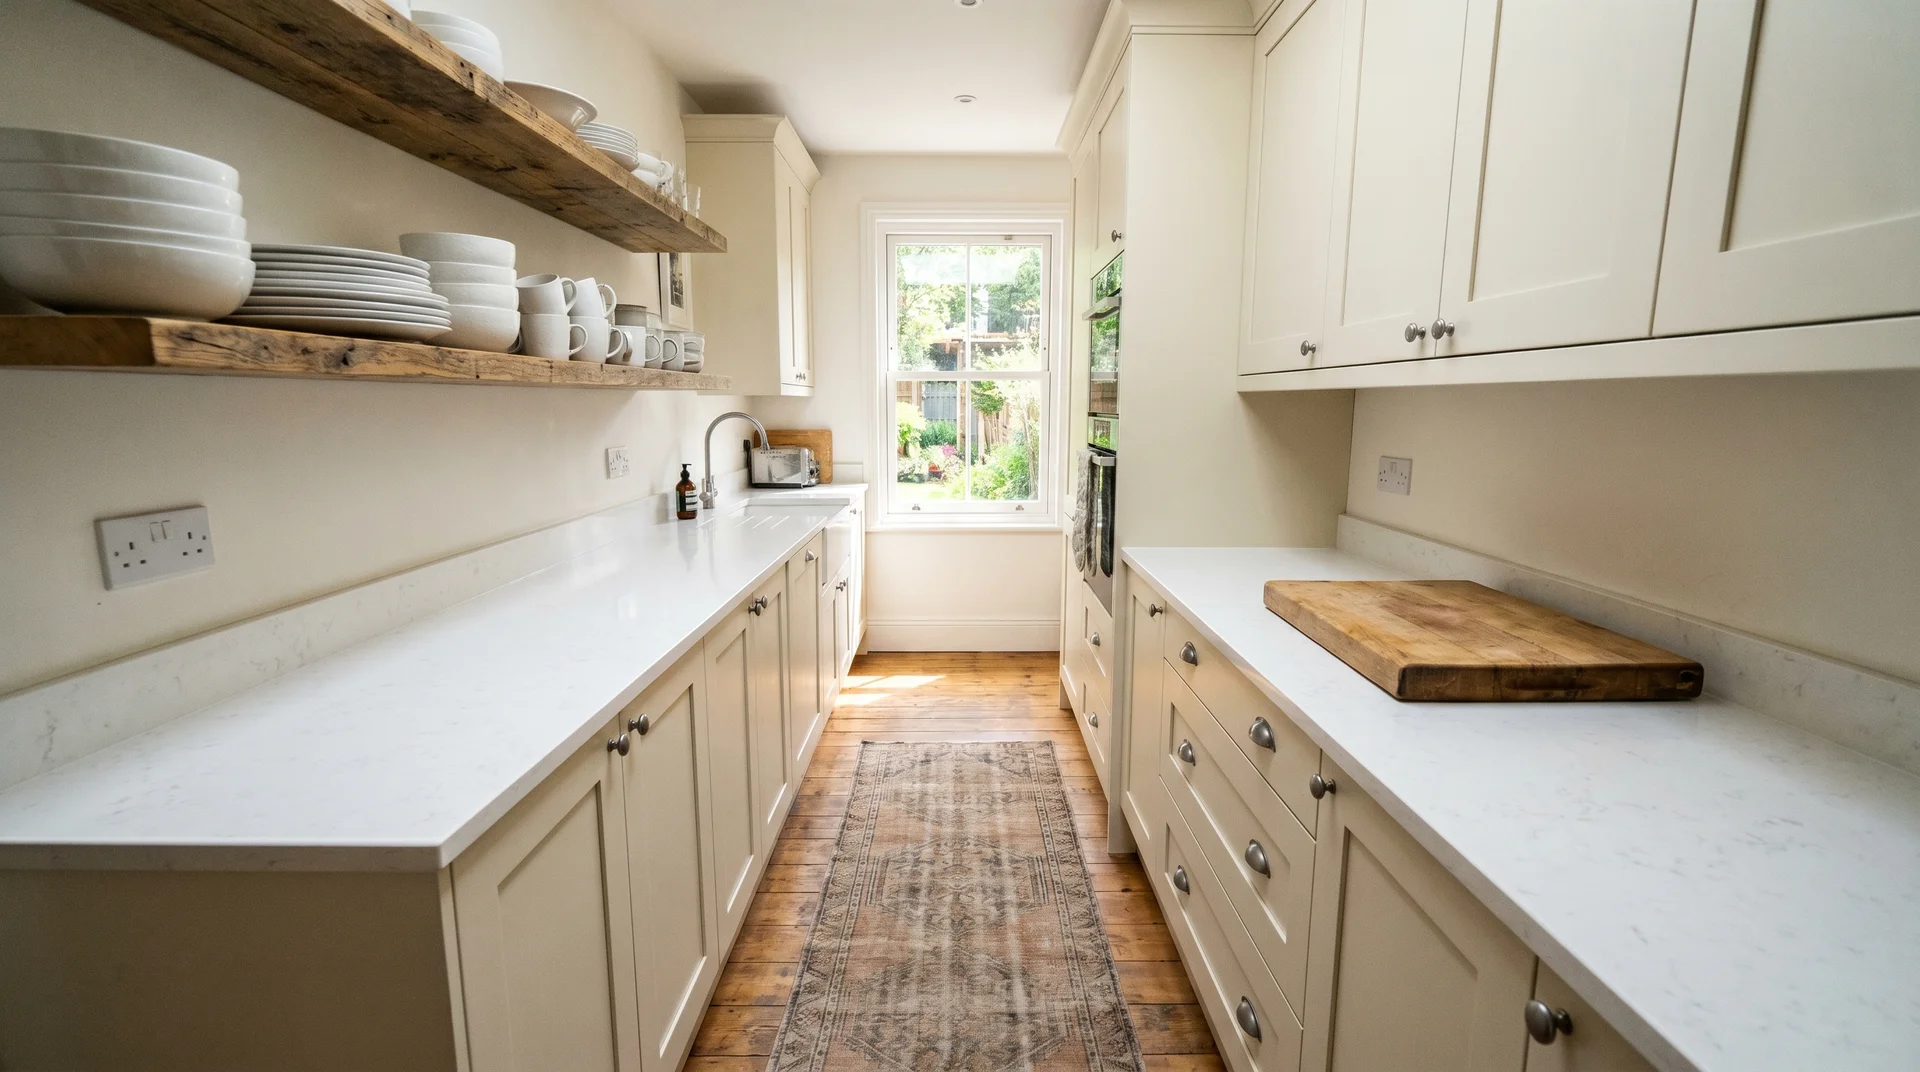
The most efficient layout for a narrow room: two parallel counter runs and a clear working aisle between them.
A galley kitchen puts two counter runs on facing walls, with a clear aisle between them. Everything you need is within two steps. It’s the layout professional kitchens use for a reason.
- Room length: 7 to 10 feet minimum
- Room width: 8 feet total minimum, allowing 24-inch-deep counters on each side with a working aisle between them
- Aisle width: 36 to 42 inches for a single cook; 48 inches if two people regularly cook at the same time
If your room is under 8 feet wide, a galley can still work. One counter run may need to be shallower, or the upper cabinets on one side may be replaced with open shelving. This is where the planning work matters most, not in choosing finishes, but in making the numbers work.
There are two versions of the galley layout worth knowing before you choose one.
- A walk-through galley is open at both ends, connecting two rooms and reducing the corridor feeling.
- A dead-end galley is closed on one side, more efficient but more enclosed. In a room under 9 feet long, the dead-end version will feel tight regardless of what finishes you choose.
The visual fix for a tight galley does not require changing the floor plan.
Reflective backsplash tile or open shelving on one run changes how the room reads without touching the layout. That’s the execution step that makes a good galley livable, and it’s a separate budget line from the layout decision itself.
For a single cook in a room under 90 square feet, the galley is often the best possible layout. The kitchen work triangle, the path between the sink, range, and refrigerator, compresses into a linear workflow. In a small space, linear is fast.
L-Shaped Layout
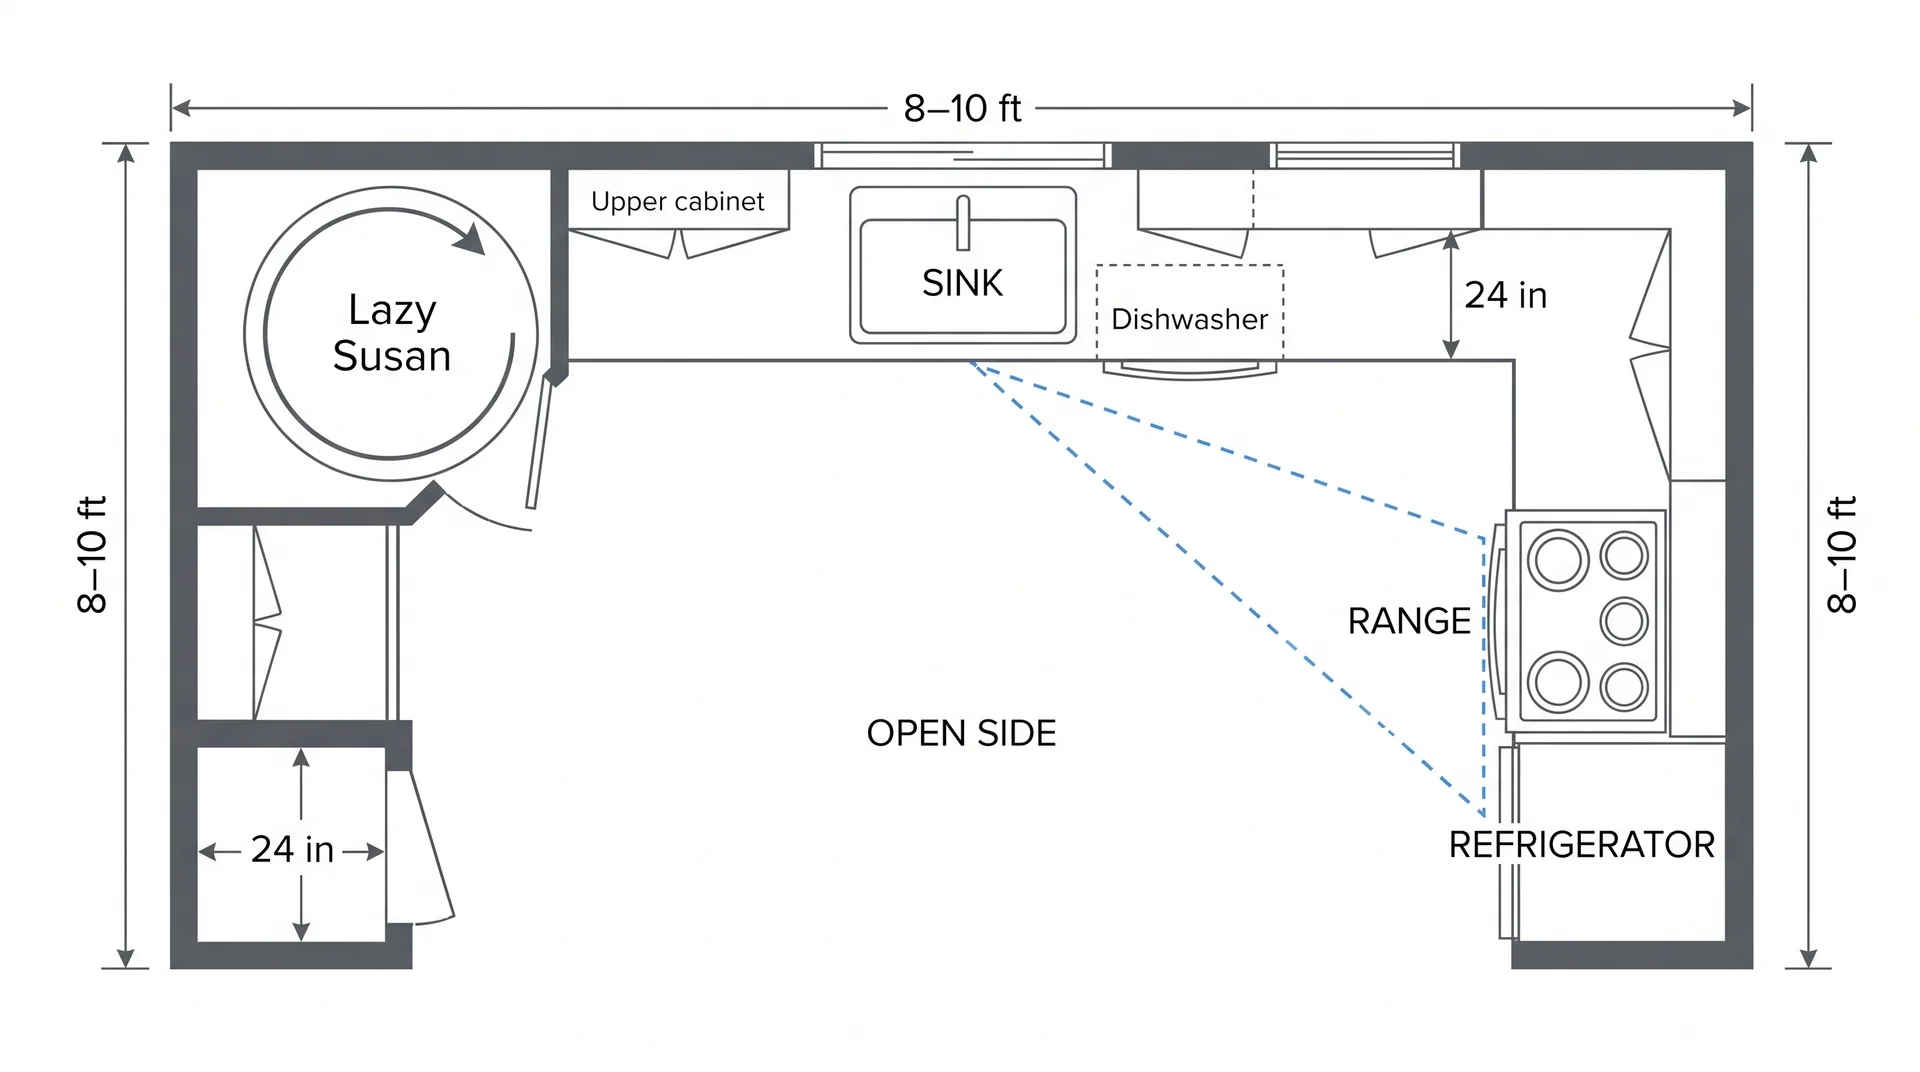
The right choice for corner kitchens and rooms that open to an adjacent living or dining space.
Stand in the corner of the kitchen. Two walls meet behind you, and the counter runs along both of them. That corner is where the L-shape earns its efficiency.
Each leg of the L needs at least 8 feet, preferably 10. The room should be roughly square or rectangular with one open side where the kitchen flows into the adjacent space. That open side is what makes the layout feel larger than its square footage.
The corner is where the L-shape gains or loses most of its storage.
The corner cabinet is the execution requirement that never appears alongside the layout recommendation. An L-shape looks clean on a floor plan. In a real room, that corner is where storage efficiency disappears unless you’ve specified a solution for it.
A lazy susan reclaims most of that corner. A blind corner pull-out reclaims more. Both cost more than a standard corner cabinet, and that cost is the actual design constraint. Build it into your budget before you commit to the layout, not after.
The corner solution is half the layout’s storage budget.
The L-shape also works well as a starting point if you want to add a small island later. Confirm the clearances on all sides first before committing to anything fixed.
Compact U-Shaped Layout
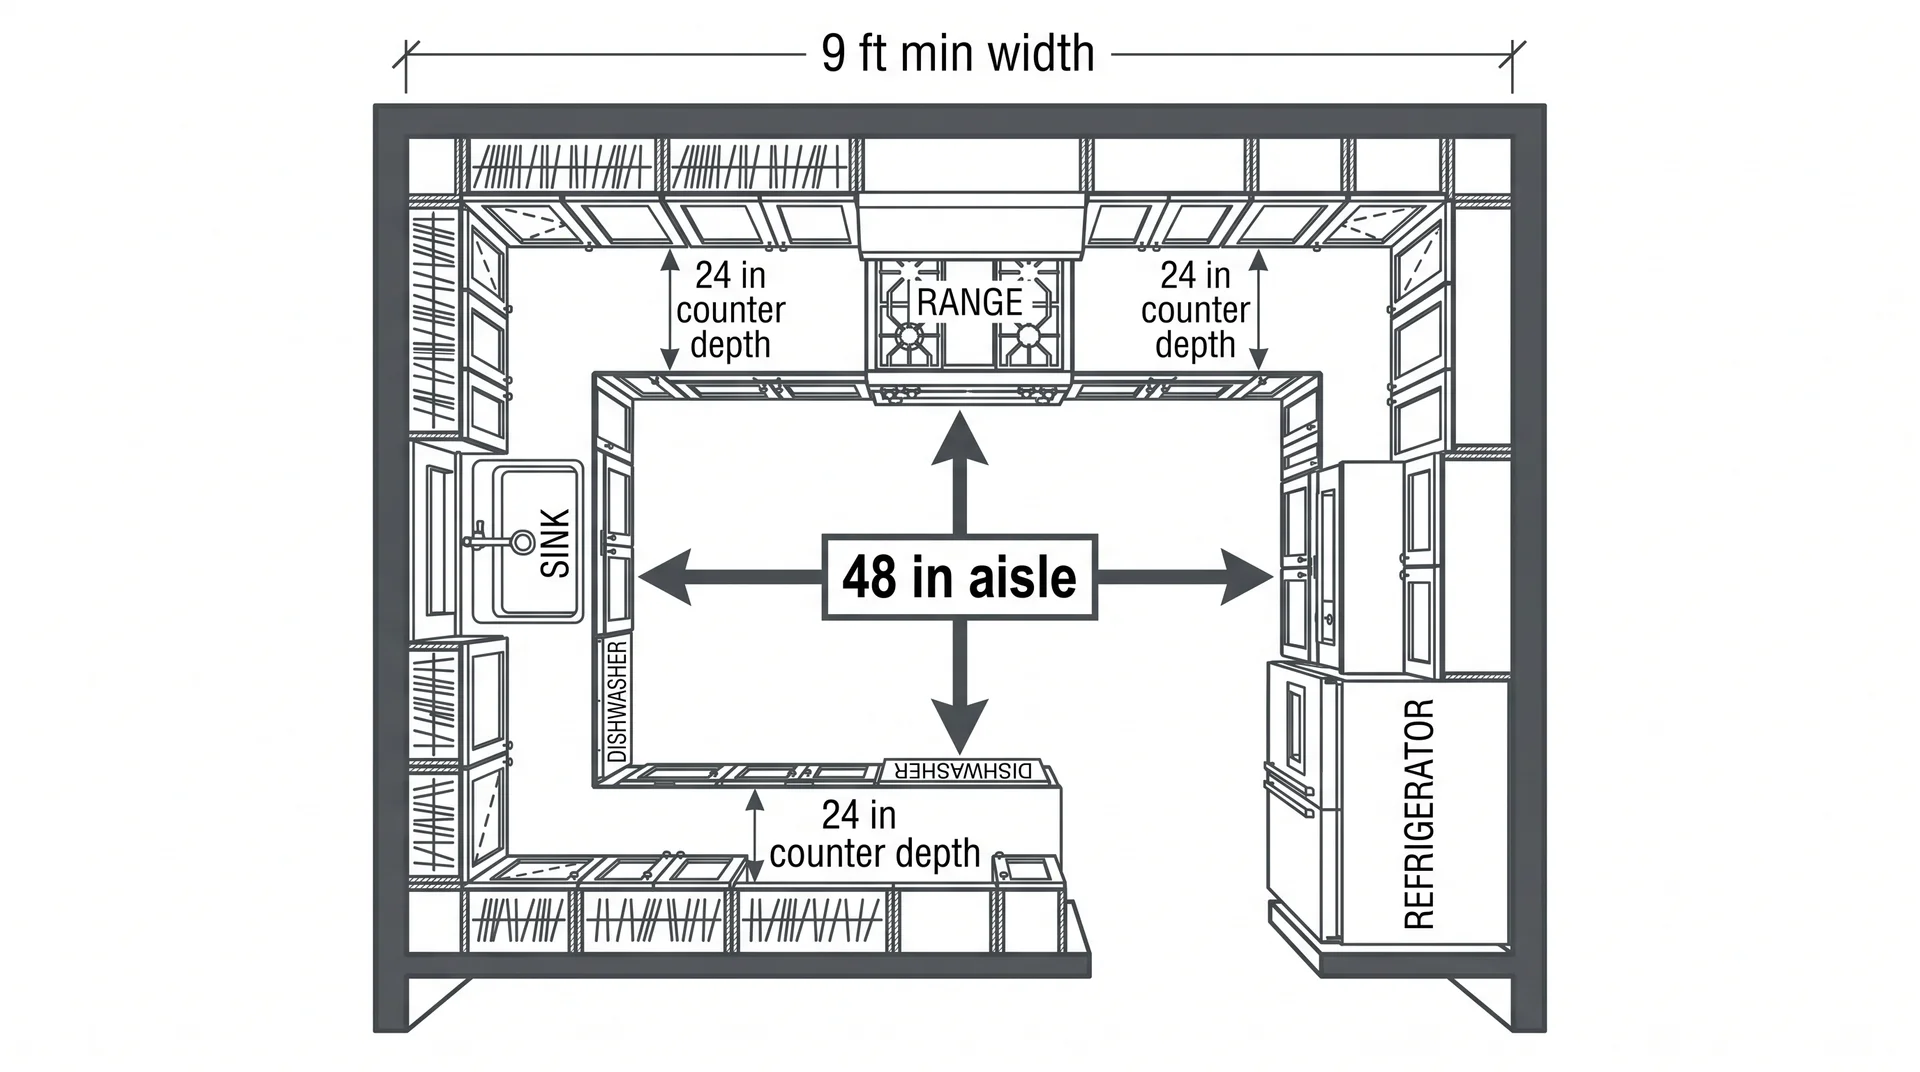
The highest counter and storage density of any small kitchen layout, but only if the room is wide enough.
Three walls of cabinetry, one open side.
The U-shape gives you the most working surface and storage of any layout in this size range. It is also the most unforgiving when the room falls short of the minimum width.
Check your room width before anything else.
Your room needs to be at least 9 feet wide between the two opposing counter runs. With 24-inch-deep cabinets on each side, that leaves 48 inches of aisle. That’s the comfortable single-cook minimum and the absolute minimum for two people cooking simultaneously.
A tight U-shape in an 8-foot-wide room feels worse than a well-planned galley. The room tells you what to do. If the width isn’t there, the galley or L-shape is the better call.
The Clearance Numbers That Actually Control Your Layout Options
Three measurements determine whether a floor plan works in a real kitchen.
In a kitchen of 70 to 100 square feet, these numbers separate a layout that works from one that only looks right on paper.
- For a single cook, aim for 42 inches of work aisle.
- For two cooks, 48 inches is the minimum.
A 42-inch aisle passes inspection on a drawing. It disappears the moment the dishwasher door opens. That gap is where most small kitchen regret starts.
| Aisle Type | Minimum Width | When It Applies |
|---|---|---|
| General walkway | 36 inches | Foot traffic path with no active cooking work |
| Work aisle, one cook | 42 inches | Active cooking zone; one person working |
| Work aisle, two cooks | 48 inches | Active cooking zone; two people working simultaneously |
These numbers come from NKBA guidelines, the National Kitchen and Bath Association’s residential kitchen standards for clearances and workflow. They are minimums, not targets. Design toward the target when the room allows it.
Here is what no floor plan shows you. When the oven door and the dishwasher door open at the same time, what aisle remains? If those two appliances face each other across a 42-inch corridor, the answer is almost nothing.
The conflict is always visible on the plan. It is almost never checked.
Before approving any layout, mark every appliance door swing on the plan:
- Draw the arc each door makes when fully open
- Note every overlap between appliance arcs in the aisle
- Flag any arc that crosses another before it becomes a cabinet you work around every day
Whether 42 inches is comfortable in your kitchen depends on your exact appliance dimensions. A 24-inch dishwasher door swings differently from a 30-inch one. The NKBA number is a starting point. Your specific setup may need more.
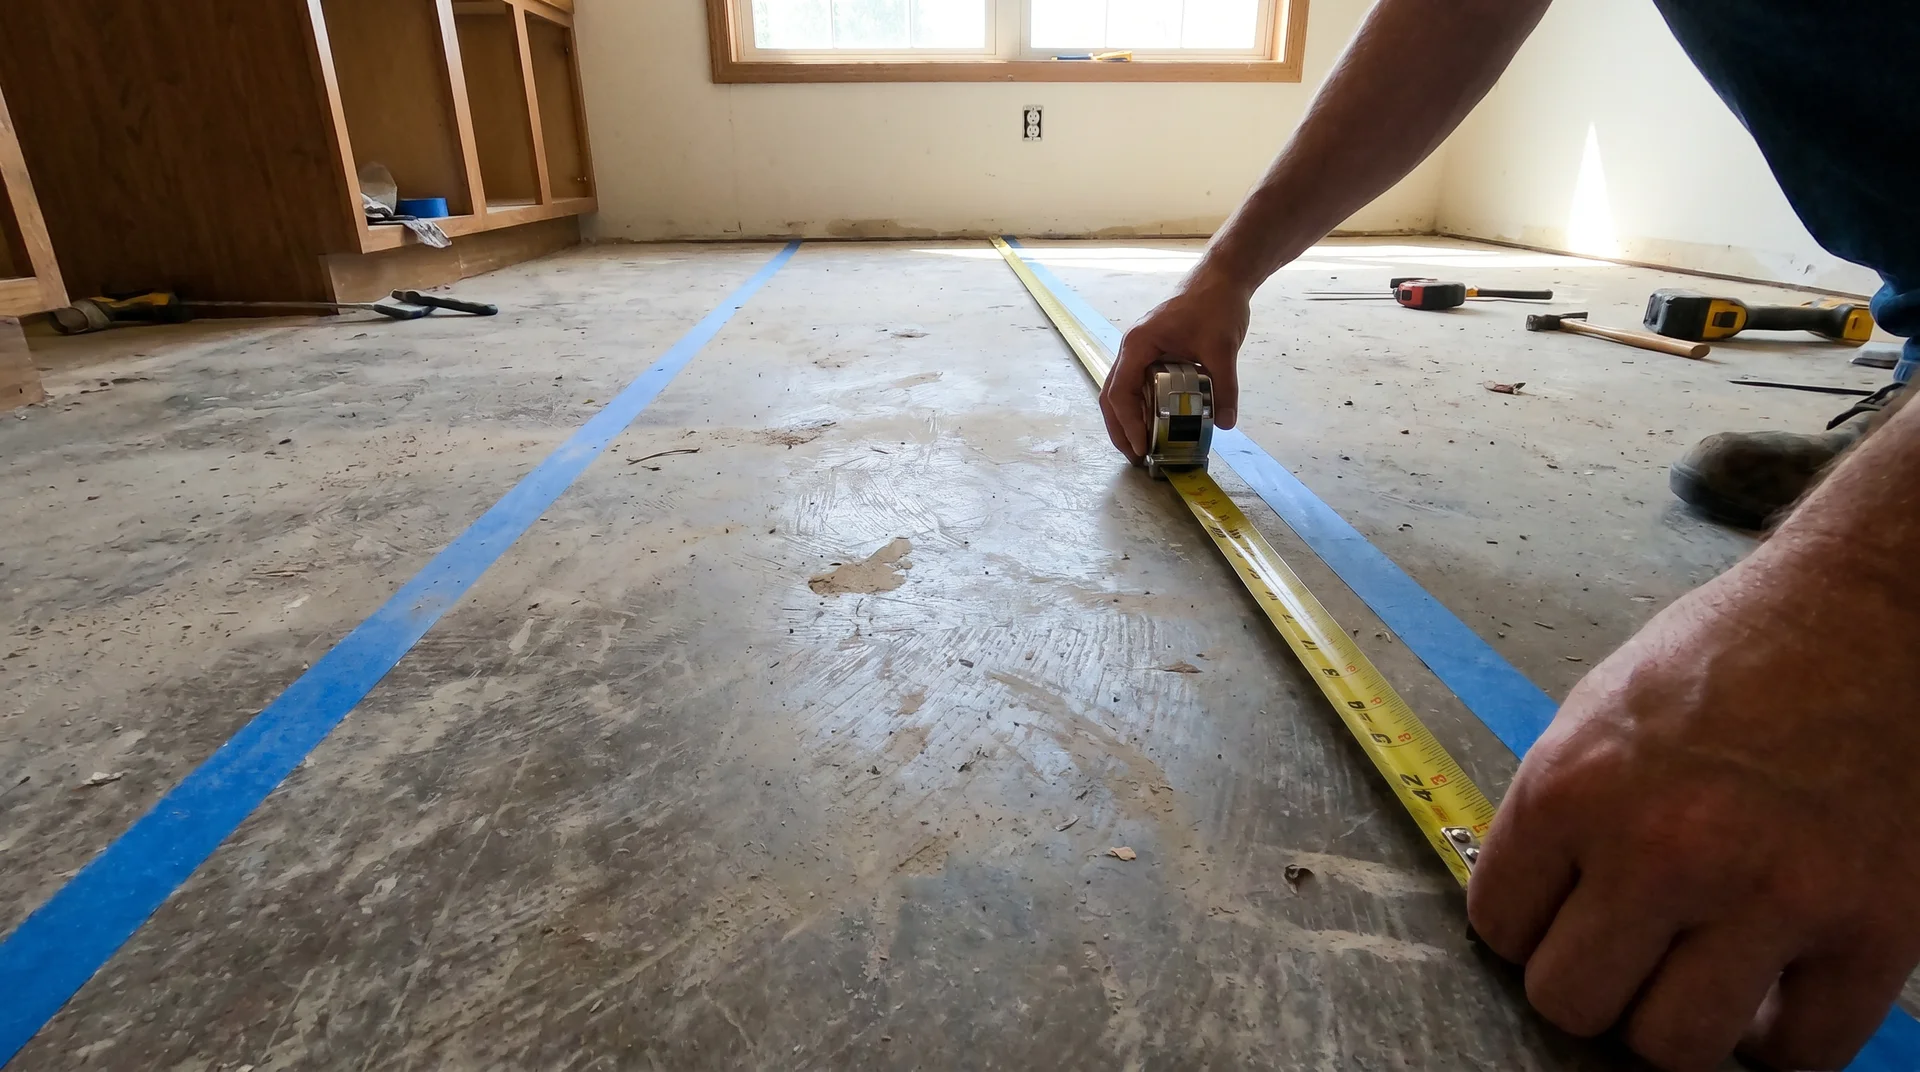
Put painter’s tape on your floor and mark out the counter runs and all appliance footprints before any plan is finalized. Open an imaginary oven door and stand where you’d load the dishwasher.
Those fifteen minutes cost nothing and catch what drawings miss.
The One Decision That Sets the Small Kitchen Floor Plan
Where you put the sink, the range, and the refrigerator determines everything else.
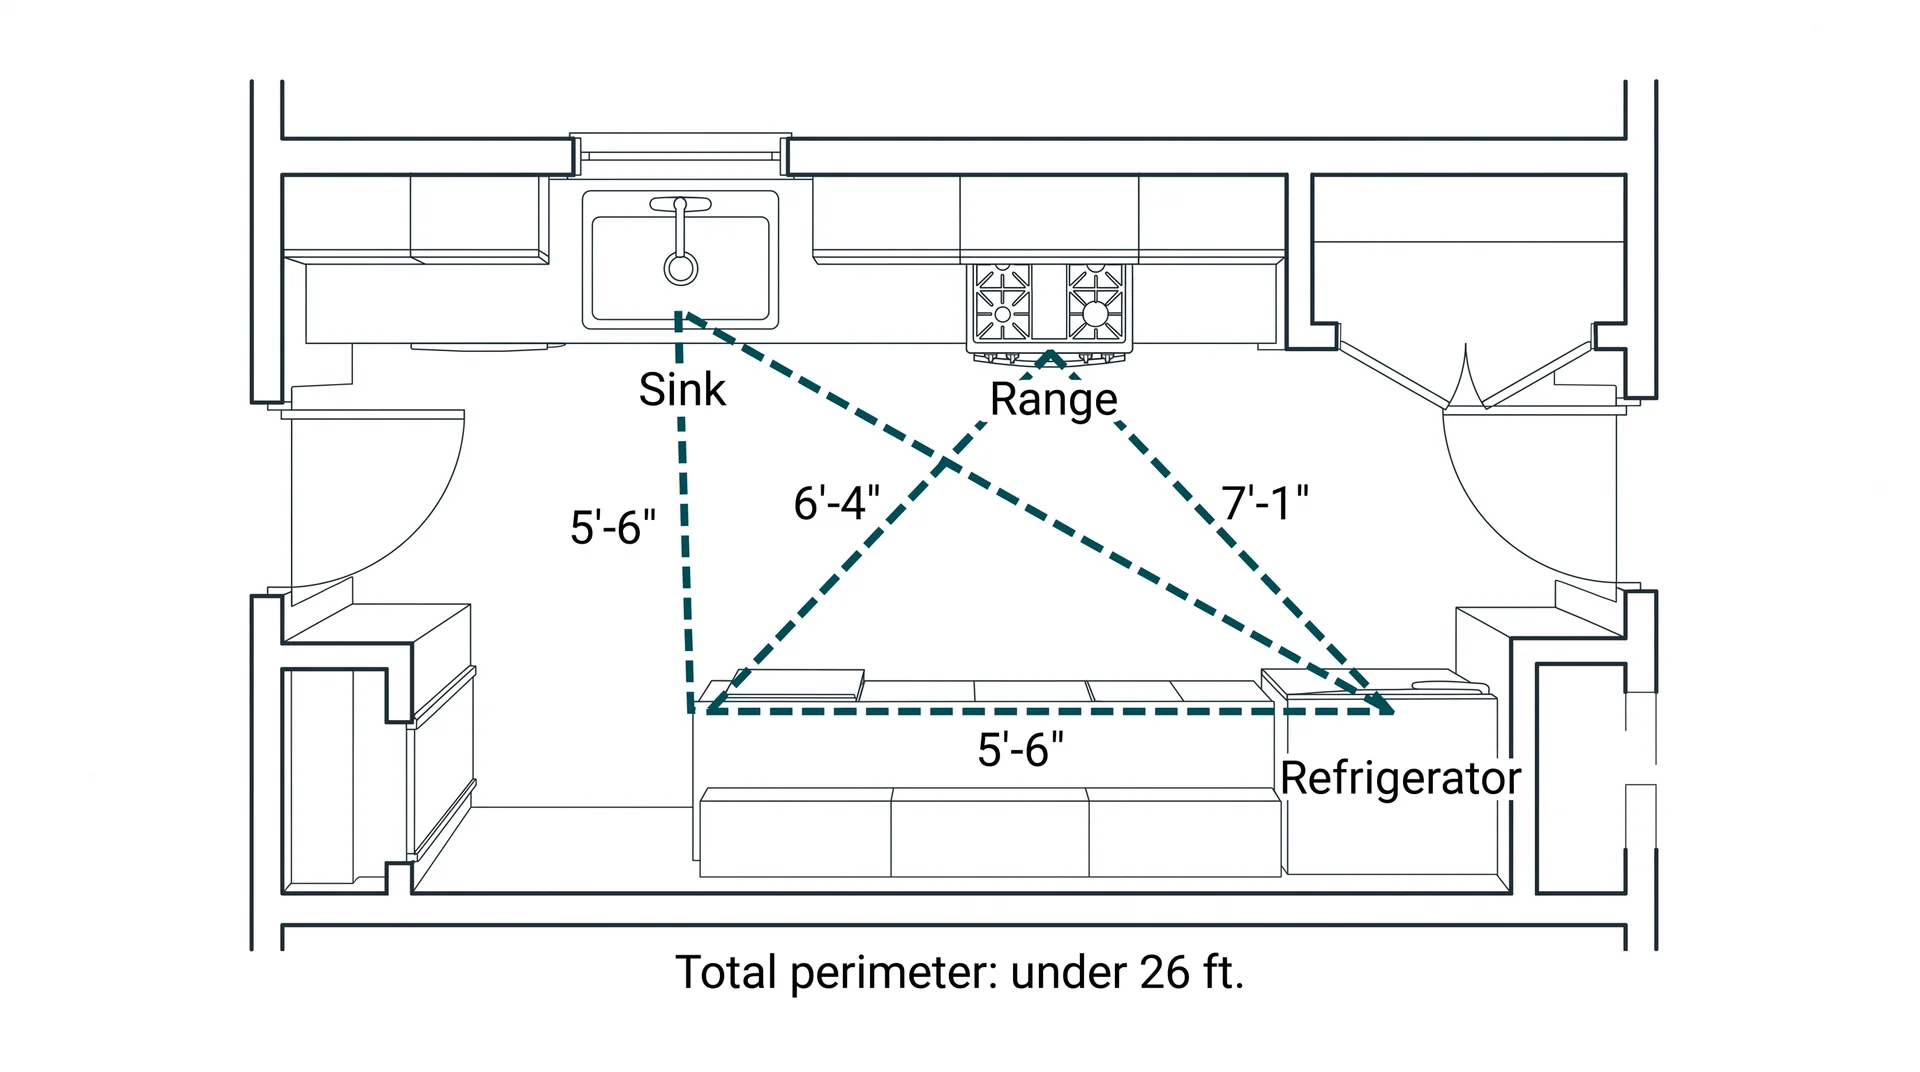
The relationship between those three points is called the kitchen work triangle. It’s the imaginary path a cook travels between the sink, the range, and the refrigerator. NKBA guidelines call for each leg to fall between 4 and 9 feet.
The total perimeter should stay at 26 feet or less. In a small kitchen, it’s usually much shorter. The risk is compressing any single leg below 4 feet, where reaching past one zone to get to another becomes daily friction.
Three things regularly override the ideal triangle placement in a real renovation:
- Where the plumbing stack runs. Moving a stack adds real cost. In most renovations, it stays put unless there’s a compelling structural reason to move it.
- Where the exterior wall is. Range ventilation needs to exit the building. An exterior wall placement keeps that path short and less expensive to install.
- Where the window sits. Placing a range under a window is possible, but confirm the hood can vent correctly from that position before the range location is finalized.
In a true galley or one-wall kitchen, the classic triangle doesn’t fully apply. Those layouts run as a linear work zone instead: refrigerator, prep surface, sink, range in sequence. That sequence can be more efficient than a triangle in a small space.
The work triangle is a useful check, not a design template. Use it to confirm that no two points are awkwardly far apart. Don’t use it to decide where appliances go from scratch in a room under 100 square feet.
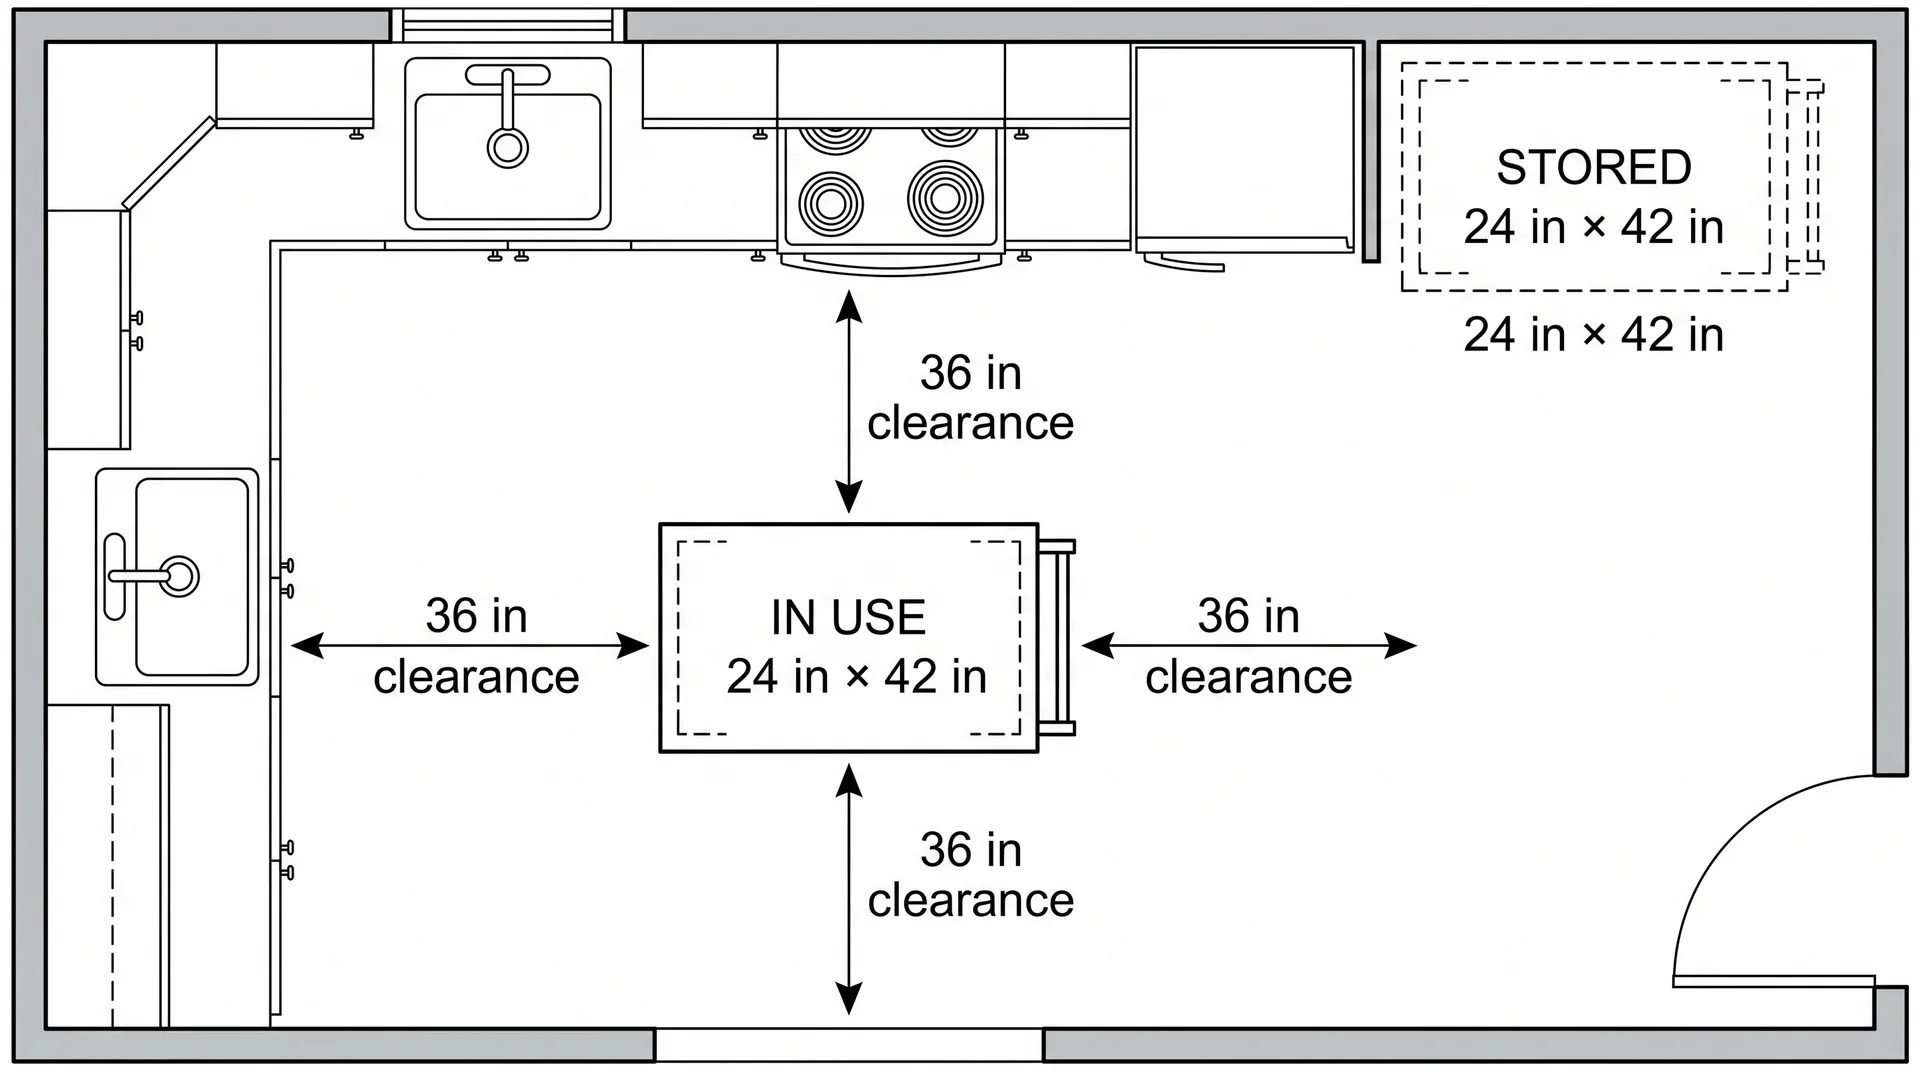
The Kitchen Island Question
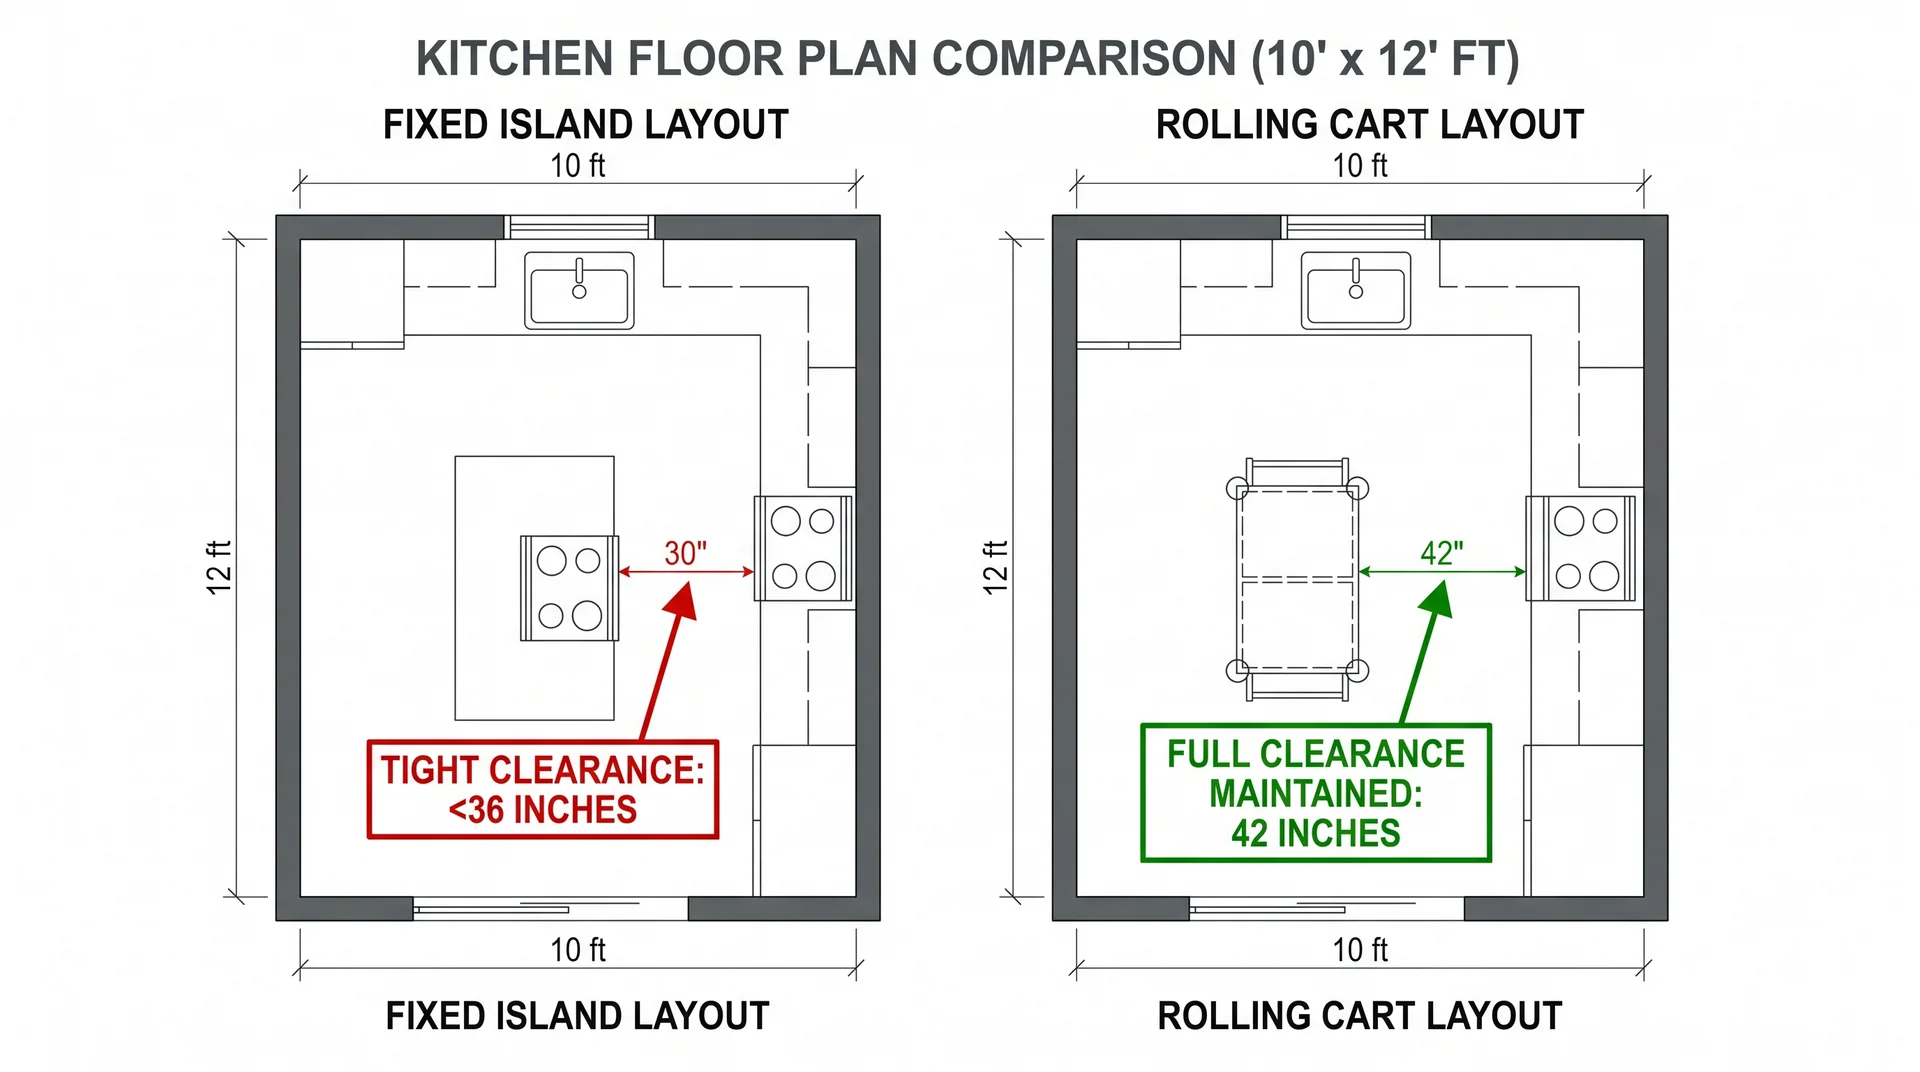
A kitchen island needs a minimum 10-by-10-foot room to be considered at all.
That’s 100 square feet. Even at that size, a fixed island may create more problems than it solves. A more reliable threshold is 12 by 12 feet before a fixed island stops eating the aisle on all sides.
The clearance math for any fixed island:
- 42 inches on all sides: minimum for a single-cook household
- 48 inches on all sides: minimum for a two-cook household
- 36 inches on sides facing a wall with no active work zone: acceptable for traffic-only paths
Do the math before you commit. Take your room width. Subtract 24 inches for one counter run, then 42 inches for the first aisle, then the island depth.
If what remains is under 42 inches, you don’t have a second aisle. The island doesn’t fit, and no amount of careful styling changes that number.
An island that fits on paper is not automatically an island that works in your kitchen.
Check your local building codes before ordering any fixed island. Some jurisdictions set clearance requirements that exceed the NKBA minimums. This is a different conversation from layout planning, but it can close the options quickly.
A rolling cart or a 24-inch-deep peninsula handles the same job as a fixed island in most small kitchens. You get the prep surface, and the clearance stays intact. Choosing a movable surface over a fixed island is not a compromise. It is frequently the smarter layout call.
How to Read a Small Kitchen Floor Plan Before You Commit
A floor plan is only as good as what you check before you trust it.
Most people verify that the appliances fit on the plan. What they miss is whether the space around those appliances actually works.
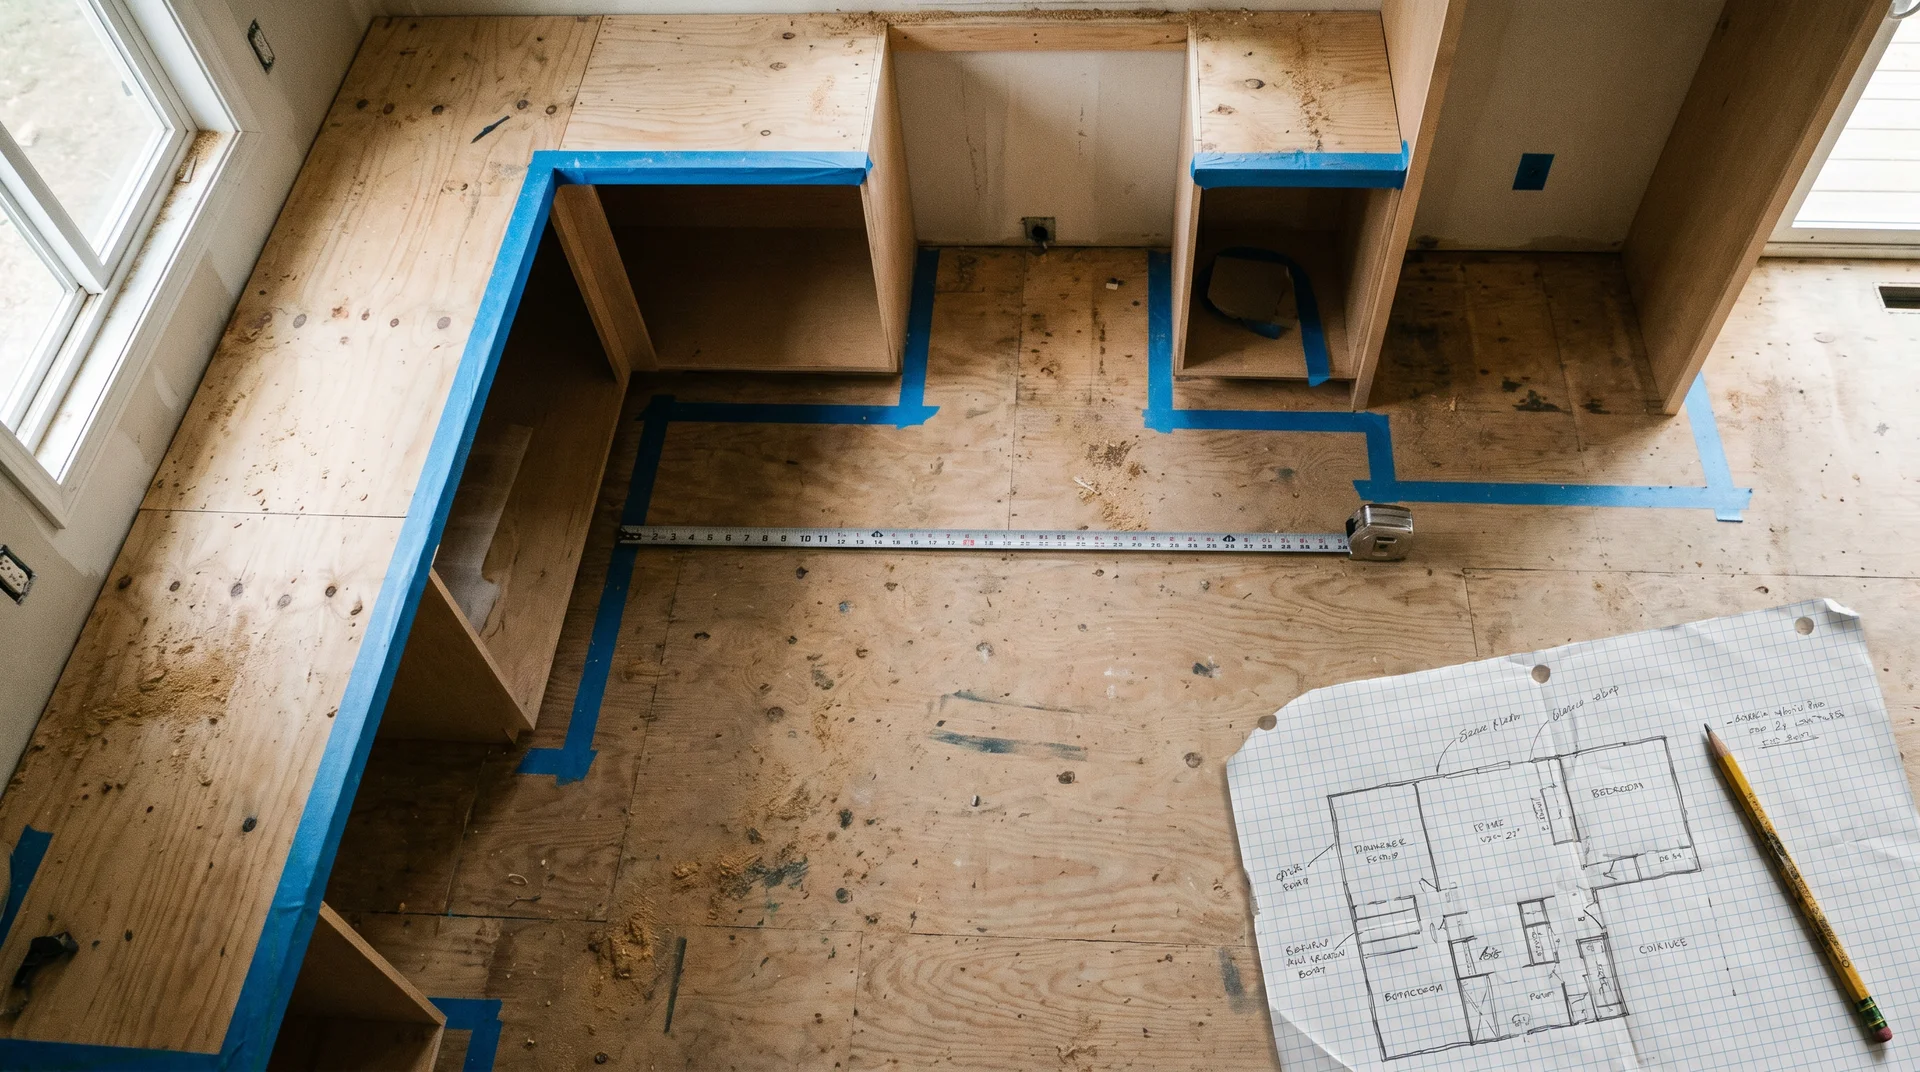
- Measure the room correctly. Length and width alone are not enough. Note where every door swings into the kitchen zone, where the window sits, and where the existing plumbing stack is. These three things frequently override what looks good on a drawing.
- Check your aisle widths before checking anything else. Mark counter depths on the plan at 24 inches per side. Measure what remains between them. If it’s under 36 inches, the layout doesn’t work regardless of what the drawing shows.
- Mark every appliance door swing. Oven, dishwasher, refrigerator, and corner cabinet doors. Draw the arc each makes when fully open. Every arc that overlaps another is a conflict you’ll live with after installation.
- Confirm the ventilation path for the range. If the range sits on an interior wall, the hood duct travels farther to exit the building. Know the route and the cost before that position is finalized.
- Mock it up with painter’s tape on your floor. Tape out the counter runs and all appliance footprints. Walk through it. Open an imaginary oven door. Stand where you’d load the dishwasher. Make sure no tape-marked appliance sits where a swinging door reduces access below a safe working clearance. Do this before any plan is approved and before any cabinet is ordered.
The door swing conflicts that show up consistently after installation were always findable at the painter’s tape stage. They just weren’t found.
What These Layouts Look Like with Real Room Dimensions
Here’s what the layout options look like when your actual dimensions go in.
Use this as a starting point, not a prescription. Existing plumbing stacks, door positions, and structural walls may push you toward a different option at any of these sizes.
| Room Dimensions | Approximate Sq Ft | Best Starting Layout | Key Constraint to Check |
|---|---|---|---|
| 7 ft × 9 ft | ~63 sq ft | One-wall or single galley run | Very limited options; maximize vertical storage on every available wall |
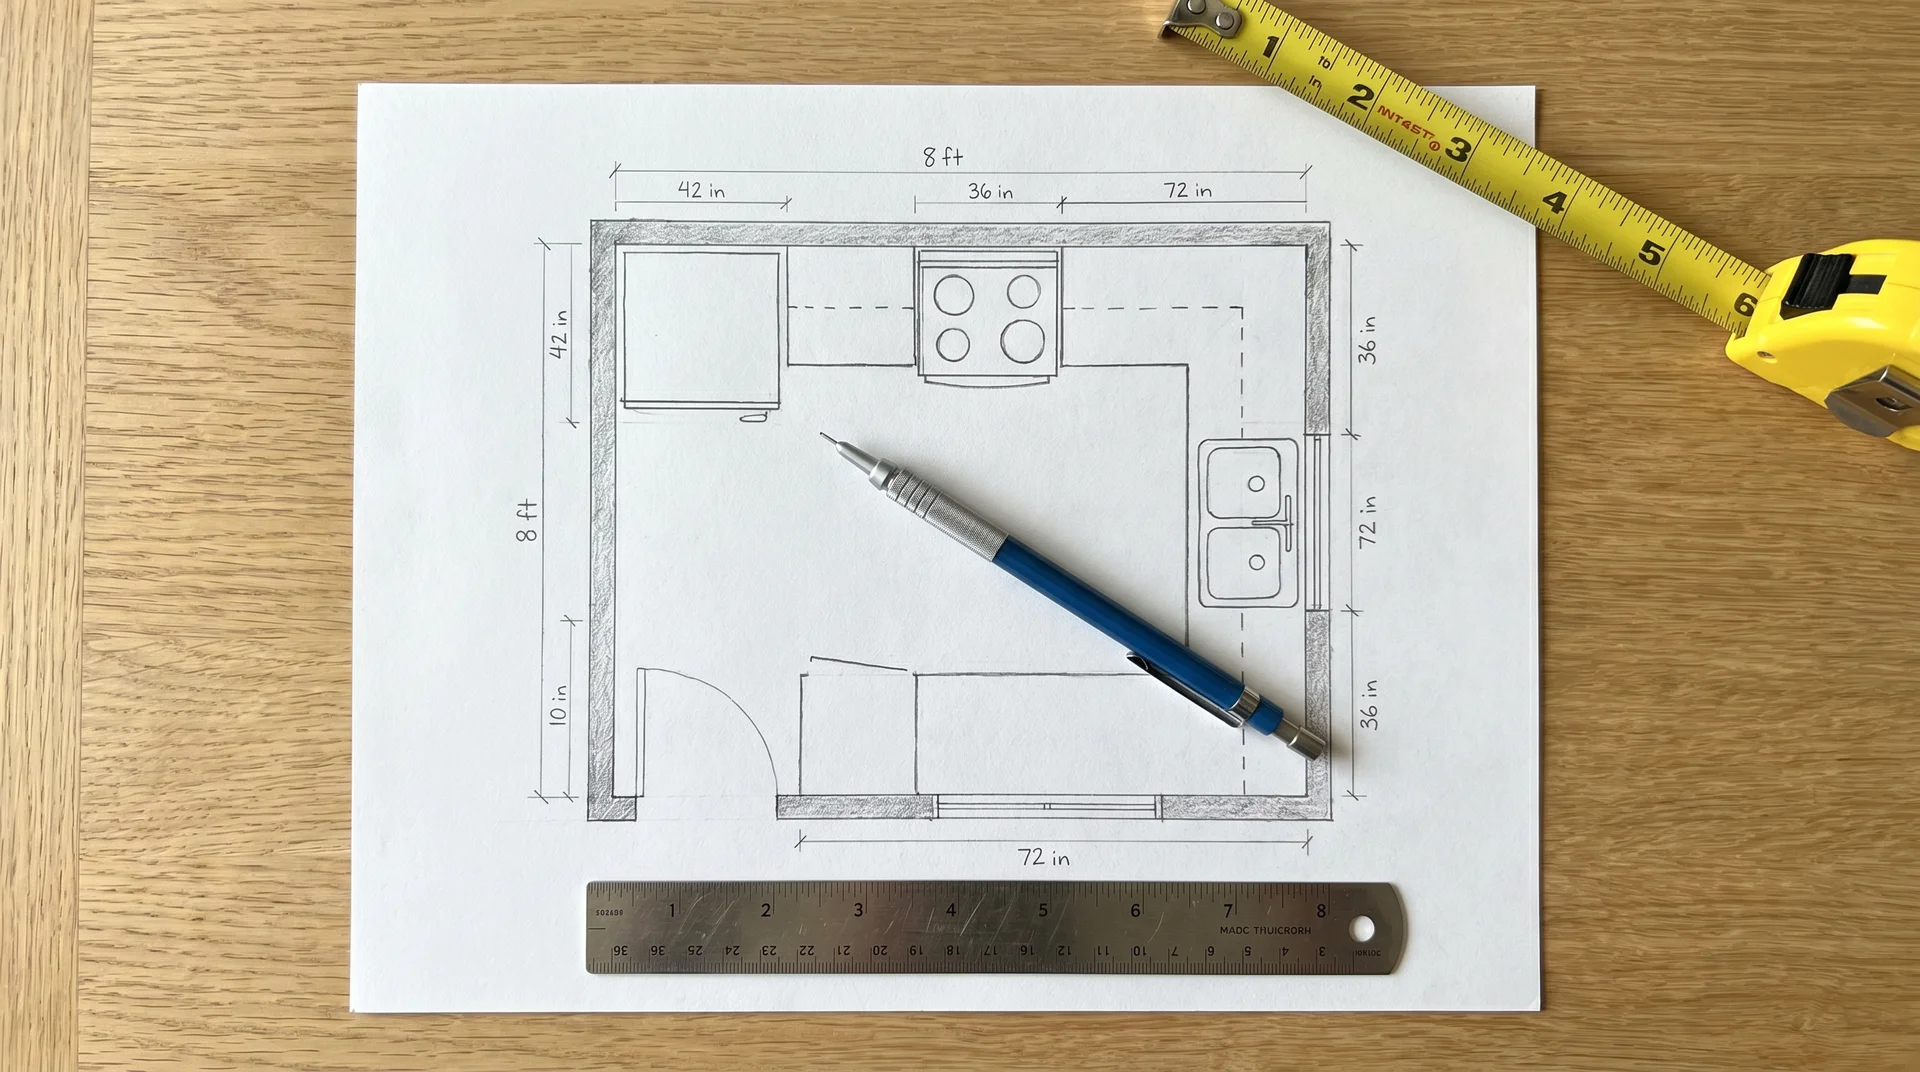
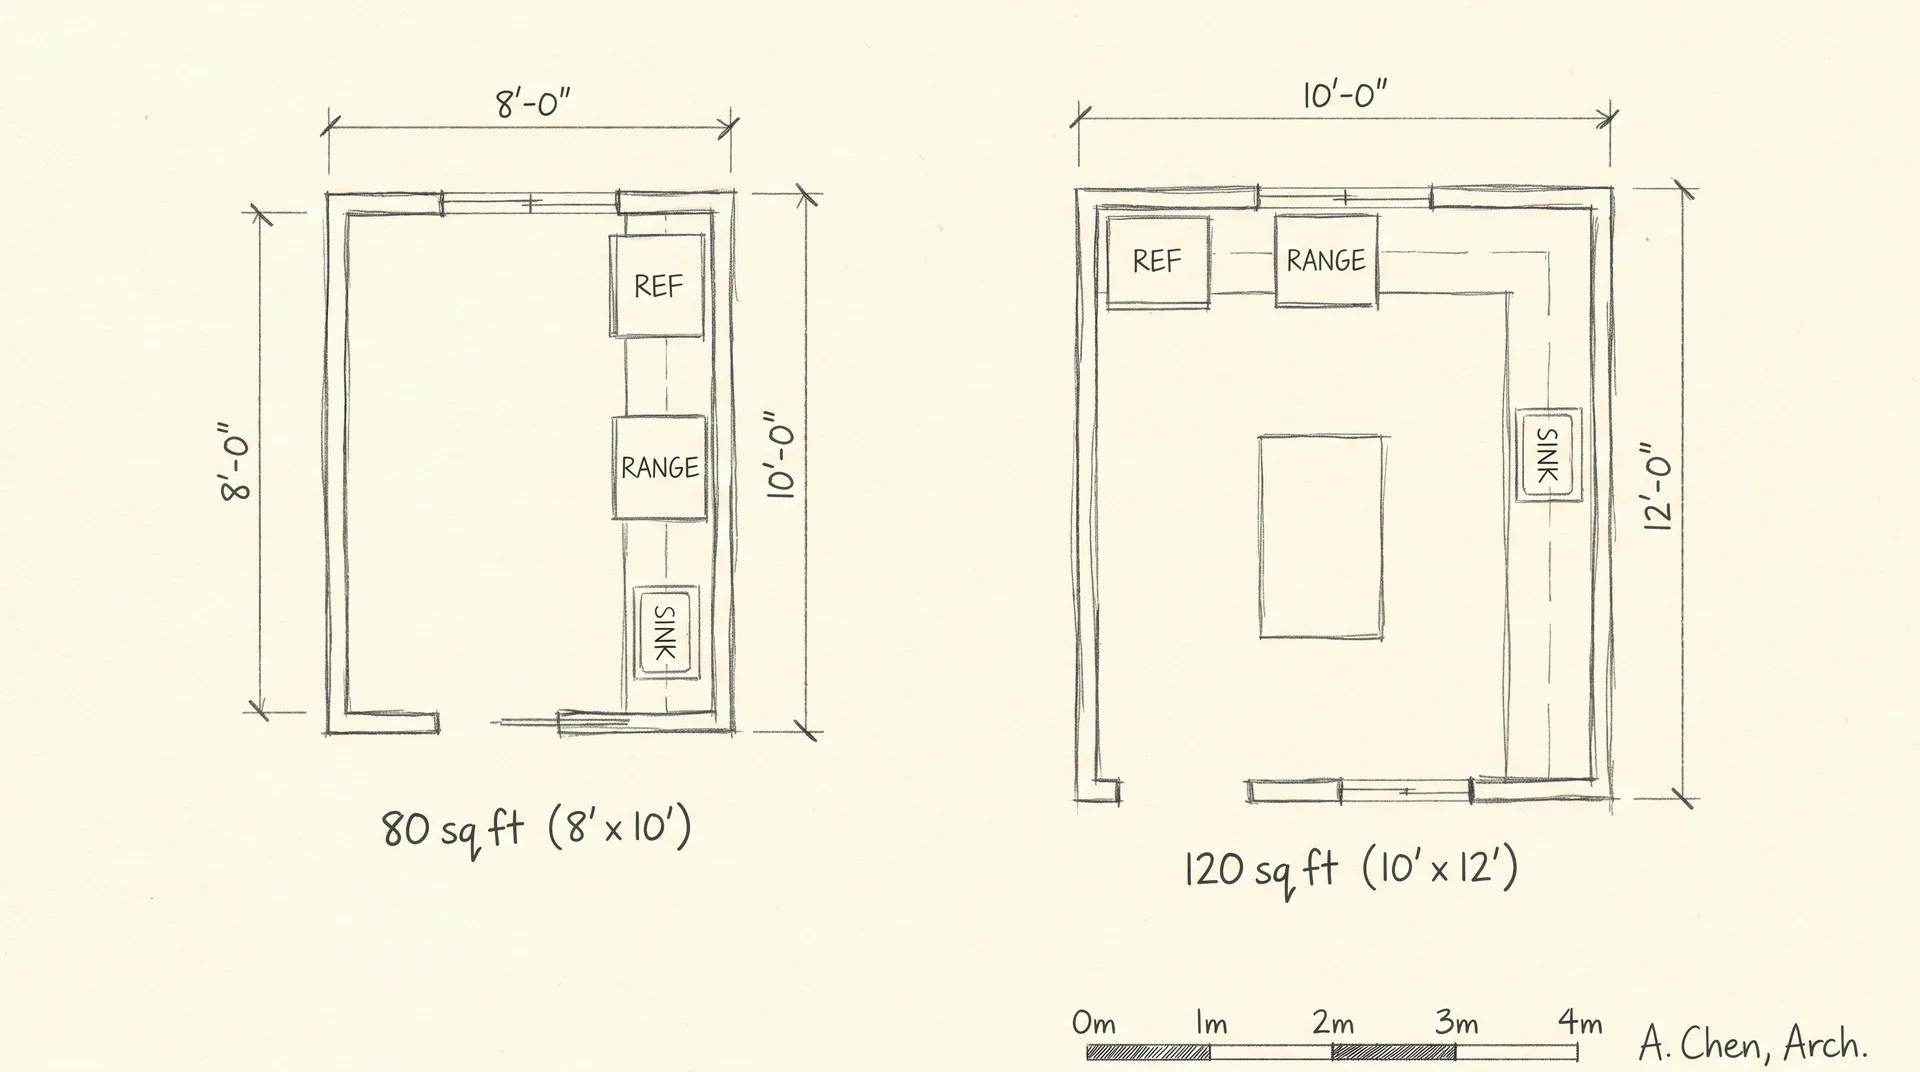
| 8 ft × 10 ft | ~80 sq ft | Galley or one-wall | Galley works if total room width allows a 36-inch aisle; check all door swings first |
| 9 ft × 11 ft | ~99 sq ft | L-shaped or galley | L-shape opens to adjacent room; corner cabinet solution required from the start |
| 10 ft × 12 ft | ~120 sq ft | L-shaped or compact U | Island only with confirmed 42-inch clearances on all sides |
| 12 ft × 12 ft | ~144 sq ft | U-shaped or L plus island | Fixed island viable; still verify 42-inch minimum clearance on all sides |
That 10×12 row is the size every other small kitchen article was written for. If your kitchen is smaller, you are not an edge case. You are exactly who this piece is for.
Pick the layout your room can support, verify the clearances, and use painter’s tape before any plan is approved. The fifteen minutes it costs is worth more than any drawing that skips it.
