Most people pick a sink they like the look of and sort out the installation details afterward. That ordering causes expensive mistakes.
Your countertop material is the first question in this decision, not an afterthought. Everything else, like cost, cleaning, and aesthetics, follows from there.
What Undermount and Drop-In Actually Mean
The Drop-In Sink
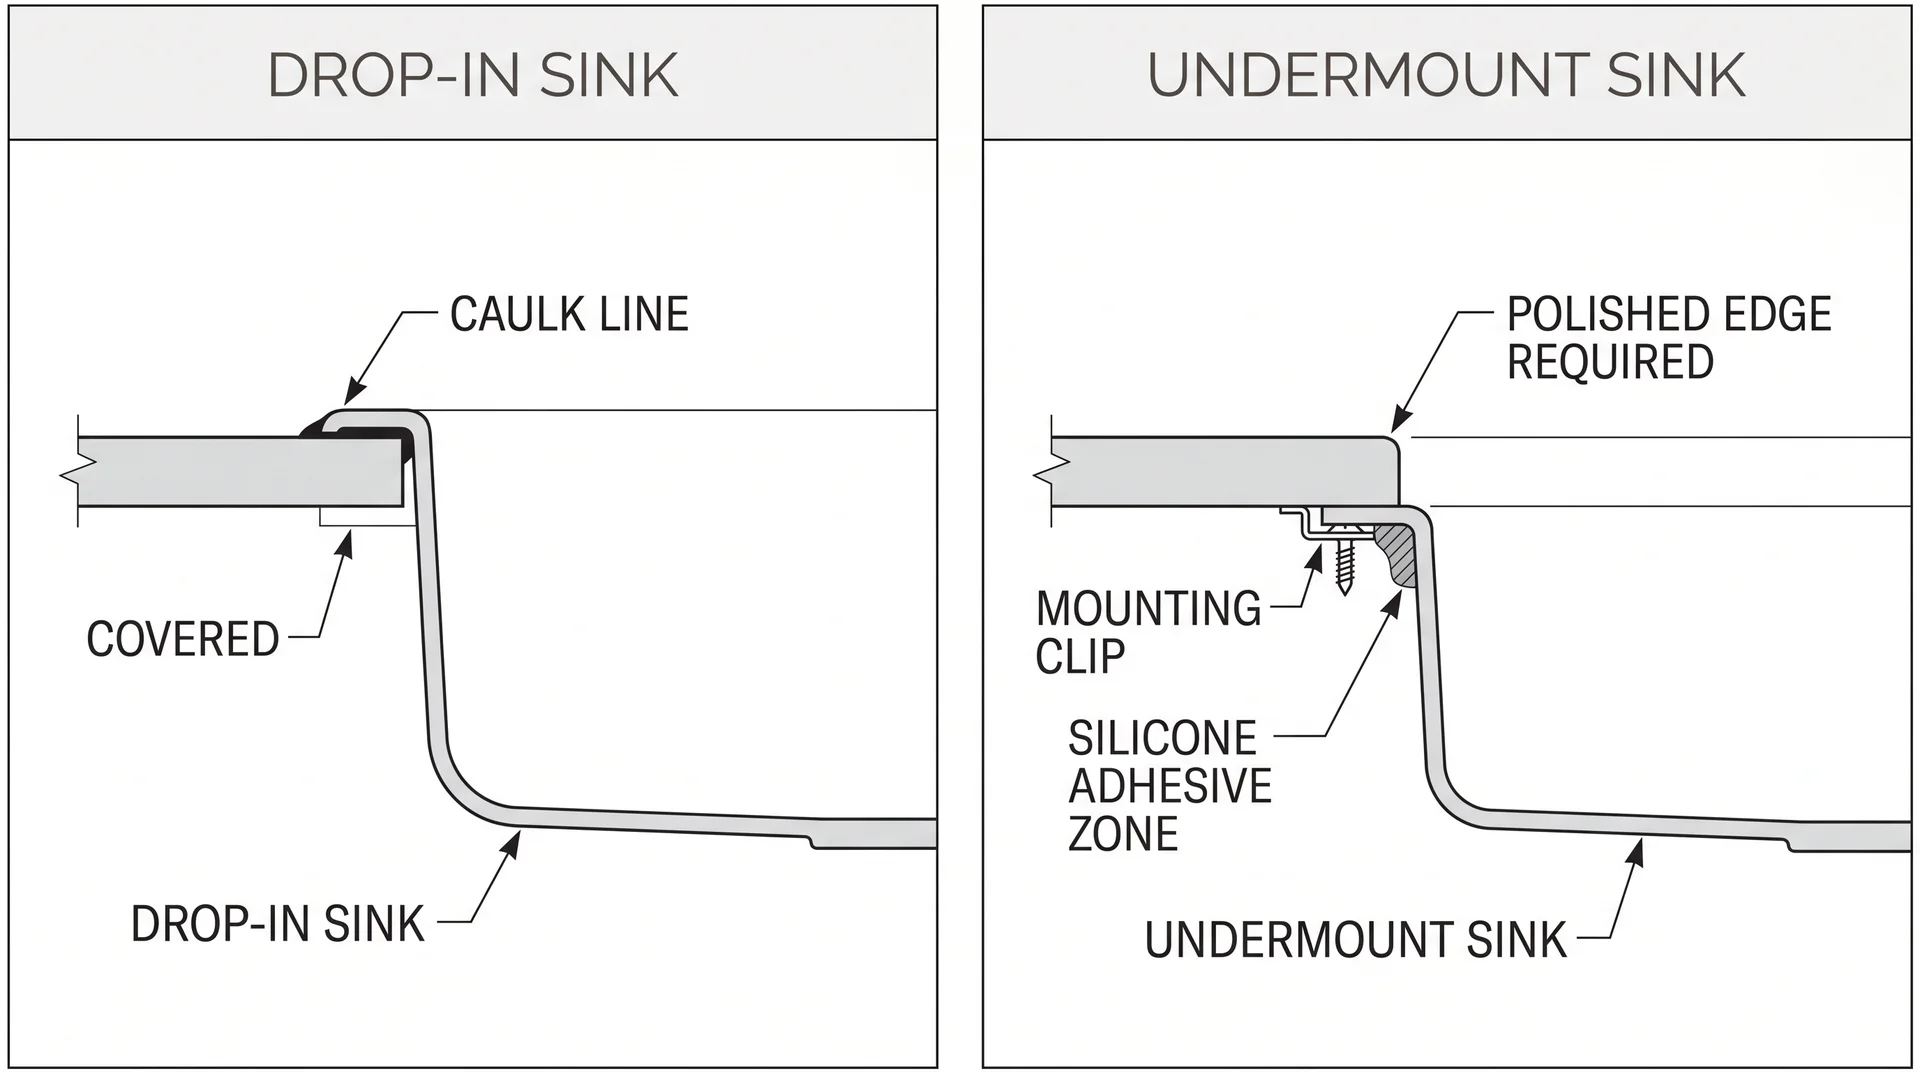
A drop-in sink drops into a cutout in the countertop, with its outer rim holding it in place on the surface.
Silicone caulk seals the gap between the rim and the counter. You’ll see this type listed as top-mount, self-rimming, or overmount in product searches. All three names mean the same thing.
The rim is always visible. It’s also why drop-in sinks work with almost any countertop material: the rim covers the raw cut edge, so the substrate underneath never contacts water directly.
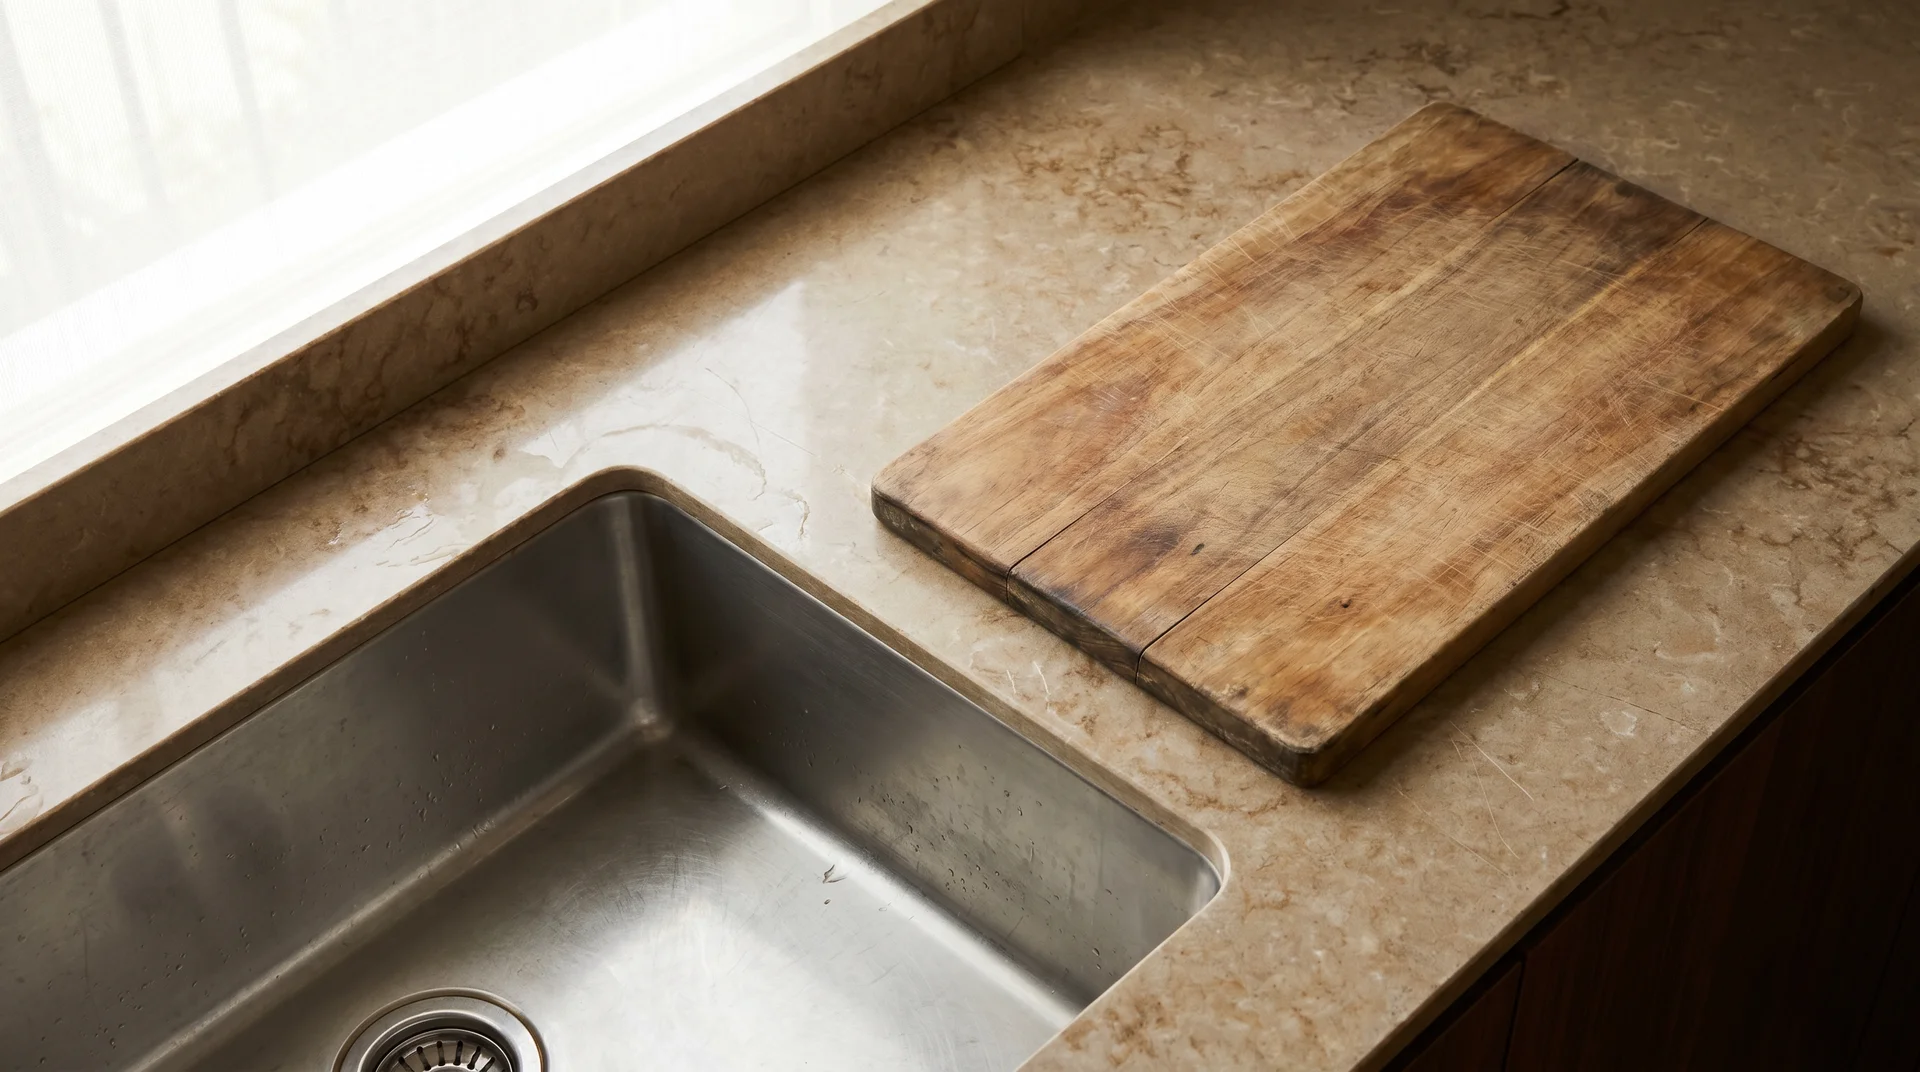
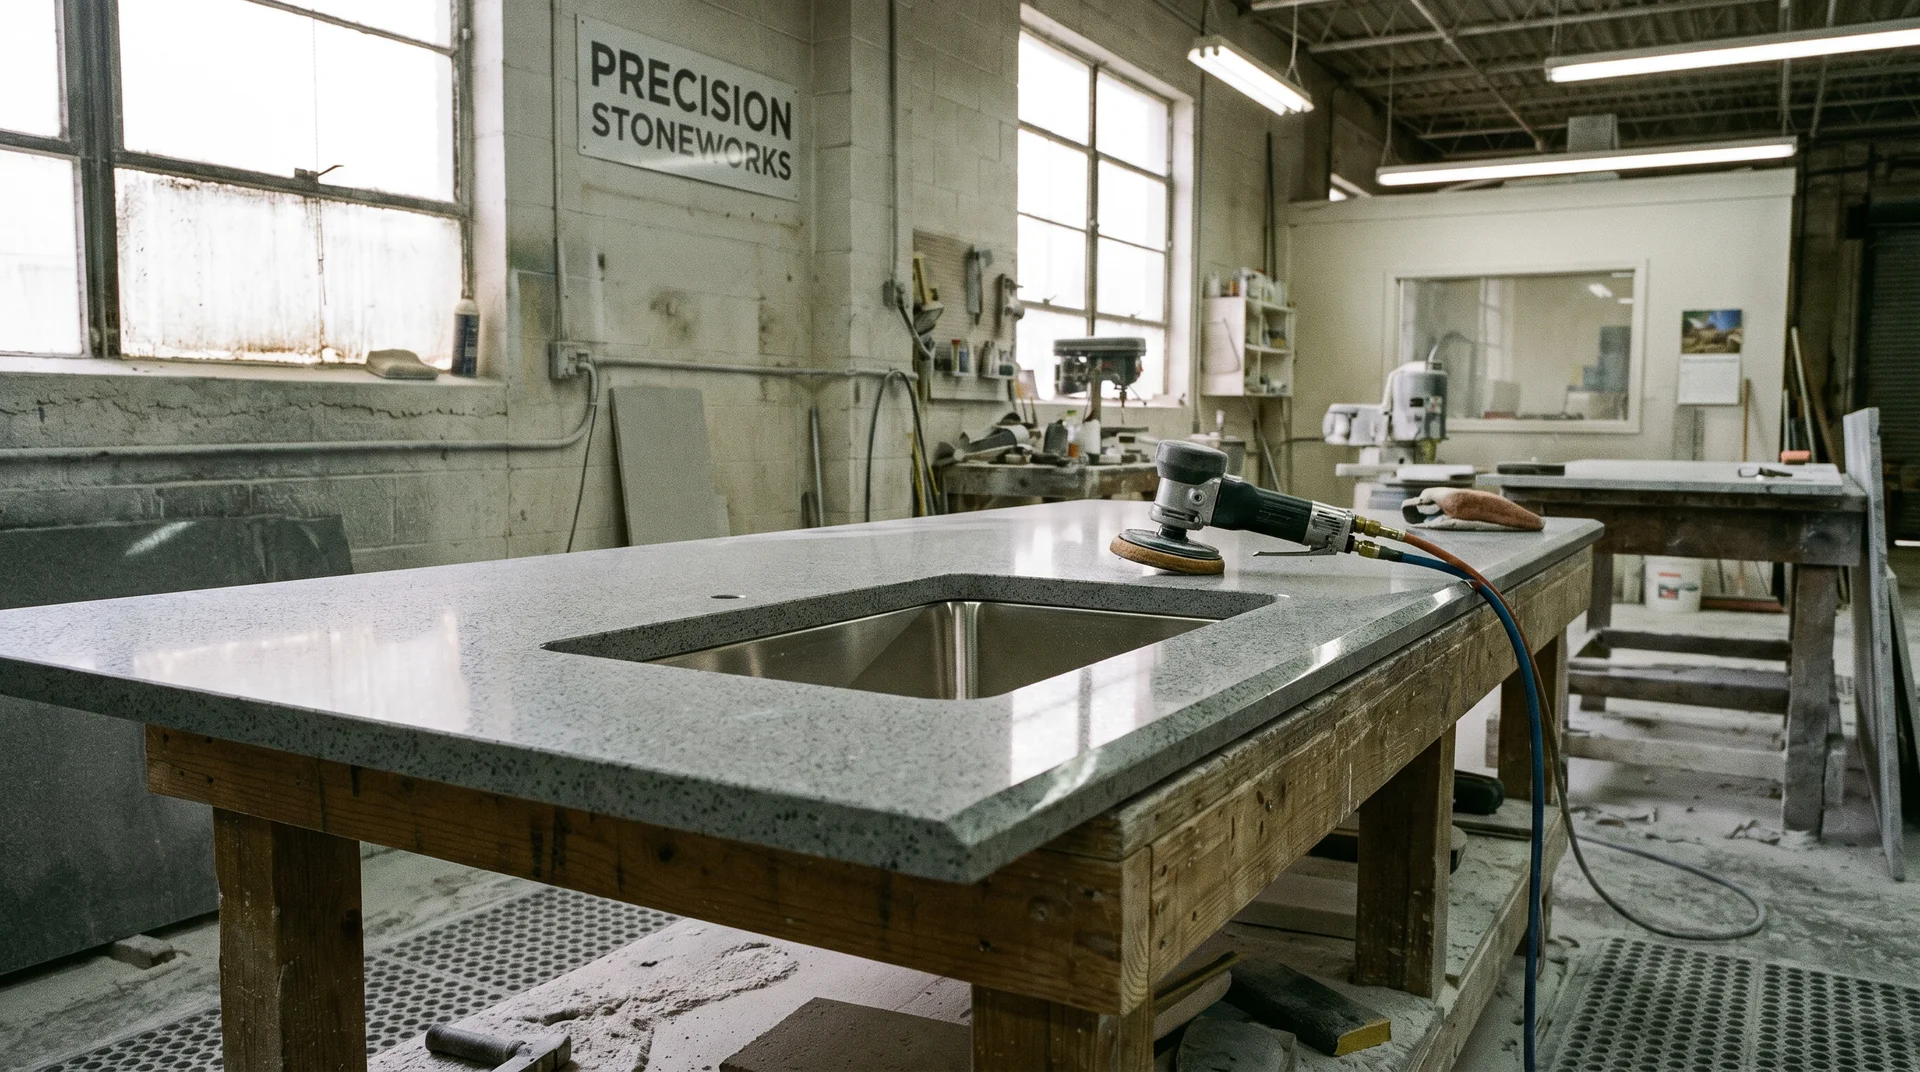
The Undermount Sink
An undermount sink attaches from below using silicone adhesive and mechanical mounting clips. There is no rim on the countertop surface.
The countertop extends over the edge of the sink opening. That exposed cut edge is why material compatibility matters so much with this installation type and why this is the first question to answer, not the last.
Undermount vs Drop-In Sink & Countertop Compatibility
Your countertop material determines which sink type is available to you.
Most comparison guides treat material compatibility as one factor among several. It isn’t.
For many kitchens, it’s the only factor that closes the question, because pairing the wrong sink type with the wrong counter causes structural damage over time, not just a cosmetic problem.
What Works With Undermount
Undermount sinks require a solid, water-resistant countertop that can be polished at the cut edge.
The exposed counter edge sits directly above the sink basin. It has to resist moisture without swelling, and it needs a smooth finished surface for the silicone seal to hold.
These countertop materials work reliably with undermount installation:
- Granite
- Quartz
- Marble
- Solid surface (sold under brand names like Corian)
All four can be polished at the cut edge and resist water at the substrate level. Edge polishing is part of the fabrication process and adds to your total installed cost.
What Works With Drop-In
Drop-in sinks work on nearly every countertop material. The rim covers the raw cut edge, so the substrate underneath never contacts water directly.
That’s the functional reason drop-in sinks have been the kitchen default for decades. Compatible materials include:
- Laminate
- Tile
- Butcher block
- Granite
- Quartz
- Solid surface
If you have laminate countertops, a drop-in is your only practical option without also doing countertop work. That’s not a limitation worth fighting.
The Laminate Situation

Standard laminate countertops and undermount sinks are not compatible.
Laminate is particleboard covered with a thin plastic layer. When that particleboard core contacts water at the cut edge, it swells. It doesn’t recover. Over months, the substrate deteriorates, and the sink mount fails.
There is one workaround worth knowing. Some countertop fabricators (the professionals who cut and finish the counter surface) will replace only the sink section of a laminate counter with a solid surface or butcher block insert, then install the undermount in that new section. It’s a real option.
It also requires finding a fabricator willing to do hybrid work, which most won’t, and it adds fabrication cost that most budgets haven’t accounted for.
I’ve watched homeowners try to seal laminate cut edges with silicone and proceed anyway. The seal holds for a year, sometimes two. Then the particleboard starts to move. Fixing that is a different project with a different budget entirely.
That context is what makes the installation section below worth reading with your specific counter already in mind.
How the Installation Actually Differs
Installation is where the cost gap between these two sink types becomes concrete.
Drop-In: What DIY Actually Looks Like
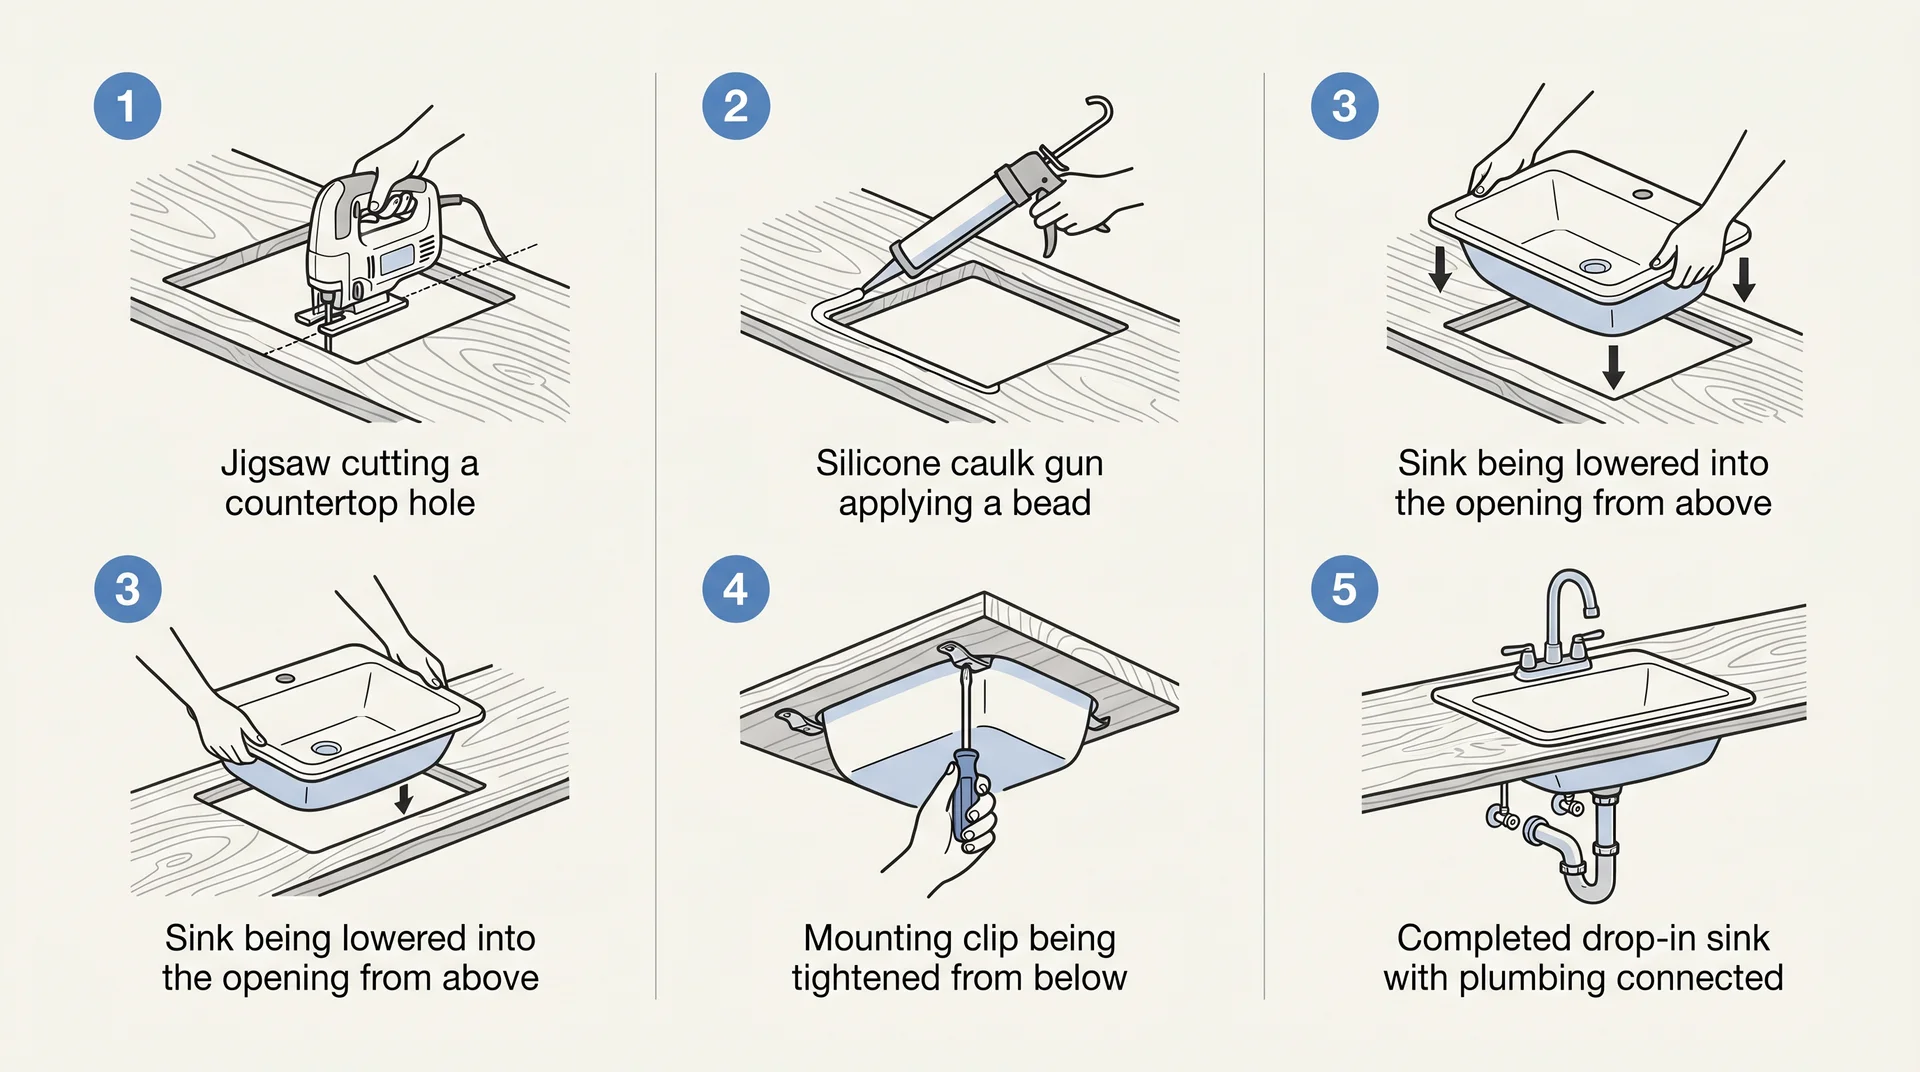
A careful DIYer can install a drop-in sink in under an hour. The steps are genuinely manageable for most homeowners.
Here’s what the job involves:
- Cut the opening using the manufacturer’s template and a jigsaw
- Apply a continuous bead of food-safe, mold-resistant silicone caulk around the edge. Check for NSF/ANSI 51 compliance on the label for any sealant near food prep surfaces
- Lower the sink into the opening
- Tighten the mounting clips from below
- Connect the drain and supply lines
The two places where most DIY installs go sideways: cutting the hole slightly off the template line, and leaving gaps in the caulk bead. Both are recoverable before the sink settles in.
If you’re replacing an existing drop-in with a new one of the same dimensions, you don’t need to recut at all. The existing opening works if the template matches. Same-size replacement is genuinely fast.
Undermount: What Professional Installation Costs and Why
Undermount installation is almost always a professional job. The total cost is higher than the sink price alone suggests. Labor runs $300 to $900, depending on your market and the sink’s weight.
That range excludes countertop edge polishing, which adds $50 to $200 as a separate line item.
Heavy sinks like fireclay and cast iron models can weigh 60 to 120 pounds and require properly built support rails in the base cabinet before installation begins. This is not optional.
The NKBA recommends making the sink-type decision before the countertop goes in, not after. An already-installed counter makes the work harder: the fabricator can’t flip it, and the surrounding finished surfaces complicate clamping.
One long-term consideration most buyers overlook is that when an undermount eventually needs replacing, it’s a more involved job than swapping a drop-in.
The seal and edge work must be fully redone, and the countertop cutout may need re-edging. A drop-in replacement, by contrast, can be done by the homeowner in an afternoon.
Cleaning the Undermount or Drop-In Sink
Both sink types have a cleaning problem. They put it in different places.
- Undermount is easier to clean the counter around it.
- Drop-in is easier to inspect and clean the sink itself.
Neither is set-and-forget; they just ask different things of you over time.
Undermount
Undermount wins the counter-cleaning comparison. You can sweep crumbs and water directly off the counter into the basin. Nothing catches them.
That advantage is real, and it compounds over the years of daily use. In a kitchen running twice a day, the difference between a clean counter sweep and navigating a raised rim is something you’ll feel over five years of cooking.
What most articles skip is that the silicone seal between the sink and the underside of the countertop degrades. Heat, cleaning chemicals, and constant moisture work on it steadily. The degradation is slow and invisible from above.
Signs the seal is beginning to fail:
- The caulk line darkens or feels soft when lightly pressed
- You notice slight movement at the sink edge
- Water appears inside the base cabinet below the sink
Inspect the seal once a year. Reseal at the first sign of discoloration or softness, before water finds the cabinet.
A failed seal left unnoticed for several months can drive mold into the cabinet structure. That repair is expensive and disruptive.
I’ve used an undermount in my own kitchen, tested the seal annually, and caught the degradation before it caused any damage. The reseal just took 45 minutes.
Drop-In
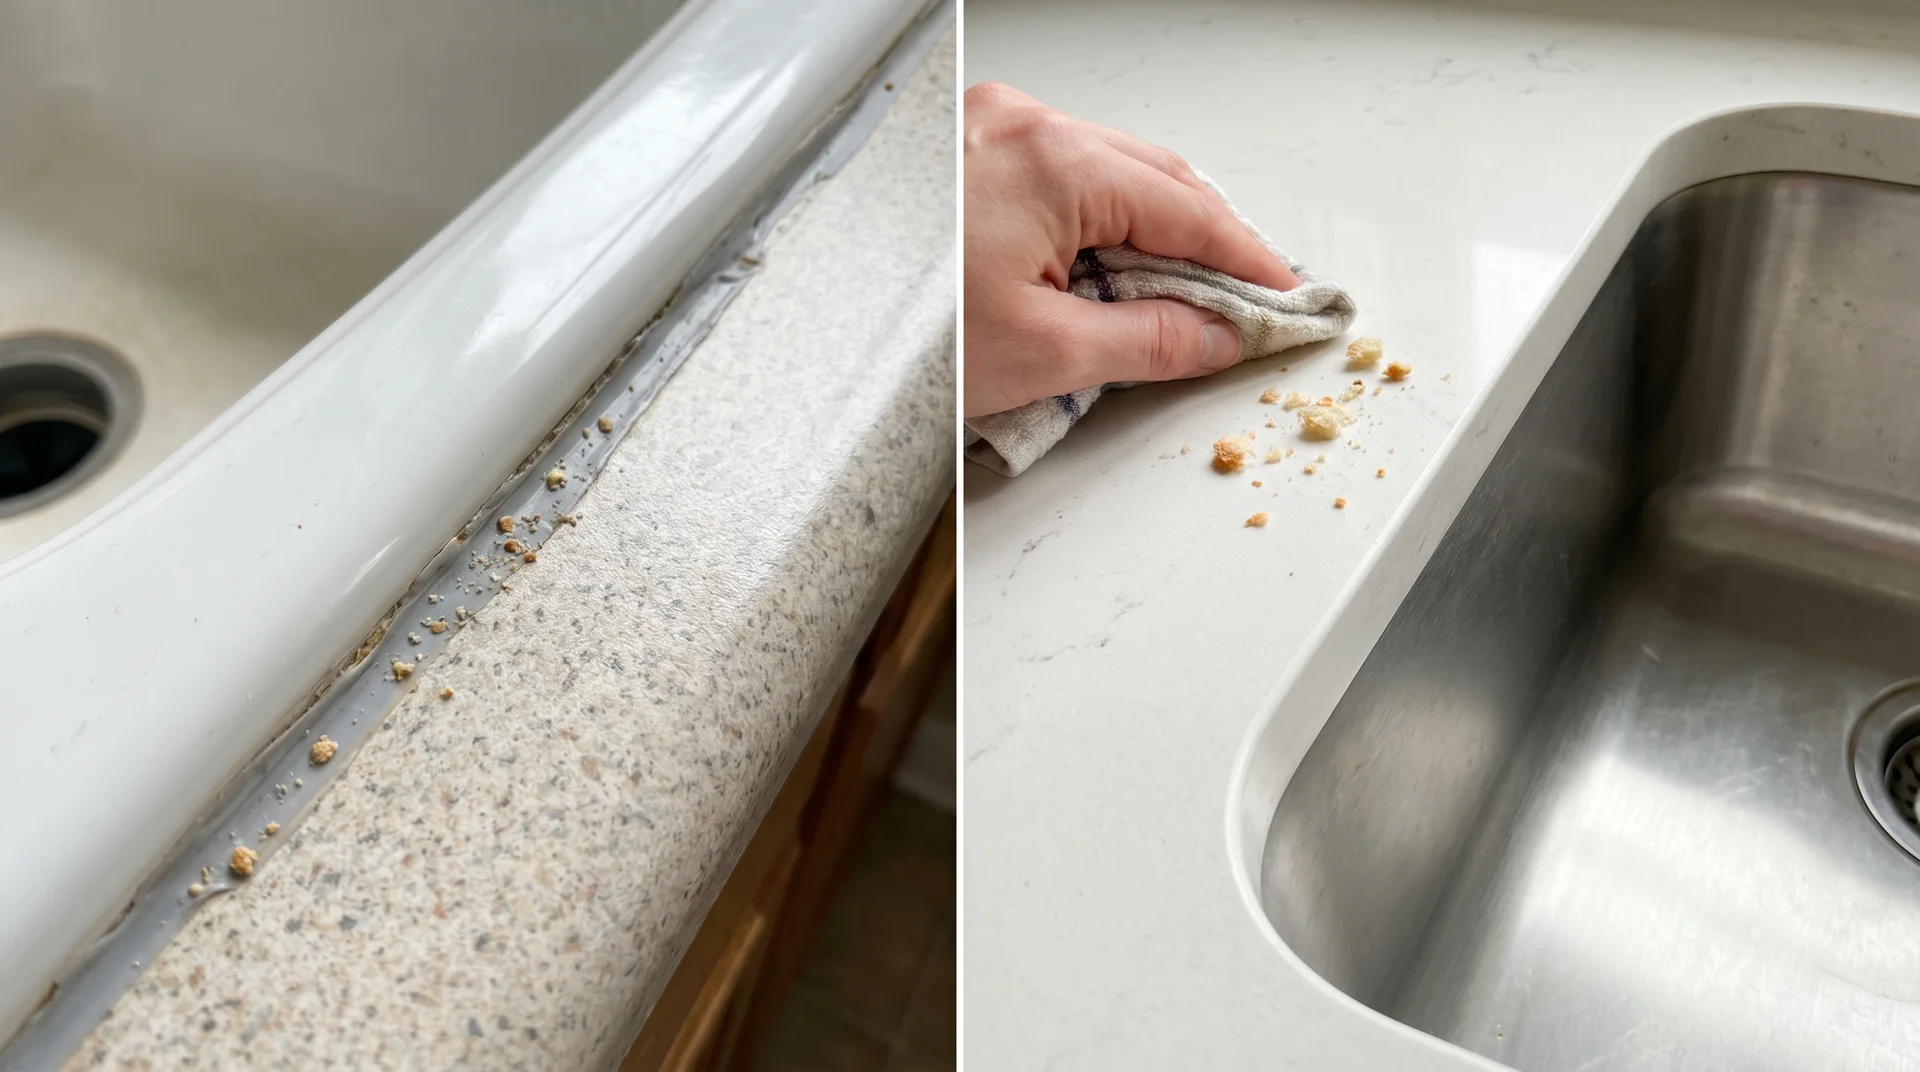
The gap between a drop-in rim and your countertop catches water, grease, and soap residue from the first week of use.
The silicone caulk around that rim yellows and grays within one to two years under normal cooking conditions.
No cleaning product reliably reverses yellowed silicone. Recaulking is the only real fix.
Resealing a drop-in rim is inexpensive and straightforward: cut the old caulk, clean the surface, apply new silicone, and keep the sink dry for 24 hours while it cures.
To sum it up, the drop-in’s cleaning problem is visible and cosmetically irritating. The undermount’s cleaning problem is hidden and potentially structural. Pick what you can manage.
Cost Comparison: What You’re Actually Paying For
The price gap between these two sinks is larger than the tag suggests.
Here is a full cost picture based on 2025–26 contractor data from Angi and HomeAdvisor:
| Cost Item | Drop-In | Undermount |
|---|---|---|
| Sink unit | $50–$800+ | $150–$1,500+ |
| Installation labor | $150–$600 | $300–$900 |
| Countertop edge polishing | Not required | $50–$200 additional |
| DIY viable? | Yes, for most homeowners | Rarely advisable |
| Future replacement difficulty | Low, homeowner job | High, professional required |
The edge polishing line is what most comparison articles omit. It’s not optional with undermount. The exposed cut edge needs a finished, sealed surface to mount against, and fabricators bill it separately from the countertop fabrication itself.
The total installed cost difference between a mid-tier drop-in and a comparable undermount typically runs $300 to $700, including labor and edge work. For a heavy fireclay or cast iron undermount, that gap widens further.
When does the extra cost make sense?
You’re doing a full kitchen renovation, the countertop is going in new at the same time, you have granite or quartz, and you cook often enough that the daily cleaning difference compounds meaningfully over the years.
When it doesn’t: you’re doing a sink-only replacement, you have laminate, or you’re planning to sell within the next two to three years in a market that doesn’t reward mid-tier kitchen upgrades. That last condition matters more than most sellers acknowledge.
Does Undermount Actually Add Resale Value?
The resale value case for undermount sinks is real but overstated.
Undermount sinks are associated with premium kitchen finishes. A buyer walking into a kitchen with quartz counters, updated appliances, and an undermount sink reads “renovated kitchen.” That impression influences offers in markets where kitchen quality drives buyer decisions.
Keep in mind that nobody offers more money only because the sink is undermount. They offer more because the kitchen overall is updated. The sink is one signal among several producing that impression, and it only registers as premium when the other signals support it.
If your kitchen has laminate counters and older appliances, adding an undermount sink, even if you can make it work, doesn’t close that gap. Buyers read rooms, not specifications.
How to Decide: A Framework That Starts With Your Counter

Start with your countertop material.
Most people begin with the sink they like aesthetically and work backward to the installation requirements.
Your countertop material is the only hard constraint here. It determines what options are physically available to you before cost or aesthetics enter the conversation.
Get it wrong, and you’re not choosing a sink; you’re planning a repair.
Step 1: What countertop material do you have, or are you installing?
- Laminate or tile: Drop-in only. Undermount isn’t viable without a partial countertop replacement.
- Butcher block: Drop-in is the safer choice. Undermount is possible with careful sealing, but most fabricators advise against it for the long term.
- Granite, quartz, marble, or solid surface: Both types work. Move to Step 2.
Step 2: Are you replacing just the sink, or doing a full renovation?
- Sink-only replacement, countertop already in place: Drop-in is almost always easier and cheaper. Undermount adds edge work and installation complexity that rarely pays off in this scenario, and replacement down the line will be harder, too.
- Full renovation with a new countertop going in: This is where undermount makes the most sense. Counter and sink are spec’d together, edge polishing folds into the fabrication quote, and installation is cleaner before the counter is glued down.
Step 3: How often do you cook, and how much does the cleaning experience matter to you?
If you’re at the sink twice a day, the difference between a clean counter sweep into an undermount and working around a drop-in rim is something you’ll notice over five years. If you cook occasionally, that difference may not justify the cost and installation gap.
That’s the decision. Not which one photographs better, but which one fits the counter you have, the renovation you’re doing, and the kitchen you actually use.