Building a custom range hood is one of those projects that looks harder than it is. Standard lumber and basic carpentry tools get you most of the way there.
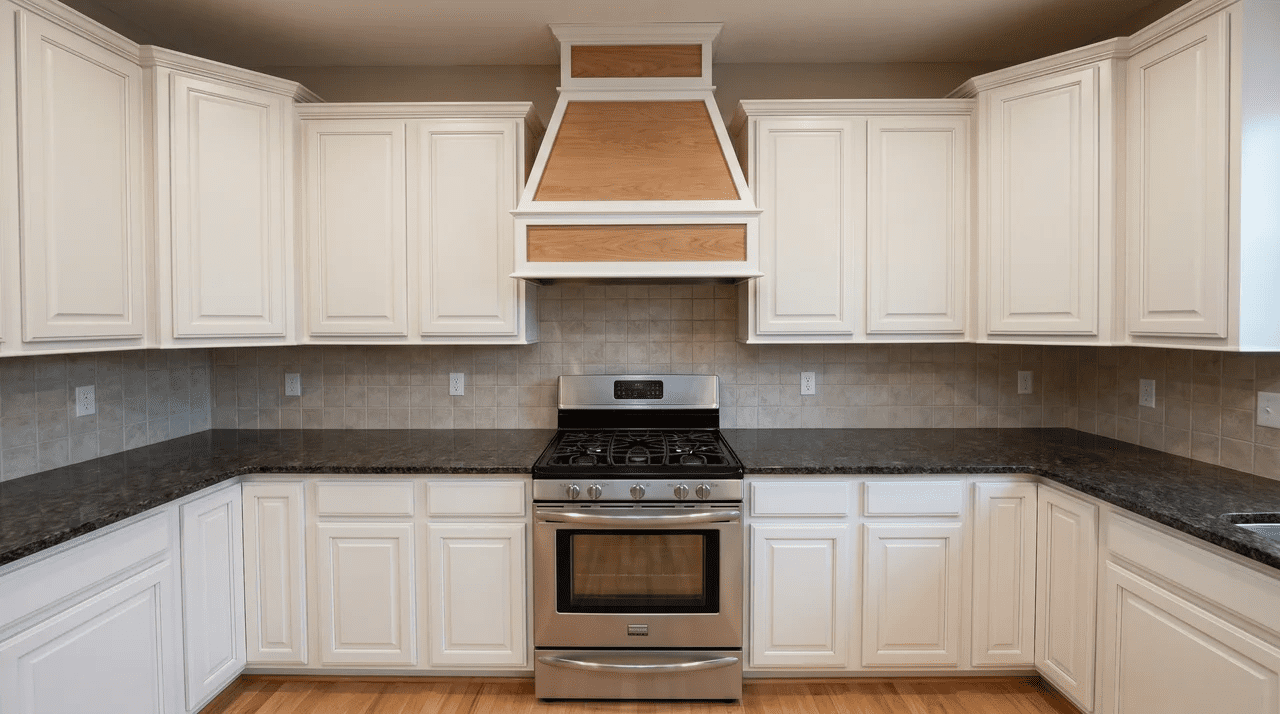
When it’s done, it looks like a $3,000 fabrication job.
I’ve seen these builds go wrong in a predictable way, though. Someone buys lumber first, starts framing, then pulls out the insert spec sheet too late.
At that point, the numbers are wrong and the frame comes down.
This guide runs the steps in the correct order. Start here before you buy a single board.
What Do You Need Before You Start Building a DIY Range Hood?
A DIY range hood is two things: a ventilation insert that moves air, and a custom enclosure built around it.
You’re building the enclosure. The insert is not something you figure out later.
Here’s what trips people up early: the insert controls every dimension in the build. Get it selected first, or every measurement you take is a guess.
Why Your Insert Choice Comes First
The ventilation insert determines the minimum width, depth, duct size, and required clearances for your entire enclosure. It must be confirmed before you take a single measurement.
Here’s how the dimensions work. The insert’s housing width is your inner frame minimum. The manufacturer also lists a required clearance per side. This number is separate from the housing width, they’re not the same.
Add that clearance to both faces. That’s your minimum inner frame width. Then add sheathing thickness to both outer faces; ¾ inch per face for plywood. That total is your outer enclosure width.
Depth and height follow the same logic. Every outer dimension flows from the insert’s specs.
I’ve seen this trip up experienced builders: the clearance spec and the housing width look like they should match. They don’t. Treating them as the same number is the most common reason a frame gets rebuilt.
CFM matters at this stage too. If you pick an insert rated too low for a high-BTU gas range, no framing fix will correct it. The ventilation problem is locked in at selection.
That’s why insert selection is a functional decision first and an aesthetic one second. If you’re drawn to a particular finish first, that’s fine. Just confirm the insert specs match before you commit.
Tools and Materials You’ll Need
Before any framing starts, get both lists confirmed. The first covers enclosure materials; everything you need before you cut a board.
For the enclosure, you’ll need:
- 2×4 framing lumber
- ¾-inch plywood or ½-inch drywall for sheathing
- Trim boards in your chosen profile
- 3-inch construction screws for frame joints
- 1¼-inch screws for sheathing panels
- Paintable caulk
- Primer suited to your finish
Those are your core materials. The tool list is shorter.
A miter saw, drill, level, stud finder, and tape measure handle most of the build. Add a jigsaw for ducted builds, you’ll need it to cut the collar opening. Ducted builds also need sheet metal screws and foil-backed duct tape. Recirculating builds can skip the ductwork entirely.
One material choice worth making consciously: plywood or drywall for sheathing. In my experience, most builders grab whichever is closer, but it matters at the finish stage.
Plywood holds screws cleanly at the edges and takes paint without any joint work. Drywall costs less and sands smoother, but seams need joint compound and sanding before any finish coat looks right.
Make the choice now so you’re not troubleshooting it when you’re painting.
How Do You Build a DIY Range Hood Step by Step?
The order matters more than most people expect. Two of the most expensive mistakes in this build come from swapping steps around.
Here’s the full sequence.
Step 1: Measure From the Insert Out
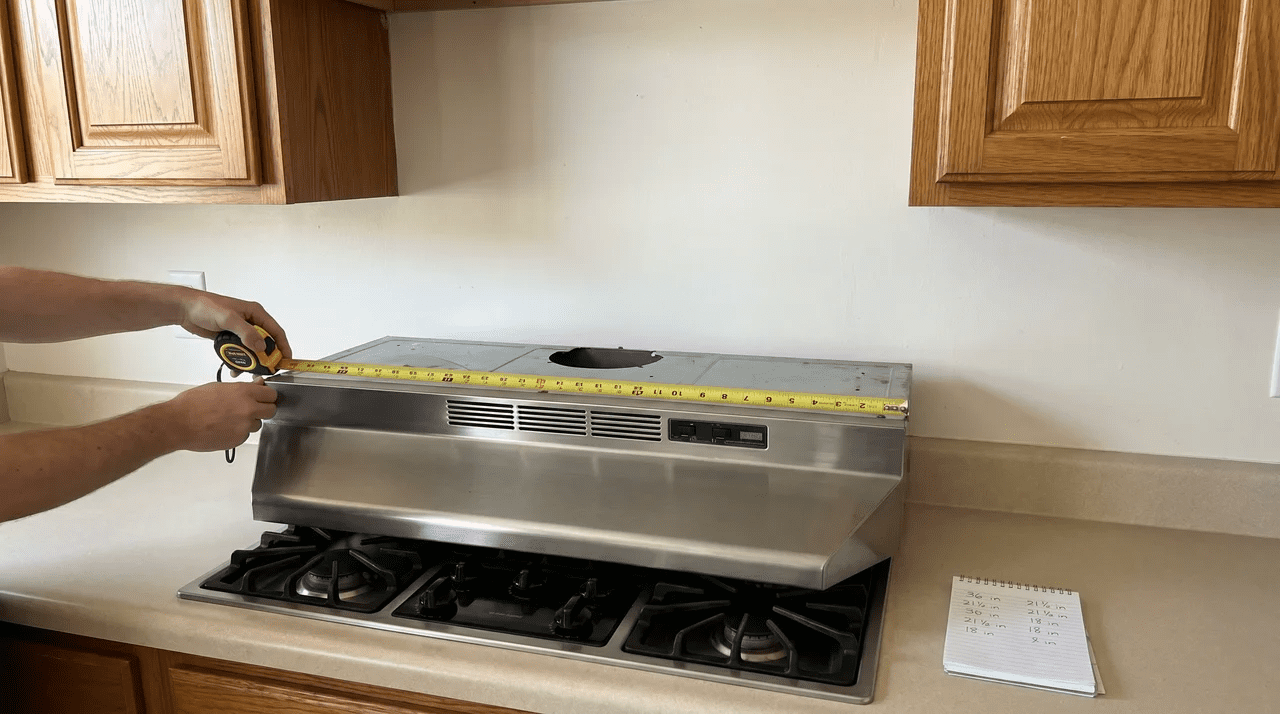
Every measurement comes from the insert’s spec sheet. Not from how the space looks, or from the cabinet layout on either side.
Start by writing down three numbers: the insert’s housing width, housing depth, and required clearance per side. Then work outward:
Inner frame width = housing width + (required clearance × 2)
Outer enclosure width = inner frame width + (sheathing thickness × 2)
Depth follows the same formula. Height above the cooking surface is a safety clearance, not a design choice. The standard is roughly 24 to 30 inches. This can vary by fuel type and local code. For gas ranges especially, confirm the requirement for your setup before locking that number in.
I can’t overstate how often a dimension error at this stage leads to a full rebuild. Write every derived number on paper. Cross-check against the spec sheet before any wood gets cut.
Once you’ve framed and sheathed an enclosure with wrong dimensions, there’s no adjustment. It comes down and you start over.
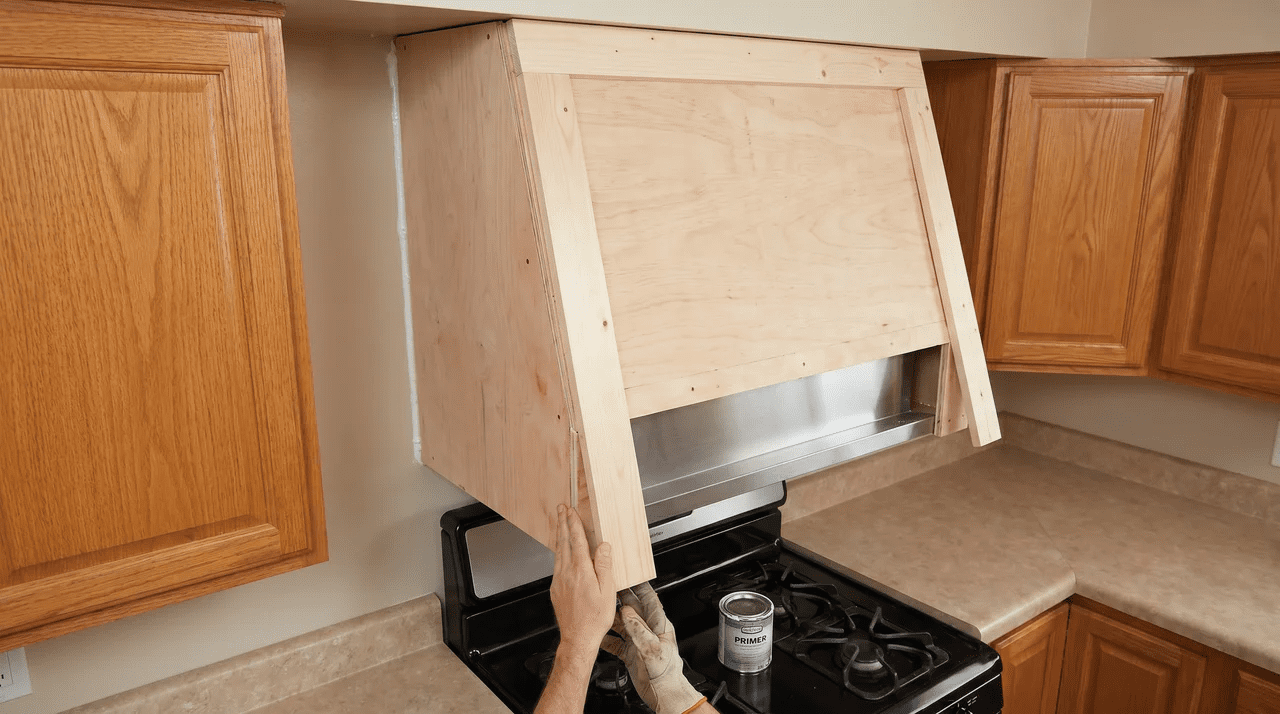
Step 2: Build and Close the Frame

The frame is a rectangular 2×4 box. Build it on the floor first, then lift it into position.
Use 3-inch construction screws at every corner joint. I’ve seen builders nail range hood frames together and regret it immediately. The moment a joint needs adjusting before sheathing goes on, nails have no give.
Screws give you room to adjust if a joint is off. Square the frame before it goes up. A racked frame makes sheathing panels gap at the corners, and trim won’t sit clean.
Once it’s in position, anchor into wall studs on the back face. Also anchor into ceiling joists or purpose-installed blocking at the top. The combined weight of a sheathed enclosure and a mounted insert is more than drywall anchors carry over time.
This is a structural requirement, not a finishing detail.
Sheath all visible exterior faces; sides, front, and top before the enclosure is closed. Leave the bottom open for insert access.
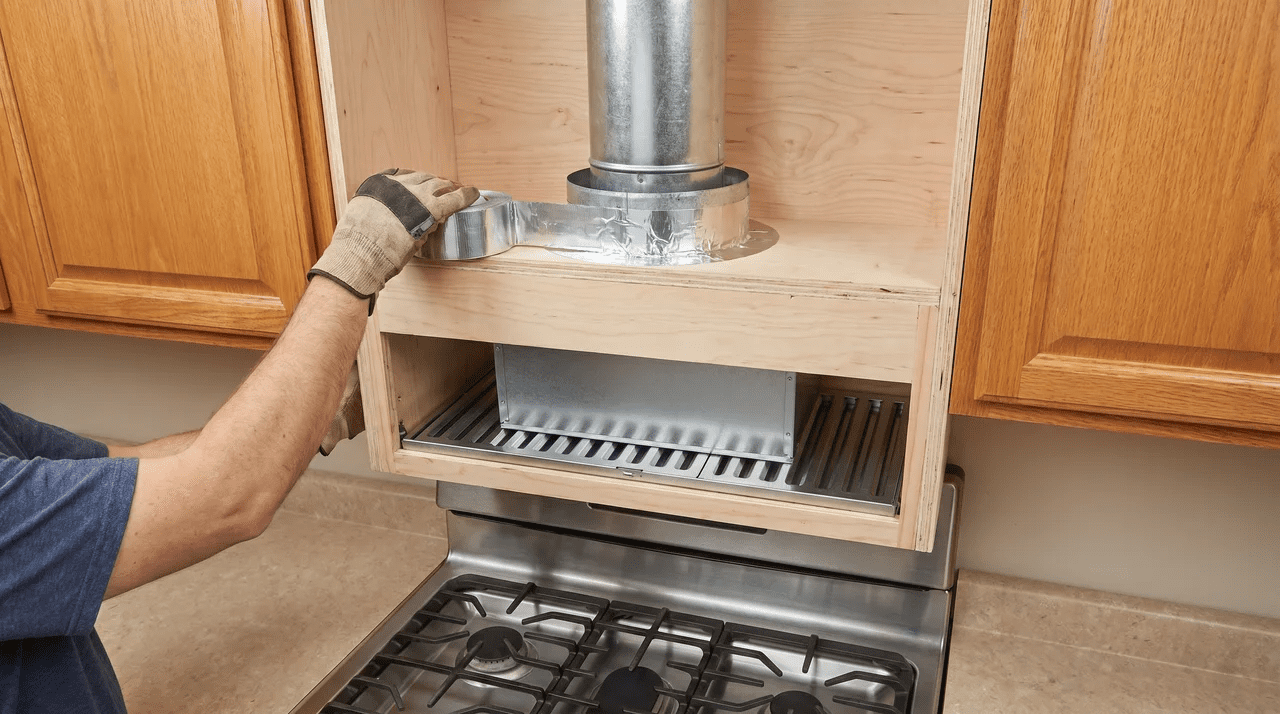
Before you fasten the top or back panel, confirm the duct opening is correctly sized for the insert’s collar. Also check that it’s in the right position before you close that face. Cutting through finished sheathing to reposition a duct opening is a miserable fix. You’ll do it once and never skip this step again.
Step 3: Install the Insert and Connect the Duct
This is where the functional side of the hood comes together. The enclosure is done, now you’re making it work.
Slide the insert into the framed opening and secure it per the manufacturer’s instructions.
For ducted installs: Use sheet metal screws and foil-backed duct tape to connect and seal every joint in the duct run. I’ll be direct: standard duct tape is not a substitute. It loses adhesion at the temperatures a range hood duct reaches under regular cooking.
Keep the run short and direction changes minimal. Every bend reduces airflow.
For recirculating installs: Charcoal filters go where a duct connection would. They filter the air and return it to the kitchen. Follow the manufacturer’s replacement schedule, filter life depends on how much you cook.
Electrical connection follows the insert’s wiring diagram. If new circuit work is required, that’s a job for a licensed electrician.
Step 4: Trim and Finish
The finish stage is what makes the enclosure look like it belongs. It’s also where small skipped steps show up months later.
Apply trim to every visible panel edge and seam first. The profile you choose determines whether the finished hood looks built-in or tacked on:
- Flat 1×4 boards give a modern or Shaker feel
- Detailed profiled molding suits traditional and transitional styles
- A full plaster coat works for organic, Mediterranean, or earthy aesthetics
Whatever the profile, the rule is the same: trim goes on first, then fill and finish.
Once trim is fastened, fill every screw hole and caulk every seam, including where the enclosure meets the surrounding wall. Kitchens cycle through more temperature variation than most interior spaces. Uncaulked joints crack relatively fast.
For paint or stain, a standard latex primer over the caulked surface is enough. For plaster, apply a bonding primer to the sheathing surface first.
I’ve seen plaster hoods start separating from the substrate within a year because this step got skipped. Plaster won’t bond reliably to bare plywood or drywall without it. It’s a five-minute step that prevents a full-day problem.
What Goes Wrong and How Do You Know the Hood Is Working?
Two mistakes in this build are expensive to fix and hard to undo once the enclosure is closed. Here’s what to watch for, and how to confirm everything is working after the install.
The Two Mistakes That Force a Rebuild
I’m putting these up front because knowing them in advance is the only way to avoid them.
Mistake 1: Wrong frame dimensions
This happens when builders measure from the insert’s exterior body instead of its required clearance specs. The insert either won’t slide in, or it fits but sits outside its required clearances. That’s a ventilation performance problem, not just a cosmetic one.
There’s no way to widen a sheathed frame from the outside. The enclosure comes down.
Mistake 2: Duct routing left unconfirmed
If you close the enclosure before confirming the duct path, you may find the exhaust collar meets solid sheathing. There’s nowhere to go without taking a panel off.
The fix means removing a panel, routing the duct, and refinishing the surface. In kitchens with cabinetry on both sides, routing options can be genuinely limited. Solve this during planning, not after framing.
Confirming the Hood Is Working
Once the hood is installed, here’s how to confirm it’s doing what it should. I check all four of these before I call any install done.
- Run the insert at full speed. No vibration contact between the unit and the frame walls. Any rubbing sound means the insert is touching the enclosure, not floating freely inside it.
- For ducted installs: Hold a piece of tissue near the exterior vent cap. Airflow should push outward and the damper should open clearly.
- Check the enclosure for flex. It shouldn’t shift or move under the insert’s operating vibration.
- Inspect the bottom perimeter. Any gap where the insert meets the enclosure opening lets smoke and steam enter the cavity instead of being exhausted. That’s a fire risk, not just a ventilation issue.
All four clear, and you’re done. Any flag on this list is worth fixing before you sign off on the install.
Wrapping Up
A DIY range hood comes together well when the order is right.
The insert goes first because every measurement flows from it. Confirm the duct path before the enclosure closes. The frame anchors into structure, not into drywall.
Get those three things right and the rest is standard carpentry.
The result is a custom-looking hood that actually does its job. And it costs a fraction of what a fabricated version runs.
Frequently Asked Questions
How much does it cost to build a DIY range hood?
The insert is usually the largest single cost, quality inserts commonly run $150 to $600 depending on size and CFM rating. Framing lumber, sheathing, trim, and finish materials typically add another $100 to $300. Most builds land somewhere between $300 and $900 in total materials. The real savings against a professionally fabricated hood come from labor. That’s where the gap is largest.
Does a DIY range hood have to vent outside?
No. Range hoods work in two configurations. Ducted hoods push air through ductwork to an exterior vent, more effective at removing heat, grease, and cooking odors. Recirculating hoods filter air through charcoal or mesh and return it to the kitchen. This makes them practical wherever running an exterior duct isn’t possible.
What size insert do I need for a DIY range hood?
The insert should match or exceed the width of your cooking surface. Most standard ranges need a 30- or 36-inch insert. CFM requirements depend on your range type: gas ranges with high-BTU burners need more airflow than standard electric ranges. A common starting point: budget roughly 100 CFM for every 10,000 BTUs your range produces. Check the recommended CFM rating on the spec sheet before purchasing.
Can I build a range hood enclosure around an existing exhaust fan?
Yes, if the fan meets the CFM requirements for your range and provides adequate grease filtration. Many built-in kitchen exhaust fans fall short on both counts. If the output and filter type match your cooking setup, the same framing and sheathing process applies.