The standard advice on this question is “check with the maker.” That works when you have a maker to reach.
Most people asking this question got the piece as a gift or bought it somewhere with no contact details. That makes “check with the maker” correct advice and useless advice at the same time.
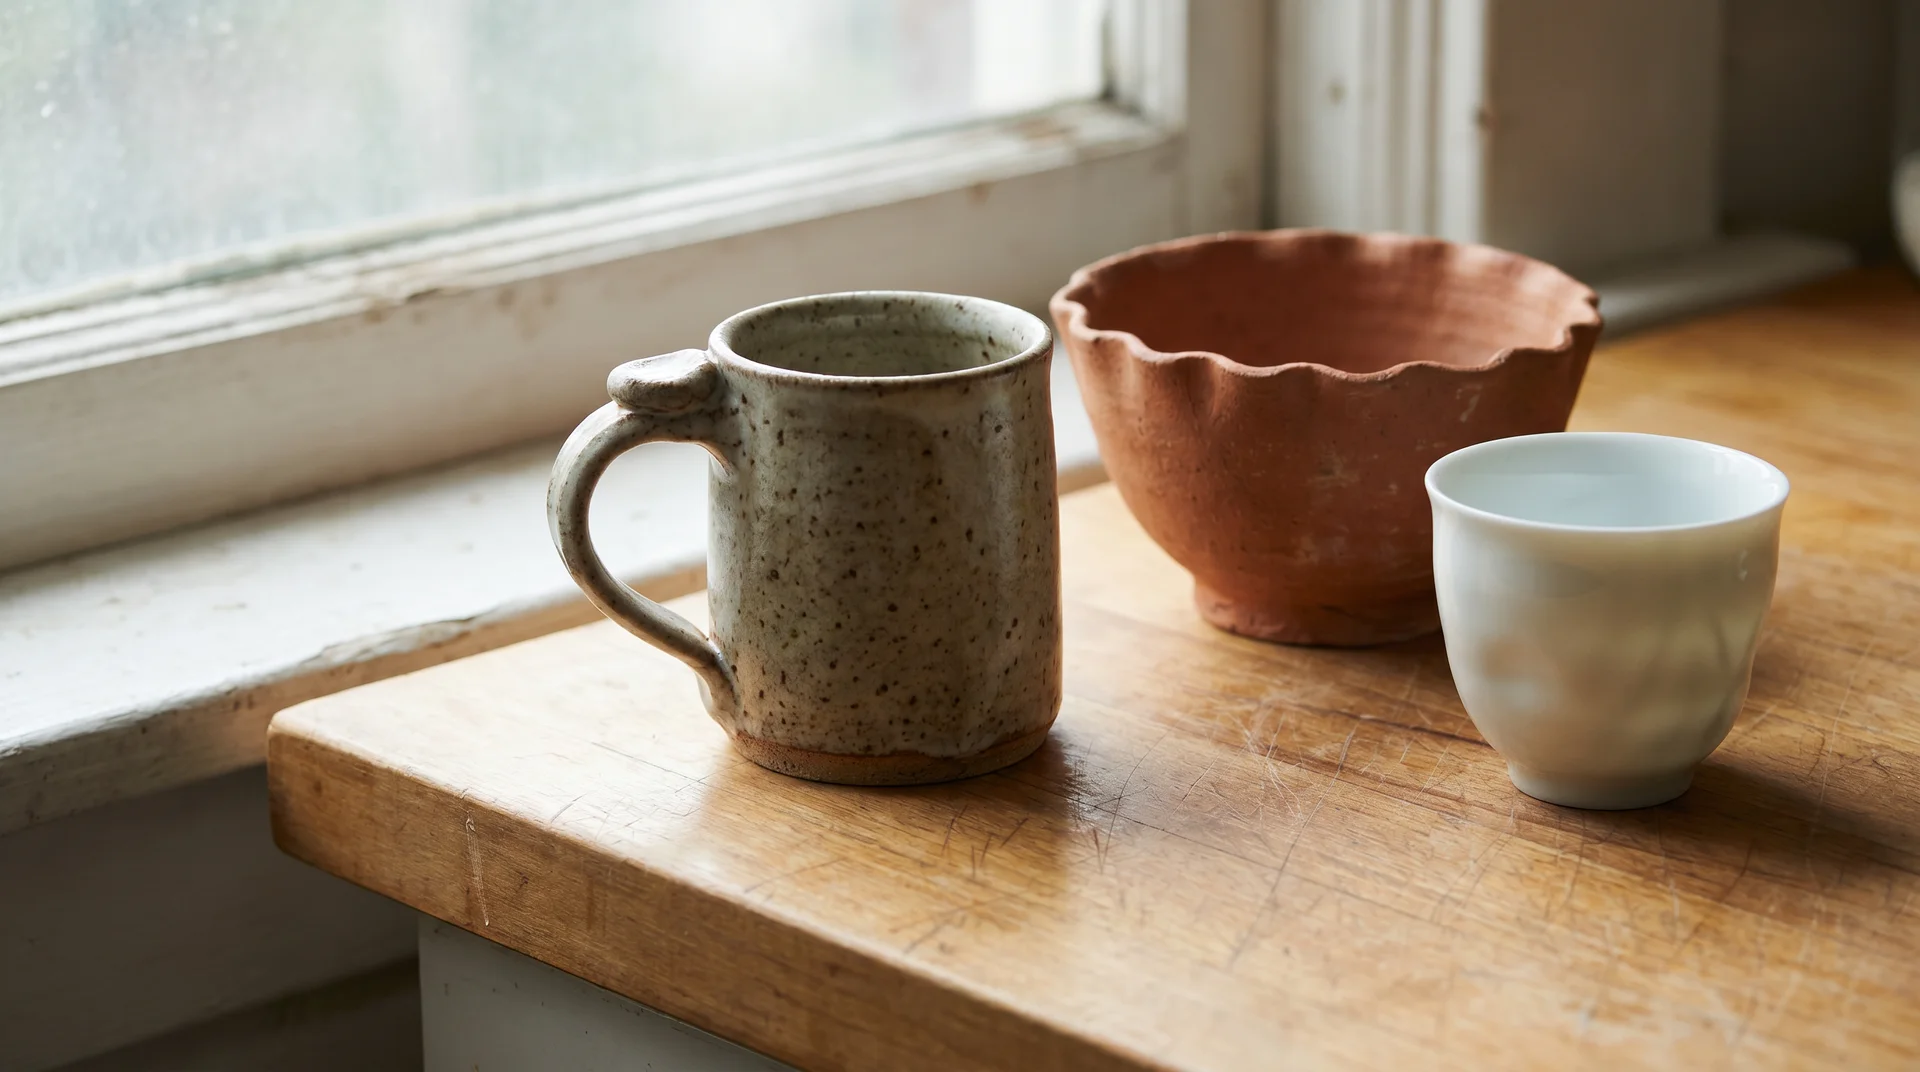
| Most handmade pottery is fine in the microwave. Three things determine whether yours is: glaze composition, how hot the piece was fired, and its current physical condition. Most ceramic mugs are also fine, for the same reasons. It’s the specific conditions that make a piece unsafe, not the material category itself, and all three are assessable without a lab. |
What Makes Handmade Pottery Microwave Safe
Three things determine whether your handmade pottery is safe to microwave: glaze composition, how hot the piece was fired, and its current physical condition.
Most of the available advice focuses on the glaze, and that’s the right place to start. Firing temperature and the condition of the piece matter just as much.
Glaze Type and What Metal Content Actually Means
Not every metallic-looking glaze carries the same microwave risk.
The advice to “avoid metallic glazes” is correct for some finishes and beside the point for others. Most people with dark brown stoneware or blue-glazed ceramics read that advice and assume the worst about a piece that’s actually fine.
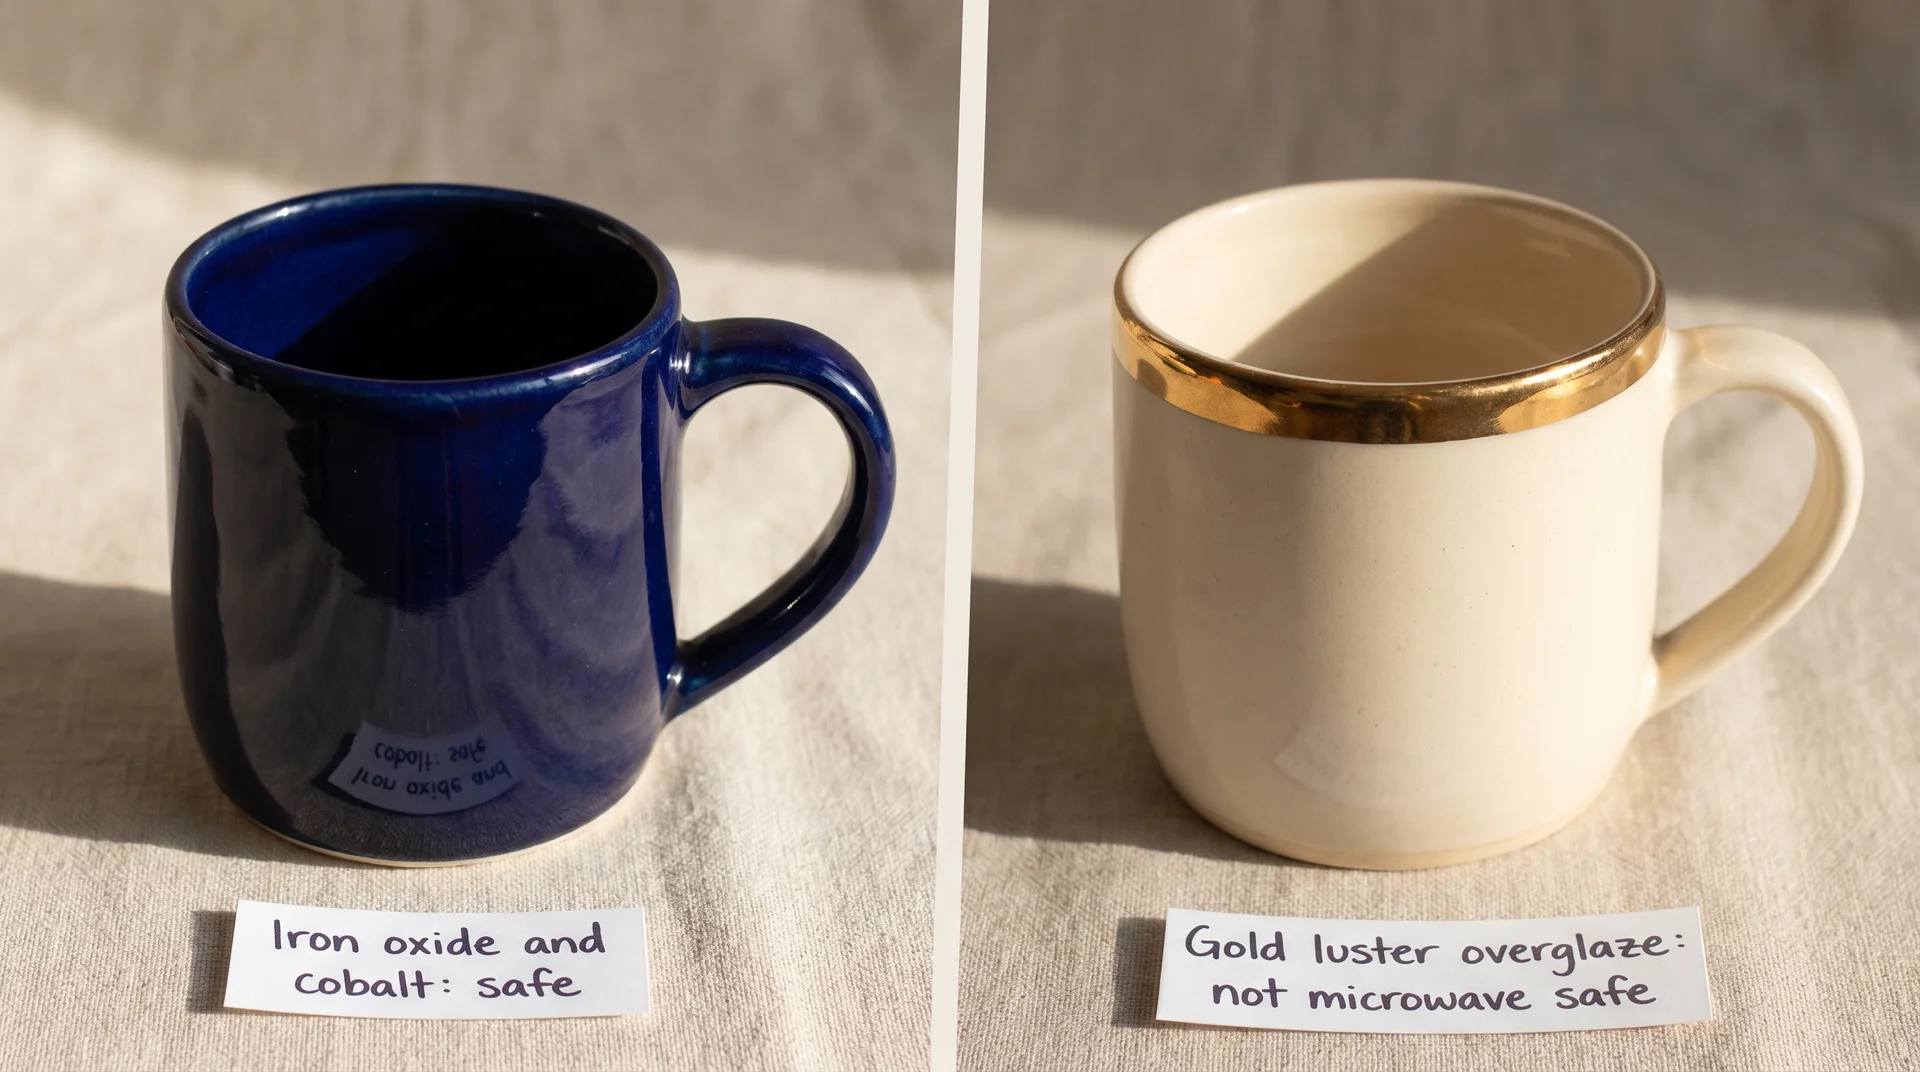
The problem finishes are gold luster and silver luster. Both go onto the piece after the main kiln firing, on top of the already-fired glaze surface.
Real metallic particles sit on the ceramic surface with those finishes. Those particles arc in a microwave the same way metal foil does.
Color glazes are a different category. Common colorants include:
- Iron oxide, which produces dark browns and blacks
- Cobalt, which produces a deep blue
- Copper, which produces green
These are metal oxides fired into the glaze at the main kiln temperature. They bond to the glass surface during that process. Nothing metallic remains on top.
The FDA’s food contact regulations address lead and cadmium in ceramic glazes. That’s a food safety concern broadly, not a microwave-specific one.
For microwave safety, the question is narrower: Is there a metallic particle surface on this piece? Handmade pottery glazes work differently from the sol-gel coatings on ceramic cookware.
Read: Is Ceramic Cookware Safe?
The practical check comes down to what catches light. Any gold, silver, or iridescent shimmer on the piece, on the rim, the handle, or a decorative stripe, means real metallic particles are present. Keep it out of the microwave regardless of how small the metallic area is.
A gold rim on a simple white mug is a more serious microwave concern than an elaborately decorated brown stoneware bowl.
Firing Temperature, Porosity, and Why the Clay Body Matters
The microwave heats water molecules. If the clay body absorbs water, the microwave heats the clay body too.
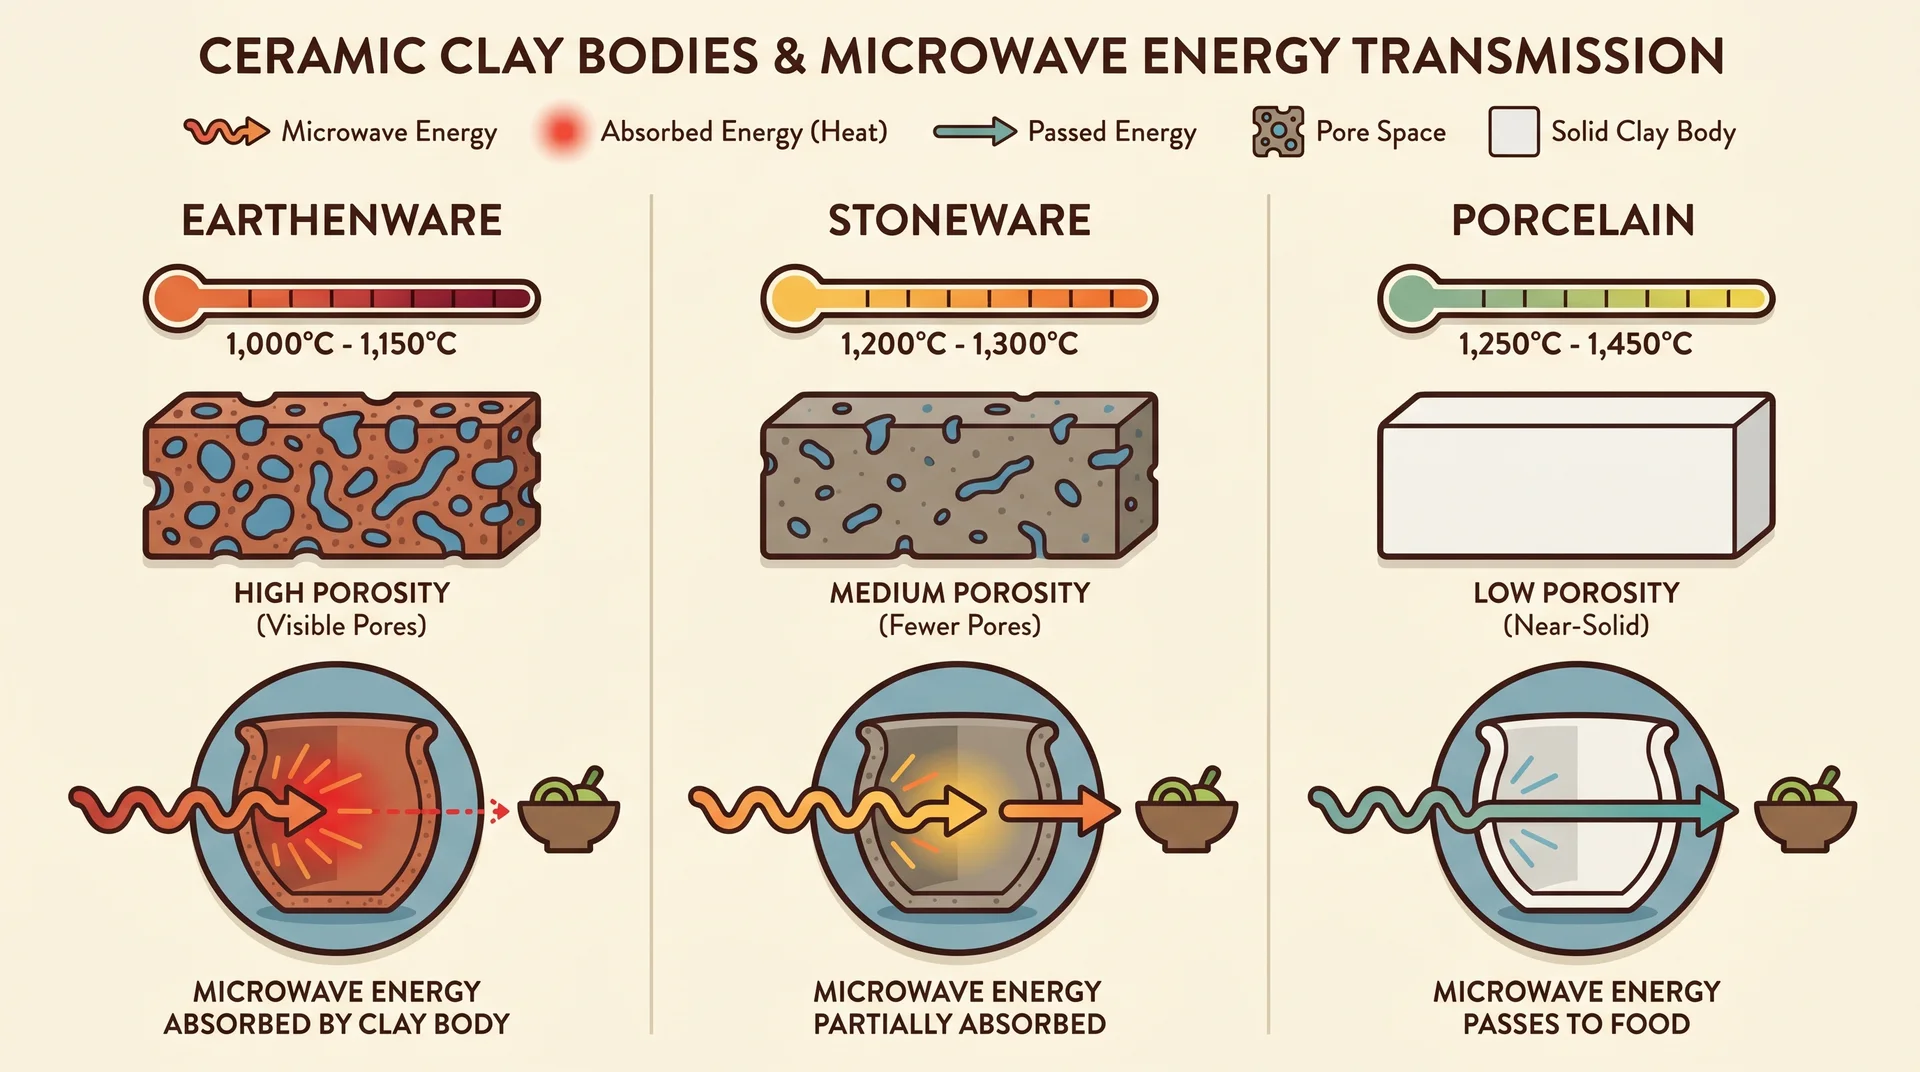
Firing temperature determines how dense and water-resistant the pottery becomes.
Low-fire pottery, including earthenware and most terracotta, stays porous after firing. Porous clay absorbs moisture from the environment. Microwave energy heats the absorbed moisture the same way it heats the water in your food.
The result is a piece that warms itself during microwave use. In some cases, it gets noticeably hotter than the food inside it. That’s uncomfortable to handle, and it means the clay body is absorbing more microwave energy than you want it to.
Stoneware and porcelain fire at much higher temperatures. The clay vitrifies, meaning it becomes dense and nearly non-porous. A vitrified piece doesn’t absorb ambient moisture. Microwave energy passes through the clay and heats the food instead.
The ASTM standard for “Microwave Safe for Reheating” checks for metallic surfaces. It sets no threshold limit for porosity, according to practitioners in the Ceramic Arts Daily community forum. A piece can technically pass that standard and still get uncomfortably hot in your kitchen.
My notes on pottery pieces I’ve cycled through the microwave over the past couple of years show more variation than first-use tests suggest. Pieces that seemed fine on the first test behaved differently after months of absorbing kitchen humidity.
A single test is a useful starting point. It isn’t a permanent verdict.
Cracks, Crazing, and Surface Condition
Inspect the piece physically before you run any test or heat anything.
Hairline cracks are weak points. Microwave use creates thermal stress across the ceramic body. Existing fractures give that stress a path to follow.
A crack that looks minor now can spread into something structural under repeated heating cycles. Run a fingernail lightly across the surface before the first microwave use. Roughness, flaking, or soft spots in the glaze are signals to take seriously.
Crazing is the network of fine surface cracks that develops in some ceramic glazes over time. It can look intentional, like part of the design. What it actually indicates is that the glaze and the clay body are expanding and contracting at slightly different rates.
That’s manageable under everyday conditions. Under the thermal stress of microwave use, it’s worth monitoring more carefully.
Once the piece clears this check, the test below tells you what visual inspection can’t.
How to Test Handmade Pottery Before Microwaving It
This test takes one minute and tells you what you need to know.
I’ve tracked microwave behavior across a range of pottery pieces in my own kitchen. This test has flagged pieces I wouldn’t have caught by eye alone. I tested it at home, not in controlled conditions. Here’s what the result tells you.
A piece with any gold or silver luster on the surface doesn’t need this test. It stays out of the microwave.
For everything else, run the test before you microwave for the first time.
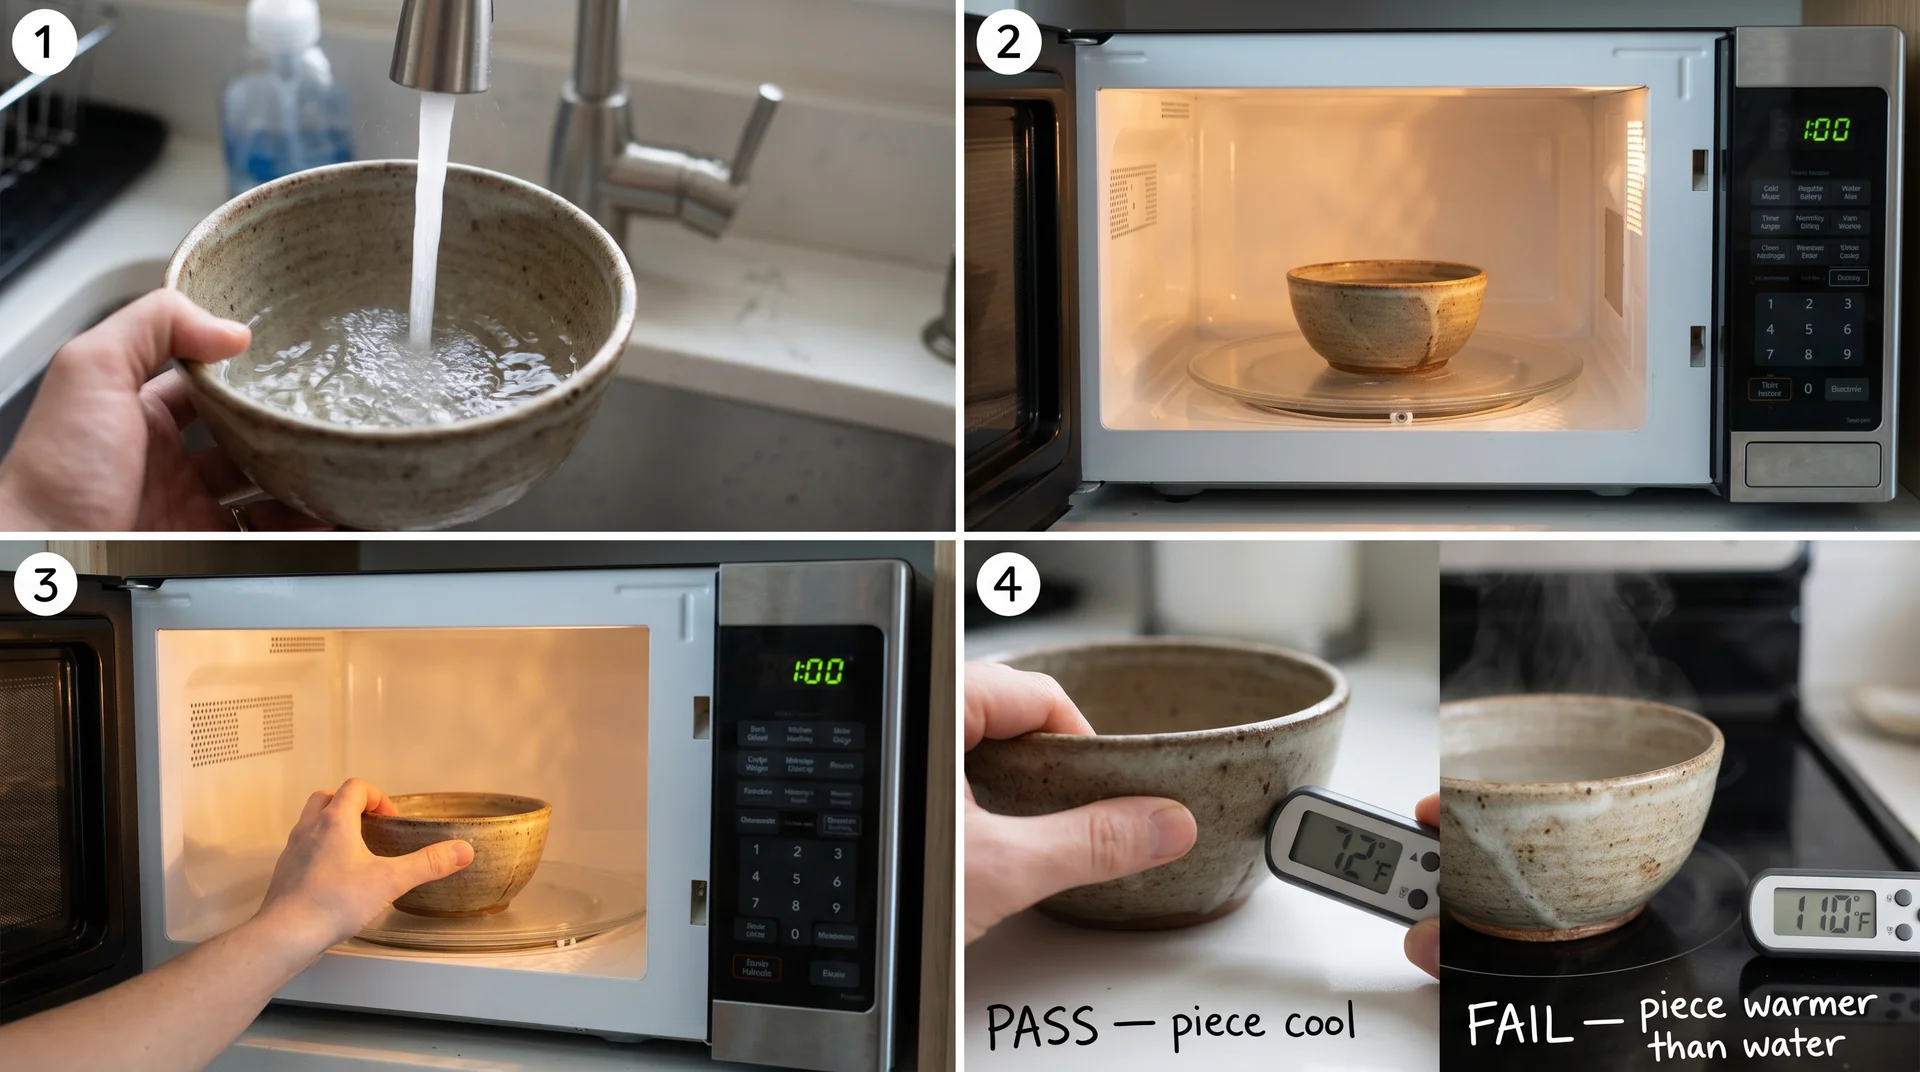
- Fill the pottery piece with cold water, room temperature, or slightly cool rather than ice water
- Place the piece alone in the center of the microwave with nothing else inside
- Run the microwave on full power for one minute
- When the minute ends, carefully touch the outside of the piece, then the water inside
The result tells you whether the clay body is absorbing microwave energy. Here’s how to read it:
- Water warm, piece cool or room temperature: microwave energy went into the water, not the clay. Safe to use regularly.
- The piece and water are roughly the same temperature: the clay body is absorbing some microwave energy. Use it for short reheating sessions and monitor whether the piece gets noticeably hotter over time.
- The piece is noticeably hotter than the water: the clay body is absorbing significant microwave energy. Keep this piece out of the microwave.
Most pottery passes. The ones that don’t usually surprise you.
The one-minute water test, which I’ve run on a dozen or so handmade pieces over the past couple of years, is the most practical check you have for any piece with no maker documentation.
This test doesn’t certify the piece to the ASTM standard. That process uses different equipment under controlled conditions.
What this test tells you is whether this specific piece is heating itself more than the food inside it. That’s what you actually need to know.
Run it again after any visible impact to the piece, or if you notice it getting hotter than usual during regular use. A crack you can’t see can change the result.
When You Can’t Ask the Potter
If the piece was a gift or a market find, a physical assessment is your starting point.
The water test is still the most reliable check, but the piece itself can give you useful information before you run it. Sometimes the answer is already visible on the surface.
Reading the Bottom of the Piece
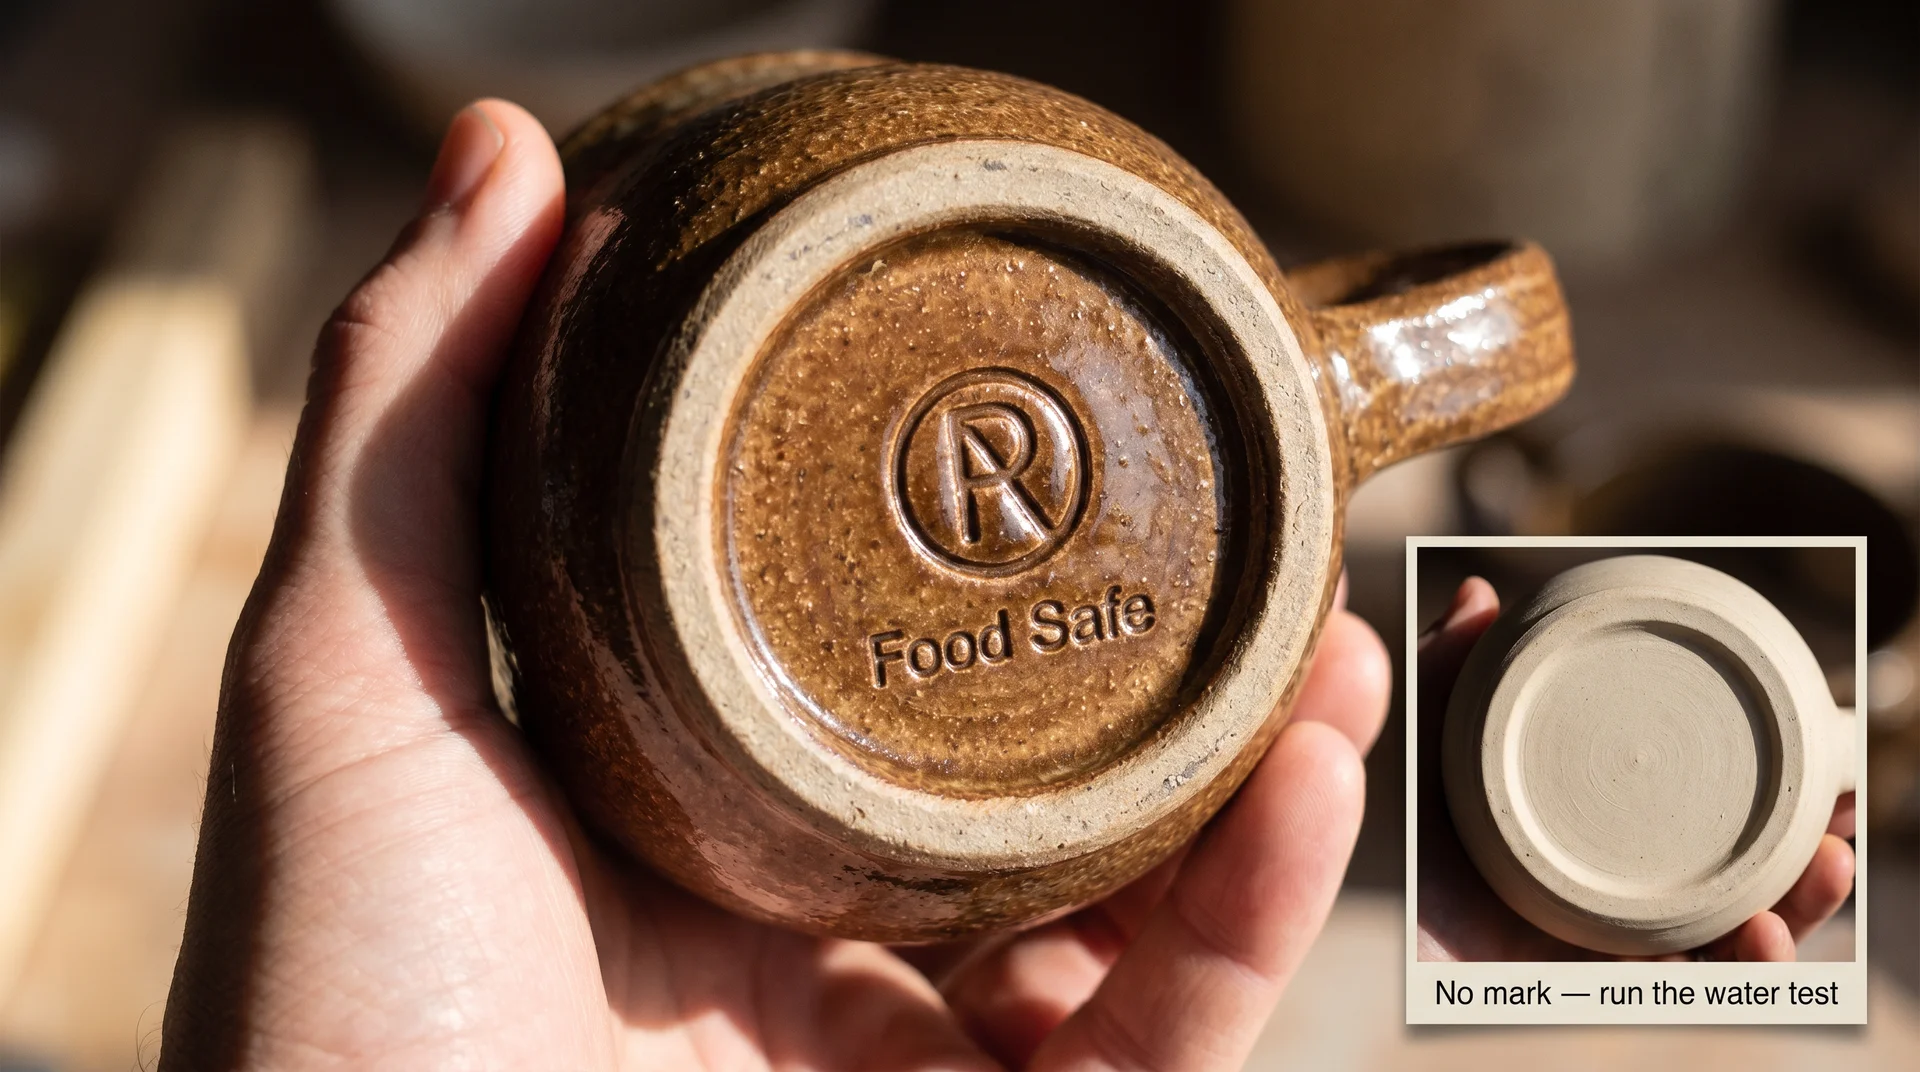
Turn the piece over before anything else.
The base often carries the most useful information on a handmade ceramic. Here’s what each marking tells you:
- A maker’s mark, stamp, or initials: If the maker is traceable, a quick search may reveal their clay body, firing temperature, and glaze materials. That documentation exists for many working potters and changes your assessment significantly.
- “Food safe” text: The maker used food-contact-appropriate glaze formulations. That’s a useful signal about overall glaze quality and is worth more than the absence of a microwave-safe label.
- “Microwave safe” text: Rare on handmade pieces, but definitive when it appears.
- No marking at all: Doesn’t indicate an unsafe piece. Many skilled potters don’t stamp their work. An unmarked base tells you nothing in either direction. The water test does.
- An unglazed base: Normal on many handmade pieces, and says nothing about microwave safety. Unglazed bases can scratch a glass microwave turntable, though. Worth knowing before you set the piece down on one.
Whatever the base shows you, the water test is still the more reliable check. It tells you how this specific piece actually behaves.
What the Glaze Surface Tells You
Look specifically for anything that shimmers gold, silver, or iridescent.
That surface condition ends the assessment before it starts. Metallic luster decoration disqualifies the piece regardless of anything else.
The gold-rim mugs are the ones I see fail most often. They’re common gifts, they look handmade, and nobody thinks twice about putting them in the microwave.
Here’s what the rest of the glaze surface tells you, in order of importance:
- Gold, silver, or iridescent shimmer anywhere on the piece means real metallic particles are present. Keep it out of the microwave.
- A smooth, glossy surface across the whole piece usually indicates a fully vitrified glaze, fired high enough to become glass-like. That translates to lower porosity and less microwave energy absorption.
- A matte or lightly textured finish is common on handmade stoneware and isn’t a concern in itself. Check for metallic elements, then run the test.
- Decoration that looks slightly raised above the surrounding glaze is overglaze, meaning it was applied on top of the finished piece at a lower temperature after the main firing. Metallic luster is always overglaze.
If you can’t tell visually whether decoration is underglaze or overglaze, run a finger lightly across the surface. Underglaze feels continuous with the surrounding glaze. Overglaze can feel fractionally raised.
How to Microwave Handmade Pottery Without Cracking It
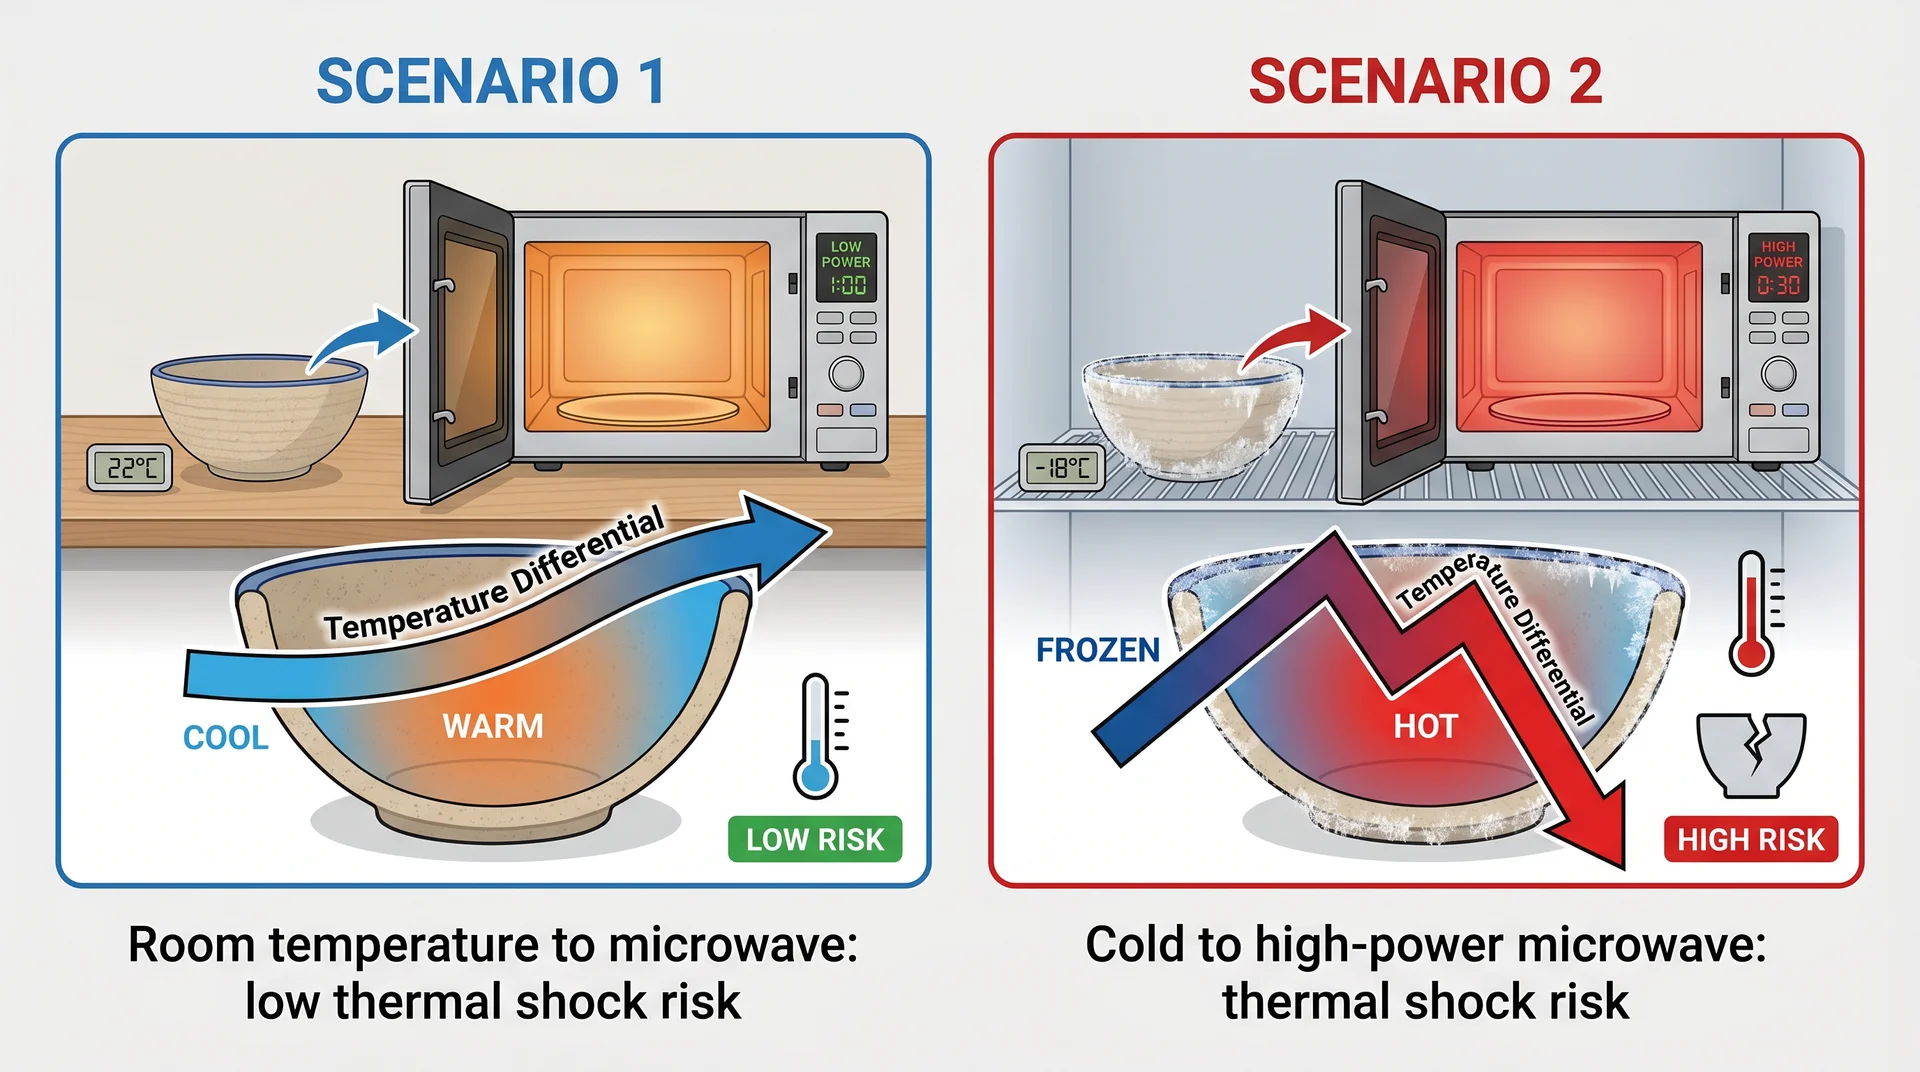
Passing the water test doesn’t eliminate the cracking risk.
Cracking during microwave use usually comes from thermal shock, not from the piece’s clay body or glaze. Thermal shock happens when one side of a ceramic heats significantly faster than the other.
The uneven expansion creates stress. Many handmade pieces have micro-fractures that aren’t visible to the eye. In those pieces, the stress finds a path.
The practical problem is cold-to-hot transitions. A piece at room temperature going into a 60-second microwave session is a low-risk scenario. That same piece coming straight from the refrigerator into a high-power microwave is a different situation.
The piece is already under temperature stress. Rapid heating compounds it.
A few adjustments reduce the risk considerably. None of them requires much thought once they’re a habit.
- Let refrigerated pieces come to room temperature before microwaving
- Never go directly from the freezer to the microwave
- Heat in 60 to 90 second intervals and check the piece temperature between them
- Don’t leave the piece in the microwave after the cycle ends while residual heat continues to build
The interval approach gives the piece time to tell you something. A piece that feels unusually hot between intervals is worth stopping on.
I don’t have a universal time limit for microwaving handmade pottery, and I’m wary of any article that does.
Wall thickness, clay body composition, and your microwave’s wattage all affect how quickly a piece heats. The interval approach is more reliable than any fixed number of minutes.
Earthenware, Stoneware, and Porcelain: What the Pottery Type Tells You
The type of pottery tells you where to focus your attention.
Type is a starting point, not a verdict. A stoneware mug with gold-rim overglaze is a bigger microwave concern than a plain earthenware bowl with no metallic finish. Type and glaze together are the actual assessment.
Knowing the type helps you know which variables to prioritize. Here’s how the three main types compare.
| Pottery Type | Typical Firing Temp | Porosity | Microwave Safety Notes |
|---|---|---|---|
| Earthenware (including terracotta and low-fire pottery) | 1,800–2,100°F | High | The water test matters most here. Higher porosity means the clay body can absorb microwave energy. Not automatically unsafe, but the most variable type. |
| Stoneware | 2,100–2,300°F | Low to medium | Generally reliable for everyday microwave use. Dense clay body, minimal energy absorption. Still check for metallic decoration before using. |
| Porcelain | 2,300–2,400°F | Very low | Most consistently safe as a clay body. Very dense, minimal moisture absorption. Gold or silver luster decoration still disqualifies the piece regardless. |
If you don’t know which type you have, the water test is more reliable than guessing. It checks actual behavior rather than the assumed category.
Identifying type by appearance takes practice. Here’s where to start:
- Terracotta runs warm reddish-brown with visible surface texture
- Porcelain is white, smooth, and noticeably light for its size
- Stoneware sits in the middle range and varies widely by maker
When you’re not sure, apply earthenware-level caution and run the test. The test confirms what the type can only suggest.
The One Test Worth Running on Every Handmade Piece
Fill the piece with cold water, put it in the microwave alone for one minute, and check which is warmer when the timer stops.
That single test does more than visual inspection, more than pottery type identification, and more than anything the maker’s label says.
I’ve caught pieces with it that months of regular use hadn’t flagged. Some of them were pieces that had sat in the rotation for a while before the test revealed the problem.
Inspect the piece first. Then run the test.
Frequently Asked Questions
Can You Microwave Homemade Clay?
Raw or unfired clay should never go in a kitchen microwave.
Unfired clay and finished fired pottery are completely different materials. Raw clay contains compounds that behave very differently under microwave energy than a vitrified ceramic does.
Microwave kiln firing is a separate production technique done in a dedicated kiln with specific materials and safety protocols. It is not the same as putting a finished pottery piece in your kitchen microwave to heat food. This article covers only finished, already-fired pottery.
What Pottery Is Not Microwave Safe?
Any piece with gold, silver, or iridescent luster decoration is not microwave safe.
Also, exclude any piece with visible cracks or surface damage, and any high-porosity earthenware piece where the clay body tests hotter than the food inside it. The one-minute water test identifies the last condition even when the piece looks fine visually.
Why Can’t You Microwave Ceramic Mugs?
Most ceramic mugs can go in the microwave. The concern isn’t the material category. It’s three specific conditions: metallic luster decoration on the rim or handle, a high-porosity clay body that absorbs microwave energy, or visible cracks in the glaze or body.
A plain stoneware mug with a food-safe glaze and no metallic accents is generally fine. A mug with a gold rim is not, regardless of how plain everything else about it looks.
Is Glazed Ceramic Microwave Safe?
Glazed ceramic is generally microwave safe, but the glaze type is what matters. A standard color glaze, the kind that gives stoneware its brown, blue, or green surfaces, is safe. Gold luster, silver luster, and any iridescent overglaze decoration are not.