

Walk into a kitchen where the stove sits on the island, and you understand immediately why people want it. The cook faces the room. The kitchen opens up.
That version exists in real homes. Getting there requires decisions made in a specific order, and most renovation plans get the order wrong.
Does a Stove on an Island Actually Work?
Yes, under three specific conditions. No, without them.
A stove on a kitchen island always requires ventilation. No cooktop type eliminates that requirement, including induction. What changes between types is how much ventilation power you need and which solutions your ceiling and layout can support.
The three conditions that determine whether this works in your kitchen:
- Your island is deep enough and long enough for a cooking zone with safe clearance on every side
- Your ceiling structure supports a ventilation solution that will perform at your cooking temperature
- Your seating placement clears the cooking zone by at least 18 inches
All three need to be true at the same time. One missing condition produces a kitchen that works against you every day you cook in it.
The Visual Decision Most Homeowners Make Last
Ventilation is the decision that should come first.
The island is the visual center of the kitchen. The ventilation system above it either supports that or competes with it. You cannot know which until you’ve confirmed what your ceiling can support and what your cooking style requires.
Most renovation plans sequence this backwards, and the results are permanent.
The One-Hero Rule and Why the Island Stove Tests It
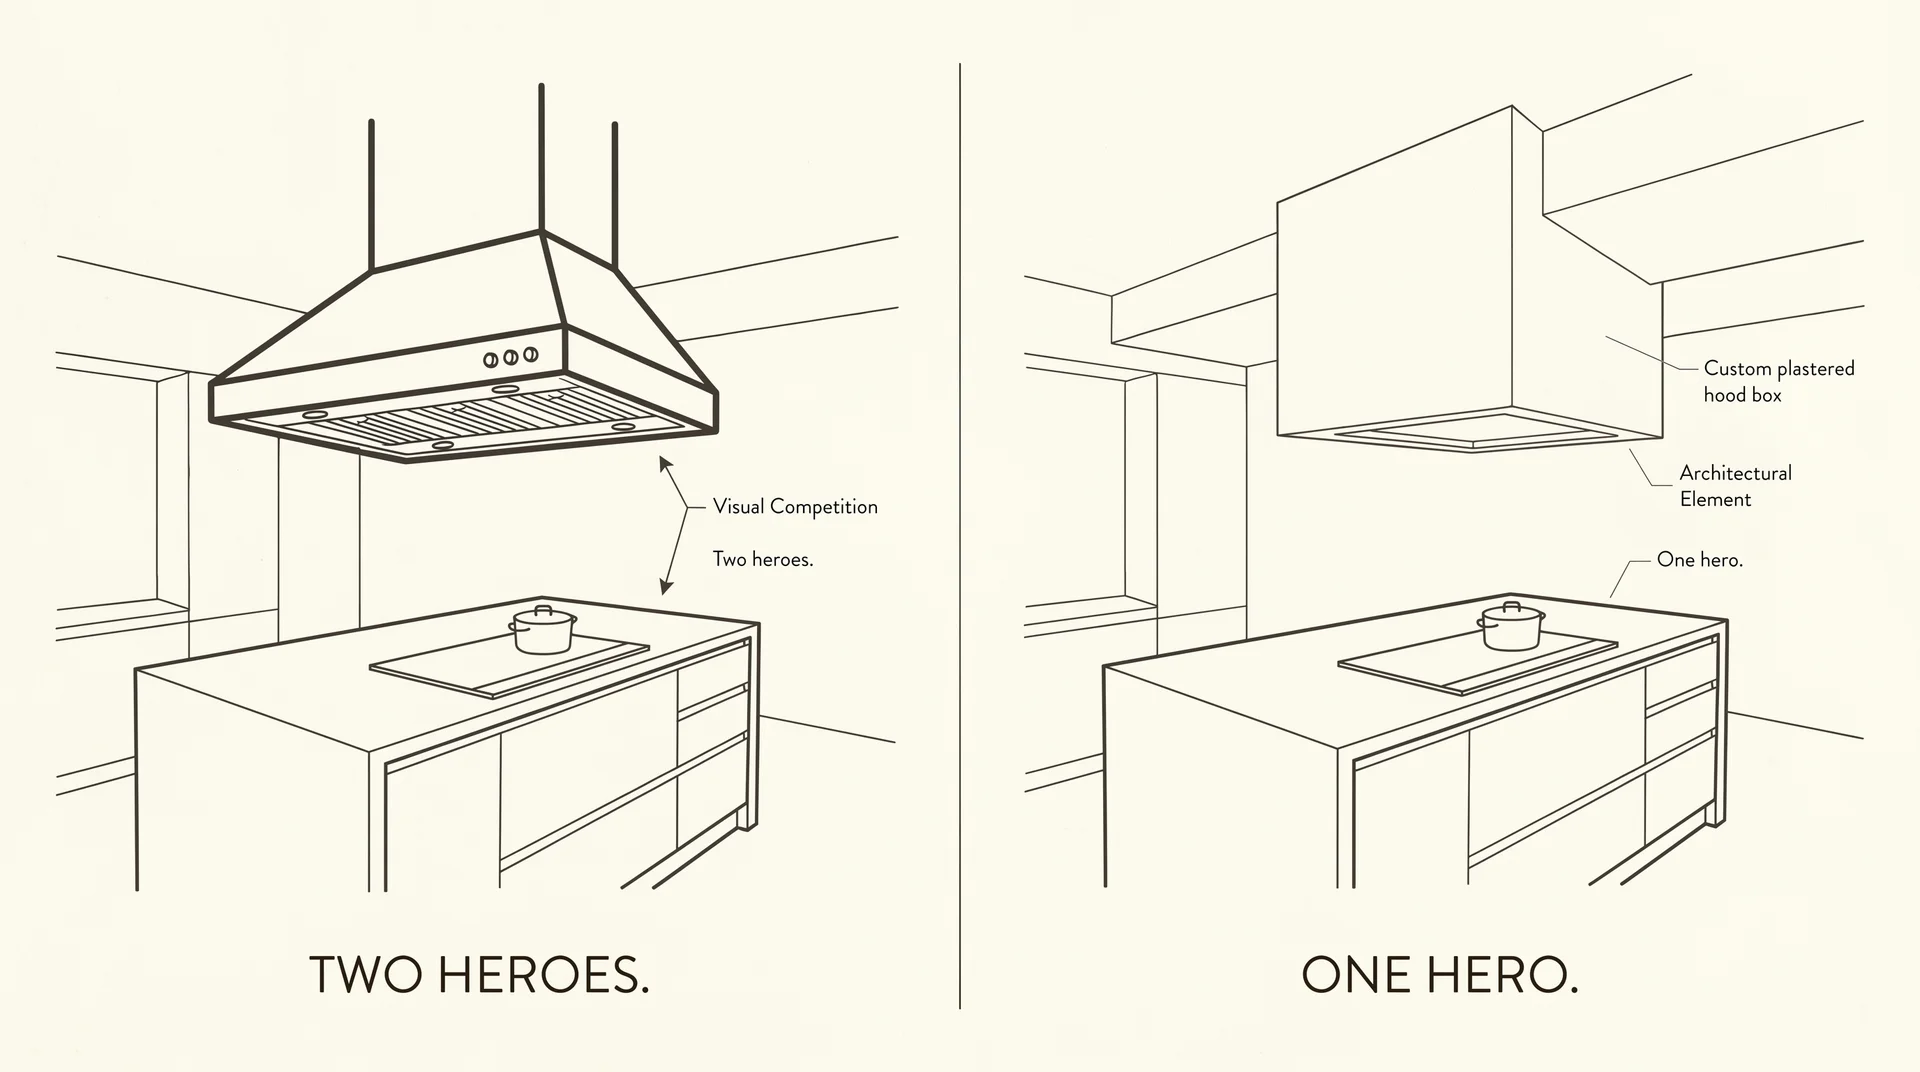
Every kitchen needs one dominant visual statement. Everything else in the room submits to it.
I call this the one-hero rule. It came directly from a project I got badly wrong in 2014. I over-specified everything: brass hardware, dark cabinets, marble counters, patterned backsplash, and mismatched open shelving all competing for the same attention. My client cried at the reveal.
I redesigned that kitchen entirely at my own cost, $6,000 out of my pocket, because the room was wrong. That redesign produced the rule I’ve applied to every project since.
An island with a cooktop becomes the visual hero of the kitchen. It sits in the center of the room.
People gather at it. When someone walks in, their eye finds it first. A cooking surface on the island amplifies all of that.
A ceiling-mounted island range hood is also a visual hero. It hangs above the room’s centerpiece. It is large by structural necessity.
Two competing heroes in one room is the design failure I’ve documented most consistently across island cooktop installations over twelve years.
The fix is sequencing. Finalize your ventilation approach before the island design is locked. Those two decisions interact directly, and working through them in the wrong order is how you end up with a beautiful island underneath a hood that fights it for the room’s attention.
What Your Ceiling Has to Do With Your Cooktop Choice
Your ceiling structure determines your ventilation options before your cooktop preference does.
Stand in the kitchen. Look straight up above where your island sits, or where it will sit. That ceiling is infrastructure before it’s decoration.
A properly ducted overhead hood needs a clear path from the hood to the exterior of the house. In a two-story home, that path runs through the occupied floor above the kitchen. In a single-story home with an accessible attic, it is often more straightforward.
Before any island design with a stove is finalized, have your contractor walk the duct path.
Walk it, not estimate it. A confirmed duct run is the first condition the design has to meet. Your hood style, your island dimensions, and your cooktop type all follow from that answer.
When the Hood Becomes the Problem
A hood that competes with the island does more visual damage than one that’s purely functional.
My reference folder of twelve years of kitchen failures contains photographs from real kitchens where a large stainless steel range hood hangs low over a beautiful marble island.
In every one of those photographs, the eye goes directly to the hood. Not the countertop, not the light, not the space. The hood took the room.
In nearly every case, the ventilation decision came after the island design was already finalized. Addressing it after the fact cost substantially more than sequencing it correctly would have.
Three ventilation approaches can support the island aesthetic rather than compete with it:
- Custom plastered or paneled hood box: Designed as part of the ceiling architecture, so it reads as a structure rather than an appliance. Requires a skilled finish carpenter and coordination with your contractor before the island design is finalized this is not a finishing detail, it’s a structural commitment. Adds $1,500 to $4,000 above the hood unit cost. Works best with ceilings nine feet or higher, where the volume above the island gives the box room to breathe without crowding the room.
- Flush-mount or ceiling-integrated hood: The cleanest visual option. Requires a higher CFM capacity than a standard hanging hood, confirmed structural ceiling access, and a contractor with specific installation experience. Cost varies widely depending on the product and what the ceiling can accommodate.
- Downdraft ventilation: Removes the overhead fixture entirely and preserves the open sightline. Performance trade-offs on high-heat cooking are significant. The full picture of downdraft is in the ventilation section below, and it matters before you commit to this option.
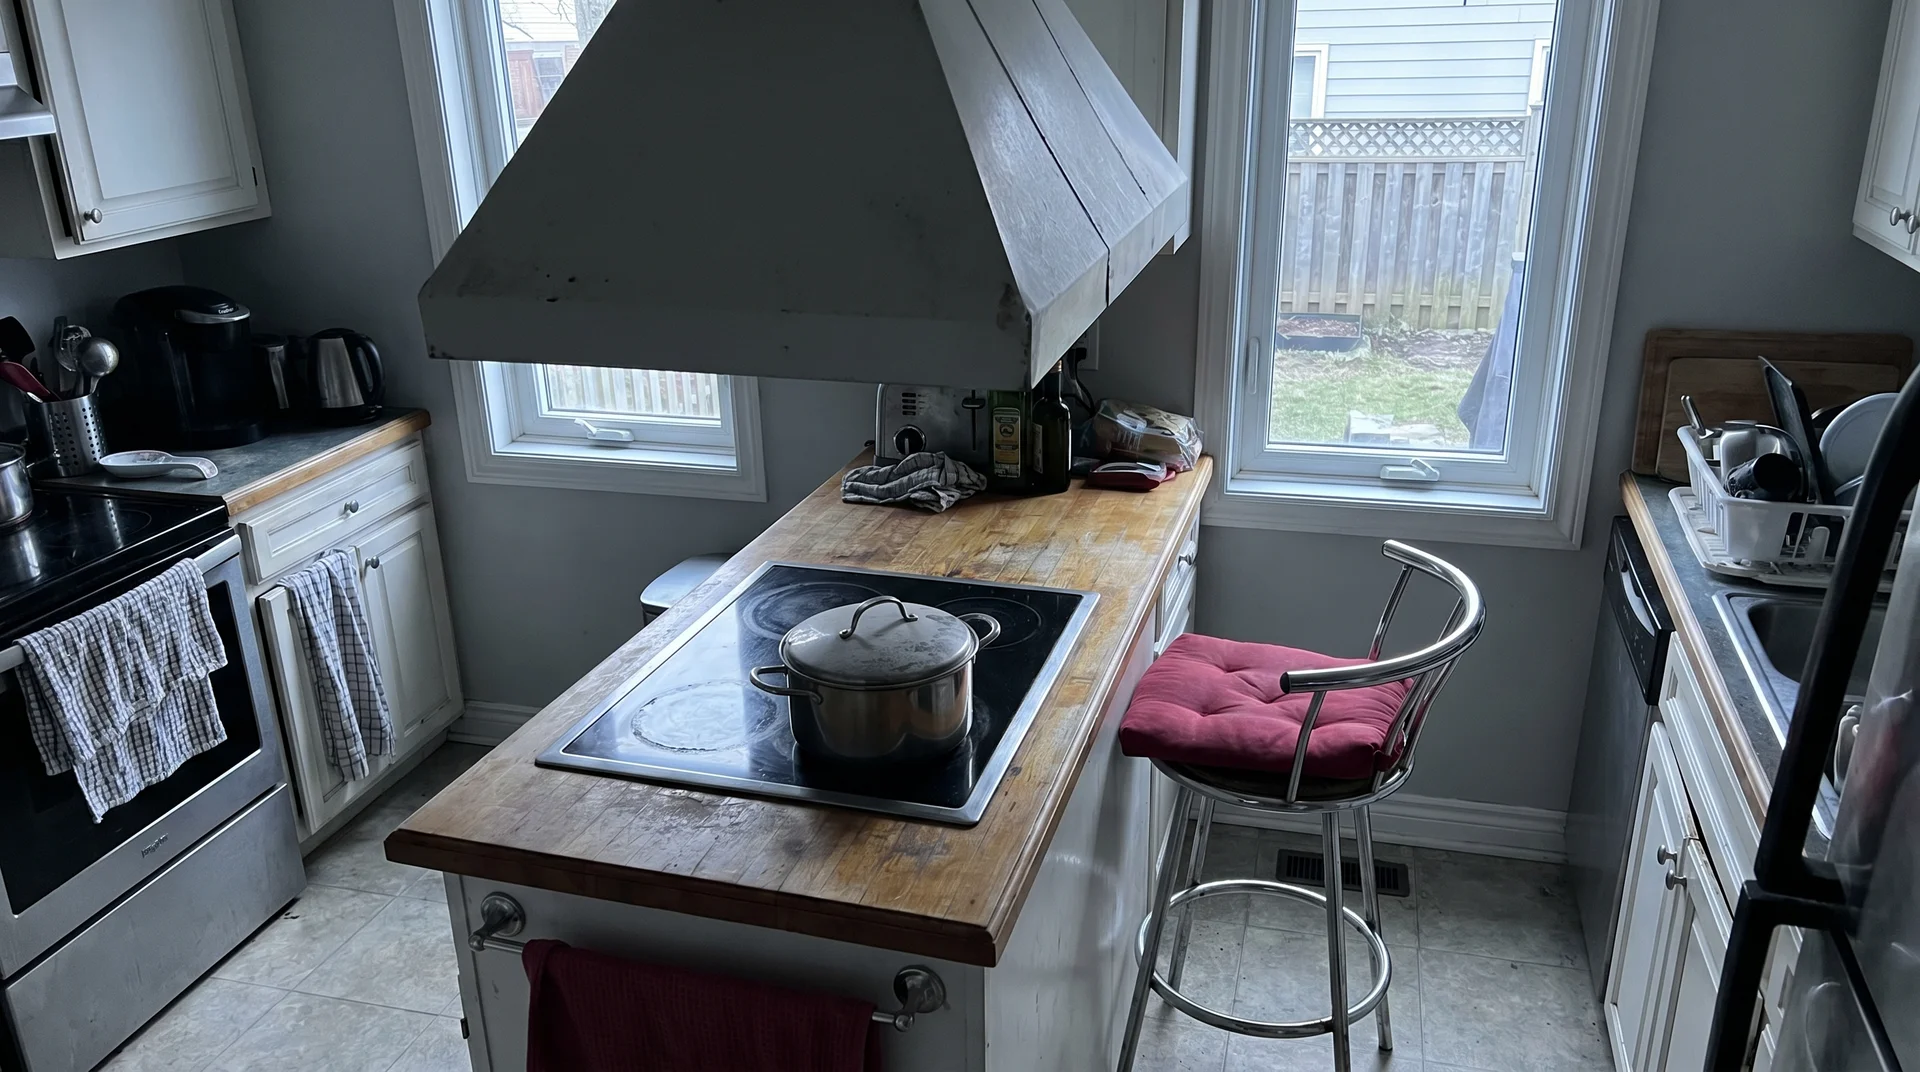
How Big Does Your Island Need to Be?
Island size requirements change once cooking is involved.
“At least 36 inches deep” is the figure that appears most often in kitchen planning guides for standard islands. That number applies to a prep-only surface.
Once a cooktop enters the design, the minimum depth needed increases, and the clearance requirements around the perimeter become safety requirements rather than preferences.
Minimum Depth for a Cooktop Installation
A standard 30-inch cooktop island needs a minimum depth of 42 inches. A full slide-in range requires at least 48 inches.
The depth requirement comes from two factors: the cooktop’s own footprint and the counter space needed on each side to cook safely.
The National Kitchen and Bath Association (NKBA) recommends at least 12 to 15 inches of landing zone on each side of any cooking surface. That’s the space where hot pans go between the burner and wherever you’re working next.
A standard 30-inch cooktop needs 30 inches of width plus at least 12 inches on each side. That’s 54 inches of island length committed to the cooking zone alone. Anything shorter and you’re moving hot pans off burners into an inadequate space.
An island you’re cooking on operates at a different safety standard than an island you’re prepping on.
That distinction needs to drive the sizing conversation with your contractor before any design is finalized. The ventilation section below explains why the sizing and ventilation decisions need to be made together, not sequentially.
Minimum Length When Seating Is on the Same Island

Seating and a cooking zone can share an island. They need real separation between them, not just distance on a floor plan.
Position the cooktop toward one end of the island. Seating goes at the opposite end, with the remaining prep counter acting as the buffer between them. The stove and the barstools should never share the same island segment.
I’ve seen this ignored in renovation plans, and the result is people eating fourteen inches from an active gas burner. It gets past the planning stage because the problem doesn’t read clearly on a flat floor plan.
| Configuration | Min. Island Depth | Min. Island Length | Notes |
|---|---|---|---|
| Cooktop only, no seating | 42 in. | 60 in. | Includes 15-in. landing zones on each side of the cooktop |
| Cooktop + one-sided seating (2 stools) | 48 in. | 84 in. | Seating at the far end; prep surface as a buffer between zones |
| Full slide-in range + one-sided seating | 48 in. | 96 in. | Deeper range footprint; physical zone separation required |
If your current island does not meet these dimensions, the stove placement needs rethinking before the design moves forward. A missing 12 inches here is not a minor constraint.
The Clearance Rules Around the Island
The NKBA minimum between an island and surrounding counters is 42 inches. 48 inches is the practical target when two people cook at the same time.
This is walkway clearance, not island size. It’s the distance between your island’s edge and the nearest counter, wall, or appliance. You need enough room to turn from a burner with a full pot and not back directly into the counter edge behind you.
In a compact kitchen, this calculation tends to end the island stove idea before the design gets far. If 42 inches of perimeter clearance on all sides is not achievable once the island is sized for a cooking zone, the stove belongs on the wall.
A peninsula with a wall-mounted cooktop delivers the same open-concept cooking experience with fewer structural and safety constraints. That configuration needs different criteria, and that is a different article.
Ventilation Is the Design Decision & Not an Afterthought
Your ventilation choice determines whether your island design holds together visually, what cooktop type makes sense for your cooking style, and how much the installation will cost beyond the appliance itself.
Most planning conversations treat ventilation as a step that follows the appliance choice. That is the wrong order.
Overhead Hood
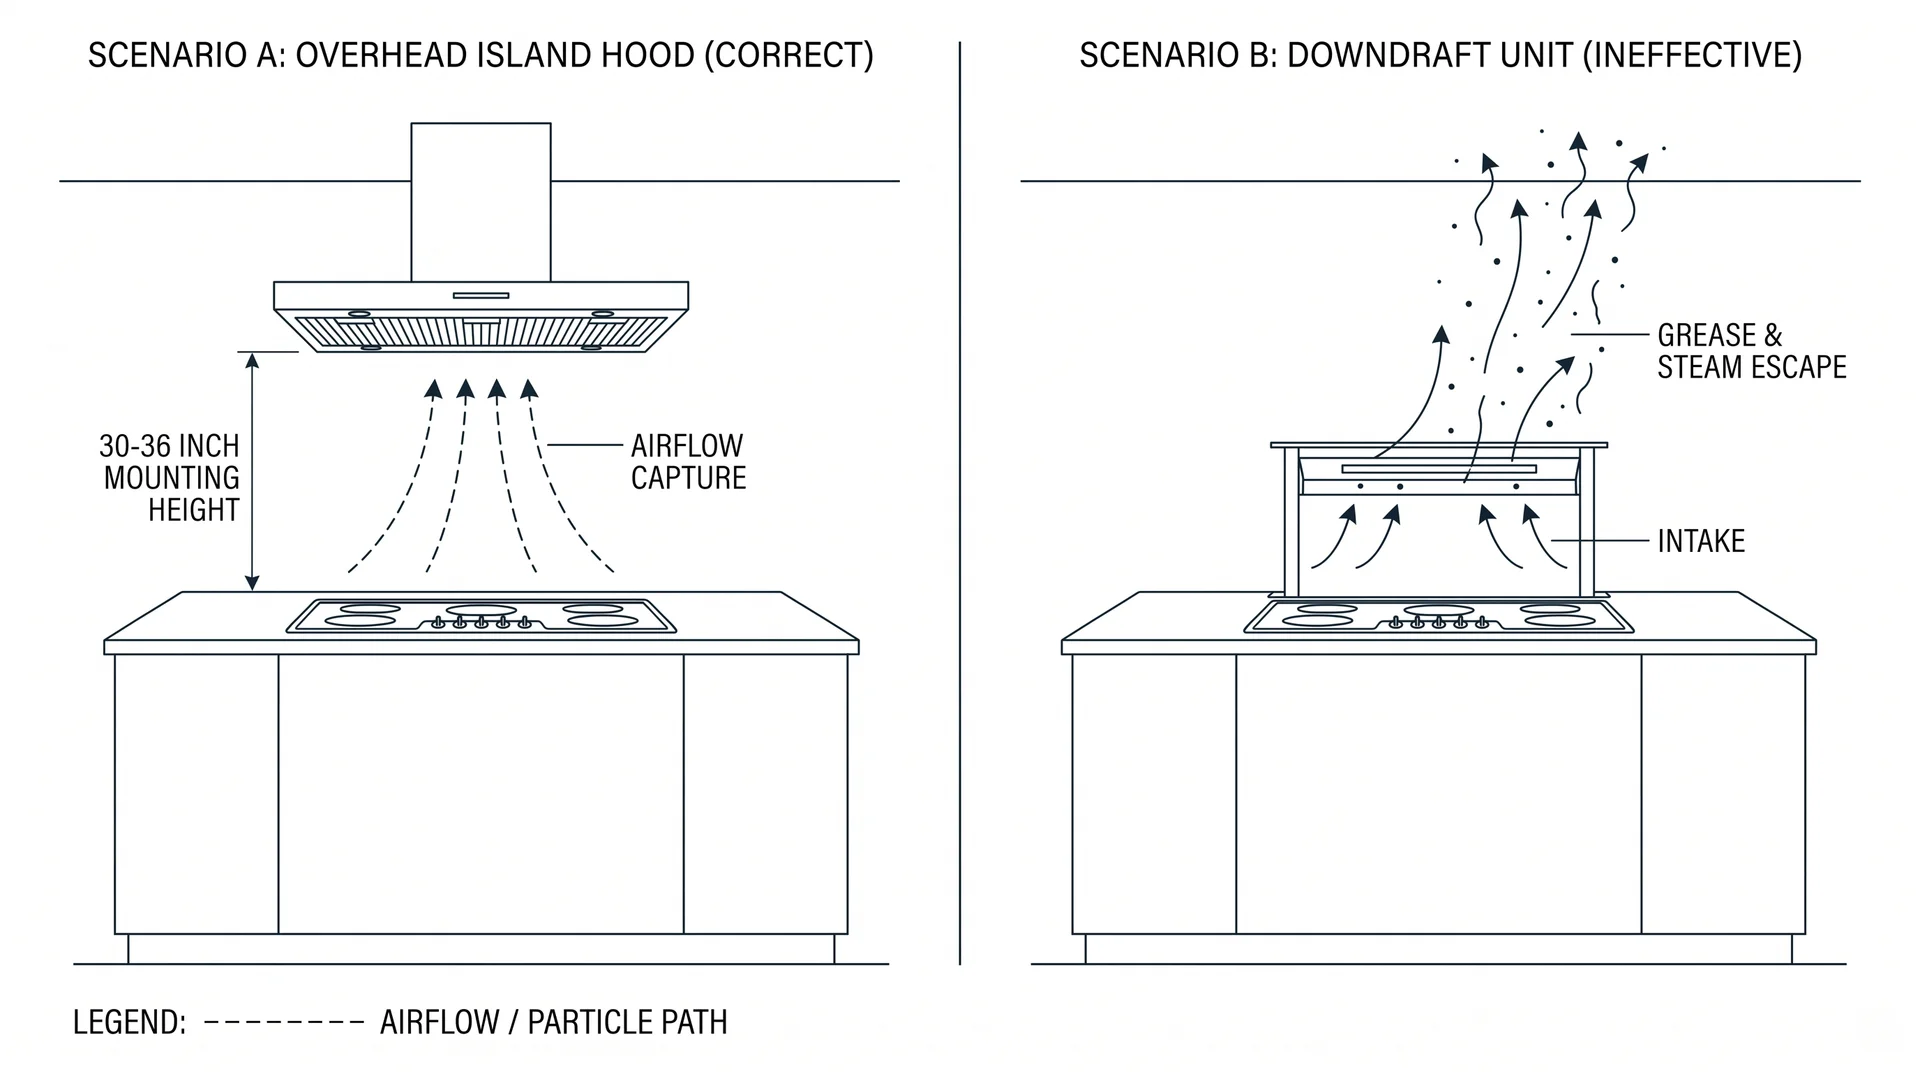
An overhead island range hood is the most effective ventilation solution for a cooking island. It is also the most visually demanding element in the room.
It works with physics rather than against it. Heat and grease rise, and a properly positioned ceiling-mounted hood captures them before they spread. For high-heat cooking, frequent frying, or gas ranges at full output, this is the only solution that will consistently perform.
The CFM requirement for an island hood is higher than for a wall-mounted hood, because air escapes from all four sides of the island rather than being contained by a wall and backsplash.
The standard calculation is 150 CFM per linear foot of cooktop width for island installations.
- A 30-inch cooktop (2.5 feet) requires a minimum of 375 CFM.
- A 36-inch cooktop requires at least 450 CFM. If you cook at high heat regularly, plan for 20 to 25 percent above the minimum.
The hood should be mounted 30 to 36 inches above the cooktop surface. Too low and it interrupts sightlines. Too high and it loses capture efficiency.
The ceiling work often costs more than the hood unit itself.
Running ductwork through a finished ceiling, patching, repainting, and integrating the installation into the room’s architecture are where budget overruns happen most consistently in island ventilation projects.
That line item needs to be confirmed before the renovation budget is locked, not discovered after the island countertop has been cut.
Downdraft
A downdraft system pulls air down and laterally away from the cooking surface. It preserves sightlines. It underperforms on high-heat cooking, and that trade-off is not a minor one.
Downdraft has genuine appeal: no overhead hood, no ceiling ductwork, no fixture competing with the island. I understand why homeowners choose it, and I’ve seen it work acceptably in the right conditions.
Those conditions are narrow. Downdraft performs adequately for low-to-medium heat cooking, simmering, and induction at moderate temperatures. Hot air rises. A downdraft system fights that at every temperature above moderate.
On gas ranges, high-heat frying, or wok cooking, a downdraft will not capture the plume adequately.
The smoke and grease that escapes the intake don’t disappear. It rises, spreads across the room, and deposits on the cabinet faces fifteen feet away from where the cooking happened.
I’ve documented this outcome in more than a dozen projects. The homeowners notice six months in, when surfaces they cannot easily clean start showing accumulation.
Ductless recirculating downdraft units are a further step down in performance. They filter air and return it to the kitchen rather than expelling it externally. For light cooking, they manage odor reasonably. For anything involving oil at high temperatures, they are not a ventilation solution in any meaningful sense.
If you want a downdraft and you cook seriously, choose induction, keep heat levels moderate, and clean the filters on a strict schedule.
Downdraft plus a gas range plus high-heat cooking is a compromise most people regret within the first year.
The CFM Calculation Before You Choose Anything
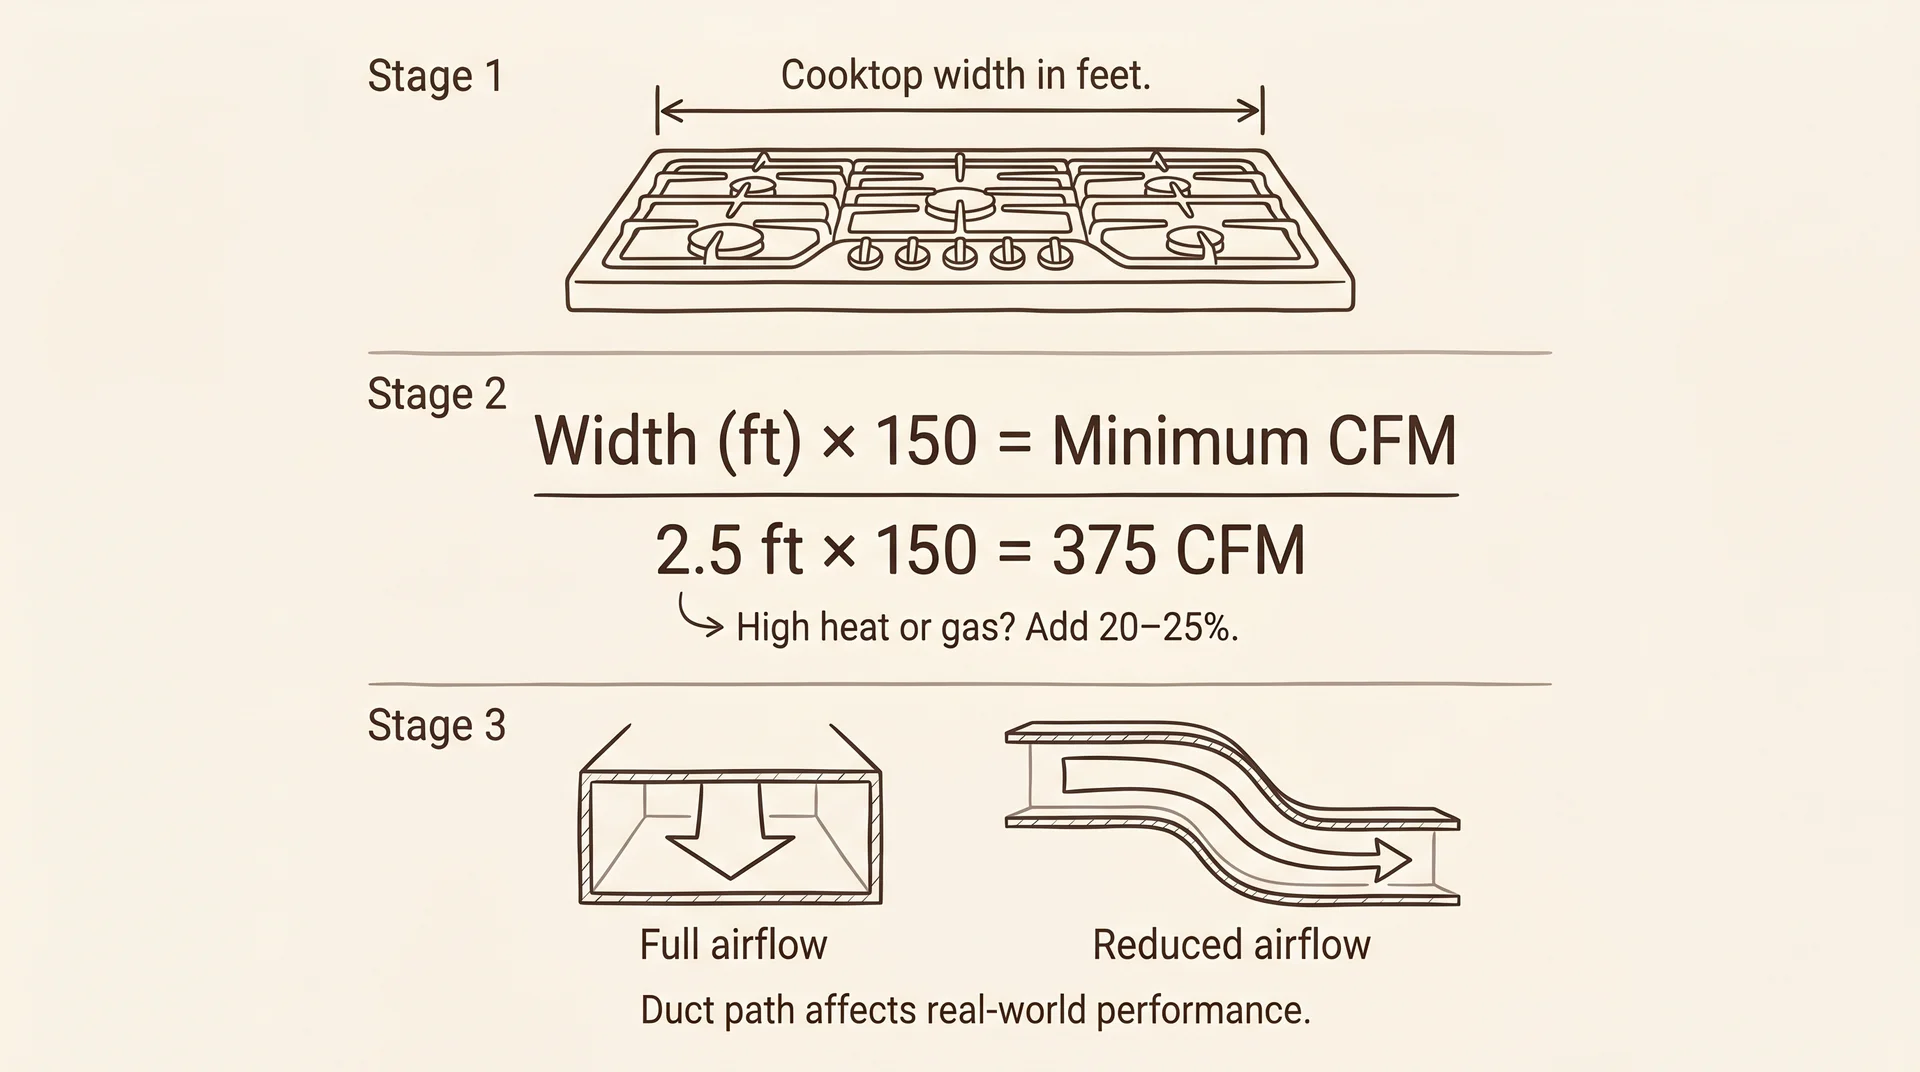
Confirm the CFM your cooking style and cooktop type actually require before selecting any ventilation product. Then confirm your duct run can handle the airflow.
CFM stands for cubic feet per minute, the measure of how much air a ventilation system can move. An undersized hood on an island moves some air, makes some noise, and allows a continuous, slow deposit of grease on every surface in the room.
The calculation sequence:
- Measure your cooktop width in feet (a 30-inch cooktop is 2.5 feet)
- Multiply by 150 CFM to get the island installation minimum
- If you cook at high heat regularly or use gas, add 20 to 25 percent to that figure
- Confirm the duct diameter and run length your ceiling supports, since a long or narrow duct run reduces effective airflow
- Size your hood to the confirmed airflow number, not to the cooktop width alone
An undersized hood is the most common and most silent mistake in island ventilation. You won’t notice for months. Then you’ll wonder why your upper cabinet faces feel tacky when you run a cloth across them.
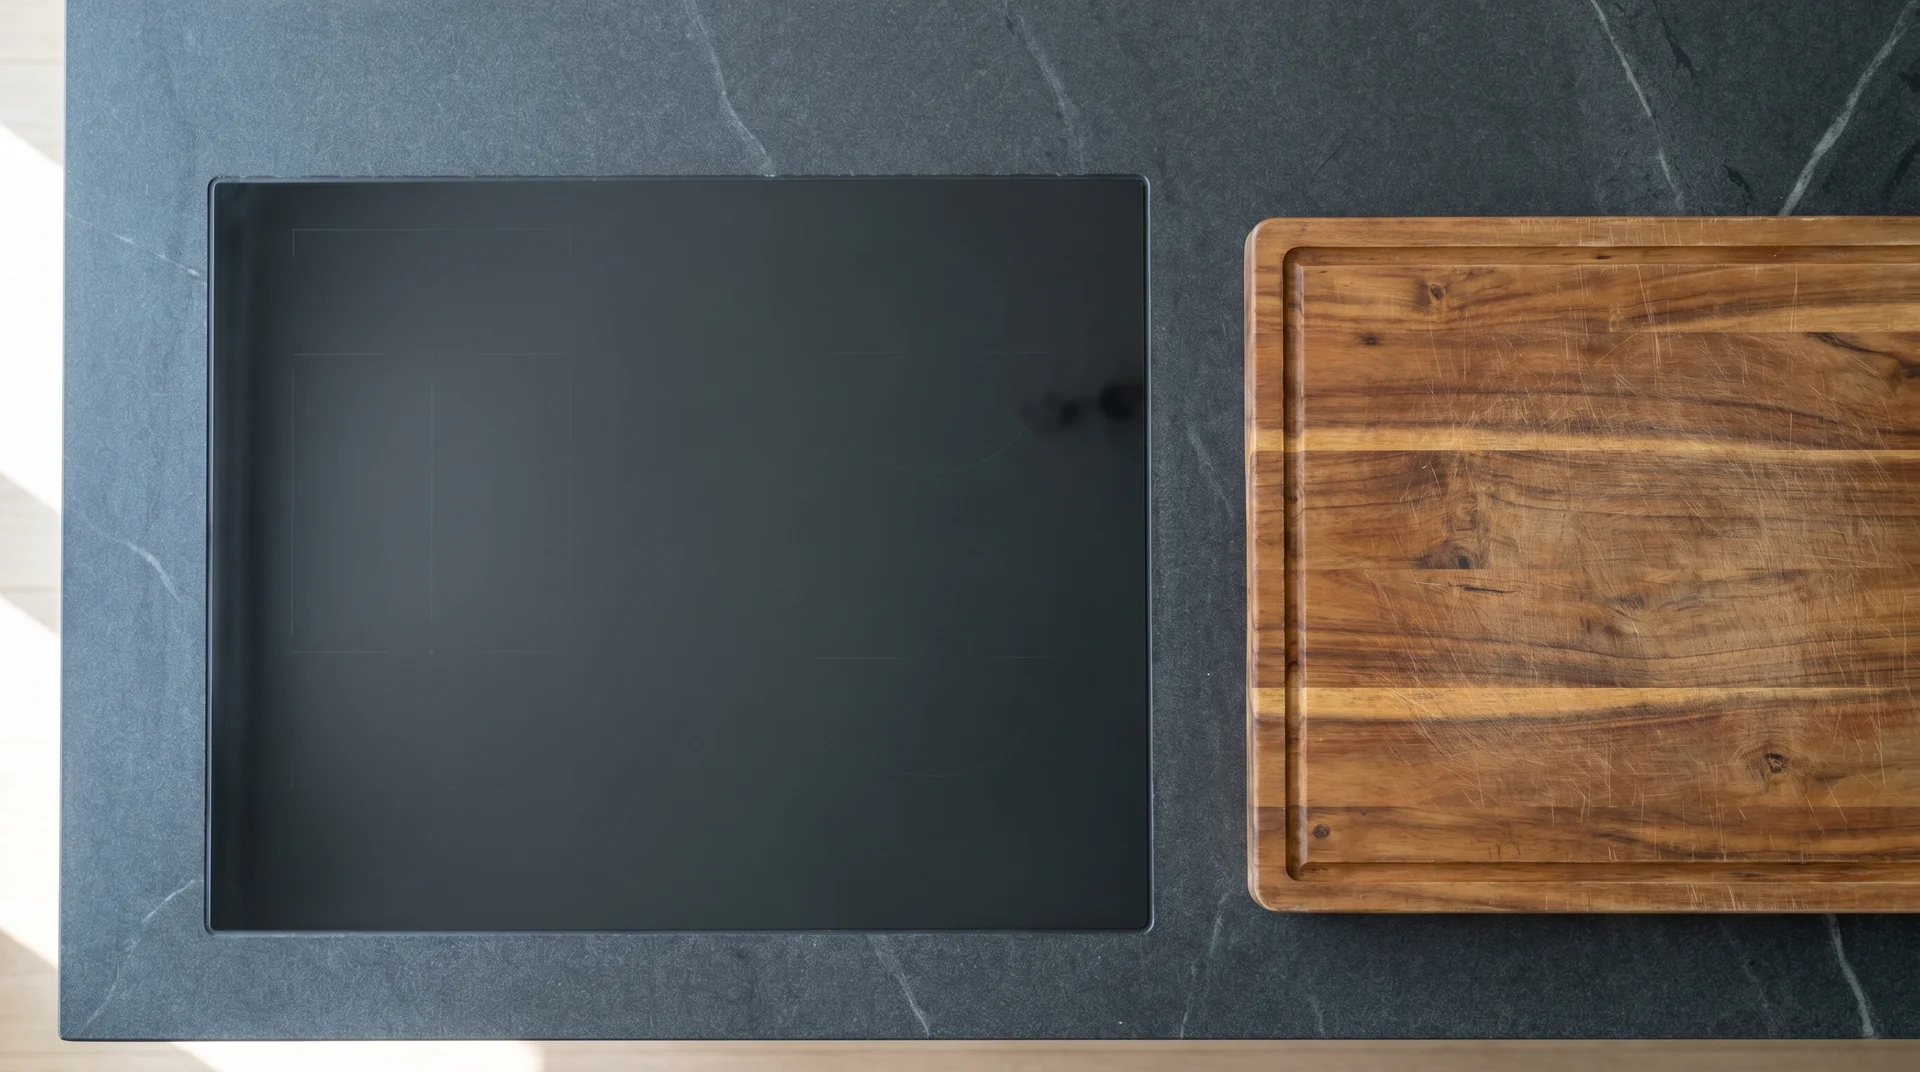
Gas, Electric, or Induction: Which Cooktop Fits an Island?
A cooktop against a wall has a backsplash, a contained splatter zone, and a wall to run a gas line to. A cooktop on an island has none of those.
The right choice depends on your infrastructure, your ceiling, your cooking habits, and the maintenance each option creates in an open-room installation.
Induction
Induction is the best technical match for an island installation, specifically because of what it removes from the ventilation requirement.
Induction heats through electromagnetic energy in the cookware, not through an open flame or a heated coil. The surface itself doesn’t get hot except directly under a pan. Oil and grease still require ventilation during cooking.
But the heat volume and combustion byproducts are lower than those of gas, which reduces your CFM requirement and makes downdraft a viable option for moderate cooking.
Induction is also the only cooktop type that genuinely doubles as counter space when it’s not in use.
The surface is flat, smooth, and cool between uses. A cutting board can sit directly on it. On a tight island where every inch matters, that’s a practical advantage no other cooktop type offers. I’ll be honest: that detail alone has pushed more than a few of my project decisions toward induction when counter real estate was the binding constraint.
The cookware compatibility requirement is real. Induction only works with magnetic-based cookware. Cast iron and most stainless steel work. Aluminum, copper, and non-stick without a magnetic base layer do not.
If you’re switching from gas and cooking with a full set of existing cookware, check what you have before you commit.
Gas on an Island
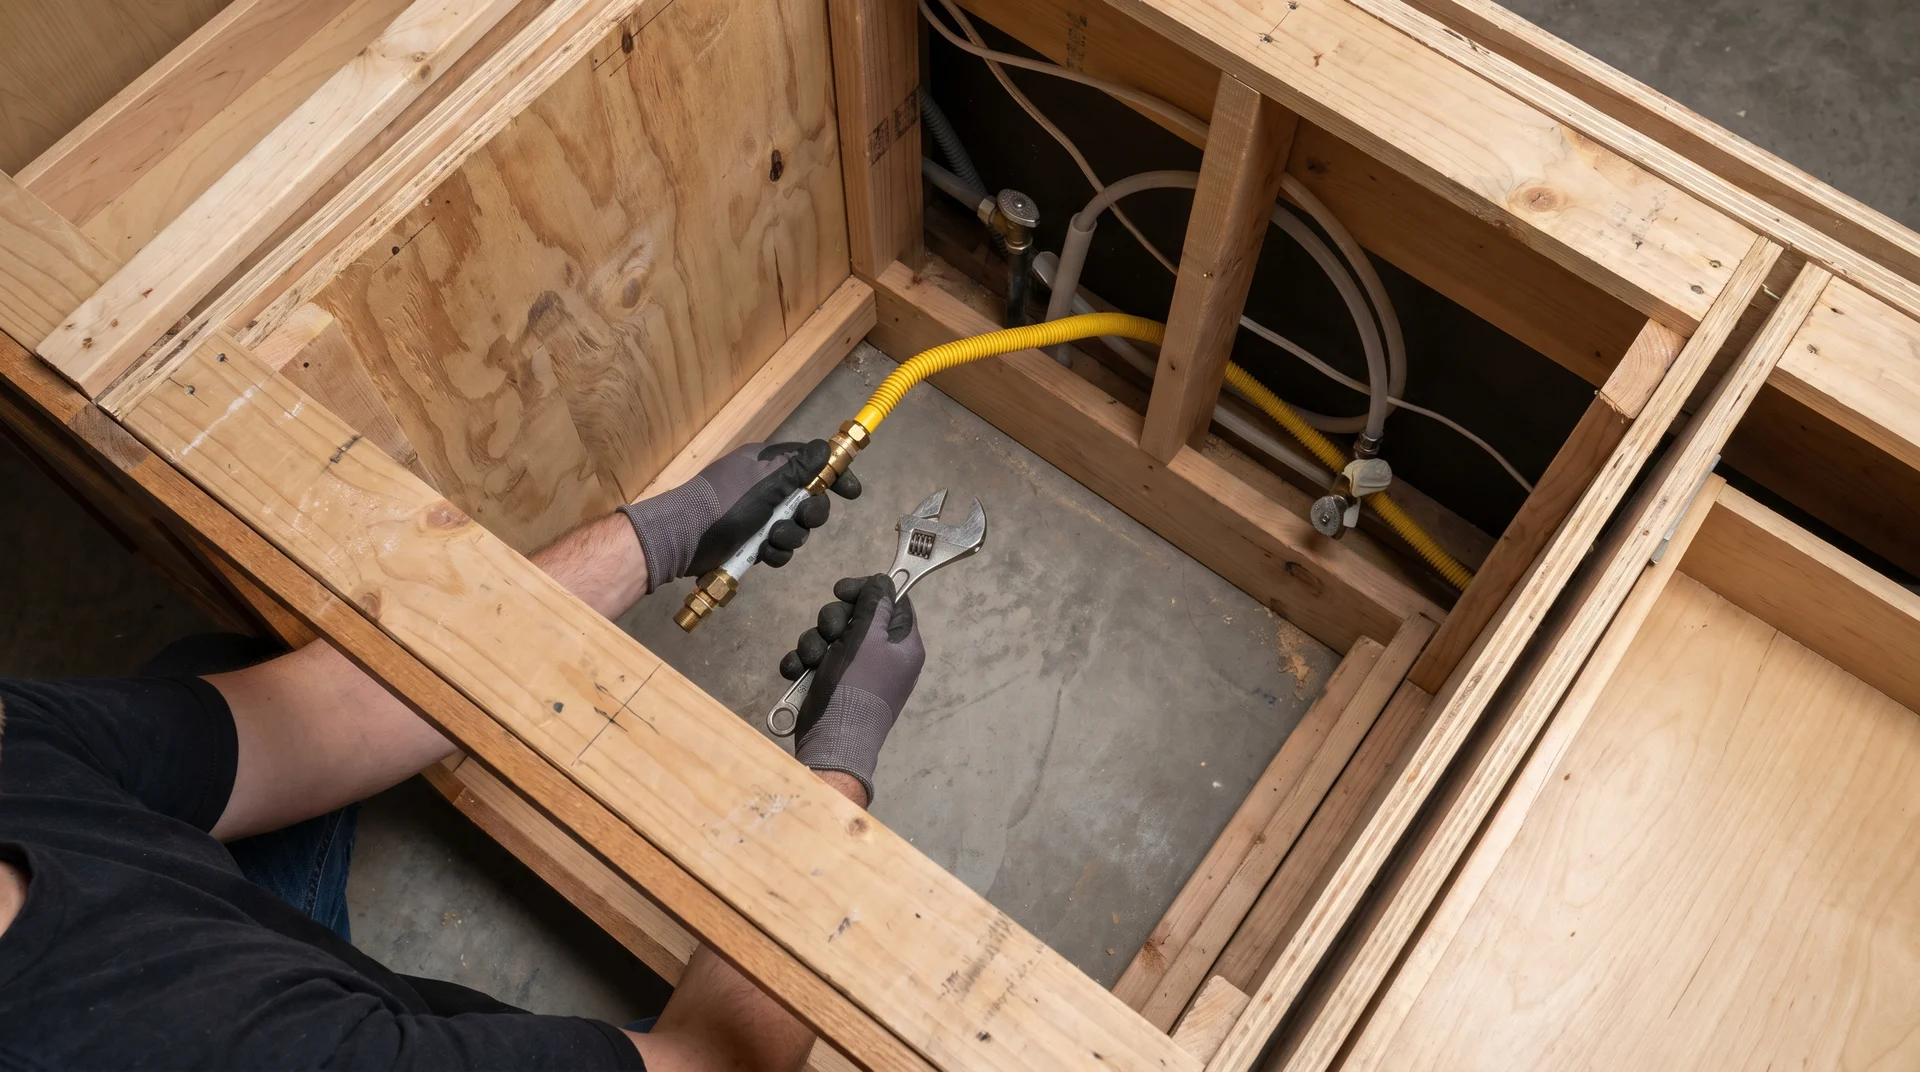
A gas cooktop on an island requires a gas line run to a freestanding structure, which is more expensive and more complex than a wall installation.
If your home is on a slab foundation and no gas service currently reaches your island footprint, the line has to come through the concrete. That adds $800 to $1,000 in concrete patching on top of the line installation.
The national average for running a gas line to a kitchen stove runs approximately $600, at roughly $20 per linear foot. Island installations commonly require 20 to 30 feet of run.
Gas on an island also generates more ambient heat and grease mist than induction. A higher-CFM overhead hood becomes close to mandatory at real cooking temperatures. The budget constraint is not just the appliance. It’s the gas line, the permits, the ceiling ductwork, and the hood, all of which the wall-mounted alternative avoids.
Permits are not optional.
Gas line installation requires a licensed professional and a building permit in virtually every US municipality. The permit triggers an inspection. That inspection is your protection, and it’s a condition of your homeowner’s insurance coverage. Unpermitted gas work discovered after an incident can result in a denied claim.
Electric on an Island
![]()
An electric cooktop on an island requires a dedicated high-voltage circuit but avoids the gas line complexity and often carries lower ventilation requirements.
Electric radiant and ceramic glass tops are durable, mid-budget options for homeowners who want a traditional burner experience without gas infrastructure. They require a dedicated 240-volt circuit, run by a licensed electrician. Wiring typically costs $165 to $535.
In my experience, electric tends to get dismissed early in planning conversations because it sits between two more compelling options. That dismissal is worth reconsidering when the gas line cost or the ceiling duct path is making the project expensive.
The comparison below covers all three in the island context specifically.
| Factor | Gas | Induction | Electric |
|---|---|---|---|
| Ventilation requirement | High CFM overhead hood strongly recommended | Moderate – downdraft viable for moderate heat | Moderate – overhead or strong downdraft |
| Infrastructure complexity | High – gas line, permit, licensed pro required | Low – dedicated 240V circuit | Low-medium – dedicated 240V circuit |
| Grease splatter on the island | Higher – open flame, no backsplash | Lower – flat surface, cooler ambient temp | Medium – coil edges trap residue |
| Safety near seating | Greater concern – open flame, accessible grates | Best – surface cool except under active pan | Moderate – surface stays warm after use |
| Slab foundation impact | Significant – concrete penetration for gas | None – electrical runs above the slab | None – electrical runs above slab |
| Cleaning effort on the island | High – grates, open recesses, no backsplash | Low – flat glass surface wipes clean | Medium – ceramic surface cleans reasonably well |
Whichever type you choose, the ventilation and sizing decisions above apply. The table changes what you’re managing. It doesn’t change the fact that a cooking surface on an island requires all of those decisions to be made before the contractor starts work.
Renovation Photos of Island Cooktops Are Mostly Cropped at the Neck
What those images don’t show is the angle of a seated adult’s shoulder relative to an active pan, or the 18 inches between the back burner and the nearest barstool.
The seating and cooktop configuration is where the most consistent planning failures happen in island renovations. Not in the appliance choice, not in the ventilation selection. Here, in the layout of where people sit relative to where cooking happens.
Where to Put the Stove When Seating Is on the Same Island
Place the cooktop at one end of the island. Place seating at the opposite end. The prep surface between them is what makes the layout safe.
You’re standing at the cooktop, facing the room. Your guests are seated to your left or your right, not directly across from active burners. The island’s depth puts them close enough to talk. It also puts them out of the direct path of cooking activity.
Never position seating directly across from or adjacent to the cooktop zone.
A barstool overhang that places a seated person 14 inches from a gas burner is a configuration I’ve seen in renovation plans more than once. It gets past the planning stage because the safety problem doesn’t read clearly on a flat floor plan. In a real room, at cooking temperature, it’s obvious immediately.
I document cooktop-seating proximity as a planning failure category in my reference folder. A kitchen that places an active burner within arm’s reach of bar seating is a room that will be used nervously, and eventually used differently than it was designed to be.
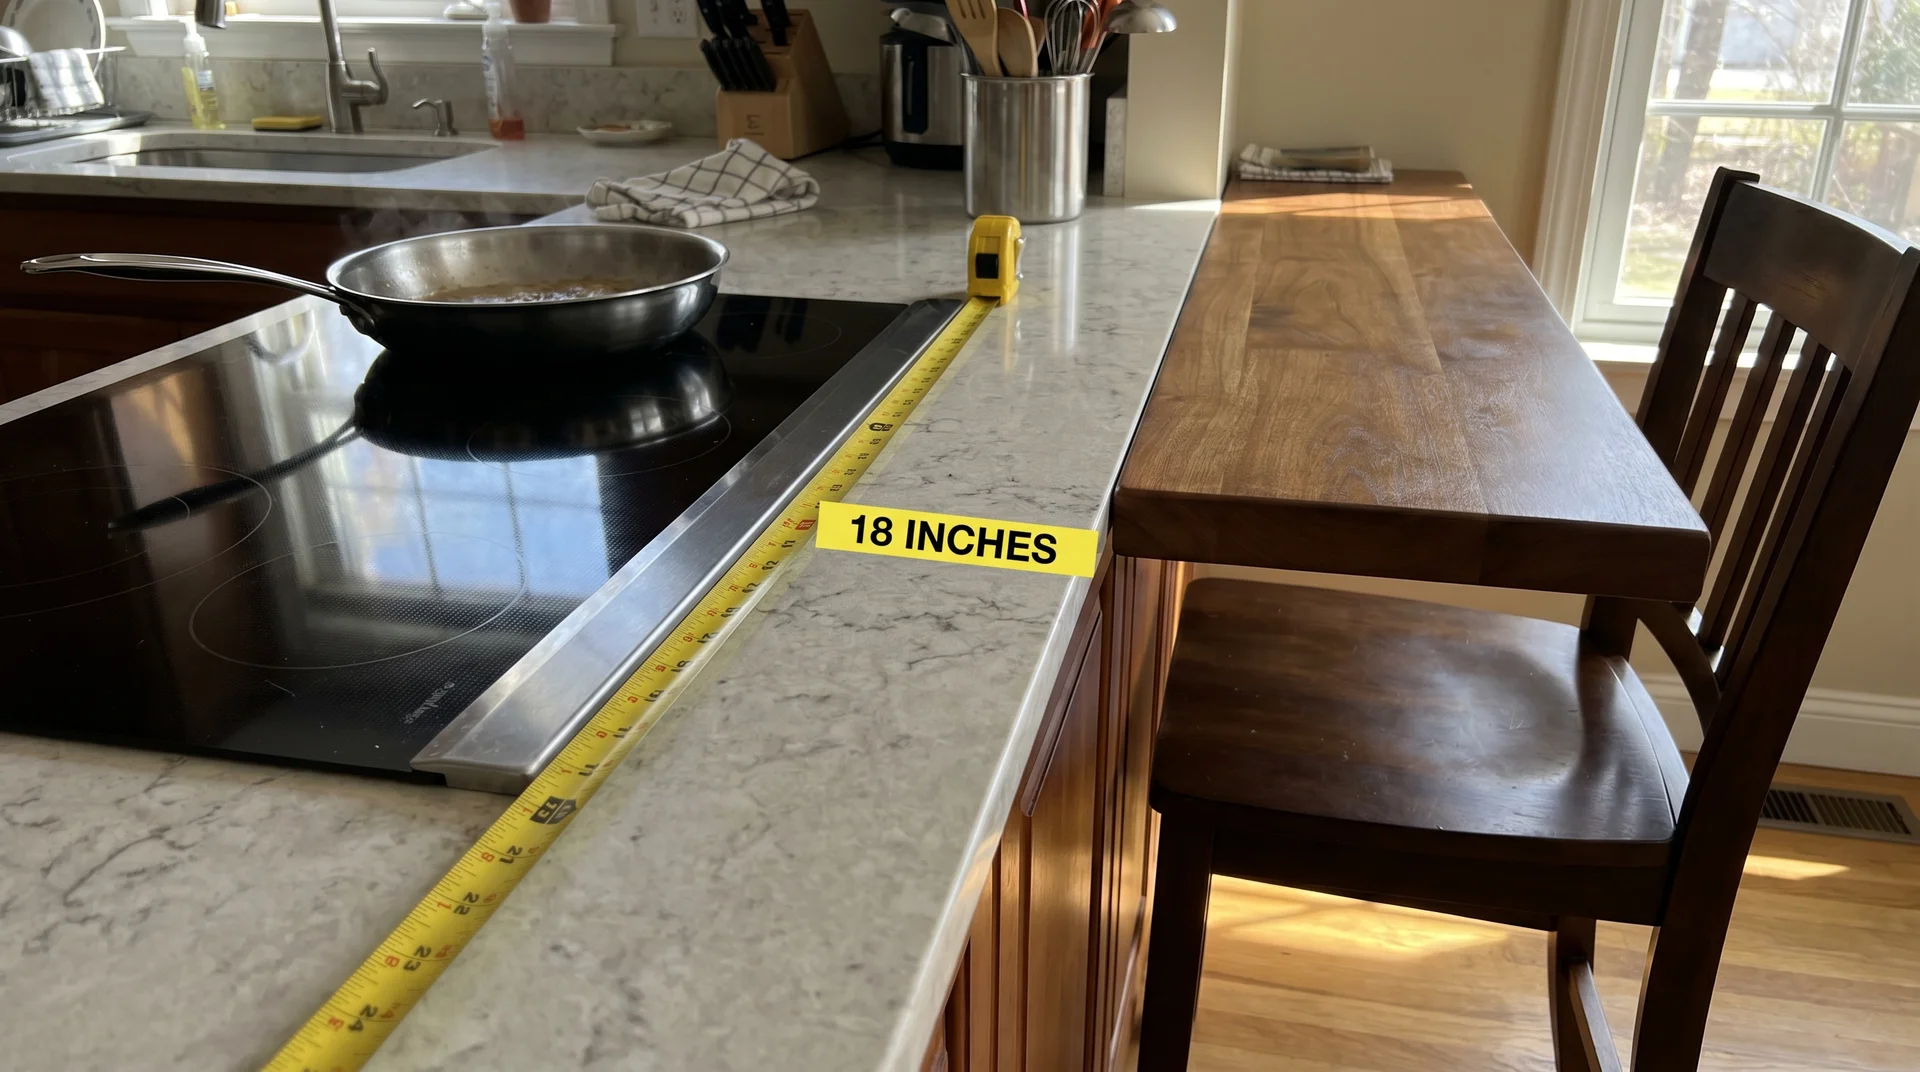
The 12-to-18-Inch Clearance Rule for Seating
Keep a minimum of 12 inches of countertop between the edge of the cooktop and the start of any seating overhang. Use 18 inches when children or regular guests will be seated during cooking.
This clearance serves two purposes.
- It creates a physical zone between the cooking activity and seated people.
- It also provides landing space for hot pans and serving dishes immediately adjacent to the burners, so you’re not turning toward the seating area with full cookware looking for somewhere to set it down.
Grease splatter behaves differently on an island than on a wall-mounted cooktop. On a wall setup, grease hits the backsplash and stays there. On an island, it travels outward in all directions.
The 12-to-18-inch clearance zone reduces how much it reaches the seating area. Beyond that point, island depth and the seated person’s distance from the cooking zone do the rest.
Gas at high heat is the most demanding scenario. If high-heat gas cooking will be regular and guests will be seated during cooking, 18 inches is your minimum. Induction is more forgiving on surface temperature, but the clearance recommendation doesn’t change.
Can You Add a Stove to Your Existing Kitchen Island?
Yes. It is not a DIY project at any point in the process.
Adding a cooktop to an existing island is different from including one in a new build: you’re working within a structure that wasn’t designed for cooking, which means confirming what’s actually possible before committing to any design. That confirmation step is the work most homeowners skip.
What Has to Happen Before a Contractor Touches Your Island
The planning sequence for adding a cooktop to an existing island runs in this order. Skipping steps creates expensive problems at the end.
- Confirm the duct path for ventilation. Walk it with a contractor before committing to any cooktop type. This single step tells you which ventilation solutions your ceiling and layout actually support. Everything else follows from it.
- Verify island dimensions. Measure depth and length against the minimums in the sizing section. If the island is undersized, that gets resolved before any utility work begins.
- Choose cooktop type based on your infrastructure. Gas requires a licensed plumber or gas fitter and a permit. Electric and induction require a licensed electrician and a dedicated 240-volt circuit. Neither trade is optional.
- Cross-reference countertop material compatibility. Some countertop materials require specific cutout treatment for cooktop installation. Your fabricator and the cooktop manufacturer’s installation specs need to be compared before anything is cut.
- Pull permits before work begins. A building permit for kitchen utility work typically costs $75 to $250 nationally. Work completed without a permit affects your homeowner’s insurance and can complicate a future sale.
What a Slab Foundation Changes About the Cost
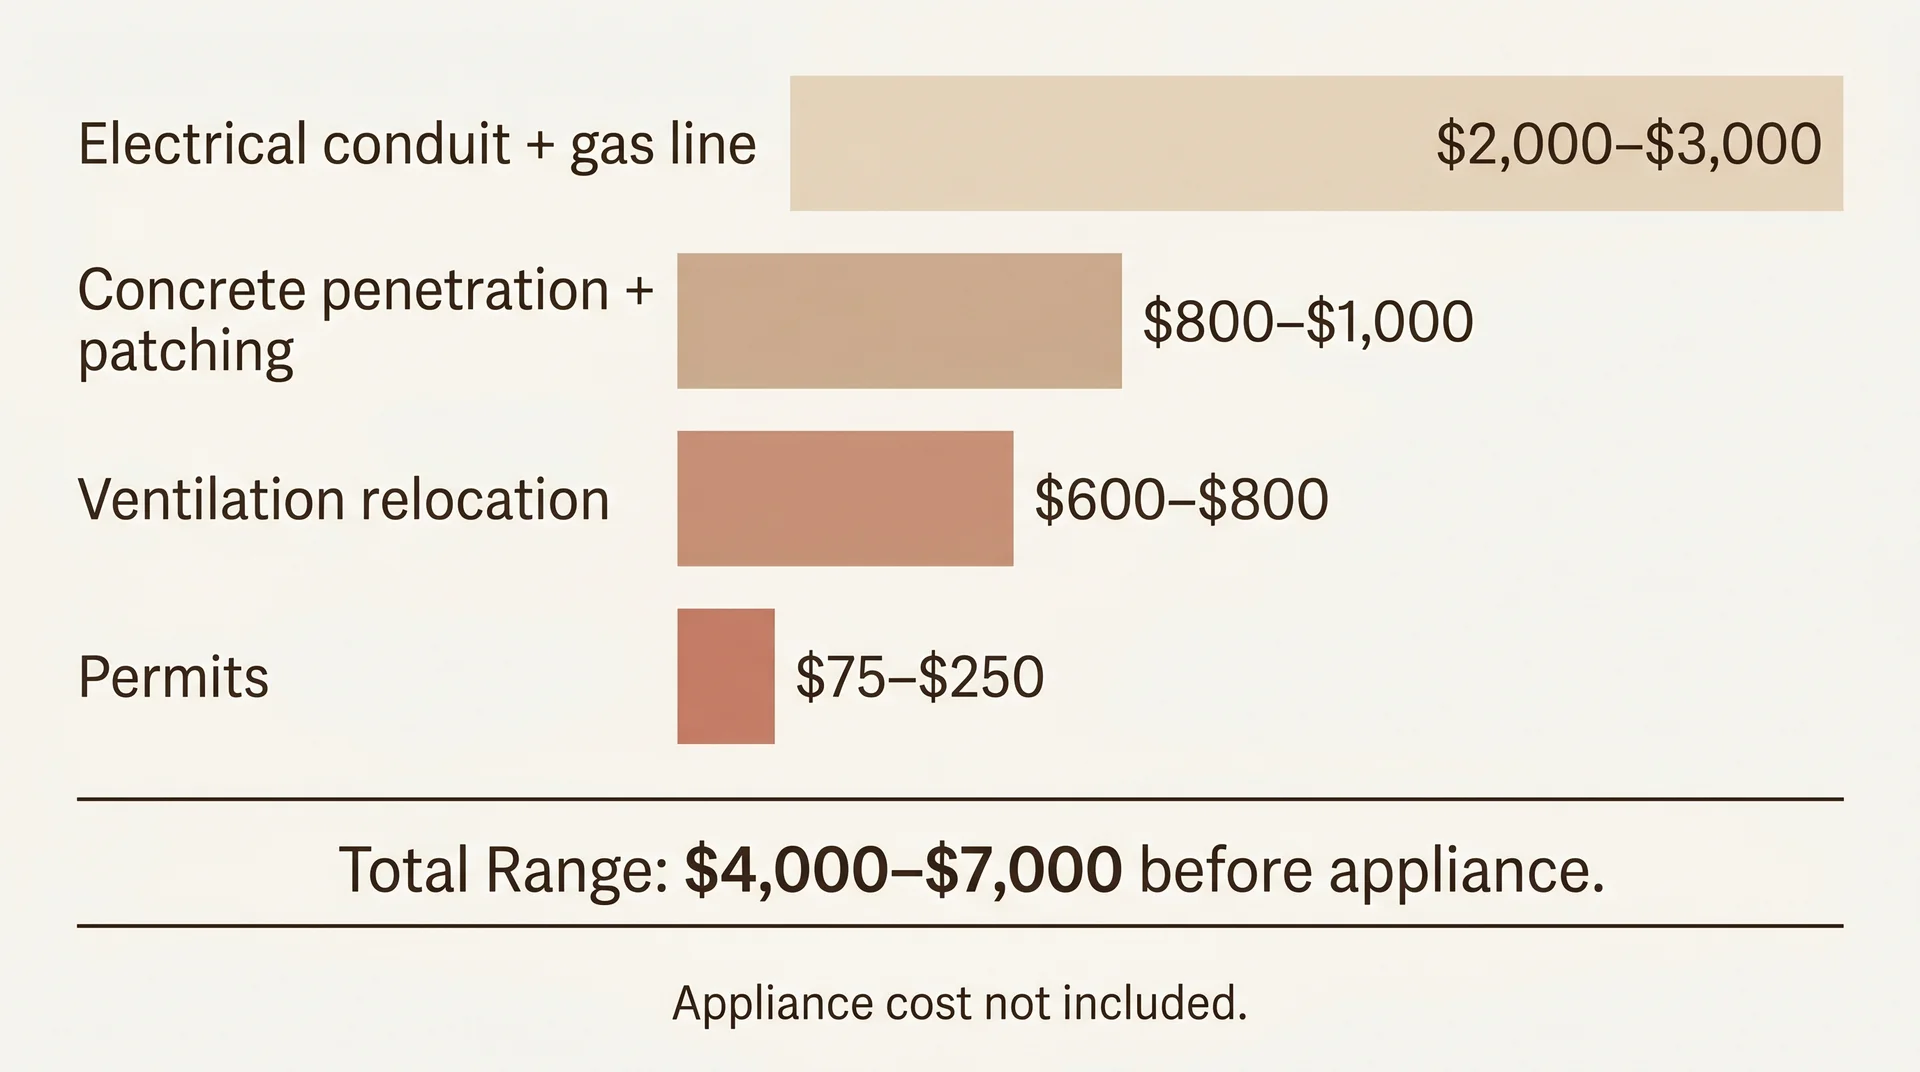
If your home is built on a concrete slab and no existing gas or electrical service runs under the island footprint, both cost more to add than in homes with crawl spaces or raised foundations.
Electrical conduit and a gas line together typically run $2,000 to $3,000 for a standard island installation.
On a slab, add $800 to $1,000 for concrete penetration and patching. Ventilation relocation adds a minimum of $600 to $800 more when connecting to an existing line. If a new roof penetration is required, that number increases.
The realistic total for adding a cooktop to an existing island, including all utility work and permits, commonly runs $4,000 to $7,000 before the cooktop appliance itself.
The appliance is the last budget line, not the largest. That figure surprises homeowners who have been pricing cooktops. The constraint is where the real decision lives, and knowing it early is what separates a renovation that lands on budget from one that doesn’t.
When a Stove on the Island Is the Wrong Answer
Most articles on this topic want to sell you the idea.
In a meaningful number of my 220-plus renovations, I’ve recommended against the island cooktop. Not reluctantly. Because the conditions weren’t there, and a cooktop on an island that can’t support it produces a kitchen that’s harder to live in than the one it replaced.
The debate about whether island stoves are a good or bad design choice misses the point. The configuration works or it doesn’t, depending entirely on what your specific kitchen can support.
Your island cannot meet the minimum size requirements. If the depth is under 42 inches, or the available length cannot fit a cooking zone with adequate landing space on both sides, the design doesn’t have room for safe cooking.
Making the island larger may solve it, but that calculation has to run against the perimeter clearance requirement at the same time. A larger island in a kitchen that can’t spare the floor space creates a different problem.
No clear overhead duct path exists, and you cook at high heat. If your ceiling cannot accommodate a ducted overhead hood, and your cooking style involves frequent frying, high-heat searing, or gas at full output, a downdraft or recirculating system will not keep up. A wall-mounted cooktop with a proper overhead hood is a better kitchen for how you actually cook.
Young children are regularly on the island during cooking. I want to be careful here, because this genuinely varies by family, and I’m not certain where the right threshold sits.
Final Thoughts
What I know from twelve years of projects is that an open-sided cooking surface at an accessible height, with seating placing children within reach of active burners, requires consistent supervision that most real kitchens don’t maintain across every meal.
Some families manage it well and wouldn’t trade the layout. For others, a wall-mounted setup with the cooking surface separated from the gathering space fits how that household actually runs. It’s worth thinking through honestly before the design is locked.
None of these is a permanent answer. They’re answers for your specific kitchen, with your current dimensions and infrastructure. A full gut renovation or a build-from-scratch changes many of them from fixed constraints to design variables.
