
A burning plastic smell from an oven comes from one of four sources.
Three of them are fixable without calling anyone. One of them means stop using the oven today and arrange a professional inspection.
For all four scenarios, the immediate steps are the same: turn the oven off, open windows, and run the range hood. Then diagnose.
If the smell is strongest near the back of the appliance or the control panel, turn the oven off and unplug it now. If it appears before the oven has reached cooking temperature, or comes with any buzzing or display irregularity, that points to an electrical problem.
That scenario gets its own section below and requires a technician. A gas smell from a gas oven is a separate issue from everything covered here and warrants different immediate action.
Causes for Oven Smelling Like Burning Plastic
Each cause produces a smell most people describe as burning plastic.
The smells are similar enough to cause real confusion. The causes are not similar at all, and neither are the fixes.
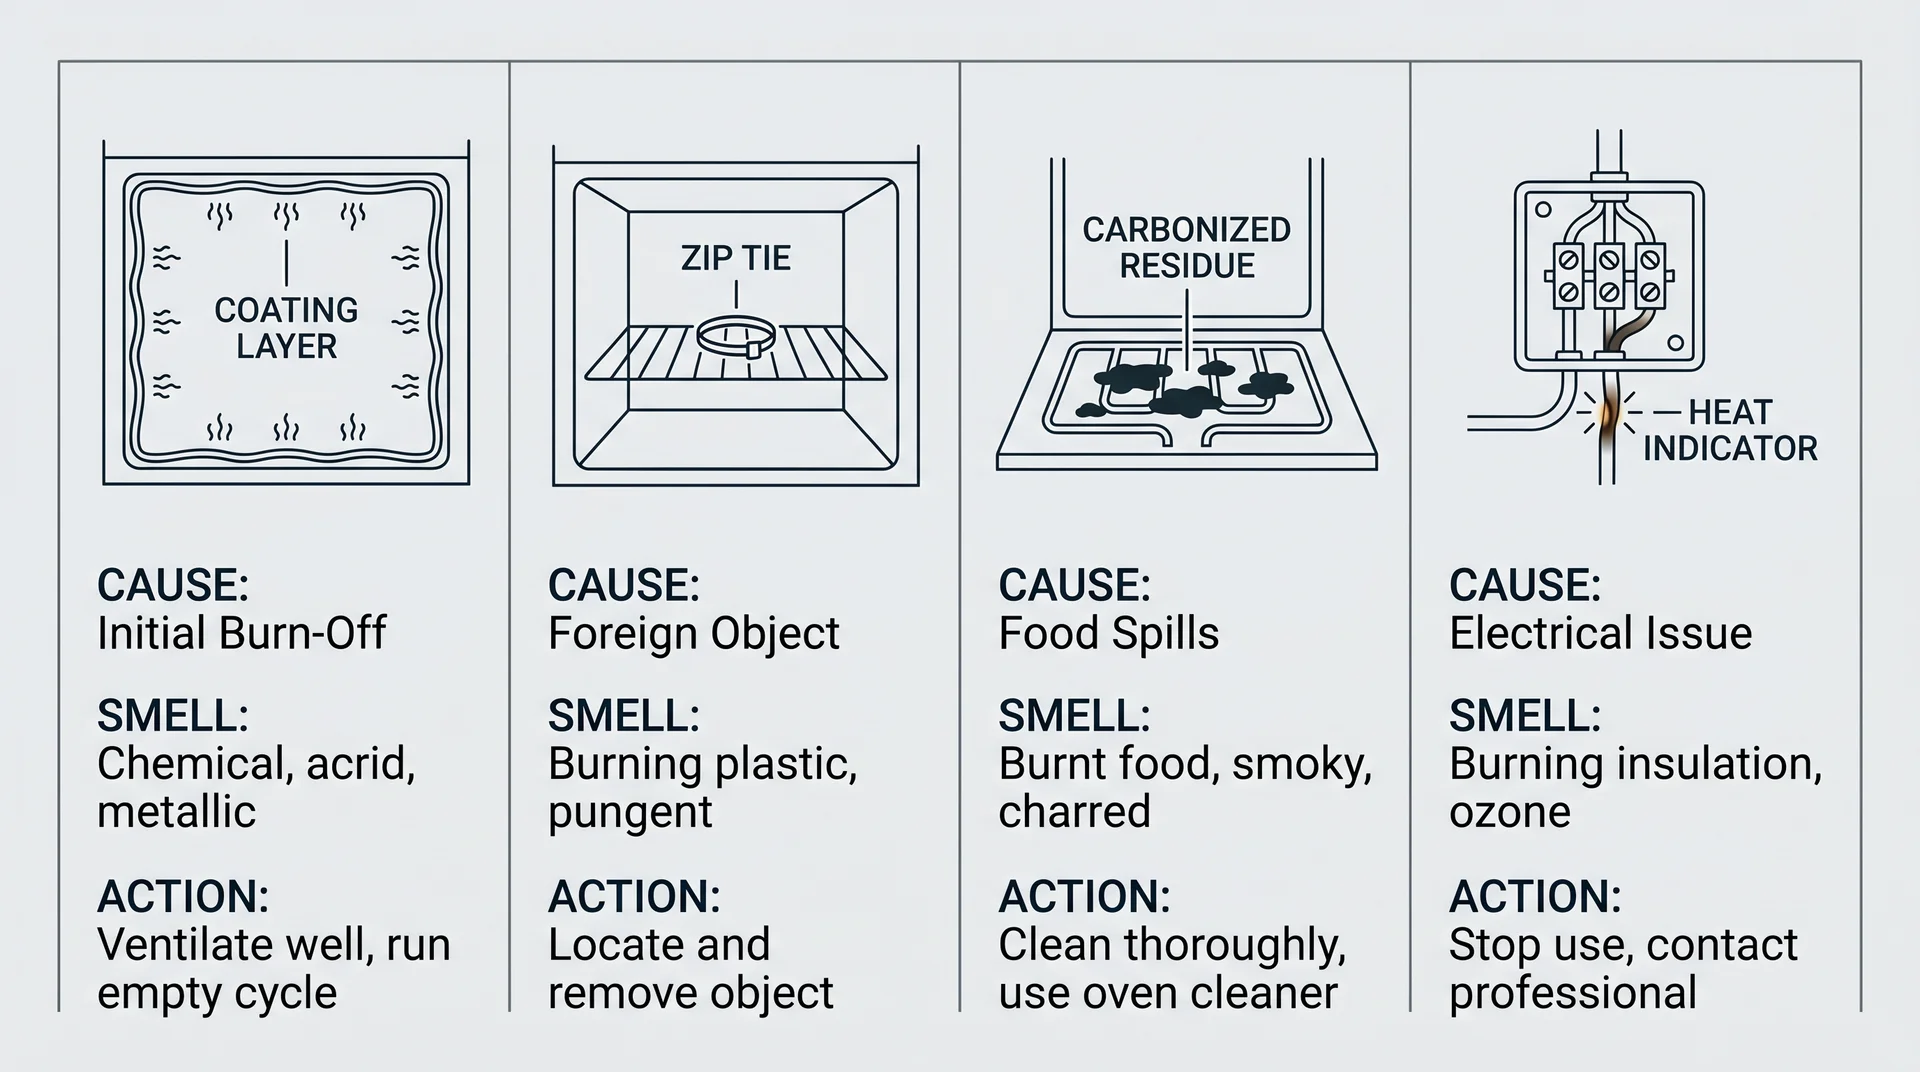
| Cause | When It Occurs | Smell Character | Where It Is Strongest | Action Required |
|---|---|---|---|---|
| Factory coating off-gassing | New oven; first 3 to 5 uses | Milky, slightly acrid, diffuse throughout the kitchen | Throughout the kitchen, no clear concentration point | Run the burn-in process (running the oven empty at high heat); ventilate well |
| Melted plastic debris | Any age; often after delivery, installation, or storage | Sharp, chemical; intensifies as temperature rises | Inside the oven when the door is opened | Remove debris manually; clean before next use |
| Grease, food residue, or cleaner buildup | Any age; after heavy use or recent cleaning | Smoky-chemical; associated with specific residue areas | Inside the oven, concentrated near the buildup spots | Manual cleaning; do not run self-clean before debris is removed |
| Electrical fault | Any age; often sudden onset with no recent changes | Sharp, like burning wire; acrid and penetrating | Near the control panel, the rear of the appliance, or the power cord | Stop using the oven; call a qualified technician |
Factory Coating Off-Gassing (New Ovens Only)
New ovens produce a burning smell during their first few uses because of manufacturing residues that have never been exposed to heat before.
The insulation, bonding agents, and protective oil coatings inside a new oven release volatile organic compounds (VOCs) when heated for the first time. This process is called off-gassing. It is expected, temporary, and not a documented health risk for healthy adults, provided the kitchen is properly ventilated.
The smell is milky and slightly acrid. It spreads throughout the kitchen rather than concentrating on the oven door. It diminishes with each use and fades entirely within a few correct burn-in cycles.
This cause applies only to ovens within their first handful of uses. If the oven has been in regular service for months or years and the smell is new, factory off-gassing is not what you are dealing with.
Melted Plastic Inside the Oven
Any plastic left inside the oven during use will produce a burning smell that continues until the residue is physically removed.
Packaging materials are the most common culprit: zip ties, foam inserts, protective film, and tape applied during delivery and installation. These survive initial visual checks because they hide in places people do not think to inspect.
A piece of packaging no larger than a twist tie can produce a persistent smell across multiple uses.
This smell is sharper and more localized than off-gassing. It intensifies as the oven temperature rises and does not diminish on its own across burn-in cycles.
If you have run the burn-in procedure twice and the smell persists, this is the most likely explanation.
Grease, Food Residue, and Cleaning Product Buildup
Burned grease and carbonized food residue produce a smell most people identify as plastic-like rather than simply smoky.
Sugar, cheese, meat drippings, and fatty residues baked onto oven walls emit a sharp chemical odor at high temperatures. Chemical oven cleaner that was not fully wiped from the surface adds a second layer: the residue itself off-gasses on the next heating cycle.
The self-clean cycle is where this gets commonly misunderstood. Running self-clean does not remove a burning plastic smell.
The cycle heats the oven interior to approximately 900°F, and if any debris is present when it starts, that debris burns at that temperature.
That is not the same as cleaning it out.
There is a shelf in my garage that my wife calls the cleaning graveyard. Most of what is on it is oven cleaners. The common thread is that they were applied without confirming that the full wipe-down was done before the next heat cycle.
An Electrical Problem
Electrical faults produce a burning plastic smell because wire insulation and appliance components are made from synthetic polymers.
A failing control board relay, a loose terminal connection generating heat through resistance, or wire insulation softening near an overworked heat source all produce this odor. The smell is chemically similar to melting plastic because the materials involved are chemically similar to plastic.
The electrical smell has a sharper, more penetrating character than kitchen debris burning. It is often detectable before the oven reaches full temperature.
The diagnostic section below explains how to use that distinction.
How to Diagnose Which Problem You Have
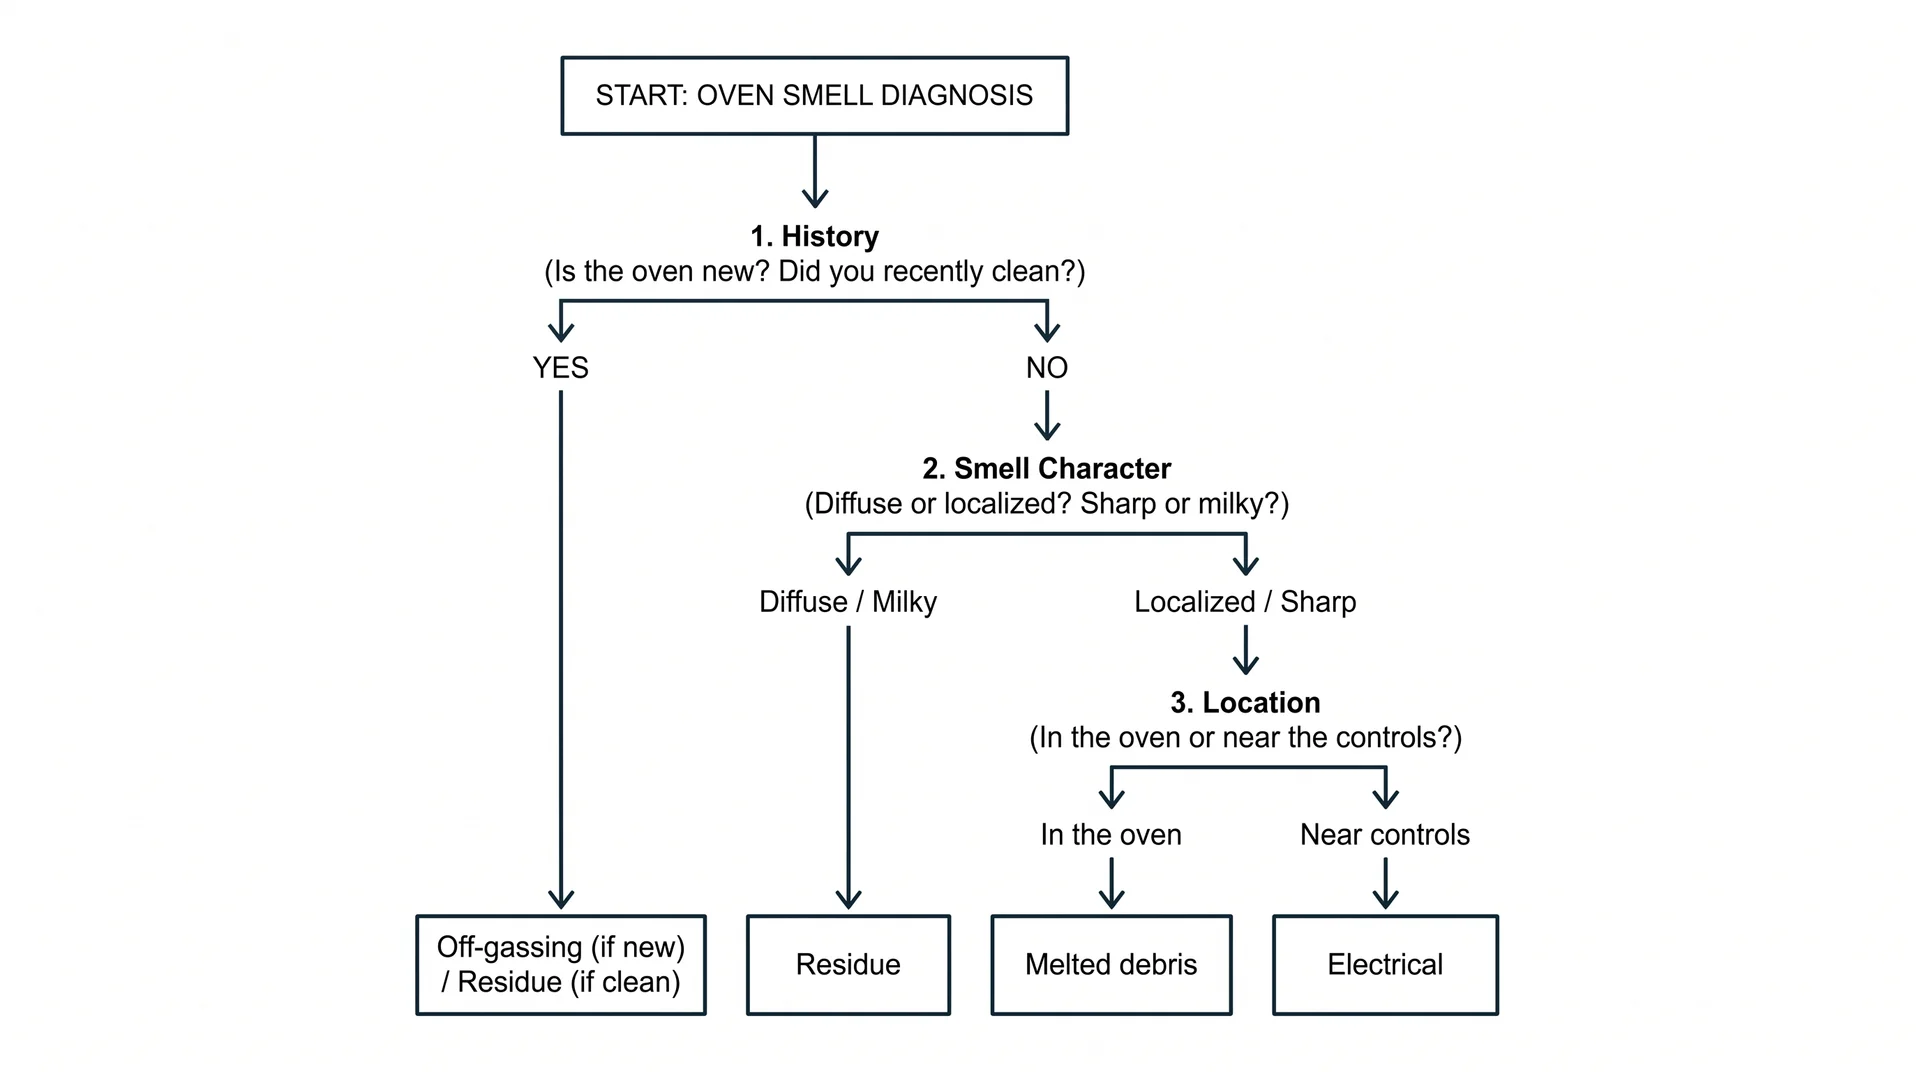
Three observable factors narrow this to a single cause in most cases.
Each factor corresponds to one of the four possible causes above. No special equipment is needed. These tests use what you can observe without opening the appliance.
The History Test
- Is the oven new, or is this one of its first five uses? Off-gassing is the likely cause.
- Did you recently run a self-clean cycle or
- Clean the oven with a commercial product? Residue is likely.
- Did the smell appear on a routine use of an oven you have used regularly, with nothing recent changing?
This narrows the field to melted debris or an electrical fault, and the next two tests separate those.
The history test eliminates two of four causes before any physical inspection. That is where to start.
The Smell Character Test
Each cause has a slightly different smell profile, and paying attention to that profile narrows the diagnosis quickly.
- Off-gassing from a new oven is milky and diffuse. It spreads through the kitchen and does not intensify as the oven gets hotter.
- Melted plastic debris is sharper and more localized, detectable from the open oven door, and gets stronger at higher temperatures.
- Grease and food residue produce a smoky-chemical smell associated with specific areas of buildup rather than the whole oven interior.
Electrical burning has the most distinct character of the four. It is synthetic and sharp in a way that feels closer to burning wire than to burning kitchen debris.
It is often detectable before the oven has fully preheated.
The Location Test
Where the smell is strongest is the most reliable single indicator of what is causing it.
- Inside the oven, when you open the door: melted debris or off-gassing.
- Diffuse throughout the kitchen with no concentration point: off-gassing.
- Strongest near the back of the appliance, the control panel, or the power cord area: stop here.
That is the electrical scenario, and the correct response is not more investigation from your end. If the smell concentrates near the controls or the rear panel, turn the oven off and arrange a technician inspection.
When New Oven Smell Is Normal, and How to Handle It Correctly
New ovens smell because their internal materials need heat to finish curing.
What the Burn-In Process Actually Does
Running the oven empty at high heat drives off residual VOCs before food is ever introduced.
The insulation, adhesives, and protective coatings used in manufacturing have not been exposed to operating temperatures before. The first heat cycles force the residual compounds out. New car smell is the same phenomenon with different source materials.
The burn-in process works for coating off-gassing. It does not work for melted packaging material. Running additional cycles when plastic debris is present inside the oven increases the fume output rather than reducing it.
The oven needs a physical inspection before any burn-in cycle is run. Most manufacturer instructions mention packaging removal without specifying where that packaging actually hides.
The Correct Burn-In Sequence
The sequence matters as much as the temperature, and the inspection step comes first.
Skipping the inspection and going straight to heat is where most persistent-smell problems originate. Complete all five steps below before cooking food in a new oven.
- Full inspection first. Remove all racks and accessories. Check the oven floor, the rack guide rails, and the area directly behind and under the heating element. Look specifically for zip ties, foam inserts, tape, and protective film. Manufacturers place these during transit, and they account for most persistent new-oven smell problems after burn-in.
- Wipe down the interior with a damp cloth only. Do not apply any cleaning product before the first heat cycle. Cleaning product residue at this stage creates a second off-gassing source on top of the first.
- Run the oven empty at 400 to 450°F for 30 to 60 minutes. Use the range hood and open a window. Do not cook food during or immediately after this cycle.
- Ventilate for 30 minutes after the cycle ends. Keep the range hood running. This clears VOCs from the kitchen air before the next use.
- Repeat once if needed. A second cycle is appropriate if the smell persists. If it persists after two correct cycles, proceed to the section below.
When Burn-In Does Not Work?
A smell that persists after two correct burn-in cycles almost always means packaging material is still present somewhere in the oven.
Most of it was visible and removed before the first cycle. The remainder is in locations the initial inspection did not cover.
Manufacturer burn-in instructions typically mention packaging removal without specifying where the packaging actually hides.
Check these areas before running another cycle:
- Under the removable floor panel, if the model has one (some models have a lift-out base that conceals foam inserts beneath it)
- Behind the rear interior wall of the oven, accessible in some models by removing a back panel
- Inside the door hinge mechanism, where tape is sometimes applied during assembly
- Along the upper interior wall near the broiler element
- Underneath the heating element itself, where foam and tape are sometimes used to secure transit protection
The smell from hidden packaging material is identical to standard off-gassing. It does not diminish across burn-in cycles because the source has not been removed.
How to Remove Melted Plastic From an Oven
Melted plastic inside an oven requires physical removal before the oven is used again.
The smell will not burn off on its own. Residue that has migrated to a hidden surface will continue producing fumes on every subsequent use until the material is gone. This is a cleaning problem, not a ventilation problem.
Before You Start: One Step Most Instructions Skip
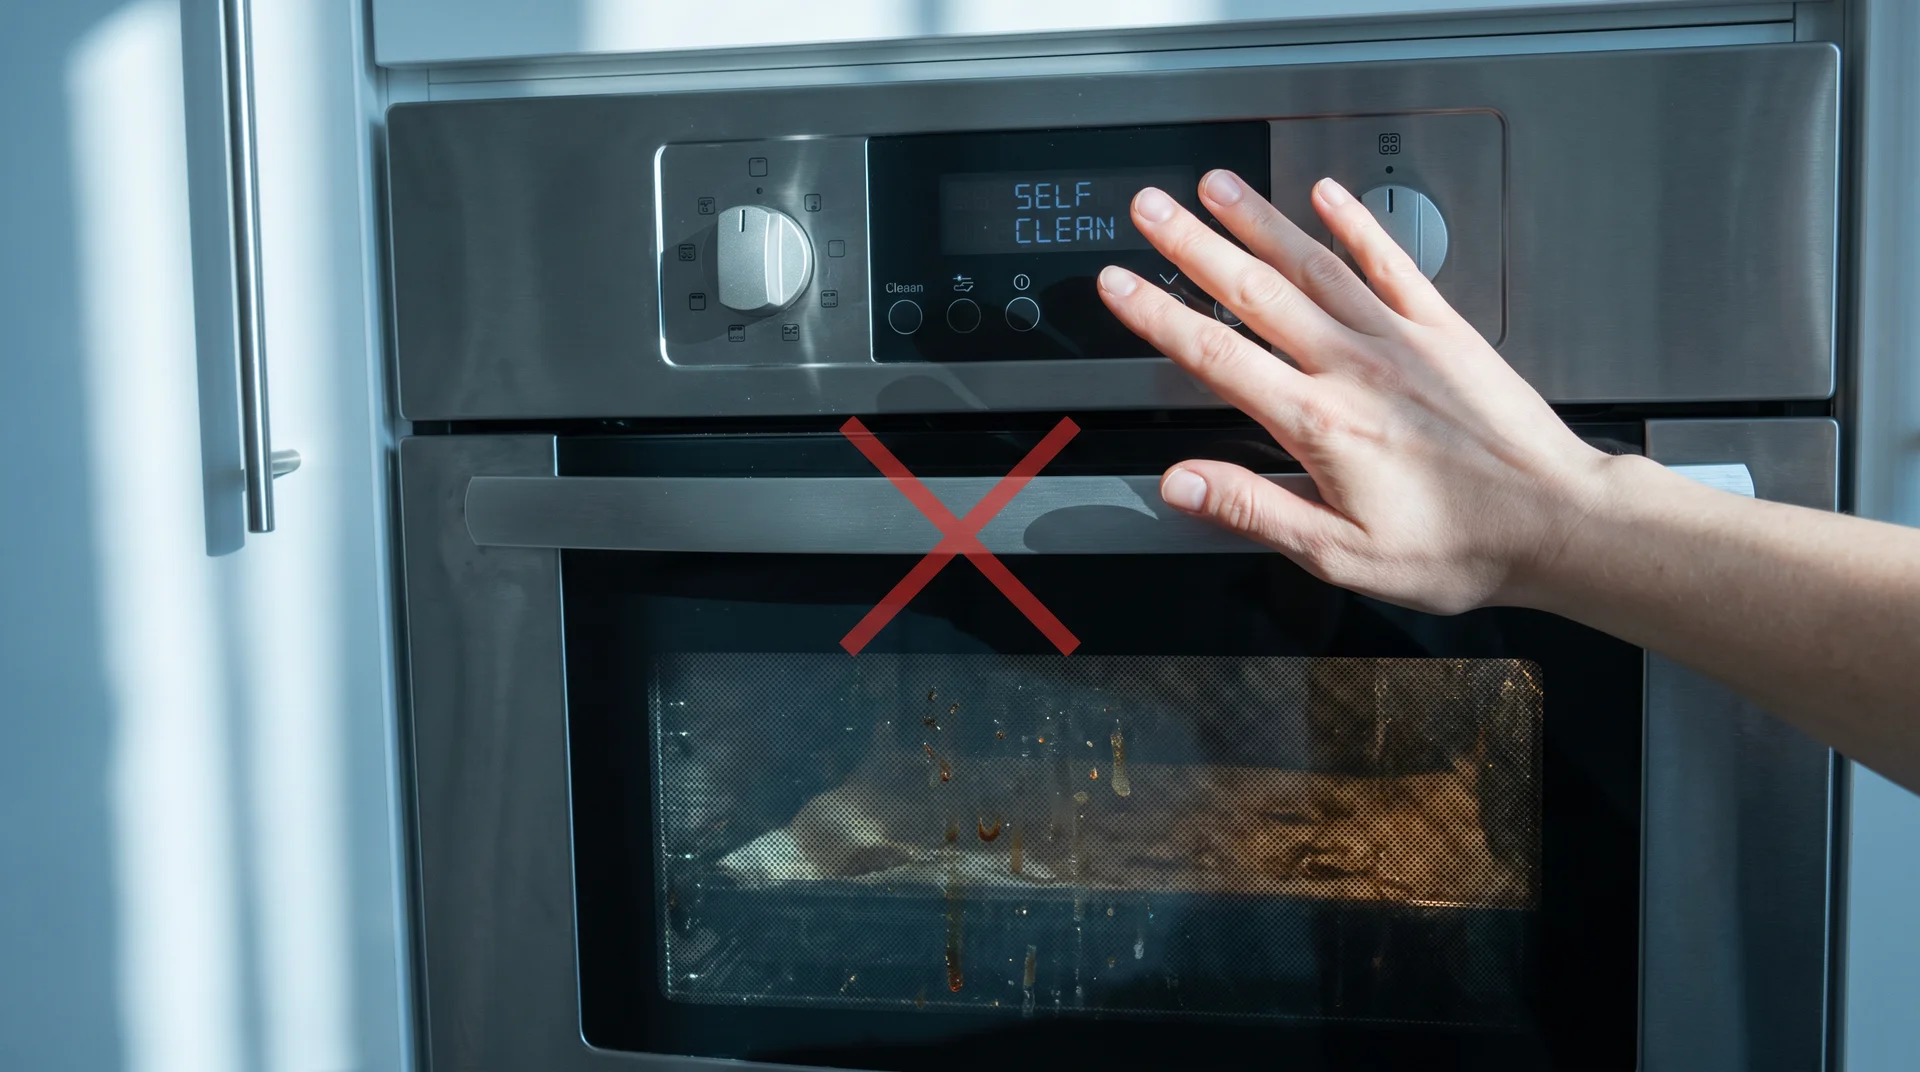
Do not run the self-clean cycle to remove melted plastic.
The self-clean cycle heats the oven to approximately 900°F. Any plastic residue inside burns at that temperature, producing concentrated fumes in an enclosed space. Remove the debris manually first.
The self-clean cycle, if appropriate for any purpose afterward, comes after the oven interior is physically clean.
Let the oven cool completely before beginning. Warm plastic smears across surfaces instead of chipping free. Allow at least two hours from the last use before starting.
Finding the Debris
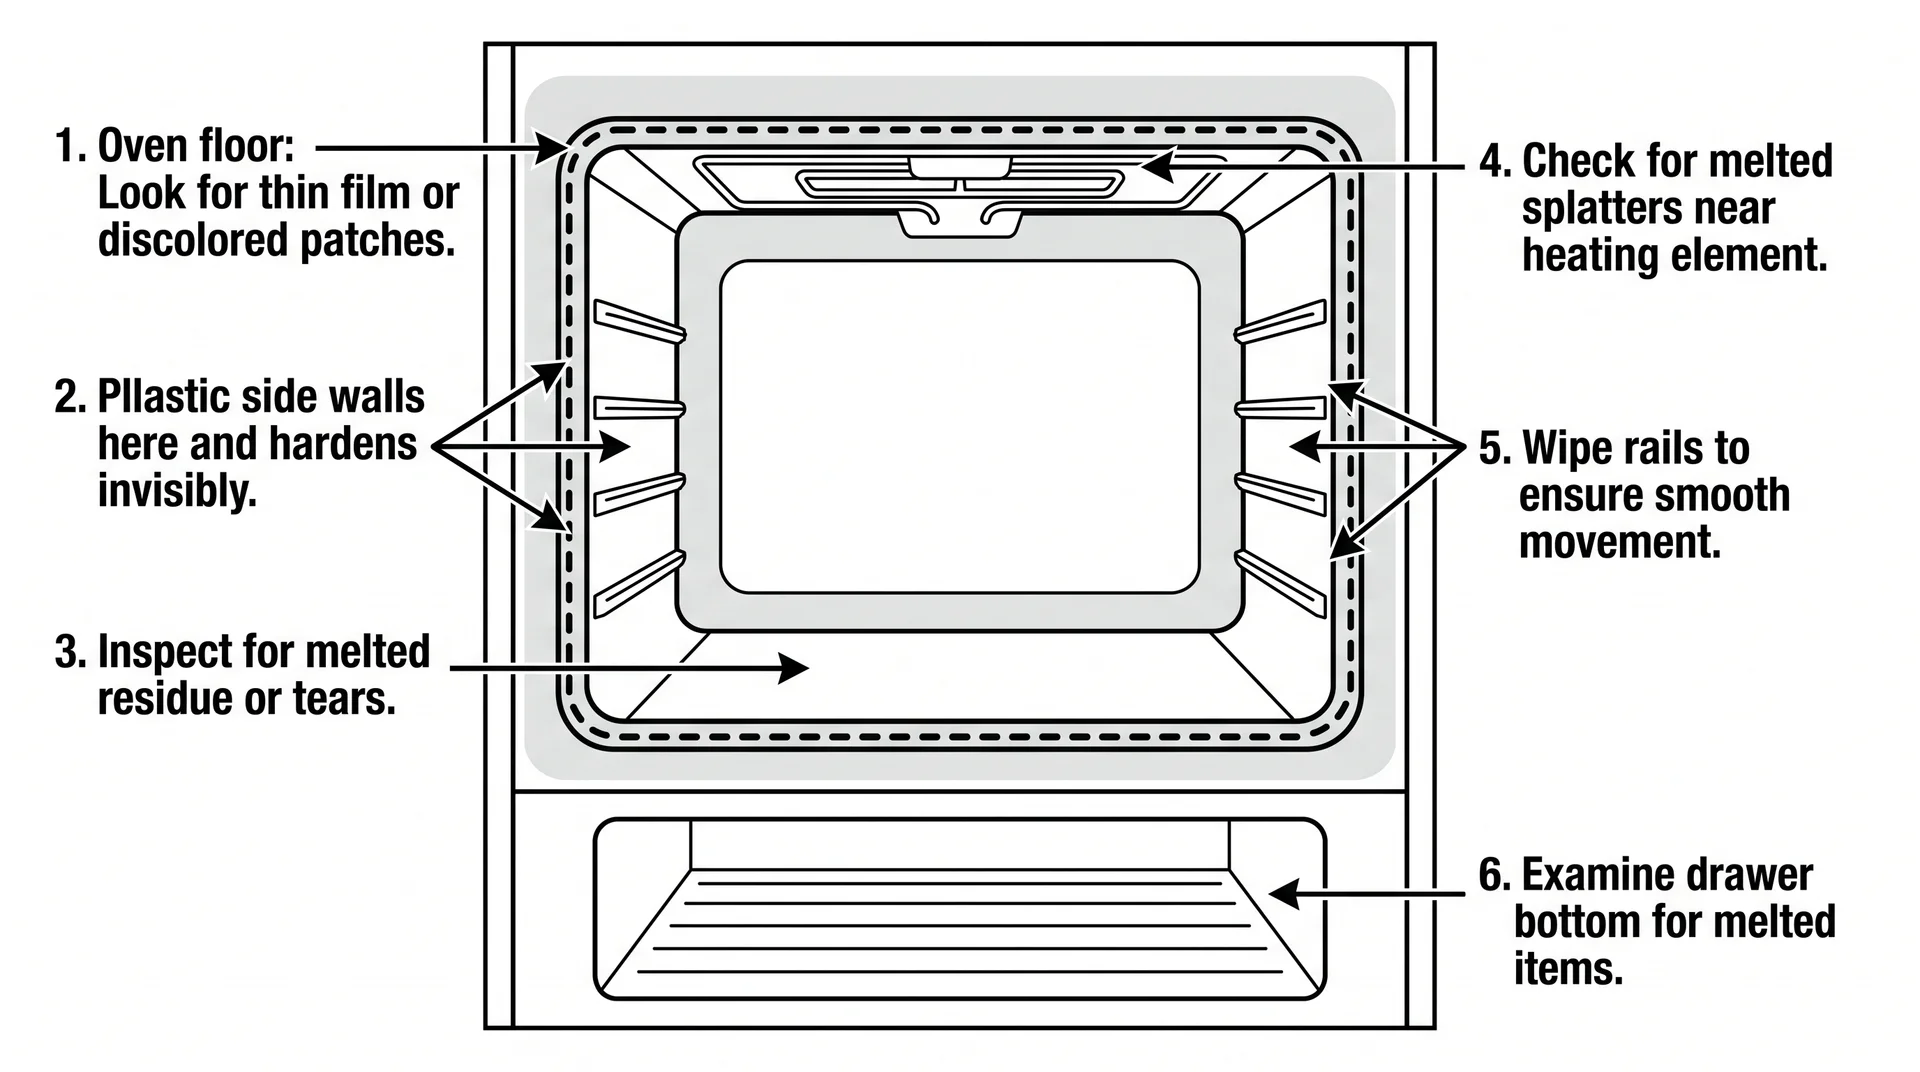
Melted plastic does not always remain where it landed, because heat causes it to flow before it hardens.
The visible stain may not mark the original location of the debris. Check these areas systematically:
- The oven floor and interior side walls, looking for discolored patches or a thin film over the enamel (the glossy, baked-on coating that lines the oven interior)
- The door gasket (the rubber or silicone seal around the door frame), where melted plastic adheres and hardens invisibly
- The underside of the top interior wall near the broiler element
- The rack guides and the contact areas where racks rest against the side walls
- The storage or warming drawer below the main oven, if the range has one
Steps to Remove the Melted Plastic from the Oven
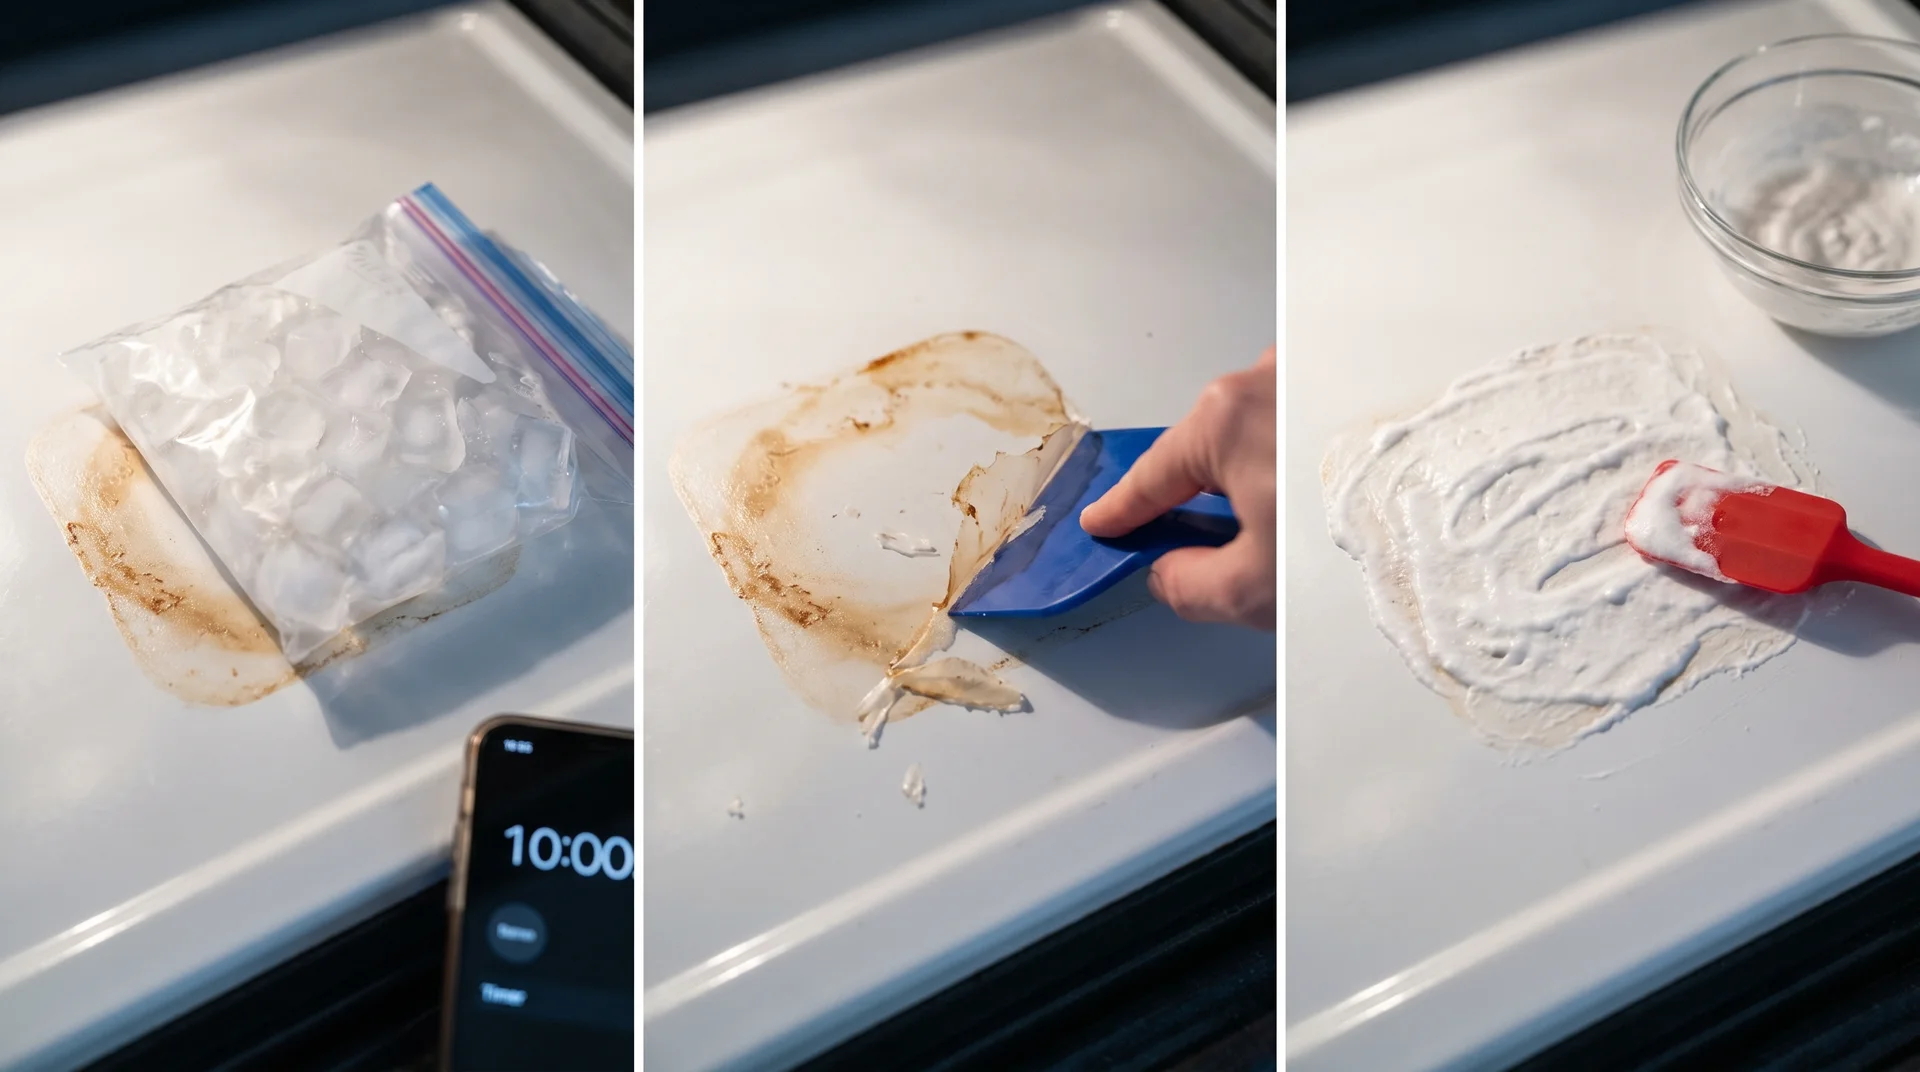

- Harden the plastic first. Apply an ice pack or a sealed bag of ice to any visible residue for 10 to 15 minutes. Brittle plastic chips free cleanly. If you skip this step and apply pressure at room temperature, the plastic warms from hand contact and smears across the enamel surface instead of lifting.
- Scrape with a plastic tool. A plastic scraper, an old credit card, or the edge of a wooden spatula works. Apply steady pressure at a low angle. Do not use metal tools on enamel-coated surfaces. Metal scratches the coating and creates future residue traps.
- Apply a baking soda paste to the remaining residue. Mix baking soda with a small amount of water into a thick paste. Cover the stain completely and leave it on for two to four hours. It draws the residue to the surface and makes it easier to wipe away cleanly.
- Wipe and repeat as needed. Remove the paste and loosened residue with a damp cloth. Repeat the paste application on any areas still showing discoloration. Most residue clears within two applications.
- Wipe the full oven interior with a clean, damp cloth. Remove all baking soda traces before the next heat cycle. Any residue left on the surface produces a white film and a faint chemical smell when heated.
- Run the oven empty at 300°F for 20 minutes before cooking. This confirms the removal was complete. If the smell returns during this step, return to the inspection list above and check the locations you did not cover the first time.
If the Smell Persists After Full Removal
A faint residual smell for one or two uses after thorough removal is expected and fades on its own.
A persistent strong smell after a removal process where every location on the list above was checked points to one of two things. Either there is debris in a location that was not found, or the smell is not coming from debris at all.
Revisiting the three-test diagnostic from earlier (history, smell character, location) is useful at this point. A smell attributed to melted debris that concentrates near the controls or the rear of the appliance is asking for a second look at the electrical scenario.
When Does the Smell Mean an Electrical Problem?
An electrical source requires a different response from every other cause on this list.
What an Electrical Burning Smell Indicates
The smell of a failing relay or overheating wire insulation registers as burning plastic because the materials involved are synthetic polymers.
A loose terminal connection generates heat through electrical resistance. That heat softens and eventually burns the plastic coating on the wire at that connection point.
A control board relay beginning to fail produces the same effect. In both cases, the source is inside the appliance structure, not inside the cooking space.
That is why the smell concentrates near the controls and the back of the range rather than at the oven door.
Signs That Point to Wiring or the Control Board
Stop using the oven if you observe any of the following.
- Smell is strongest near the control panel or the rear of the appliance, not inside the cooking space
- Smell appears within the first few minutes of operation, before the oven reaches cooking temperature
- Display is flickering, showing error codes, or behaving inconsistently during the smell episode
- A faint buzzing or crackling sound is audible near the rear of the appliance
- Smell recurs on every use after thorough inspection found no visible debris
- Visible discoloration, scorching, or heat damage is present near the power cord or the wall outlet
What to Do If the Smell Is Electrical
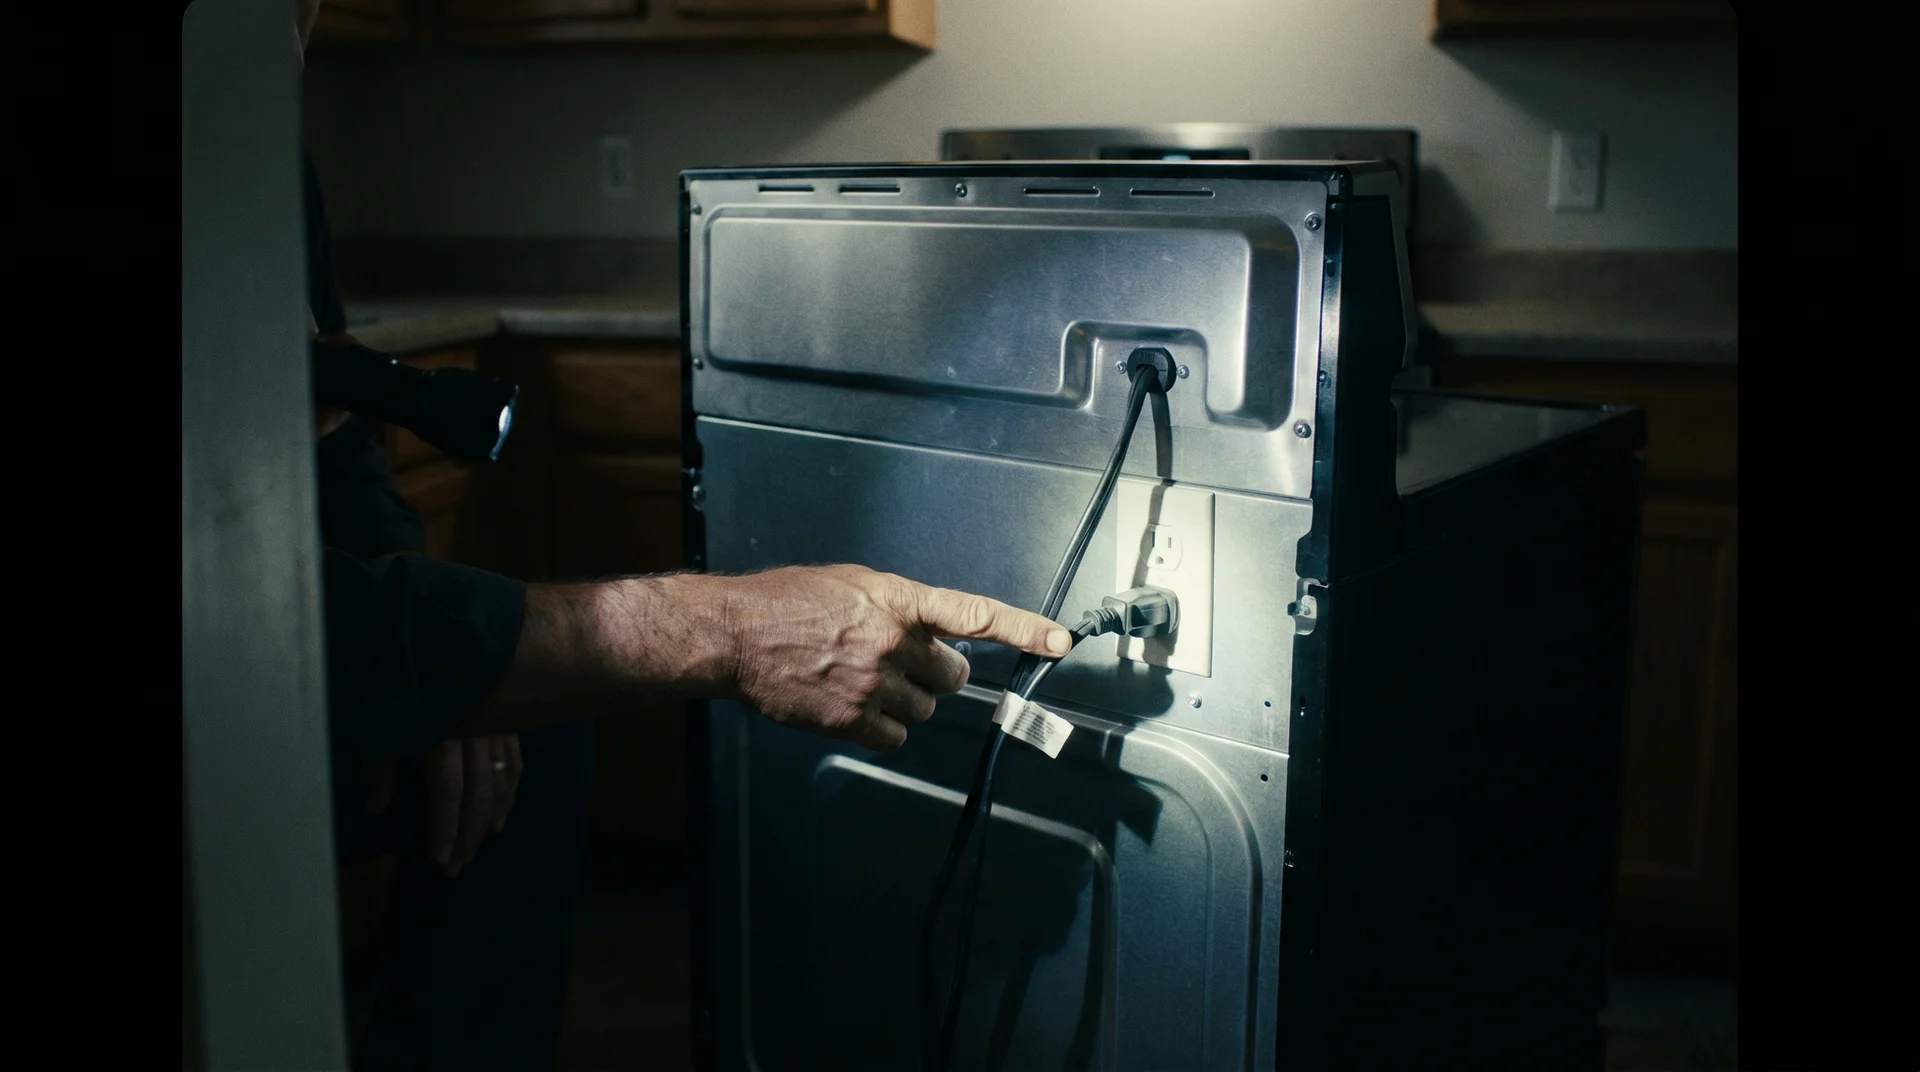
Turn the oven off and do not use it again until a qualified technician has inspected it.
For a freestanding electric range, unplug it from the wall. For a hardwired wall oven, turn off the circuit breaker for that circuit.
The NFPA estimates that electrical failure or malfunction accounts for between 45,000 and 55,000 home structure fires each year in the United States.
Cooking appliances are among the leading sources. An overheating control board or degrading wire insulation is not a problem that ventilating or waiting out resolves.
What These Fumes Actually Do

The health question has a different answer depending on which cause you are dealing with.
Off-Gassing From a New Oven
Short-term exposure to new oven off-gassing, with adequate ventilation, is not documented as a health risk for healthy adults.
The EPA acknowledges that new household appliances release trace VOCs during initial operation. That is broadly consistent with what independent data shows for the specific scenario of factory coating off-gassing in a ventilated kitchen.
The word “adequate” is doing real work in that framing. Running the burn-in in a sealed kitchen is a different exposure than doing it with the range hood on and a window open.
Ventilation is not overcaution. It is the correct protocol.
If There Is Actual Plastic Burning
Burning synthetic plastic produces a different exposure profile from factory coating off-gassing, and the two should not be treated as equivalent.
Combusting synthetic polymers releases VOCs at substantially higher concentrations than controlled off-gassing from manufacturing coatings. Headache, eye irritation, and respiratory discomfort are the expected symptoms at sustained exposures in a poorly ventilated kitchen.
A single piece of packaging burned off in one cycle, then identified and removed, is a low-level and temporary exposure. Repeated exposure across multiple uses before the source is identified is a different situation.
My father spent thirty years as a commercial kitchen inspector, assessing what got restaurants shut down. His standing position on any burning smell in a kitchen has always been like open the windows, you will be fine.
He is not entirely wrong. He is also not entirely right, and the distinction between those two positions matters specifically when the fumes are coming from burning wire insulation inside an appliance rather than burning packaging tape.
The Pet Issue Is More Serious
If any nonstick-coated accessory is involved in the burning smell, move pet birds out of the kitchen before any further heat cycles.
PTFE, the synthetic polymer used in most nonstick coatings, releases toxic particles and acidic gases when heated above approximately 500°F.
For humans, this can cause polymer fume fever: flu-like symptoms that are generally self-limiting in otherwise healthy people.
For birds, PTFE toxicosis is acutely and rapidly fatal. According to Poison Control and VCA Animal Hospitals, deaths can occur within minutes of a single overheating event.
The gases are colorless and odorless. There is no visible warning signal before it is too late. This applies specifically to PTFE-coated accessories placed inside the oven: liners, coated drip pans, and nonstick racks.
It is a different risk from standard plastic packaging burning off.
Preventing Recurrence
Most recurrences trace back to the same two oversights.
The first is not checking the oven interior after a delivery or service visit. A technician or delivery team may leave packaging, transit protection, or tools in the oven.
The second is not tracking what was last cleaned and how. In a kitchen with multiple people using the oven, uncertainty about the cleaning history creates the conditions for the same problem to repeat.
I keep a whiteboard in my kitchen that tracks which surfaces were cleaned and when. Most households will not do that, and do not need to. Knowing roughly what was done to your oven and when is enough to prevent most mystery smells.
Practices that prevent recurrence:
- Inspect the oven interior after every delivery, service visit, or extended period of non-use before the first heat cycle
- Keep plastic utensils, containers, and packaging away from any surface near oven vents, including the warming drawer below the oven
- Check the oven door gasket periodically for hardening, cracking, or visible damage, and replace it when found
- Before running the self-clean cycle, manually remove all visible debris and confirm no plastic items or significant chemical cleaner residue are present inside
- After cleaning with a commercial oven product, complete the full wipe-down sequence the product specifies before running any heat cycle